In this video I take you thru the process of replacing a wheel bearing in this Nissan quest enjoy. I do not own this music. Copyright can suck a fatnut
great video, just couple things....you forgot to put back the shield plate behind the wheel bearing and i always have seen people put grease in the inside for the axle rod. is all. thanks again for the video
Great video. Especially when you generally know how to do this job. I'm an old schooler and am used to beating those inner/outer bearings out with an over sized socket. Thank you for the upload.
I did my wheel bearing last night you don't have to take out the speed sensor my speed sensor was stuck I just put the hub back on it works with no problem 👍👍
Used your video to change out one front bearing last night. Will be doing the same for the other bearing today. Your video helped out a lot. Thanks. When the bearing came out after several hammer strikes it happened exactly like it did in the video. Lol. Spilled out all on the ground. All uphill from there.
Kevin, a good comment to add would be to loosen the hub nut prior to raising the car. With 129 +/- lbs of torque, it's a pain getting it off otherwise since it'll spin without the weight of the car preventing it. Just thought I'd save others the trouble.
Wolfe262 your comment it's stupid cause if you would pay attention in the beginning what kind of rims it has you would be like ohhh ohhh yeah yeah like a dumb ass but then again you're trying to learn...can't do that without taking the wheel off first
Ok job dude. Some things need mentioning. Recommend the caliper is supported and not allowed to dangle as it could break the rubber brake line. Also, lube the spline for the CV axle before replacing. Open the channel lock plier to secure cotter pin. That part you left out is important for water diversion to the part you just replaced.
Great video! I love the air hammer. I have an air hammer for years and never find a use for it. Today I did! It worked just like it in the video! Thanks
Too funny.....I bought a airhammer set up at Harbor Freight waaaaay back when I got my first proper air compressor.....I don't think I've ever used it either.....but I will in a week when I change my hub.....I gotta use it at least once! lol
Thanks for taking the time to post this. You saved me a ton of time, I banged this out in a little over an hour. I owe you a drink and dinner, message me if you're ever in Tacoma, WA area and I got you. Merry Christmas!!
scottjocwu merry Christmas to you buddy! Thank you for taking the time to reply! Appreciate it and I’m glad I could help you save some money! If you have any video request lmk.
Kevin, Use You Tube all the time. Never Left Comment... Great Video Man !!! Made it So Much easier..Replaced Wheel Bearing in my Wifes Pontiac Torrent Years Ago. Bought Ruined Drive Shaft trying to getting it Loose. Drive shaft Came Loose On My Nissan Sentra, Using Harbor Freight Air Hammer. Just like your video, Showed... No longer intimidated to do wheel bearings.. Thanks Man. Have A Good Day..
Watched others that taught me as well but seemed very clumsy through it all. They are correct about the angles and the way you showed it all. Last dude started in the middle of it and even though I know how to take some of that stuff already off, he definitely shouldn't have started halfway through it. He should have showed them how to do everything because most people come on here not knowing anything. I came on to make sure I wasn't going to have any surprises.
Just did this on my 2009 Nissan Cube. Axle nut is 30mm, torque is 92ftlbs, bearing bolts 65ftlbs, shock bolts 122ftlbs, caliper bolts 62ftlbs, wheel nuts 80 ftlbs. My sensor would not come out but the bearing came out and went in around it, carefully!
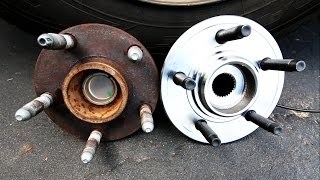
Great video except I see the bearing on at 7:20 and the dust shield is on the ground. I hope you didn't put too much together before realizing the mistake. After watching the entire video, I never saw you put the shield back on.
Marc Smith i dont put them back on personal prefrence. been year no problems or premature wear on any parts because of brake dust. nice eye tho thax for your comment buddy!
Nice video well explanatory but you missed 2 steps first you the dust cover obviously is there for a reason and second didn't show when you put back the wheel bearing hub cause in the last part of the video you mentioned some like "if the abs sensor don't fit in...it's because you put the wheel bearing hub wrong" get it??? Just an observation😎👍
Kevin Rodriguez they serve a simple purpose of repelling dust and also cooling the rotors let me tell ya I just did both fronts and one I couldn’t get with the air hammer so I torched it after soaking and still no go I had to use a 10lb sledge hammer lol of course replaced the axle as well but lord it wasn’t wanting to come out
Hey I just changed mine thanks for the video it help only thing I can say too other is buy the air hammer cuz I fuck up the nut hitting it and bearly got it back on
I give you 4.0 stars out of 5 due to left over conponets and not tork spec. Overal you make this job look easy and simple grest job thans ( with all my respects)
Yeah, I'm sure the engineers who did the analysis for the car decided "air impact wrench to unknown torque" was the right specification. Look in the Factory Service Manuals (they are available online for free for all Nissan models/years) and you will find a torque spec. One of a modern mechanics most valuable hand tools is a TORQUE WRENCH!!!
My 05 Grand Prix is similar, I was able to get to all 4 bolts by just pushing axle inward and not dropping from strut and risking alignment.. if dropping, mark it or paint it so it aligns close to where you pulled to prevent tire wear.. but yes, torque wrench needed for axle nut and pinch bolts or another bearing in future.. this video looks close to Pathfinder, that procedure is not uploaded here... reason viewing yours... my bud was quoted nearly 500 for just 1 side so I told him 100 for the pair plus parts and get to hear my back complain later...
I k ow this video is old but hopefully I get a answer I have a 06 Pathfinder with the 4.0 LE model. Got my bearings today new ones have a harness on end my stock gave no plug in the end just goes to bunch of wiring under hood.
Any one know what kind of sounds it makes when u need a replacement.. Just asking cause I have a vibration noise... Seems to be coming from right front.. 50-75 mph.. I thought it could be there outer tie rods since the sound would go away if I turned slight left at those speed. So i I replaced the rods... And still experience the same noise..
gmillan5150 wheels bearings cause vibration as well. Same goes for warped rotors. But in your case I would recommend going with new wheel bearings sound like that’s what your problem is.
Hey Kevin, my mechanic did this job and broke the abs sensor so I had to replace myself. Once the job was done the abs tcs and slip are now on. What do you think this could be?
hook up a obd2 scanner and make sure thats the only codes for that wheel speed sensor. could be all they need is to be cleared or could be further issues


For those who are doing their diy projects, make sure you follow your manual for the torque, don’t just tighten your nuts to the extreme.
great video, just couple things....you forgot to put back the shield plate behind the wheel bearing and i always have seen people put grease in the inside for the axle rod. is all. thanks again for the video
This is rhe best video. Especially reminding to remove the ABS sensor 1st.
Great video. Especially when you generally know how to do this job. I'm an old schooler and am used to beating those inner/outer bearings out with an over sized socket.
Thank you for the upload.
No need to separate the strut. Move axle in and take bolts out.
That’s what I was saying, you don’t need to take all that apart that was little over kill, probably added over an hour to the job.
I did my wheel bearing last night you don't have to take out the speed sensor my speed sensor was stuck I just put the hub back on it works with no problem 👍👍
Used your video to change out one front bearing last night. Will be doing the same for the other bearing today. Your video helped out a lot. Thanks. When the bearing came out after several hammer strikes it happened exactly like it did in the video. Lol. Spilled out all on the ground. All uphill from there.
Kevin, a good comment to add would be to loosen the hub nut prior to raising the car. With 129 +/- lbs of torque, it's a pain getting it off otherwise since it'll spin without the weight of the car preventing it. Just thought I'd save others the trouble.
good point for the guys not using an impact! thanks
Wolfe262 your comment it's stupid cause if you would pay attention in the beginning what kind of rims it has you would be like ohhh ohhh yeah yeah like a dumb ass but then again you're trying to learn...can't do that without taking the wheel off first
Ok job dude. Some things need mentioning. Recommend the caliper is supported and not allowed to dangle as it could break the rubber brake line. Also, lube the spline for the CV axle before replacing. Open the channel lock plier to secure cotter pin. That part you left out is important for water diversion to the part you just replaced.
Great video! I love the air hammer. I have an air hammer for years and never find a use for it. Today I did! It worked just like it in the video! Thanks
Tian Fei me neither🤣 planning to use on my bearing job this weekend!
Too funny.....I bought a airhammer set up at Harbor Freight waaaaay back when I got my first proper air compressor.....I don't think I've ever used it either.....but I will in a week when I change my hub.....I gotta use it at least once! lol
Thanks for taking the time to post this. You saved me a ton of time, I banged this out in a little over an hour.
I owe you a drink and dinner, message me if you're ever in Tacoma, WA area and I got you.
Merry Christmas!!
scottjocwu merry Christmas to you buddy! Thank you for taking the time to reply! Appreciate it and I’m glad I could help you save some money! If you have any video request lmk.
Kevin, Use You Tube all the time. Never Left Comment... Great Video Man !!! Made it So Much easier..Replaced Wheel Bearing in my Wifes Pontiac Torrent Years Ago. Bought Ruined Drive Shaft trying to getting it Loose. Drive shaft Came Loose On My Nissan Sentra, Using Harbor Freight Air Hammer. Just like your video, Showed... No longer intimidated to do wheel bearings.. Thanks Man. Have A Good Day..
DUDE! that is the best video for this task I have seen. The camera angles are perfect.Thanks for posting
Thanx a lot! I'm glad I could. Help.
YES IT IS!! THX MY DUDE!
Watched others that taught me as well but seemed very clumsy through it all. They are correct about the angles and the way you showed it all. Last dude started in the middle of it and even though I know how to take some of that stuff already off, he definitely shouldn't have started halfway through it. He should have showed them how to do everything because most people come on here not knowing anything. I came on to make sure I wasn't going to have any surprises.
Brother this is the greatest video I have seen for a novice. Thanks man!!!
Just did this on my 2009 Nissan Cube. Axle nut is 30mm, torque is 92ftlbs, bearing bolts 65ftlbs, shock bolts 122ftlbs, caliper bolts 62ftlbs, wheel nuts 80 ftlbs. My sensor would not come out but the bearing came out and went in around it, carefully!
Well that's out lol. Thanks for a great video......except maybe for the dust cover! cheers.
Awesome Job. Thank you so much, I love the way you explain this job!
Thank you for the good filming job you did,,, you give me the confidence of doing the job myself work.... you the man
great vid! Wish I could hear what you are saying over the music!
Great video. Thank your for sharing your knowledge.
Dust Cover F*&$# . We don't need anymore . Great job.
Great video except I see the bearing on at 7:20 and the dust shield is on the ground. I hope you didn't put too much together before realizing the mistake. After watching the entire video, I never saw you put the shield back on.
Marc Smith i dont put them back on personal prefrence. been year no problems or premature wear on any parts because of brake dust. nice eye tho thax for your comment buddy!
Hey Kevin - great video...will be fixing my bearing thus week. will certainly be using this as my resource!
I get a grind only when I’m braking, did you get that too?
Nice vid man thanks for sharing your wealth of knowledge!!
Nice video well explanatory but you missed 2 steps first you the dust cover obviously is there for a reason and second didn't show when you put back the wheel bearing hub cause in the last part of the video you mentioned some like "if the abs sensor don't fit in...it's because you put the wheel bearing hub wrong" get it??? Just an observation😎👍
Great job, Now I know exactly how to do it! Thanks!
I always take a piece of wire and suspend the caliper.
That puppy always swings down if you don't.
So u can change the bearing with no need to remove the ball joint screw and loosing the alignment?
You forgot the backing plate bro , great vid , great angles ! Good job man !
TWO DUDEZ GARAGE yessir good eye I went back and installed it got wrapped up in filming 😂
Kevin Rodriguez they serve a simple purpose of repelling dust and also cooling the rotors let me tell ya I just did both fronts and one I couldn’t get with the air hammer so I torched it after soaking and still no go I had to use a 10lb sledge hammer lol of course replaced the axle as well but lord it wasn’t wanting to come out
Thanks very organized with tour tools
Great video I have to take it apart and put the dust shield on the other way as it did not have the clearance for the rotor
Hey I just changed mine thanks for the video it help only thing I can say too other is buy the air hammer cuz I fuck up the nut hitting it and bearly got it back on
Thanks a lot that was a very helpful video!
Turn the music down. Great info
You make it look beyond easy lol. I'm gonna have to skip fixing this myself and send it to the mechanic....
Well that gave me the confidence to do my wife’s Murano. Thanks
Washa el Kevin! Ima get this done too pretty soon
good vid bro. Thanks for sharing.
I give you 4.0 stars out of 5 due to left over conponets and not tork spec. Overal you make this job look easy and simple grest job thans ( with all my respects)
other thing u need to torque the hub, the impact gun may damage the hub
YOU ARE RIGHT over torque the hub it will fail /under torque the hub the spindle nut will back off torquing is the live of the bearing
Yeah, I'm sure the engineers who did the analysis for the car decided "air impact wrench to unknown torque" was the right specification.
Look in the Factory Service Manuals (they are available online for free for all Nissan models/years) and you will find a torque spec.
One of a modern mechanics most valuable hand tools is a TORQUE WRENCH!!!
Need to take the lower ball joint out only which will save money for alignment if wanted
Very helpful!
Wow, my mechanic broke my speed sensor trying to change my wheel bearing. He says it happens all the time.
This would be the same for a 2012 Nissan Maxima also... thanks for the video!!
Thank you. Really good.
Ty very helpful, wish me luck lol
what about dust cover? don't need it anymore?
Jejeje
😂😂😂😂
Did I miss something, or did he forget to put the dust shield back?
You forgot the shield guard plate 😂
Yeah that's is the best video
he forgot the dust shield ! Seen that movie !
bungee cord comes in handy for the brake assy.. so youre not having to catch it 4 times during replacement.. ;)
i usually have one handy but i didnt this time good tip tho!
Bro, where did you get that NEW whole hub & bearing???, Just bolt on!! I can't find it at AZ or Orielys
My 05 Grand Prix is similar, I was able to get to all 4 bolts by just pushing axle inward and not dropping from strut and risking alignment.. if dropping, mark it or paint it so it aligns close to where you pulled to prevent tire wear.. but yes, torque wrench needed for axle nut and pinch bolts or another bearing in future.. this video looks close to Pathfinder, that procedure is not uploaded here... reason viewing yours... my bud was quoted nearly 500 for just 1 side so I told him 100 for the pair plus parts and get to hear my back complain later...
If someone has torque specs for bearing flange, pinch bolts, axle nut that would help this OP with missing details..
101# is for a 2008 Pathfinder. found here www.fme-cat.com/HubWheelTorqueTableWindow.aspx?a=11414&q=4WD
awesome thank you so much! helping others out with this info love it!
Awesome video man... curious... will this be the same as my 09 altima? i cant find that anywhere. i really want to do it myself lol
Yes, it’s the same.
Hey man you forgot to put the plate back
I k ow this video is old but hopefully I get a answer I have a 06 Pathfinder with the 4.0 LE model. Got my bearings today new ones have a harness on end my stock gave no plug in the end just goes to bunch of wiring under hood.
Wait a minute! At 7:06 When did you put the bearing assembly in place?
Nice video. I didn't see you put the wheel hub assembly into the knuckle. Can it be put in by hand or do you need a hydraulic press?
Michael Veroukis yes it can be put by hand.
great video... how long did it take you to remove and install
what about that dust cover???
well done!
This is the best video by far and boy I got a laugh when you threw it to the side "piece of shit" 🤣🤣🤣🤣🤣
Jejej yeup it was funy but over all great job
Nice tx
Hey dude u forgot the dust shield lol
Cool vid buuuuuut, the dust shield is just laying there on the floor wondering when coach is gonna put him in....lol. Good vid though.
why was it necessary to remove strut bolts.
could you please provide a link to the wheel bearing assembly you purchased?
2nd that
Any one know what kind of sounds it makes when u need a replacement.. Just asking cause I have a vibration noise... Seems to be coming from right front.. 50-75 mph.. I thought it could be there outer tie rods since the sound would go away if I turned slight left at those speed. So i I replaced the rods... And still experience the same noise..
gmillan5150 wheels bearings cause vibration as well. Same goes for warped rotors. But in your case I would recommend going with new wheel bearings sound like that’s what your problem is.
@@Tiptoeinn36 yo! Changed it out! Problem fix... Next easy project.. Right front motor mount..these altimas!
That’s great!!
Cual dado usaste para destornillar el balero?
Forgot the back plate.
Thanks !!!!!!!
Eres in Crack! Lo hiciste de la madera mas facil y practica! Gracias
Hey Kevin, my mechanic did this job and broke the abs sensor so I had to replace myself. Once the job was done the abs tcs and slip are now on. What do you think this could be?
hook up a obd2 scanner and make sure thats the only codes for that wheel speed sensor. could be all they need is to be cleared or could be further issues
What torque settings should be used?
How much does the tools come out to?
Nobody's going to say anything about tightening up the jam nut with an impact gun?
No shield was put back on
At 6:00-- Don't force it. Use a bigger hammer!
Se te olvido poner el cobertor el metal o ojalata para q no le pemetre tierra o mugre jejeje
Yo tambien me di cuenta,vino demas jaja
👍👍👍👍👌👌👌👌
Brilliant video, annoying background music!
Is that new wheel hub assembly from MOOG parts?
it was from my local autozone. tbh im not sure
You forgot the dusting shield and its bad for the bearing
Would be great if you could also add Install time in the notes. What is the total time that this job takes to complete ? Thanx ... :)
So did you add grease??
no grease added
Why the hell mixing music to an informative video it is not very practical otherwise good video ruined by some cheesey music.
Never reuse a cotter pin.
Why did he put back the dust plate lol there was nothing wrong with it
Yeah..there not that easy to get to if u don't have extensions.. a breaker bar.. so on so forth..
how much the bearing cost?
mike tyson I bought a Duralast wheel bearing from Auto zone for roughly $110.
He Said The Bitch jajajajajaja he for got he was doin a video jajajajjajjaja
Music off please... next time
You ain’t got to do all that
Link to the bearing you purchased?
GOGOCED are you still waiting for an answer? or could you please tell me which one you went with and as well as your thoughts on it?
I did Moog bearings on my 2007 Quest and they solid after 18 months.
2004 to 2009 are two different generations in between those years. Not very helpful!
YOUR MUSIC IS TOO LOUD.
.
GAY!
Congrats!!! Glad you came out now go tell the rest of your friends and family.