Hey Brad, This is by far the most comprehensive video I've seen on RUclips about this type of build. Now there are no more excuses. I have to build mine in short order. Thank you for sharing. BTW, it looks outstanding. Cheers.
I like the build. Has a great quality look. How do you keep rain into the storage side? Aren’t you worried that moisture will enter and start rusting all that metal, or do you roll the cart under cover when not in use?
Fantastic build! I already have your typical raised cooler on wheels I got from the sporting goods store (remember them? That's how old mine is lol). I have been trying to visualize something along the lines of your build. The only thing I want to do differently is not have the cooler "permanently" mounted. I want it to look like it is, but able to easily remove it for thorough cleaning. Glad I came across this, your cooler looks great!
Great build! This project has been on my short list to do for awhile. Also, I like the 1/16" chamfered edges. I've been thinking of doing the same thing for the top of a coffee table that I want to build for my friends, and now I got to see what it would look like without having to test it out.
Hi brad, I bought your plans a built my cooler cart and now a bunch of family and friends who have seen it love and want one. Thanks for putting the plans together. Where can I find the chamfer bit?? I’m having trouble finding one. I used my table saw at 45 degree instead of the chamfer but that takes a while so I’m trying to speed up the process. Thanks again.
Excellent video and cool idea! That Kreg jig youre using..... is there a big difference between the lower cost model $50ish compared to the one youre using? I understand your jig is much bigger but am wondering if the lower model will do the exact same job, just a little more timely?
+fordsucks27 yup, the bigger one just let's you do more holes faster. The R3 will do the same job with just a little more effort. If you don't have the money for the K4 or K5 then a R3 is a great choice.
I’m on the storage lid and have a question, you don’t say anything about ripping those pieces down but when I put the 4 pieces together it’s wider than the opening.
Love it! One question: did you have to turn the actual cooler backward? I can’t find one that has the drain on the left side like that. I suppose there’s nothing wrong with turning it around to put the drain on the left, huh? I need it on the left like yours.
Thanks for the build. I did have a question... I was wondering what brand chamfer did you use again? where'd you get it? I recently built this cart but couldn't find a 1/16in chamfer anywhere... I went with a 1/4 in instead but would've preferred the smaller profile like yours. Thanks again! the downloadable instruction were GREAT too!
+Jay Stewart this one will be a head smacker for you. It's the same bit. Just raise it up in your router so only 1/16" is showing vs 1/4". You can do any size chamfer up to the max size of the bit.
This is the first video of yours that I have seen. Nice work and I am now a subscriber! Coincidence that I have one of these to build for a friend, got some good ideas from you. Thank you!
Hey bud, great stuff :) I don't understand the grill part though, being next to wood and plastic. Is it just a container for the grill bits or will you have a flame about there? Maybe a sort of camping style gas grill? :S half through typing this it slipped to the next video on the playlist lol, hope it isn't confusing
I'm looking to do a similar project, but I would rather just have a side accessed cubby for storage. Trying to figure out what kind of modifications I'd have to make. Any thoughts?
Brad, I just built this yesterday and I'm concerned with the noticeable give in the bottom shelf. Have you done anything to help support the shelf further? Other than that, it really is a great piece to add to a BBQ station!
David, sorry for the late reply. I did leave the handles on. They don't cleanly unscrew and they actually provided a nice shoulder for the cooler to rest on the top frame during upside down assembly.
I hope you still get these comments, do you have a video of something like this for a Weber grill? If not, could be a great idea for a matching set with cooler and grill!!
I end up using this, DANCO 1/2 in. Faucet Tailpiece Nuts (2-Pack) homedepot.app.link/hTmgkMv9OL On the inside of the cooler and screwed into this, 1/2 in. x 18 in. PVC Riser homedepot.app.link/aTGyiB29OL With the original cooler seal from the plug. I cut the other threaded end off to the size I needed in order to glue on the male PVC adapter and screw the spigot on that. Worked out just fine. Only downside to the whole drain thing is that the entire thing need to be roped to fully drain. Thanks for the awsome build. Made a couple of them already for friends and family. I use pallet wood for mine though.

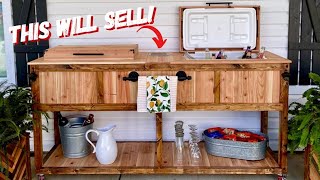


Get PLANS HERE: fixthisbuildthat.com/patiocoolerplans
Building this right now for my mom! I got rough sawn full dimension cedar so I’m gonna keep my boards a bit thicker and adjust accordingly
Seeing an older video it's neat to see how much u have improved in your videos.
Thanks! It's been a journey
Just found you I have been looking for someone that was not trying to make money off of the plains for the wood work thank you an I have subscribed
That's a perfect ideal for a birthday gift for my brother whose always throwing parties in his back yard. Nice job Brad!
Hey Brad, This is by far the most comprehensive video I've seen on RUclips about this type of build. Now there are no more excuses. I have to build mine in short order. Thank you for sharing. BTW, it looks outstanding. Cheers.
+Eltee954 thanks for the feedback! tag me on social when you do your build.
I like the build. Has a great quality look. How do you keep rain into the storage side? Aren’t you worried that moisture will enter and start rusting all that metal, or do you roll the cart under cover when not in use?
Great tutorial! I’m doing this! I think I’ll add a trashcan to the storage side for bottles and cans.
I was just looking for plans to build a cooler. Your cooler is the nicest I have seen. Thanks for sharing the plans.
Just built this one after purchasing the plans. It looks really good.
Fantastic build! I already have your typical raised cooler on wheels I got from the sporting goods store (remember them? That's how old mine is lol). I have been trying to visualize something along the lines of your build. The only thing I want to do differently is not have the cooler "permanently" mounted. I want it to look like it is, but able to easily remove it for thorough cleaning. Glad I came across this, your cooler looks great!
Great build! This project has been on my short list to do for awhile. Also, I like the 1/16" chamfered edges. I've been thinking of doing the same thing for the top of a coffee table that I want to build for my friends, and now I got to see what it would look like without having to test it out.
+Jonathan Walker it adds some nice detail to the piece and looks a little more classy than totally rustic. 👍
Trying this out this weekend. Hopefully it’ll be halfway decent lol
Two things - 1. Did you remove the drain housing that came with the cooler? 2. Did you detach the hinges on the cooler lid?
I was able to use the but from the drain, but replaced all other parts. And yes, removed the hinges
Hi brad, I bought your plans a built my cooler cart and now a bunch of family and friends who have seen it love and want one.
Thanks for putting the plans together.
Where can I find the chamfer bit?? I’m having trouble finding one.
I used my table saw at 45 degree instead of the chamfer but that takes a while so I’m trying to speed up the process.
Thanks again.
Bits and bits
That's awesome, Brad! Great build video! You made this look like a simple project that anyone can build.
+Joshua Luther good, because it is! 😃
Great build and video Brad!
"Like a glove" made me subscribe. Great build!
+Ifiok “iobotwoodworks” Obot Gotta love a good Ace Ventura reference :)
Ifiok Obot I like ur work
Shahila Siddiqui thank you!!
Excellent video and cool idea! That Kreg jig youre using..... is there a big difference between the lower cost model $50ish compared to the one youre using? I understand your jig is much bigger but am wondering if the lower model will do the exact same job, just a little more timely?
+fordsucks27 yup, the bigger one just let's you do more holes faster. The R3 will do the same job with just a little more effort. If you don't have the money for the K4 or K5 then a R3 is a great choice.
Awesome build! Great job
Very nice build!! Looks like a nice project to complete before next weekend.
+Bill Diehl it's a pretty straightforward build. Send me a pic if you build it!
That's awesome! Above my skill for now, but someday hopefully!
great idea for back yard.
That is an awesome build. love the storage part
Nice build! Handy cooler unit cart!
+Sebastiaan Mollema thanks!
This looks great, Brad! Definitely one of the nicer ones I've seen. I dig the extra storage you built into it.
+Carter Wilson Workshop appreciate that!
I’m on the storage lid and have a question, you don’t say anything about ripping those pieces down but when I put the 4 pieces together it’s wider than the opening.
Love it! One question: did you have to turn the actual cooler backward? I can’t find one that has the drain on the left side like that. I suppose there’s nothing wrong with turning it around to put the drain on the left, huh? I need it on the left like yours.
Thanks for the build. I did have a question... I was wondering what brand chamfer did you use again? where'd you get it? I recently built this cart but couldn't find a 1/16in chamfer anywhere... I went with a 1/4 in instead but would've preferred the smaller profile like yours. Thanks again! the downloadable instruction were GREAT too!
+Jay Stewart this one will be a head smacker for you. It's the same bit. Just raise it up in your router so only 1/16" is showing vs 1/4". You can do any size chamfer up to the max size of the bit.
Fix This Build That ok cool! Again I appreciate the info.
Great video, Brad! It was awesome meeting you in Anderson last week! I wish had had more time to get to know each other. Maybe next time? :)
+Thrift Diving (Serena Appiah) great meeting you as well! I'm sure we'll be seeing each other again.
This is the first video of yours that I have seen. Nice work and I am now a subscriber! Coincidence that I have one of these to build for a friend, got some good ideas from you. Thank you!
Nice job Brad, turned out real nice! Looks like some rad Ridgid gear there!
+Mike Kapotsy the new Palm Driver is pretty sweet!
awesome job....looks great. I'm gonna build one now.
+Bob Lambert thanks, Bob! Tag me on social if you post about it.
Excellent. Awesome project.
Great Build
That's right!!! #Team RIDGID!!!! Nice 👍 cooler
+FITO FITO thanks, man! #teamRIDGID
Hey bud, great stuff :) I don't understand the grill part though, being next to wood and plastic. Is it just a container for the grill bits or will you have a flame about there? Maybe a sort of camping style gas grill? :S half through typing this it slipped to the next video on the playlist lol, hope it isn't confusing
Awesome job! Nice and clean project!
+In my Spare time thanks!
I'm looking to do a similar project, but I would rather just have a side accessed cubby for storage. Trying to figure out what kind of modifications I'd have to make. Any thoughts?
+Nomadic Stanimal would just need some cleats to hold the side together on top and bottom then make the whole side inside the legs a swinging door
Brad, I just built this yesterday and I'm concerned with the noticeable give in the bottom shelf. Have you done anything to help support the shelf further? Other than that, it really is a great piece to add to a BBQ station!
nice work! Here another one of your project i'll have to add to my to do list.
This is really nice! Going to have to try and build me something like this
+dagarcia23 thanks!
I have been wanting to build one of these for some time. This one looks real nice!
+Summers Woodworking thanks!
How do you like that electric Brad nailer versus a pneumatic one? I know it's going to be a lot quieter, but how's the performance?
So much #TeamRIDGID in this video!! 😃👍🏼 Save a root beer for me, Brad! Great job as usual!
Nice work on this man.
Another great build. How did I miss seeing this before?
Man that is one great video...very informative and clear
Thanks!
Hi brad, that was awesome and sleek... great idea for a backyard and nice video
+Sargam Dedhia thanks much!
that's awesome and so easy good work ,thanks
Thanks!
nice job.. something I need and going to build in a few weeks..
Now, that's a nice project. Thanks for sharing.
+Ray the 5 th cut thanks!
You did and excellent job I’ll bye it.
Sweet! Good job!!
Awesome project.... question did you leave your handles on the cooler?
David, sorry for the late reply. I did leave the handles on. They don't cleanly unscrew and they actually provided a nice shoulder for the cooler to rest on the top frame during upside down assembly.
perfect thanks man
Beautiful!
+Christine Daley thanks!
Nice. Looks like I'm heading to the hardware store today haha
I hope you still get these comments, do you have a video of something like this for a Weber grill?
If not, could be a great idea for a matching set with cooler and grill!!
Cool build Brad! Nice video work as well!
+donny carter thanks, Donny. Still got a long way to go.
that looks great!
+loupipeline thanks!
Great work! Really loving your transition to RUclips. Your Ace Ventura impression is a bit weak but I won't fault you for that ;)
+Colby Ruffing yes, when I was editing I was ashamed of my impression. Not enough to take it out of course, but it was weak. 😃
What kind of wood did you use for this project?
looks great biulding one for my son in GA
+Glenn Shea awesome! I'd love to see finished pics!
Make me one please lol
This is great, definitely going to put this on my to do list
What ice chest did you use?
What type of wood is this ? Sorry new to woodworking
Awesome build!
+Charles & Hudson thanks, Timothy!
You make it look so easy!!! LOL
+Shirley Guenther thanks, Shirley!
great video, very well made. I subscribed
+Jason Welder thanks for the sub!
Great job thanks
Did you have to drill hole in cooler, most come without hole or drain in cooler.
Pretty darn cool Brad!
+GuysWoodshop thanks, Guy!
Great video. thx
Nicely done my friend good job bro:)
great work man!
thanks, Rob. That's an oldy :)
Subscribed. Great video.
Looks good
+rob thanks, man!
Oh my god... that was awesome.
Nice. You gave me a great idea. Thanks for sharing
Great video!
Thanks!
Awesome!!! Now I want some root beer
Dude.... this is way too neat and cool. What the heck is wrong with you?!?! 🤘
+gradeez I'm an engineer by schooling 🤓
Very nice man!..Subscribed..looking forward to checking out your vids
+Inhalin1514 thanks for the sub!
Hey, no drinking and drilling. Lol...Jk. That looks really nice Brad.
+Tony Bryce Perez thanks, Tony!
I have downloaded the plans, but I still don’t know which pocket holes and wood screws I should use. I see they are 1 1/4” but what length. Anybody?
what type of wood did you use for the top?
Great video mate, I followed you over from instagram and have subscribed 👍
+Craig Nicholls awesome, thanks!
Could you please tell me what brand of cooler that is.
Really good job and cool design buddy!! 👍 Ron, Littlewierdshop
What did you do to keep the door from opening all the way
Love this! Can't wait to build it. Thank you!
Why didn't you screw the center piece on the cooler lid like you did the rest of them?
AWESOME.
+THERESA GUEST thanks!
Could you help me out with the half inch pvc nut can't seem to find on of those.
I had trouble as well. Ended up using the one that came with the cooler.
I end up using this,
DANCO 1/2 in. Faucet Tailpiece Nuts (2-Pack)
homedepot.app.link/hTmgkMv9OL
On the inside of the cooler and screwed into this,
1/2 in. x 18 in. PVC Riser
homedepot.app.link/aTGyiB29OL
With the original cooler seal from the plug. I cut the other threaded end off to the size I needed in order to glue on the male PVC adapter and screw the spigot on that. Worked out just fine. Only downside to the whole drain thing is that the entire thing need to be roped to fully drain. Thanks for the awsome build. Made a couple of them already for friends and family. I use pallet wood for mine though.
Makes me feel good that you use the $.99 harbor freight screwdriver
instant like for the intro :)
subscribed for the well done video!
what size of ice chest did you use?
Wow!
What type and size of wood did you use?
Plans for this build are available with all the detailed info on measurements plans.fixthisbuildthat.com. But it was mainly 1x4 cedar.
RoOT BeEr’S GoOd