DIY: Plant Stand - Simple Method Included! (Materials and Instructions in Description)

HTML-код
- Опубликовано: 15 июл 2024
- Hey Gang! If you're enjoying the video please be sure to leave a like and consider subscribing! Today we're tackling Plant Stands. It's a simple project that can add style to any room! In this video we go in depth on the methods we use to build these things and we hope you learn a thing or two that can help you not only in this project but others down the road!
Materials:
FIVE 1/2 x 1/2 x 32 Poplar Turning Squares
5/16 dowels (doweling drill jig for accuracy)
Pocket Hole Jig w/ Pocket Hole Drill bit
1 1/2 Pocket Hole Screws for SOFT woods
Square Drive bit for Pocket Screws
Drill
5/32 drill bit
Combination Square
Pencil
Measuring Tape
A Saw to make accurate cuts with (If you don't own one a Miter Box Saw is a cheap and great option for this project!)
(SIMPLE METHOD BELOW AFTER STEP 9!)
STEP 1: Cut one Poplar piece in half. Measuring the length, find the middle of one piece and make a mark. Then measure 3/4 of an inch to one side and make a mark. Place your square on that mark and put your second half up against the square. Remove the square and make marks on both sides of the Poplar on the bottom and top.
STEP 2: Cutting the Half Lap. Dial in your blade so you're removing half of the Poplar on one pass. Once your half lap is done (Reference Video) determine the size of the base relative to your plant/pot. Once you have the total length of the desired base, make your cuts based on that measurement.
STEP 3: Determine how high you want the plant base. Once you have the desired height, make a mark on one of the uncut Poplar boards. Then transfer that mark across all 4 legs using the square. This line represents the top of the base.
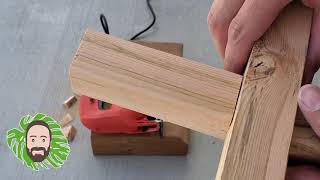
STEP 4: Drilling the dowel holes. Take your doweling drill bit and using tape make a depth stop at half the length of the dowel to prevent over drilling. Now, using the plant base make a mark half an inch below the top of the base. Using your doweling jig and combination square, set your square so you can make repeatable cuts (Reference Video) Start Drilling!
STEP 5: Mark half an inch down from the pencil line on your uncut Poplar boards. Use the same combination square trick from the previous step to achieve similar dowel holes.
STEP 6: Drilling the Pocket holes. Use your pocket hole jig to drill pocket holes in the bottom of the plant base on all 4 sides. Then put all 4 dowels in the plant base (may need some tapping)!
STEP 7: Put your plant base in one of the legs and using the square drive bit and pocket screws, lock it in place! Do this to all 4 sides!
STEP 8: Put your plant inside and determine how tall you want the wood relative to your plant! Make a mark at that height and cut the 4 legs to that height!
STEP 9: FINAL STEP! Flip the Plant stand over and using the 5/32 drill bit, drill a pilot hole in the middle of the plant base and use a pocket screw to secure the whole together! (Standing test Optional)
SIMPLE METHOD
STEP 1: Cut Poplar board in half. Set one on top of the other forming a cross and set your plant/pot on the base. Determine how long each end block needs to be for the pot to sit comfortably on the base. (Reference Video)
STEP 2: Find each center hole for each of the 3 holes to drill (Reference Video for an easy way to do that!)
STEP 3: Using tape as a depth stop, drill 3 holes using your pocket hole step drill bit in the bottom of your plant base. Sink one pocket screw on each end to secure the blocks to the plant base!
STEP 4: Screw the base together using the middle screw hole we drilled earlier creating a full lap. f
STEP 5: (Reference Step 4-9 earlier in the description!)
You will have to unscrew the pocket screws on each side to make room for the pocket holes in the bottom of the base and that's okay! It's very easy to take apart and put back together!  Хобби
Хобби


![XO (Only If You Say Yes) - ENHYPEN エンハイプン 엔하이픈 [Music Bank] | KBS WORLD TV 240712](http://i.ytimg.com/vi/wBT1bKKwPTo/mqdefault.jpg)

I love how you expalin things. No matter the project I always learn something. I also really like the interaction between you and your son. Keep up the great work.
Excellent.learned a lot! Very practical
This videos is the most helpful video I have seen. Thank you Sr.
Oh, I love these diy plant stands. I'll definitely be making some for my plants; both indoors and outdoors. Thank you for sharing. ❤
I liked how you showed a few different methods. You are a good teacher, thank you!
You got it thx👍👊
Great job!
Congrats, you had 10,000 subs last year & now you’re at 120k.
Go, Stud Pack, Go!
Looking good boys!! Love seeing your growth, well deserved!
brilliant
Super nice, smart design
Keep the vids coming love watching and learning. Some great tips there
Omg I have been dying for some plant stands like these!! I ordered some online but they canceled my order and I never got them. Can’t wait to try this out! ☺️
you did a great tutorial video! Thank you.
Brilliant job!
What a sweet Daddy💕🥰
😎
🤣🤣
good job !! that is nice diy flower stand
❤❤
Great
awsome job.
Thx Daren👍💪
Paul is obviously very comfortable with the math--much more than the stereotype of a small project contractor from the South. Very cool using the wood instead of measuring, or Paul's way of finding a center without fractions. Math when necessary; not when it's not. Both of you are the opposite of the anti-knowledge crowd so visible in politics these days. You're both great role models.
Thanks for watching this older video 👍😁
Keep going I like your videos
Glad you like them!
Love your videos! I don’t really understand why the dowels were needed in addition to the pocket screws. Can you help me understand, please?
Thx Denise 👍. One dowel and one pocket screw prevents joint rotation. If I used two pocket screws you would see one them. I wanted a clean look but you could certainly use pocket screws throughout and plug them 💪