Bandai Y-Wing Model Build Pt II Cockpit Lighting and Painting

HTML-код
- Опубликовано: 31 янв 2025
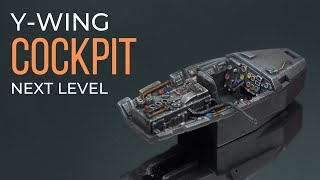
- This video covers my building of the cockpit, using photo etch and LEDs to create a fully lit cockpit, as well as some other modifications.
Please visit my Y-Wing model blog for more photos and detail at y-wingmodelbui...
Also visit my Facebook page. Facebook.com/modelsbychris


Who would dislike this video?
Awesome work on 1/72 scale.
You must be an engineer..
Thanks. Not even close to engineer. I just try, experiment and hope for the best.
Great job 👍
Dude, the care and attention to detail is truly a thing of sublime beauty. Thanks for sharing this build with us!
so i built this kit a few years ago (i wish i had discovered your videos back then), and after seeing this it made me want to build another one as my technique has improved a lot. But this kit now costs around $200 aud, when a few years ago i got it for about $50. it completely unreasonable, and almost makes me contemplate taking apart my old one and redoing it
I wouldn't. The kits are being re-released this year. They're so expensive right now because of Covid and a lack of supply. Some kits have already started resurfacing. Give it a few months, and you'll start to see them readily available again.
@@modelsbychris wow thanks for letting me know othetwise i really would have wastes a lot of money!
I was looking for ideas on how to add LEDs to a custom batmobile cockpit. Your video helped a lot, thanks. Bad ass! Nicely done!
Starting this build today, but not with the insanely awesome lighting as I’m not that experienced yet. I’ve watched this whole series and can’t thank you enough for how much this will help me weather and make my model look almost as cool as yours.
Thanks. Have fun with it. Such a great kit
OMG you're on totally different level! the cockpit looks fantastic!
amazing attention to detail
Yes!....the guitar string is perfect! I used bass guitar string for some Duesenberg exhaust....but never thought about guitar string for smaller scale. Love this series!
W0W, what a MAGNIFICENT & AWESOME & OUTSTANDING & INCREDIBLE diy-cockpit built. Love this idea adding LEDs / SMDs to the model, keep up your amazing work🤘😎😉🤙
may I ask you why weren't using a dremel tool to remove all the extra stuff in the cockpit?!
Sometimes the Dremel is a little much with the power, even on lower rpm, and I feel I have more control in other ways. I do use it in some instances though. Just depends.
Very cool I just ordered this one myself. I will be definitely checking out your other videos as I have a few Bandai kits.
guitar strings are genius!
Mind BLOWN 🤯.. Love it!!!
Wonderful as always Chris
Amazing work you do. I've done a Rebel destroyer and fitted fiber optics in the windows and slow pulsing engine lights. Starting my Empire destroyer now. But i all was woundered how you did cop pit lights. Thanks for showing us,
looks SOOOOO good !!!!
have no words man, keep it up.
Sooo much details...🤙🏽
Awesome detail work! I noticed a small detail you missed was that the pilot's black gloves actually extend past the wrist, almost to the elbow, like a gauntlet.
They actually are further. I finished it later. It just wasn't in this video
Very nice! great channel. Subbed.
Amazing! As always!
It’s already been said, but that was really creative use of guitar strings.
Very nice work mate!! I have this kit but would love if they did a 1/48 version
Agreed. Don't know why they did it so small. It's such a great detailed ship.
Awesome !
Haven`t watched the other parts yet, so the answer to my question might be there, but how did you end up lighting the side panels? Thanks!
Never mind! Just watched part 3, and there it is! :D Love your work!
AWESOME WORK !!! What tweezers are you using? Love it !
Got a set of tweezers from Ebay. Very nice. Just search ESD tweezer set on Ebay. Pretty cheap
What size wiring do you use? I thought 20 gauge but it's too big
In the Y I used 28 awg. I've also been using 30 awg a lot lately. But 28 awg should work fine.
Thank you...epic craftsmanship and documentation. Very inspiring during these times.
HI
YOUR Y-WING LIGHTING EFFECT VERY BEAUTIFUL AND REALLY REALLY AWESOME .
I'M LOVE STAR WARS MODEL KIT AND 1/1 SCALE LIGHTSABERS .
I HAVE 21 EFX MR ICONS LE OR SE OR EE OR AP LIGHTSABERS .
I HAVE MR AND EFX STUDIO SCALE X - WING SNOW SPEED TIE - FIGHT AT - AT BUT VERY EXPENSIVE NOW .
THANKS .
KURURU .
Do you paint figures under microscope or something ? Looks amazing though
I do use a jeweler's magnifying visor
christopher, what size white LED did you use for the cockpit?
I used 0402 SMD LEDs
Me at beginning of video: "Pfft. A grown man playing with Star Wars toys."
Me at end of video: "I'll give you $5000 for it."
LOL. Thanks
That's awesome bro, question, I'm going to build an snow speeder and I want to put sound boards and lights, and my question is where I can get those things and now that I see you applying son photo-etch did you know where I can get a set for my build, by the way, awesome work man, always enjoy your builds
The LEDs I get mostly on EBay. I have a snow speeder as well I will be doing down the line, but unfortunately I have never seen any photo etch for it. I plan on doing lighting still, but it'll be done differently
That's awesome man, looking forward for more updates and to see that snow speeder build, I looking for sound boards too, any suggestions on that?
I got a little sound board from Adafruit that I'm going to experiment with and possibly use in this Y- wing. It's the Audio FX Sound Board mini
That's so cool, I start searching for that sound board and is very cool, I'll bee PM you for some help with it, that will be my first time trying stuff like that, hope you don't mind bro
That is some fantastic work, and I offer this only as constructive criticism because you've done such an amazing job - the pilot gloves are actually gauntlets and come up the arms further than you've painted. Take a look at the flight suit here for reference.
starwars.wikia.com/wiki/Rebel_flight_suit
You know, one of my reference photos was that same one. Not honestly sure why I didn't point yoo further. Maybe cause I just looked at it, and there's barely a separation there pin the model. But thanks, I actually will fix that.
youre a fucking genious man. guitar string was totally the best thing you could have gone with.
Oh, lucky you, you got the Y-Wing with the standing pilot figure. I have the kit post Revell/Hasbro/Disney's ban of Bandai SW kits debacle. What a pile of horse crap that was!!
I agree with you. I got the same kit with the "Flat Stanley" pilot.