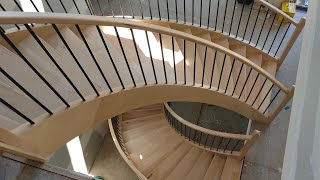
Curved Stairs - Part 2

HTML-код
- Опубликовано: 7 фев 2025
- THE ADVENTURE OF THE CURVED STAIRS CONTINUES!
The masking tape will help me both keep glue off of the alder veneer of the stringer, AND to line up the first trim piece.
I’ve gotta just say this about clamps: You hear guys say that “You can never have enough clamps” and I think that’s hard for most people to comprehend. You know, “Why do you need a hundred of the same type of clamp?” I even remember when I bought all of these spring clamps at The Home Depot the cashier looked at me sort of like: What could you possibly do with so many clamps?!” Well it’s precisely for times like these when you need pretty much a clamp for every free spot because it’s totally crucial that I get good adhesion of these strips I’m bending around this curve.
This corner cap has taken an entire day to do but it looks great and I’m very happy and proud of how it turned out, especially seeing the individual strips all glued tight with no gaps.
Now it’s time for the mammoth post bracket to get bolted down into its final place.
That’s my full effort to try to budge this post and it’s good and solid.
Now back to the woodworking: Temporarily setting the bottom two shoes it’s time to start gluing and nailing down the rest of them. There are gaps left over that will need to be trimmed out later.
The rounded piece that wraps around the metal post bracket is called the volute. I didn’t know that that’s what it’s called before this project, but it’s comprised of several layers of ⅛” MDF with a final layer with a Alder veneer. I had some trouble on this one but luckily I had my friend Tyler standing by to hold it in this critical moment.
Once removed, I noticed that it had sprung back some and was not the right curve anymore. Using some bailing wire I tightened it back up to the proper dimension before gluing on the final layer and veneer.
Aaaaaaaaand once again, out come the clamps. The vaneer I’ve covered with masking tape to make sure I don’t drizzle glue onto it. My hope is that once I cut the wires it’s won’t spring back into the incorrect shape.
I’ll let this dry while I work on trimming out the gaps on the stairs.
Alright it looks good while it’s under tension, now let’s cut the wires and see how it looks….
Watch that again….It hardly even budged when I cut that 2nd wire.
One more curved piece to make to trim out the top of the volute. Not gluing to to the volute right now, just using the volute as a form so that I can make all the necessary cuts and shaping to this small piece before gluing it on.
The volute is 100% held on with construction adhesive. Now I can set the bottom two shows and move onto the knewel post and handrail.
The hand rail I made over 3 years ago when we built the house so I’m able to reuse it. It was one of the more difficult wood pieces that I had ever made so shortening it to the proper length really feels just wrong, like cutting off my arm or something.
My steel post was not perfectly plumb so I’ve made these blocks as shims to put the outer wood post right where it needed to be. They shims are held in place with spray adhesive.
To make this joint between the existing handrail and the new elbow just as solid as possible I'm cutting and gluing in two biscuites.
This is Rosario, he’s going to take what I’ve made, which is hopefully any good and take it to the 95% done mark.
I was not brave enough to tackle the staining and lacquering of the stairs...I’ve spent way to much time to bring it to this point, I really don’t want to mess it up doing the one thing I know pretty much nothing about doing right. I mean sure I’ve stained things, but nothing with so much time invested on the front end.
The painter is insisting that I remove all the previous stain and clear coat from the handrail so I’m doing my best to get that ready before he’s finished with the stairs and needs to continue on with the handrail .
The balusters (or spindles, as some people call them), need to be properly spaced and plumb, so I’ve made myself a template for laying them out on the shoe and then using a laser level to project up the the handrail the precise location where I need to drill to insert the balusters.
Music: www.bensound.com" or "Royalty Free Music from Bensound"
Music: “Real Ride by Nicolai Heidlas”


Fancy spindles in there. What a cool staircase, man!! Monnneeeyyyy
Wonderful job!!!
Wow! Really classy staircase. Nice work, Bro. You are on another level.
A beautiful project and finish. I hope you have enjoyed your new home and continue to share your projects on RUclips. Thanks.
Thank you! We've been talking about moving and it will pain me to say goodbye to the stairs.
Dude the work you did is absolutely amazing.
I am a long time framer and rough stair builder. This video is very inspiring. Thank you.
What a patient carpenter & cameraman and what a project! thanks for sharing !
Genius. Congrats on a well done job
Absolutely amazing. Thanks for making such great videos
Just wanted to say that as a journeyman carpenter this is very impressive man. Worth every second I imagine. Well done!!!
Absolutely beautiful!
I install wood stairs and rail in Colorado. That was a courageous diyp!
I really appreciate the bandsaw right next to the stair case, that is the first time I have seen anything like this.
I am interested in more movies like this.
I uploaded a curved rail video on my channel that you may like , more higher end stuff with multi laminated rail
Great job. Giving me the needed boost to start on mine.
Nice work mate! Looks great. Very big job!!
Good job on the stringer and on the rail, oh yeah, you said it, clamps are never enough, if anyone said
otherwise, they don't understand.
Beautiful
That came out nice. There’s something about a curved stair that just makes a very dramatic statement.
Well done! Would love to see more final pics/video of this. Great craftsmanship.
Gorgeous!
Absolutely brilliant
Really nice work !....enjoyed watching it !
Thanks! I'm glad it's over.
I Like the fact you kept a cool head and pushed thru it. I would work with you any day good work!
I need a beer after watching that
It's really fun to watch.
Nice job on a challenging project. Thanks for sharing it.
Thanks Mark
YOU ARE LEGIT!!!! GREAT JOB11
You are very kind. Thank you!
Nicely done!!!Congratulations
Brilliant work.
Thank for the video, very interesting, a lot of work. Turned out really nice.
Crazy amount of time involved but so worth the final result, great job
Yeah in total I had about 22 hours of video for curved Stairs parts 1 & 2.
Mad skills bro!👍👍
Excellent craftsmanship sir.
Thank you!
Awesome! So inspiring!
Nice😍😍
wonder full work.
Amazing! Inspiring!!
Just WOW! 😍
Just Great!
big job nice work
Can't believe you got only 59.now 60 comments.your fortunate it was your home. I had a similar project that was 35 miles from my home that was bottom 5 treads circular off a slab to a landing to a deck and had to build as you know 2 forms for the different radii suspended steps. My point is it is a birch of you need a measurement you missed.fortunately. Rise/run min tread and width is pretty basic but ya spring back is a birch and when I got back to the job it didn't look lick the radii worked.funny how just a little spring can make you look like a regard with the homeowner watching.anyway if your going to watch your going to help lol. Give that a push(similar to you) and glue,screw and an anchor bolt later and it's show me the money. PS.the guy that made the railing said he would never build a circular railing again.he didn't have the benefit of my forms. Anyway nice job friend .
That’s a great job you did looks awesome! I have a question would you be kind enough to advice me I have my first curved staircase build in a few weeks! it’s about the handrail I know they got bending kits. just wondering how you went about it and if you bent it further out more then it’s final form to count for spring back? And did you clamp it it the wall that was in video 1 to give it the same shape? Thanks for you’re time once again great job!!!
You really need to mount a tv under the stair and just have this video on repeat.
I like wood working
Now you can enter and exit The Concrete Box in style!
Haha yeah!
That’s ALOT of work. Was is worth the 3,000,000 in time?
Fucking awesome dude. Well done.
Hi, that was a great movie of you work!
What was the bid they gave you for a company to do this for you?
Hi Peter. Thank you for the kind words.
The only bid I got was for the 3 newel posts and two curved hand rails as seen in 'Curved Stairs - Part 1'. For that they quoted me $3,500 in 2014.
With that I knew I'd be doing the whole thing.
That metal volute base and post support look like a bit of overkill , nice job though
Very nice. I am sure you now understand why the bids to have the stairs done were so high. Wood stairs take a lot of patience. Everyone has probably pointed out the mistakes and other ways you could have done it. The most difficult part of a wooden staircase is the miter joint at the riser and the outer skirt. You chose to cover it with a molding. That would never fly on a for hire job. But they are your stairs built by your hands and within the constraints of the dreaded budget. You can be proud of an awesome set of custom stairs.
Yeah I guess it depends in where you live. I did them almost exactly how they're done in this region.
Thank you sir.
Can you give me design drawing and calculations
I can probably send you dimensions. I don't have any calculations.
What do you do for work?
I'm not sure if you wanted the new paint to look like that. But it seem that your painter missed some spots
Eeee that's not good 😨
i thought i do stairs over kill put juste take it to another limite lol
The only thing I don't like about this is the hideous mismatch in color on the treads...