Это видео недоступно.
Сожалеем об этом.
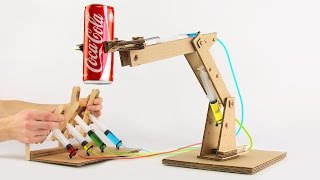
How to make a robot arm - Arduino | Acrylic Robot Claw Arm

HTML-код
- Опубликовано: 20 авг 2018
- Hey guys whats up.
My new video is up watch now and tell me how it's.
so guys In this video you learn how to make a Robotic Arm, this is a Diy Kit you need to assembling.
you can get here- bit.ly/2Mplfw8
Get More - / crazyartline
My another RUclips Channel - goo.gl/NwNLwD - Mera Diy
Thanks for watching Please Hit Like Button and Share This video... It really Motivates me to make amazing stuff for you Follow on All Social media for Latest updates...
Social tuch
Facebook - / crazyartline
Twitter - / crazyartline
Instagram - crazyartline
13. How to make a Tractor Preet - • How to make a Tractor ...
12. How to make Helicopter bus - • How to make a helicopt...
11. How to make a Drone that can lift Rc car - • How to make Quadcopter...
10. How to make powerbank - • How to make a Powerban...
09. How to make a Rock Crawler - • How to make a car - Ro...
08. 2 Amazing How to make Drone - • 2 Amazing Homemade Dro...
07. How to make a Dji Tello Drone - • How to make drone at h...
06. How to make Quadcopter - • How to make a Drone at...
05. How to make Smartphone Speaker - • How to make a Smartpho...
04. How to make Cooler Bottle idea - • How to make a Cooler a...
03. Modify Upgrade Rock Crawler Car - • My Modify Rockcrawler ...
02. How to make Paper House - • How to make paper hous...
01. How to make electric Bike - • How to make a Bike Har...
#crazyartline #DIY #gadgets #robot #arduino #roboticarm #arduinorobot #acrylicclawrobotarm
Audio-
Track: Dirty Palm - Freakshow (feat. LexBlaze) [NCS Release]
Music provided by NoCopyrightSounds.
Watch: • Dirty Palm - Freakshow...
Free Download / Stream: ncs.io/FreakshowYO
Track: Electro-Light - Symbolism pt.II [NCS Release]
Music provided by NoCopyrightSounds.
Watch: • Electro-Light - Symbol...
Free Download / Stream: ncs.io/Symbolism2YO


How were you able to fit those screws in the tiny pivot servo arm? dheck?
Aaaah my eyes! Where did you learn to solder!? (But seriuosly, thanks for good clear assembly walktrough :-)
Umm haw did you put it in I can't do it but I never give up
learn soldering🤦♂️🤦♂️🤦♂️,It's self learning......S-E-L-F__L-E-A-R-N-I-N-G
Gracias hermano....
:)
Hi Sir
I want to make this arm with automation... Using Teachable machine AI... The purpose of the arm would be to detect some desired substance and then pick it up automatically
Hello there..The robot is very exciting.. May I know the measurements of the robot please.. I am concerned about the area it can cover ..
You can make so big as you like
*osm bro*
Так
mrc monsieur vrsiment c'est magnefique ms s'il vous plait essayer de nous adresser le lien pour suivre les etapes que vous avez fait notamment la partie commande
What servo did you use? 180° or 360°
Where do you take the set
Nice
شكرا على المعلومة
What type of studio is it
As far as I understand the arduino plays a small role by controlling the arm. The potmeters outputs go to the arduino's analog in. According to that signal the arduino writes a PWM digital signal to the servo's reference pin. And the power adapter powers both the servos and the arduino. But why is the arduino necessary when you use the potmeters? Couldn't they just be connected directly? But ofcourse the arduino comes in handy when you want to automate the arm
You answered your own question. A robot arm is not practical in a home environment its mostly for automated assembly jobs and such.
You could connect the pots directly but you'd have to design a circuit to modulate the PWM to move the servo motors. The Arduino set up is much more simple.
@@MeArmTM It is funny to see what a rookie I was with microcontrollers 3 years ago. I forgot I posted this comment but what you say is true. The arduino is a very easy interface to modulate the PWM signal for this kind of project
Wahi motherboards - heavy duty - work main use kar Sakoge kya = motor to badalne Hongein ?🤔🙏
Sir your link for buying diy assemble kit is not opening can you help me to buy this kit
Friend, help me with the final programming that you created
Which mechanism it is
Bro from did you buy this kit
Hey does anyone know how to solve the inverse kinematics of this robot
How much volts did you put?
is there a way that i can program it with my arduino uno?
Any arduino can run the same code as another
How to buy need things for this
Can you send me the link to buy it
Bro mujhe iska structure dekhna h kaise h konsi arm kha connect h mujhe vo smjh nhi aya mujhe ye cardboard se bnani h
hi please can you give me the dimensions after u r done the assembly
How do you do the Acrylic part??? I am doing it for cad but don't know any measures or anything
if you know anyone with a decent lasercutter (for wood e.d.) they can also cut acrylic for you. You can pre-determine the thickness of it with that person and use that in CAD. Then convert the CAD files to Illustrator files for the laser cutter. (make sure its a 2D drawing)
its a kit on banggood
How i can buy this kit????
if i want program the robot arm with Arduino, i need the shield?
You don't need the shield, but you will need something to handle the power supply.
Sir did Arduino need coding to operate this
Makasih yaa
i created that too
you can also connect it to a computer and operate it with the computer
how?? which software && howwwww??????????????????????
Gostaria de obter o código de arduíno
Re-upload but at normal speed
is it possible to automate the movements of the arm?
reply ASAP
yes
It is. You can use basic Arduino commands or search for MeArm inverse kinematics for a better but more complex method.
can I use plastic geared servos instead of iron?
will it effect for torque,and weight it can carry
Can you send me the aurduino code, my arduino was burned so I need the code can ypu send it please
hello can you please give me the dimensions of this robot, i need the arm dimensions only. On amazon there are no dimensions.
Thank you
plish give voice in order to easy
Hi, Sir can you help me I have created a program that controls the motion of the stepper motor in which i have used the L298 driver , but now I'm stuck at one point , I'm not able to apply anticlockwise motion via push push button (PB IS ACTUALLY LIKE ELECTRIC CONTUNITY PATH (please suggest me how i apply if command)......
Actually it is a robotic machine where if electric continuity is High then motor rotate anticlockwise & if electric continuity will LOW Motor will be remain stop
// Include the Arduino Stepper Library
#include
int i=0;
int PB=13;
int RELAY=12;
// Number of steps per output rotation
const int stepsPerRevolution = 200;
// Create Instance of Stepper library
Stepper myStepper(stepsPerRevolution, 8, 9, 10, 11);
void setup()
{
// set the speed at 60 rpm:
myStepper.setSpeed(60);
// initialize the serial port:
Serial.begin(9600);
pinMode(PB, INPUT);
pinMode(RELAY,OUTPUT);
}
void loop()
{
while(i
You have to use servo motors
Hey,bro I buy this project...so you can help me bro
Can i ask this script ?
Bro, How to install auto control rather manual control. If you know source code explain it please
By using sensors
can you build this and pair with a playstation pad???
yes,but I think you need a Raspberry Pi board for the joystick
Bro iska source code kya h?
Make iron spider, dr. Octopus
I want to make this
Is that Arduino board is already coded?
yes you can get the kit from banggood but the instructions are hard to understand i came across this video and it helped
bro..codes kidhar hai?
Hamen bhi yah Saman mangana Hai batao hamen bhi Kaise mangaye Saman
Can you tell me the name of all the component ? So i can buy it
Cause i've the project that i have tou make arm robot. Hope you can reply this comment
Hii this is a complete kit (robot claw arm) Need to assembling. Thank you!!
@@fauzimaulana726The kit is called "robotme arm kit"
no need to programmed isn't it?
You must program the servo motors to respond to the variable resistors/potentiometers.
can someone build this in autodesk fusion plsssss
How to make or How to buy
banggood
Please upload the code to program
yes please
Link no open
please try again thank you!
Circuit diagram please
0:00
Khaby lame be like:
No need to tell you already know
7:57
Kenapa?
Hanzhen harmonic drive gear , robot arm gear reducer, over 30 years experience ,,,
Muncang
this is a very complicated video
//base,shoulder,elbow
int PWM[] = {12,10,2};
int DIR[] = {13,11,3};
int POT[] = {A5,A4,A3};
int remot[]={A10,A9,A8};
int Kp=30;
int Ki=0.0001;
int Kd=0;
void setup() {
for (int i=0;i=0){
analogWrite(PWM[pin_motor],pwm);
digitalWrite(DIR[pin_motor],LOW);
}
else if (pwm255){
PID=255;
}
else if (PID255){
PID=255;
}
else if (PID255){
PID=255;
}
else if (PID
Bookmark
deuttttt
What were you thinking when you added the music track ? Forgot to take your pills or what ?! This video would have been really awesome if you tried a little harder to choose better audio. Instead it's now a 'fast forward'/skip version. Remaster it please !
Why don't you just turn the sound off or way down?
@@thagrit it caught my by suprise...
Every tutorial video has these annoying songs lol, its driving me crazy
Fucking pixie music everywhere!!!!!!!!!!!!!!!!!!!!!!!!!!!!!!!!!!!!!!
You asked for a video review....Great opp to talk about a really cool project, and you chose an obnoxious music track instead of talking details about what you are doing. I turned it off.
Annoying Music! Can't people simply narrate?????
Very bad instructions. Still made it but could be so much better
Not "make" whatsoever, but simply "assemble"... ugh, sad