HOW TO LAY+GROUT FLAGSTONE SLABS | PRO GROUTING NATURAL STONE SAND JOINTS |MASONRY PATIO PAVERS WORK

HTML-код
- Опубликовано: 30 июн 2024
- video is not sponsored! used tools:
COLLOMIXER: amzn.to/2QwUlUD
GARDENA WAND: amzn.to/2Um03ru
FLOOR SQUEEGEE: amzn.to/2SyCkme
GROUTING KIT: amzn.to/2UlLZ15
4k Gopro: amzn.to/3878qAx
Gopro head strap: amzn.to/2XzhR7A
Gopro bicycle mount: amzn.to/2xDfK3l
Tripod: amzn.to/34NcAvm
The links above are affiliate links that belong to Amazon or Ebay partner programs. If you buy something through these links, I will receive a commission, of course without you having to pay anything more. Thanks for your support!
For contact options and links check my channel info,
Thank you for your interest in my videos!
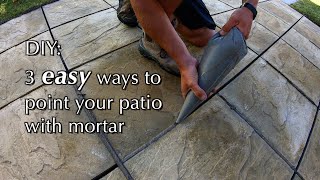
Hi this is Carl the landscape guy. In this video I will show you how we complete cement-bonded grouting of natural stone slabs. This chapel forecourt is being redesigned. The natural stone slabs laid in sand have sagged over the years, forming trip hazard joints. The plates will be re-installed later, so they will be picked up, cleaned and stored off to the side. The dirt is excavated out to the planned size and a base layer of mineral crushed stone is prepared and compacted. Then we set the frame stones. On the gravel surface, the sandstone slabs are now placed in a layer of permeable concrete. An adhesion compound is applied to the underside of the sandstone slabs. The entire chapel forecourt is laid this way. Meanwhile, the work for the sandstone wall has started. The wall will frame the little forecourt at one side as a retaining wall. You will find a detailed video about natural stone masonry on my channel, I’ll also link it at the end of this video. Okay that was it for the preparatory work, because this video is specifically about how to grout natural stone slabs. Before grouting the slabs are watered well. Moisturizing is very important, even more when it is hot out, so that the natural stone does not draw moisture from the fresh grout filling later on. For mixing, we fill a bucket with water. The mixing ratio is 5 L of water per 25 kg of cement. If the mixing ratio is wrong, color differences may occur after hardening. Therefore, always try to use the same mixing ratio for the entire area. For very narrow joints, the mixture can be a little thinner, so add more water. These are joint widths of about 1-3 inches. With these wider joints, the material can be mixed with a little less water, making it a little thicker. Mixing is best done with an electric mixer. Some mortars have coarser proportions of material, so make sure you have the right mixing tip. I would recommend one that is open at the bottom for easier and quicker whisking. We slowly add more water until the mixture is right. As soon as the dark filler material begins to deposit black streaks on the surface, it has enough water. Here we use the Marbos PFM - ZE melan in 25kg bags. The mixed batch should then be applied promptly onto the slabs. Since the mortar starts to thicken immediately, we start to work it into the joints right away. The joints are to be well-filled and the excess material is to be pulled off. The quicker the excess material is removed, the less it needs to be washed off later. The outer edge of the slabs joints should be sealed up before grouting, so that no grout can seep out the sides. If the mortar becomes too thick, it can be slightly rewetted with some water. While one employee distributes the grout, a second guy should mix the material so that there are as few breaks as possible during grouting. The mortar must now be washed from the surface of the natural stone slabs before it sets too much. But wait until the new grout is slightly hardened. There are two methods for cleaning the slabs that we would suggest. For the first one, it is smart to lay out a wooden board to protect the new grouts. For washing, a professional wash box should be used and filled with clean water. Then the natural stone surface is washed with a sponge board. First, a surface section is washed with circular movements. This loosens the mortar from the surface and smaller groves. Then wash out the sponge board before wiping the surface clean. It is important to always pull in one direction and put the sponge board down on its entire surface. As soon as mortar streaks are visible, the sponge board should be washed out again. Also, depending on the size of the area, the water in your box should be changed every now and then. With this method you can work your way out of the corner. For surfaces with a higher proportion of joints, it’s possible to easily pull out the joint with the sponge. Try to pull across or diagonally and not along the joint. For deeper spots a regular cleaning sponge can be used, but this is not suitable for washing larger surfaces. The second option is to wash the surface by spraying it with a fan spray nozzle. This method speeds up the process, but requires more attention and practice. ..
#grouting #flagstone #grout  Хобби
Хобби


Wow, that slab cleaning with the sponge took great skills to make it look so easy.
You guys do a very professional job. Not everyone puts the time in like that. 20 years that will still look awesome
Nice video! It's refreshing to see work being done with old school values in mind.
Wow, that’s a lot of work and these workers seem dedicated to doing a really good, thorough job.
It's always a pleasure to watch people who care about their craft make something beautiful. Those guys are a bunch of pro's.
My back hurts just from watching the video, I hand it to these guys for the hard work they do!!
Very informative! Thank you for posting. I live in Texas so Ill be trying this with the Austin Stone we have here.
most impressive rock slab reboot !
that is the best and quickest way to get the job done right. . . and the use of that squeegee just made it better.
awesome video !!
2000 thumbs up !! ingenuity !
Those men do impressive work. Dirty job & amazing results. Beautiful! Thank you for a great video 👏🏻
Great work! Looks amazing and this video makes me want to do a landscaping project.
Liebe Grusse from Colorado! My wife Sandra (from Fulda) look forward to using your helpful tips to mortar our Flagstone patio we just finished laying in. Danke!
Amazing quality video!! Doing a regrouting job like this and was very informative.
Excellent vid, step by step. Thx. That Dutch guy knows his stuff!
I live in a condo and loved this! 😀
Absolutely gorgeous great job
0:27 Those are some amazing gloves even we carpenters and other workers use i noticed no joke.
Great-looking job! Nicely moderated, too.
That retaining wall is just gorgeous!!
Thanks
This is so helpful ,been around this work my whole life .
However being an electrician never paid much attention,to busy doing my work .
Now my daughter is in desperate need of some patio stone needing something besides gritty stone .
Wish I had paid more attention when I was younger .
Almost 70 and never attempted a finished outdoor patio stone refinishing .
With this video I am fairly confident that
I can pull this off .
Thanks so much
Very Helpful
ok good luck and thanks
You do beautiful work Carl!
Thanks a lot for a very nice, informative and clear video!
WOW - that's a lot of work!!! Beautiful results - thank you.
thank you
That is some beautiful work.
Wow. Looks like a ton of work but final product is beautiful.
Excellent workmanship!! 👍👍
Beautiful job!
incredible skill on that grouting
beautiful landscape!!!
Looks so luxurious. Looks very labor intensive and expensive!
I have tons of flagstone just laid on dirt in my backyard, and this is exactly what I need to do. After seeing how much labor goes into it though, I may abandon my typical DIY mentality and hire someone.
I just stumbled on this video and I was NOT disappointed!! Fantastic narrative of the process and its' work. just Subbed!!! 😉
Lolololololololol
Idiot
Wonderful attention to detail. Thank you for the guidance!
Great job. Well done and thank you for sharing.
Not bad 👌 idk if it was intentional, but you guys did a great job of mimicking the jointing in the flagstone with the the stone work around it.
Haha I wish I could spray my grout out with tile. Looks excellent guys!
Old stone mason over 40 yeah expensive retired now l you got 3 men there you could pont it by hand been much clean job 👍 I have use a product call flow pointing you do same thing squeegee in but leave it 15 to 20 starts to set give a light jet wash not keen on it all founds the joints would sync a little bit . Pont by hand all way best way 👍 even on to own way of doing it but laying of the sandstone look really good and the wall you built 👍
I'm a stone mason bricklayer from Australia. Was hoping I found a quicker way to grout. But no, goes back to what we do, but we hand grout on knees following by same roller bucket. We must all hate grouting from around the world haha. But we do use some cleaning vinegar in our cleaning bucket, it helps with smears.
Soul Drummer what is the mix consist of exactly do you know
I like that !! Nice video and very professional. Got a lot of tips. Thanks!!!
this looks amazing. love your work
Nice one. Thank you so much
hey carl thank you so much
Excellent job
Great vid thank you from Calif
This looks a lot easier than filling every joint by hand that's for sure. Pretty amazed at how quickly it starts to set when poured that wet
I would rather not get the mirror all over and not have to do so much cleaning. I’m sure it’s hard to get all of it off this way.
Mortor
wow, really hard work but the results are beautiful, very pro...
Excellent narrative and illustration
Awesome video !
That’s got to be some tough work. All that liftingwow
Beautiful job
Excellent Video Carl job well done thanks for sharing
you are welcome, thanks
Great video, Keep up the outstanding Performance
Great video!
That is really nice 👍
Great job!
Nice job!! I am a costum carpenter, but i im becoming a master tile layer too!! I love it
You will never master shit thinking this guy did good work
You are becoming a tile layer. The master part takes many many years.
Awesome video man
That will be beautiful for as long as it stands. no one will ever want to change the look.
Labor intensive! Nice job Carl.
That looks 👏
Beautiful red stone. I think I would have added a little red dye in the mortar
The cha-pell looks great
So enjoyed and helpful.
Not sure why I watched this, but it was awesome.
Great Job ! Being a Bricklayer I can appreciate the skill involved. . . ..
Nice instruction!
You do very clean work
Wow great video very informative
Really interesting!
Great vid thank you
never knew this type of videos would entertain me lol
rocketeer101 getting old sucks
Thats looks beauty
Good job 👏
Why am I watching this? So satisfying
I learnt something from that...thank you!
welcome, thanks
This was satisfying to watch
Indeed very satisfying
Well done xx
It really was/is! Good job men! 😐
That was very nice.
Great job!!!!🤙🏼💪🏼
thanks 👍
Beautiful
Very nice my friend.
Very good video.
I swept my dry powder grout into my stones then wet it with a light sprayer of water, still there and looks great after 15 years, and no messy wet crap to trowel around and have to clean up the stones.....
that guy is a genius
@franco ...who proved that what works? The dry powder guy? Let scrutinizing eyes be the judge of that - have him make a video- there are draw backs to that method.
I’m trying that! Today!
Hahahahaha
Do you use sealant after or do not need? Thank you and congrats for the excelente and beautiful job
Nice work...
Impressed
Lovely job mate
Many thanks!
Very good
Brilliant
Great work, cool accent.
Thank you for your very indeed proper use of motar..i didn't realize motar can be used ?
nice video my friend :)
Bravo bel muretto
I would use a hand grinder to get better joints and I always lay a slurry down so as to get a better bonding. For grouting I am old school I use a grout bag very nice job by the way..
I still like the traditional sponges because I can manipulate its shape to better get in the tight spots.
I wouldn't spray that mud off at all....thats the sponge's job!
Yea I agree, some grade 20 or 30 silica sand, wire brush and and sponge to give it that final touch
Excellent work and video. I recently had blue stone installed and extended along side of my pool deck, the grout is cracking between the stones. Where did they go wrong and what should I do to get it corrected? Thank you so much. Rich Z 🙏
This was a great video! Learned so much. I've read elsewhere to make grout with 2 parts cement, 9 parts sand, and 1 part hydrated lime. Is this similar to what is used in this video?
since we used a premix grouting mortar in this video i don't know what the mixture is made of, but thank you and good luck with your project
Not sure i got here but it looks good fellas.
And if it starts to rain heavily during the application, you could be in deep trouble. Great video.
Don’t do it with a threat of rain
very nice
This project looks amazing! Nicely done. What grout is that and where do I get that from?
Also I did put down gravel, then sand, then my flagstone. Is this the right product for my case? I'm not a fan of poly sand, it's too soft and falls apart.
I really like this pavement style. Next week i'll get access to my new home with a 1660m2 backyard. Can't wait to make it a small paradise :-D