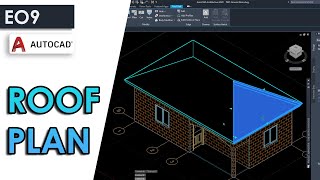
How to do a roof plan in AutoCAD

HTML-код
- Опубликовано: 2 окт 2024
- This video explains how to do a simple hip roof for a rectangular building in AutoCAD.
If you are interested in one on one tutoring you can head over to
reacheducation... and book a session with me.


Thank you every much for your help…❤❤love form Grenada 🇬🇩🇬🇩
You are welcome. Thanks for the kind words.
Thank you so much sir ... it really helped me in my SBA
You're welcome. Glad I could help.
This video help mi a lot .thanks 🙏
You are welcome.
I know so many shortcuts to make that process shorter but. No cap. The best video I've ever watched on RUclips. I learnt from your process and I learnt from your errors. How can I get such a great experience from learning something. Thanks a lot. I hope you're considering creating more content because this helped me a lot. I knew nothing about these roofs but learnt so much and I haven't even finished yet. (Exam in 8 hrs.)
Thank you so much for the kind words. I do plan on creating more content. I've just been researching as a few of my videos need updating. Including this one, I hope the exam was ok.
hi what if you are doing a square building do you follow the same measurements
Good day. Yes you would. You would end up with a pyramid roof.
@@mr.cargill oh thank you
@@zamanicollins6940 You're welcome.
Hi Mr Cargill, thanks for your video. Just to clarity does the hip rafter always have to be at 45deg? if not how do you determine the angle?
Hey. I think by standard they should always be 45 degrees
I am so sorry that I am just seeing your comment but yes the standard is 45
The angle of the hip depends on the angle of the 2 roof sections it is joining. If they are the same pitch, then it is 45 degrees. If they are different pitches, then it will vary depending on the pitchs.
Excellent Content
Show the valley and ridge board
The ridge is shown and this is a simple hip roof so there are no valleys. Here is a link to a video that explains how to draw the ridge details ruclips.net/video/_0IhHzolKhU/видео.htmlsi=1CsWl5glDBAF448m
I have learnt a lot Thank you
thanks for the video F enter,M enter join lines at any angle,also MODIFY and select join would lines to become as one
Thank you so much for the information and I'm glad you found the video helpful. J enter can also be used for joining lines.
Sure
THANKS YOU VERY MUCH FOR THE VIDEO!!!!!
Happy to help.
When I do the 45 degree lines from one side, they don't line up with 45 degree lines in the other corner
Good day, if you mean that your 45 degree lines on the left are not meeting up with the ones one right exactly in the centre then you would have to check to ensure that your roof or the section of the roof that you are drawing is a perfect rectangle. If you're saying that the 45 degree lines are not meeting up with the ones in the opposite corner, this will only happen if your building is square and that would be a pyramid roof and not a hip roof like the one in the video. Let me know if my comment helped.
@@mr.cargill Hello. The section of the roof is a perfect rectangle, but I am not sure why they aren't meeting
@@malikplayz4425 send me the drawing that that you are doing . My email is dontaecargill@gmail.com. I will look at it and tell you what's wrong.
@@mr.cargill Thank you for taking the time out! I just sent it!
Thank you
You are welcome
greeeeat
good comment
you should subscribe
Ty
You're welcome.
Why don't you have Hip Gurder Trusses?
This is a simple hip roof design
Long process ....we can use fillet command instead of stretching line
Yes Mathew that is indeed a quicker way of doing it.
exam in 3 hours.
give thanks 🙏
You're welcome. How was it?
NICE VIDEO, TOO LOW THO
Thank you for the feedback. Really appreciate it
why didn't you just fillet the lines instead of extending them and trimming them
Not sure exactly which part of the video you are referring to but there is more than way to do a lot of things in AutoCAD and suggestions are always welcome so thank you Josh.
I need a roof are you still doing it
Good day. Yes.
email me dontaecargill@gmail.com
Y didn’t you jus turn off the floor plan
The floor plan has to be represented in the roof plan in broken lines and also you need the outer walls of the floor plan to get the overhang of the roof. Turning off the floor plan after getting the overhang could be done though.
f enter= fillet
Yes sir that is indeed the shortcut
how about a flat roof
For the flat roof you will draw any rafters, just draw the roof outline. When you do a section through the roof you will have to show the steel work
@@mr.cargill ok thanks much. so that means I would not add a concrete or steel hatch
@@jasonhall9588 No, that would be shown in the detail drawing
How do you draw a slab roof plan?
Sorry for the late reply. The slab roof would be flat and there would not be any rafters.
@@mr.cargill could you do a video showing the steel layouts please
TD tomorrow '-'
How was it?