DIY: Lithium 18650 Cells Charger By Using TP4056 Modules

HTML-код
- Опубликовано: 27 авг 2024
- This time I'll make a charger, which could charge 5 pcs of lithium ion 18650 cells at a time. Parts for this build cost only 5$ at ebay: 18650 battery holders and TP4056 charging modules.
In video, I forgot to mention about power supply current. In my case - to power up 5pcs of TP4056, it's need a power supply witch could give minimum 5 amps of current.
Julian Ilett video about charging 18650 with TP4056:
• Charging a Lithium 186...
TP4056 datasheet in *.pdf: www.datasheet-p...
You could support me and my content creation by buying Well Done Tips official outfit: teespring.com/...
Due to factors beyond the control of WellDoneTips, it cannot guarantee against unauthorized modifications of this information, or improper use of this information. WellDoneTips assumes no liability for property damage or injury incurred as a result of any of the information contained in this video. WellDoneTips recommends safe practices when working with the tools or equipment seen or implied in this video. Due to factors beyond the control of WellDoneTips, no information contained in this video shall create any express or implied warranty or guarantee of any particular result. Any injury, damage or loss that may result from improper use of these tools, equipment, or the information contained in this video is the sole responsibility of the user and not WellDoneTips.


Thank you very much for not having loud music in the background... :)
Gdg
Vfypggzbjhx
Gfhfdffffgyuudfujdedbkdgjufaeyiehjogdsf
Vbncxbjkljdgcv
Vgvvvvvvgbbbbvvhhhhgghghghghhnjnbhbjjjbnhjjjjafgjggdf
Fdk
@@sreenithdesignworks1559 .
That's some slick soldering you did there, nice job.
Yeah. I'm a lot slower than this.
Would have been a much neater job if he drilled through the holes and brought the wire up from below.
How do you mean?
nothing special but i like those strippers :} gotta get me some of those!
@@em0_tion I use those for 10gauge and up to 24
simple clean build, you put most of those Ive seen to shame, I especially like how you started soldering little bits of wire for the positive then realised how much quicker it would be to strip the wire a bit more and crimp it to make it stick out and just solder that, I like your style :)
Thank you for the idea. I'm ordering the parts. I have the 12 battery holders, 12 TP4056 charging modules with protection, and I ordered a 5 VDC 20 Amp power supply. Thank you, Great project and excellent craftsmanship.
Not long ago I started playing with Li-Ion batteries from Dell packs just like the one you disassembled here. Most people don't know that a laptop battery pack can be "dead" when only one or two cells in it are "dead". I like your methodology of verifying and sorting the cells by remaining capacity and will get myself one of those charger/discharger devices. Thanks.
Awesome skills there with the clip holding that wire while soldering. Plus that amazing wire-stripper. Wow. I just now saw how he stripped back the wire like 1/4", and then folded the wire in the middle of the stripped part, twisted it to make a tiny wire going to the connector. Forget the project. This video is about electronics skills. This guy's got em. Subscribed.
That was a really WELL DONE TIP! - No annoying music and well explained. Thank you very much!
I'm so glad I'm not crazy for thinking this would work despite there probably being ic's more specifically suited for this
Great video editing. You sped it up when necessary. Thanks for not wasting my time like so many other youtube channels.
I have found that foam board is pretty useful for mounting small projects like this. You can buy it in big A3 size sheets from Amazon very cheaply. It is easy to work with, just cut it to size with a craft knife and you're done.
This was exactly what I was looking for. I spent hours trying to make sure I got it right. Thank you.
You can buy holders that hold multiple cells. Saves money and time.
that's a really neat design. I have alternate versions of the same charging board, the only difference is the LED placement and instead of a green LED, full battery is indicated by a blue LED. I use the boards to charge 3.7V single cell LiPos, and it works great.
I AM DEPRESSED...I mean ..impressed --------very very impressive work. THE WHOLE BUILD. BUT THE SOLDERING IS SOMETHING ELSE. ONE DAY I MAY COME CLOSE I hope
Excellent video! I don't trust my wire stripping and soldering skills to be able to do something like this, though the video shows the process very clearly!
Hi, just use small pieces of wire and solder them one by one :)
The stripping part is so satisfying. Great video !
Brilliant simple and useful! At home you can use an old AT or ATX power supply from a scrapped computer. It gives 20A or more at 5V. However, for 1-3 (or even 4, if it gives 4 Amps) cells you can use your laptop power supply with a single step-down buck converter, such as XL6009. This will make the whole charger pocket-portable.Your way of charging Li- batteriues is the best - they have to be charged 1 by 1, not together in series. Regarding the application - you can replace outworn batteries of old wireless tools (14.4V) with only 4 Li- batteries, placed in two double 18650 holders (glued back to back). However, use protected batteries or make/use a protection circuit to avoid over discharge. Thank you for sharing!
+Bolgartopper hi... i tried and failed at my version of this. i think the problem was i was trying to charge 5 batteries at once, connected to a cheap 1 batt module as the charge controller. Im going to try this one... So do you think charging them individually is best?
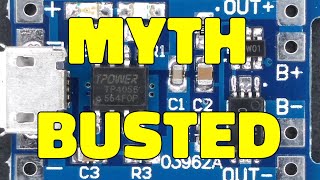
In case anyone is planning on building one of these in the future I think I should mention that there are *two* versions of this TP4056 module, one of which is a direct upgrade to the other. If you're looking to pick a few up, make sure they have 6 pads total, with 2 in the front (positive and negative), and four in the back (OUT positive, B positive, B negative, OUT negative).
It is not necessary. If you use TP4056 for only charge Li-ion only, old version is really good. But, if you do some DIY flaslight or boombox, whatever you want, new version of TP4056 would be good, it will protect your battery from deep discharge.
Beautiful workmanship, a pleasure to watch :-)
This is very nicely done! If I manage to get the parts, I know I will play this video back and forth a lot!
great project but thanks also for showing the soldering skills. Nicely done using one wire each for positive and ground across 5 boards. others may know this but for me it was a revelation.
The double sided tape on the modules is covering up the holes that let heat out from the IC. I would do it in a way those holes are left open.
There are no such holes on these boards that I can see - only the structural grounding posts from the micro USB connectors and two traces on the rear side of the boards. I thought such features were only common with BGA-type ICs, anyway.
what holders are you useing for the 18650 cells? ones i have are hard to get the cell in and out
I would recommend mounting them on aluminium, because with 1 amp output IC is getting quite hot and lower output current, at least it was the case with my modules
Impressive as hell. Really beautiful work. Thank you for your time and very helpful video
That was a great tips for DIY,
Thanks it inspired me to built one.
Can I just use one TP module to charge battery which all parallely assembled?
+airul aszyudhi depends on how fast you want to charge. See how many amps the TP module can take. And match that. It would work, but most likely charge very slow.
+Alex Leonard if 1 battery is charded per hour, 5 battery will be charged after 5 hours (sorry for "english" :D)
can i use 1 module to charger 2 batteries? and connect them parallel? I'm planning to make a 6 bay charger for this..
yes, but if 1 cell with same mAh is charged per 1 hour, this will be charged per 2 hour :)
Ji run oh... if just follow this vid how many amps does each battery takes to charge? do i need to change each resistors to achieve a 500mA current?
Do you know how to make or where I could buy a dc to DC boost buck converter to easily allow the use of lithium batteries in place of lead acid batteries for projects etc so that you can still get max capacity from the lithium batteries by using their full useable voltage range? Thanks.
Be careful when using an ATX power supply like that. It is recommended to put some load on the 12V rail, if you don't, depending on the quality of the power supply, the following things may happen:
- the 5V rail is very unstable
- the 5V rail doesn't work at all
- the power supply breaks after some usage.
very impressed with your soldering.
neat, i like how tidy the arrangement is. excellent project.
add 5x "usb-doctor" module (3$ each) then you have a display which shows charged capacity + charging time + charging current. i did the same, by the way TP4056 is an awesome chip and costs with pcb only 35-50 cents
Isn't each piece supposed to have a separate charger?
You can also create with a TP4056 for four batteries. Battery must be parallel
Ciekawe rozwiązanie techniczne aby naładować ogniwa
Excellent... Thank you very much.. I have about 20 of those PC power supplies ! Now have a great reason to use some for this type of charger..
nice cable management skills
Great job with all the best information and knowledge
it seems like the cells will not charge faster because they'r in parallel connection the circuit path is different which is every cells will receive 250mA out 1A to overcome such delay you may use 5A LM2596 buck converter.
Cracking vid, and very neat. like the link to Julians video which he explains very well. Just doing some math for people it maybe worth to do this you need at least a 5amp supply or higher (1amp per cell) for any newbeies. You get a thumbs up from me.
very good idea.its very powerfull charger.i think its impossible to find the same power amperage charger for 4x or 5x batteries.
01.how many of those batteries can we charge with single module?
02. I have old Nokia 300ma batteries...like 20 of them, can I make a working battery bank with it.?
Very clever idea and the price is right as well. Thank you Sir.
I tried same way to power these boards instead of using usb cable. But the boards aren't working after that. The leds are always red, even without battery. And output at B+ B- also shows less than 1V, even with USB cable connected.
What if we make this small chargers in series way 7s for example...
I think they can charge a 18650 pack
And, dont need to install pcb or bms....
Just came across your beautiful craftsmanship & innovative use of readily available parts in a nice compact package.
I'm curious if this is still working today?
U didn't told about amp 5v but what about amp hiw much ?
Very cleaver - really well done mate! Cheers from DownUnder
Thank-you for sharing. After watching your video, I built mine. It works great and I it was fun!
This is the second time I’m watching that’s how good this is
Btw how long is the charge time for all the cells
Love that trick you did with the cable, very clever. Would it be possible to connect the output of the batteries together if you put a diode on each cell to prevent current flowing back? What I would like to achieve is a super high capacity set of parallel cells that can be charged individually.
Can i charge this with a normal 2amp 5v charger??
Yes
Thank you for the commentary. I just subscribed and look forward to many more videos!
That is brilliant. Genius
franchement bravo
travail très propre :)
merci pour le partage.
Very neat and tidy charger on a budget :)
What is the required Power Supply? how many Volts should i need?
cool i thought of that to the cells are like the same size as AA batteries . simple but looks cool
I wonder if batteries are wired in parallel, can we juste pu one module to supply two batteries instead of using one module per battery ?
nice clean design.
Where do you get those wire strippers? Those are amazing!
Tom you can get it from ebay ,i have one from PRC works well , price around $15//
what do you call it
Just post the name as awg wire striper and you will get a variety of this gadgets , good ones and cheap ones ,,,enjoy Juan claude .. cheap ones are red in color . and expecince ones are blue colors, they look a like and works equal , donno why the difference , proberberly the sellers price ,, happy shopping
Tom Glander get the ones with blavk bottom plate and smaller jaws. I had the same as in the video and they broke after few months because the backplate was aluminium.
Very good, now lets say I want to charge one of those 18650 batteries with solar panels : which solar panels would I need : voltage amperage etc and how many panels ?
If you connect all the battery’s in parallel and connect it to a single module ..then it will also work the same ....just it will take a longer time ...but it will be more better ....then doing like this.
can you also have the batteries wired in series at the same time to create a battery bank and yet still be able to charge them using a standard 5v phone charger? for example.. 3x 18650 batteries to create a 11.2-12.6v battery bank. yet charge using a 5v 3A charger?
Have u connected wire to charhing point ( near micro usb port ) of tp 4056 in parrallel ........
This is exactly what I needed--thanks!
Yea, pretty nice soldering. 👍
Hmm, crafty hands ! good work .
this is the best method the charging current should be 0.37 5 of the battery currunt capacity each tp4056 provides 1000ma max so any battery from 1200 ma to 2600ma cane be charged.moreover all batery need not to be of same capacity.total cost of 6 tp4056 in indai ils 150r s much less than bms .also each batteryn has its own protectin gr man
Could you please tell me why the batteries separation by Volts? 3V, 3,2V, .. Is it necessary separates batteries with different voltages? Why? Thanks...
but do not worry, that the power supply 5 volts and 25 amperes ? and you need only 5 amperes for all five batteries?
Simple and clean.Thank you
Hello,
Great video tutorial & the idea of using a PSU... just brilliant ! 😆🤗
finally i found a video without glue gun and scissor to strip up wires
Nice Video, can you help me with one question...
I want to do a power bank serializing the voltage, so 4x3.7v, Can I serialize the output from those TP4056 to have a combined output of 14,8 like I would have serializing he batteries ? thank you!
Johnny Monteiro did you find out? need this too!
Thanks a lot mate, I have just made one
Fantastic! Any simple way to rig one LED to show full-charge on ALL cells? THX!
where do you work at? man i said this already the way you put things together is really clever. It's so unique
Do you have the means to show us this.. Used as a power bank? I want to recreate you work here but turn the unit into a viable power bank.
Super bien merci pour l'information et le Tuto je ne connaissais pas ce module tout fait. continuez à faire ce genre de vidéo vous contribuez à une éducation très utile pour tous à très vitre pour une nouvelle vidéo instructive.
Super good thank you for the information and the Tuto I did not know this module of charge. Continue to make this kind of video you are contributing to a very useful education for all to very glass for a new instructive video.
Great demonstration!
Wait why would you need all of those charging modules? If they're in parallel you could basically do it with 2 wires, 1 module, and 2 nickel strips. Or did i miss something?
+Denzel Ray yes, you can, but then your charging time will be 5 times longer;)
+Well Done Tips did not think of that. That's genius.
+Denzel Ray does that mean with 5 of the units you can draw possibly 5a from the supply since he said each module can give out 1a max? Isn't that kind of a lot of watts for the small wire? somehow that doesn't make sense to me. It makes more sense that the point of the 5 units is so you can charge each one independently and some will finish charging faster than others. i dunno much about electronics. appreciate any comments
+danh le I asked because I had a similar setup with a portable ps2 mod. I had a 24,000 mah battery connected to a module similar to his except it output 2.5A. I also used the same wires to connect the ps2 (which draws about 5A) to this power source with no issues. Although mine is easier, his is better because it will charge much faster than my setup.
+danh le oh and watts is completely dependent on the charger. Amperage x Voltage = Watts.
the wires for these holders are awfully weak and they are expensive for what they are, so therefore i printed my own charger, but since i do not have the manufacturing capabilities to make springs i used bolts instead and would recommend the same thing as this puts no stress on the plastics or wires as they are no longer required to flex and improves the durability of the product, making it last an indefinite amount of cycles instead of a dissapointing 30 that i got from my charger before it required maintenance due to structural malfunction.
can't you charge them all together with only one charging module?
Hi. Please explain why do you need TP4056 for each battery? Thank you..
Is 5v Power Supply's Current is enough to charge full all 4 batteries within the optimal time period? I think it would take a lot of time to charge all battery
Nice. I went straight on eBay and bought everything needed. :)
Hope to see your video s soon
Awesome! Thanks for sharing!
one question though, if may I ask?
HOW many modules and batteries I can charge at the same time from the same power supply "like the one you use" simultaneously?
Thanks again!
All depends from power supply specs ( how mutch curent it could supply at 5V). All PSU have a spec sticker on it, there you could find those numbers.
Well Done Tips What wire did you use to connect the tp4056 with the computer supply? Thanks 😃
++Well Done Tips - how many ampere is ur PSU, bro.?
thanks for asking Fahad Al-Monaya I have assembled a 100 cell charger unit using the same charging units as here my only problem is that these PC boards do not seam to shut off even if left for hours I have installed 1 120 amp 5 volt dc power supply Mean Well HRPG-600-5 AC/DC AC/DC Power Supply Single-OUT 5V 120A it handles these cells quite easily.
Thanks for information, very simple
Brilliant! Great video thanks for sharing!! Your channel is great!
Hello well done love your videos could you now show us how to build a charger for various cells of Ni-cd and Ni-mh batteries please. Thank You
nice work
i have 4x 18560 battery pack connected in parallel with total 4.2v/2200mah how can i charge this battery pack not individually like you did as it is reside in robot and i need to just put an adapter in the robot to charge it rather than extract the batteries and charging them out of the robot
thanks
is it possible to build this , put it in a case, to use like a reachargeable Pack. so you dont have to take them Out of the charger
love it. I would like to use you're design but as a portable battery bank for charging electronic devices. could I just add a step up PCB?
s.aliexpress.com/BBBbi2Mf
(from AliExpress Android)
If you add a bms with usb port to this device can we use it as powerbank? I think we must add that bms with paralel connection so that it should not give a voltage bigger than an one battary's voltage to the phone, am I right??
Thanks for the video. I will be applying this to my ebike battery
Very good project.
Hey can I use a step up / step down ,,,power converter ? too charge the batteries With the TP4056
The heat of the ciruit pack must be careful.