🖨️✨ INKJET PHOTO TRANSFER: No Smearing, No Rubbing, Amazing Results

HTML-код
- Опубликовано: 27 сен 2024
- Do you want to learn how to do a photo transfer using a ink jet printer? No rubbing or smearing...
Hey everyone!
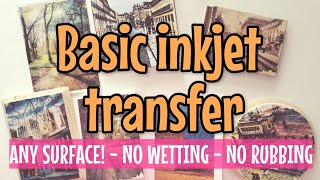
Want to transfer your favorite photos onto wood, canvas, or other surfaces without smearing or rubbing? Look no further than this tutorial on photo transfer using an inkjet printer with Mod Podge!
In this easy-to-follow guide, we'll show you how to create stunning photo transfers with amazing results using just an inkjet printer and Mod Podge. Our no-rubbing method is perfect for creating personalized gifts or adding a unique touch to your home decor.
We'll cover everything from selecting the right printer and paper to sealing your inkjet prints for long-lasting results. With our step-by-step instructions, you'll learn how to transfer photos onto wood and other surfaces with ease.
Whether you're a beginner or an experienced DIY enthusiast, our tutorial has everything you need to achieve professional-quality results. So if you're ready to take your photo projects to the next level, be sure to check out our tutorial on photo transfer using an inkjet printer with Mod Podge. With our helpful tips and tricks, you'll be creating stunning DIY projects in no time!
Happy crafting! Deidre
Mod Podge: amzn.to/3oiwmsm
Homemade chalk paint: • Easy DIY Chalk Paint i...
Poly acrylic sealer: amzn.to/3lENeIN
If you love my videos please SUBSCRIBE and don't forget to press the bell, 🔔 like, comment and share.
▶️ Please Subscribe: / ourupcycledlife
------------------
▶️ Visit my store: www.etsy.com/c...
▶️ Support my channel: www.buymeacoff...
▶️ Subscribe to my email list for more crafting and DIY content! eepurl.com/hLQBjf
------------------
▶️ Follow Me on:
• Instagram: / our_upcycled_life
• Facebook: / deidrewoodgourlay
• Pinterest: www.pinterest....
• TikTok: bit.ly/3wfznxk
------------------
Email: ourupcycledlife@thestation.io
#trashtotreasure #chalkpaint #OurUpcycledLife #dumpfinds #upcycledcrafts #diycrafts #diy  Хобби
Хобби


Subscribe to my email list for more crafting and DIY content! eepurl.com/hLQBjf
Just found your Channel and I just love it so far thank you for the great ideas so far keep up the great work
I just discovered your channel today and have to say thank you SO much for this tutorial! Just what I needed to know. 🙂
My email address is not being accepted. I tried this before and it never works!!😩
When painting the modpoge on to the wax side of the label paper does it matter if is matte or glossy?
So glad you’re enjoying
Just caught the “label transfer sheet” comment. So excited! We use at least one label sheet at work per week. I have put 100’s of them in the trash. Now I get to upcycle!! Thanks! Great tutorial!
Yes make sure to save some! Thanks for watching ! Glad you enjoyed Jennifer
Same, I work at "that Christian craft store" and we throw those away ALL the time.
Thank you for creating this video!! I used this technique on a piece of wood. I used an old photograph of my father and his brother. He was so thrilled to have this!! Thank you again for sharing your tips and crafting ideas!
That is awesome! Glad it worked out well for you! What a great gift Cassie
Excellent!
Thank you so much for sharing this method. After some experimenting I was able to make an important improvement. I use a plastic protective sheet as carrier. Not the thin ones with the hole on top where you have to slide in the paper from above, but the more THICKER ones that are already open on the side. They are a fraction bigger than letter format so if you cut them to size you will have 2 carriers. The big advantage is, that the plastic is thick (and has no paper backing) and it absolutely does not wrinkle when you put the Mod Podge on. (I used 3 brushed layers of Mod Podge) You can re-use the carrier after cleaning and it is still straight….. I have experimented with the Mod Podge also, done 1 batch with 50% Mod Podge and 50% transparent Elmer’s PVA school glue. I find 100% Mod Podge works excellent although the mix had a bit of better “flow”, almost no brush streaks, having said that, I stick with the Mod Podge, it’s 100% result against maybe a risk and (maybe) time and materials lost. The best part of your system is (I do mixed media collages), that I can position all the transfers on the canvas before to glue them on. Question: Do you have experience with storing these transfers for later use?
Great tips
I have to say this is the best video for transferring that I have seen yet kudos to you
Thanks so much!! Appreciate it
I absolutely love your tutorials! You are very thorough yet stay on topic and don't go super fast like others I've watched. Your projects turn out fantastic and give those who don't have access to cutting machines, etc. other options to create the same look. I plan on subscribing to the next level also!
Thanks so much for you thoughtful comment Angie! I appreciate it and glad you are enjoying!!
Thank you so much for sharing.
You have opened up a whole new world of crafting with this technique.
Kudos to you lady. 👏
Thanks for watching Toni! So much fun
What a fantastic idea. Honestly, you should have a million subscribers. Your ideas are superb.
Ahhh how sweet! Maybe someday! I love to share my crafts
😯
This is MAGIC!
And YOU are magician!😁😁😁
Lol... Thanks for watching
Am I missing something here, you've basically printed a picture onto a transparent sheet and placed it on a white wooden background,
if you printed the photo/picture onto a white sheet of paper, cut it to size and stuck it to the board (of any colour) you would have the same result without the extra cost, work or mess, it's like your trying to re invent the wheel, I'm not trying to disrespect you, it just seems like you went around all the houses on the block just to get next door
absolutely, also not a transfer. You can get a reasonable inkjet transfer by using the carrier sheet and printing directly onto the shiny side, then pressing it down on to medium while ink is still wet.
I was like HUH? 🤔
I thought the same… maybe the effect is slightly different/more shiny, but nobody got time for that. 😅
For a full picture, absolutely right. But if you want text or something with a transparent backing, this would still be a good option. Worth trying out, at least.
This makes no sense at all
There is decal/transfer sheet available for inkjet printers. It's used by modellers who want to make bespoke decals for their plastic model kits. It can be purchased with white backing or transparent. What you do is to print using your inkjet, wait for the ink to dry then either paint clear varnish on or use a spray to seal it in then cut around the decal (transfer in Europe) then put into a saucer of luke warm water for a minute. For best results in printed images long term use sublimation dye ink as it's less affected by sunlight. Certain ordinary inkjet inks fade over time.
Yes water slide decals
Thanks for this info! I'm going to order some! I wonder if the decal sheets, and/or modpodge prints, can be used within resin projects... I'll be experimenting :)
@@SJones3677 It's a pleasure! There are various model kit manufacturers around the world who make resin model kits with decal/transfer sheets included. What some modellers do is that once the decal is in place on the resin model and has dried, they then spray or paint a thin layer of varnish over the whole area to seal the edges as an added bonus. All you need to do is to go through the same process.
It is amazing to me how many people are crafty and creative. THANK YOU for sharing. I can follow directions, but cannot always come up with such creative ideas.
Glad to inspire! Thanks for watching
This is so cool! So many projects so little time!
Thanks for the tips! 💖
Can get overwhelming at times :) happy crafting
Holy cannoli! Game changer is quite the understatement. I can't wait to try this. Thank you for sharing your genius with the masses. 😉
My pleasure! Thanks for watching and have fun
Wow I had been looking at laser printer thank you so much for sharing.
Thanks for watching ! Glad you enjoyed Paula
I cannot wait to try this! Such an amazing technique. Thank you for sharing!!
Thanks for watching!
I made my own bbq sign..i printed it straight onto the sticker backing ..reversed everything..let it dry..then put the printed side facedown on the wood..then rubbed it onto the wood...
Let it dry 1hr..went over the entire prodject with modpodge..dry ..
repeat..and then 2 coats of varnish..lasted 4years outside..
(Forgot to repeat the modpodge and varnish once a year)
Turned out awesome.
Oh great idea! . It will work like a rub off transfer
This is great. I am wondering, could you reuse the carrier sheet? Thanks for sharing!
I bet you sure could! Make sure it is really clean before you use again I don't see why you couldn't if it is still really glossy. I will have to try that!! Great tip Janice
Could you also use wax paper?
I’m not sure if wax paper is glossy enough but worth a try
@Jamie Andrick I think I’m going to try that!
@@tonyacalhoun4040 did you try the freezer paper photo transfer?
I was looking for a way to easily transfer text over the top of paintings.... I think I found it! Thank you so much for sharing this technique 😊
Glad it was helpful!
I N C R Í V E L essa mulher é simplesmente maravilhosa pois nos ensina pelos meios mais fáceis, simples baratos já que nem todos podem assim como eu ter uma @cricuit pois esse sonho de ter uma cricuit aqui no Brasil 🇧🇷 é um tanto difícil no momento atual. Sou gratissima pelos seus ensinamentos simples e possíveis de reproduzir muito muito obrigada de Balneário Camboriu SC Brasil 🇧🇷
Lembrando...não falo é tão pouco entendo a língua que ela fala mas....ela explica muito bem com as mãos tornando a linguagem entendivel e compreensível ao meu entendimento gratidão falo apenas o português
Thanks for watching!
This is the first method I have seen that looks like it would work for DYE BASED printers. I have watched many RUclips videos claiming to do image transfer successfully with ink jet printers, but they are using PIGMENT based printers so of course they work. This seems like it would work with dye based printers because you're not spreading wet ModPodge on the print, but instead using dry ModPodge as a printing surface. Using your method, you could even coat the printed image with wax, like Judikins, for extra protection. I'm excited to try this method, unless I just go the easy but more expensive route of image transfer paper, which I think would also work much the same way.
This works amazing for me and the colours were very vibrant! Happy crafting Lanette
I just discovered you, but you and I are one in the same. You do lots of different crafting...I do, too. You hate waste, like I do! I love what you do!
So glad you’re enjoying hope you’re finding lots of great content
I am so sorry for all the rude comments. Thank you for showing us this technique. Now people can recreate this and apply it to whatever color, shape, or texture background they want. My only question is if the same results can be obtained with a laser printer?
Thanks for watching glad you enjoyed and yes this will also work with a laser jet printer
When I was young I used to do this, with postcards. But you needed 4 Coates of mod podge on the front of graphic, each in different direction, left and right, up and down. When completely dry, would wet back side the gently rub excess paper off. The image infused into the mod podge, then thin coat on the object being transferred to, place on image, and smooth!
Yea that works great also!!
I love this instructional video! Thank you for your time in creating and posting. May I say that you sound a lot like Catherine O'Hara?
You are so welcome!
I love this
I want to surprise my sister and transfer her wedding picture!
Thanks for watching ! Glad you enjoyed Jennifer
Confusing some. But you can use this on so many projects. Like on wood or material. Yes she use a frame. But adhered it to the wood itself. Not a piece of paper she can just change the frame. This technique is brilliant. I am a ceramic artist and crafter 37 years. This is brilliant!!!
I love this technique and it has such a cool look when it’s all finished
Wonderful video. I want to try this but I fear my printer will suck the paper right into it and create a paper jam. I have an inexpensive Epson XP-7100 and I don't think it takes much more than computer paper. I have been saving my sticker papers from my business and am dying to do something with them. Nicely done. You're a good teacher. Thanks so much.
Thank you so much for watching. Glad you enjoyed.
WOW! I love this idea. Thank You for teaching us this technique 🙏
Thanks for watching ! Glad you enjoyed Cristina
I think I liked the rake the best. For some reason, I just love old rakes! I always think that there’s got to be something it can be repurposed into, when it’s raking days are over. I’m always looking for items to hang things off of, also, so this fits the bill on two ways! BTW- I also LOVED the white enameled ?pail with the blue trim around the top! I live in northern Michigan, and we have a lot of humidity, which translates into lots of rust🥲. I think it lends a lot of character to items, but not if they’re still being used in their original capacity. Thanks for sharing these really cute and creative ideas!😊
Glad you enjoyed!
Thank you for showing me the way to do an ink jet transfer. That is so awesome!. I have learned so many ways to transfer stuff from you,and love them all!.
So glad you enjoyed the video Bonnie thanks for watching
Muchas gracias por todo su trabajo, una técnica muy interesante, saludos desde España, Sevilla.
What a great idea 💡
Glad you think so!
I love this channel and the ideas. I watch the videos in the spirit of learning something that I can use in other ways. But I can't see this one. I'm trying. You have to put it on white and you need to put a layer of mod podge over it to protect it, so why not just print out the photo on a white sticker sheet and then put mod podge over it. Or just print it on white paper and decoupage it onto the surface. I KNOW I must be missing something here. Anyone, please help me so I can see. Anyhoo....thank you for another great video. I love them all that I watch. You seem like such a sweet person, I enjoy hanging out with you playing on my computer.
Merci beaucoup pour le partage on attend toujours vos publications de qualité 🤗😘
YOU are a Genius ! TY sooo much!
Thanks for watching Becky. Glad you enjoyed.
Top easy to follow tutorial, ...so much to do now this year and now a lot more...thank you.
You're very welcome!
Best image transfer video Ive seen
Thanks so much. Glad you enjoyed.
This blew my mind! Great work!!!!!!
Thanks for watching ! Glad you enjoyed MIchelle
Absolutely brilliant and the best that I've seen so far!
Glad to help out ! Thanks for watching
Thank you so much for showing me this technique it's awesome.
You are so welcome!
That's awesome now i can do my photos thank you and god bless..
Yep will work perfect!! Thanks for watching Ana
Omg! Genius! Can’t wait to try!
Thanks for watching Deb
Plastic coated, freezer paper also works. Just have to cut it to the size one wants.
You can also use the shiny side of a printer transparency paper. Or stencil making plastic.
Yes you can
What's the advantage over just putting the original photograph in the frame?
Roberta Laidman, good evening how are you doing, how's the pandemic situation over there?
This is one of the best ideas . Thank you.
Awesome technique. I will definitely try this. Thank you🙏
Thanks for watching glad you
Thank you thank you! I’m definitely going to use this technique ❤
You're so welcome!
I don't know if anyone told you this but freezer paper is the same as that shiny backed paper from your labels. Lots of tutorials out there about using it.
Wow! That’s great, thanks for that tutorial I only have an ink jet printer so am anxious to try this out.
Thanks for watching Fay!
Wow! This is just what im looking for. I love it. Thanks a lot. And i'm running to print my woods.
WOW, Has to be the method I've seen, Excellent ! Awesome Thanks for sharing !
It works fantastic!! Thanks for watching!
for me the easist way is water slide decal paper either clear for light colord bacgrounds or white for dark colord backgrounds scence we cant print white sometimes i mirror the image on clear and with a dip pen and white ink fill in were the the white would be seal it and wait till it dries and then dip in warm water and slide it onto the surface paper side facing up.
Thanks for sharing all of your great ideas. I may have to try this one.
Thanks for watching Kay
Creative technique !!
Thanks for watching ! Glad you enjoyed
Gostei da ideia de usar impressora com jato de tinta. Será que vou acertar esse trabalho? Ficou lindo o quadro!
Quero saber se pode fazer o transfer em tecido.
How to PRINT on your own FABRIC / EASY DIY PROJECT
ruclips.net/video/okMcwgS8FiE/видео.html
Wow! This is awesome. can't wait to try ... Cheers
Have fun! Thanks for watching
Love the gift tag idea!
So cute eh? Thanks!
I'm experimenting with freezer paper...will keep you posted.
Yes! Let me know how you make out.....
It is a beautiful photo and an very interesting technique. However, in this tutorial you adhered it to a plain white background…so I’m curious as to why you wouldn’t just print your photo on printer paper??
Thank you for this info. I have been trying to find out the material used to make transfer papers for a bit. : )
I am excited to try this technique, thank you for sharing!
Thanks for watching ! Glad you enjoyed Brenda
Going to get some fresh mod podge tomorrow! Thanks!!
Yah!! have fun
@@OurUpcycledLife it is drying now!
Amazing- thanks I can’t afford a laser printer either - can’t wait to try this ..
Hope you enjoy it! Thanks for watching ! Glad you enjoyed Lorraine
Great technique! Thanks!!
Thanks for watching!
This just proves that there can be a workaround when someone says there is no way it can be done!
Thanks for watching ! Glad you enjoyed
Brilliant video thank u 👀❤️👍👍👍👍👍👍👍👍👍👍👍👍👍👍👍👍👍👍👍👍👍👍👍👍👍👍👍👍👍👍👍👍👍👍👍👍👍👍👍👍👍👍👍👍👍👍👍👍👍👍👍👍👍👍👍👍👍👍👍👍👍👍👍👍👍👍👍
That was AWESOME....I LIKE!!!
Glad you enjoyed it
You are very creative. Thank you for sharing.
Thanks for watching ! Glad you enjoyed
Great ideas and suggestions, thanks!
Thanks for sharing..that technique amazing..i will try.
Have fun! Thanks for watching ! Glad you enjoyed
Could you put it on a stretched canvas to look alittle like a painting?
Yes, you could. Thanks for watching.
Interesting idea... and great video ... but I think I'm missing the point here - why not just print out the image on normal paper and glue it to the wood, then protect it with mod podge?
I thank you for your awesome technique. 🤗😙😙❤
Thanks for watching ! Glad you enjoyed
So many useful tips! Thank You!
Glad you enjoyed 🌸
Thank you! What great information.
Genius! Thank you
Thanks for watching
Great video. Easy to follow steps.
Glad you enjoyed Lisa
Awesome! Thanks
Thanks for watching Sandy glad you enjoyed
How do you think up these things?? Absolutely amazing.
Alot is just trail and error!! When I find something that works great I share. :) Thanks for watching
Oops, I misunderstood....this IS the method for inkjet printers...yippee!!!
Yes this is for Ink Jets :) not washable though
You are my favorite.
Thanks so much ❤️
Wow great idea. I wonder if you could put the mod midge on shiny side of freezer paper. May have to experiment. Thank you for this tutorial.
I have not tried freezer paper but worth a try! Thanks for watching Barbara
wow! Amazing technique!
Thanks for watching ! Glad you enjoyed Vivian
Totally Works!❤️❤️👍👍
Yes it does!
This is by far the best technique I've seen for an inkjet photo transfer. I wish I would have found your channel sooner. Thank you for this! 🤍
So glad it was helpful thanks for watching the video I appreciate your support
That's so cool.
Thanks for watching. Glad you enjoyed.
This is so far the best of the best of the best idea …. I love it!… Already prepared 2 sheets to dry soon I will print and transfer. I will update you ;-)
Hope it worked well for you!
That is so awesome! Thanks a bunch!
thanks for watching!
How clever and helpful! Thanks!
Glad this video was helpful! Thanks for watching Lora
Love the idea, thank you!!!
Awesome. Gotta try it
Thanks for watching!
Wow! That was amazing! Thank you so much for sharing.
Glad you enjoyed it! Thanks for watching
Another way is to take freezer paper or parchment and tissue paper, cut both to the size of your copy paper. Then the tissue onto the shiny side of the freezer paper, this adheres the tissue. Then place into your copier and you have your print on the tissue and carefully pull off. You can even use the freezer paper more than once.
I have never had luck with freezer paper. I need to give it a try again
Yes, but you still have ink jet print run off, the ink is not sealed on the tissue paper
I just found your tutorials, I love them. Can this method be used with a laser printer? They use hot to print. I love the idea of no rubbing....I don't have an inkjet printer anymore... Have a great weekend.
This method will only work with a ink jet printer. Thanks for watching ! Glad you enjoyed Carole
@@OurUpcycledLife Thank you for answering my question. Have a great week,
Thank you very much 🍀
Thanks for watching!
So excited to try this! I had some labels on hand, but when I try to paint mod podge on the slick side, it wont cover. It looks like swiss cheese. I'l let it dry and try to add another layer, but I dont think I'll get enough coverage.
Yes you need to let the first coat dry really well then add the second coat. If still not covered well enough you might need to add a third coat. Thanks for watching Suzie
This is happening to me too. I don’t know why it is separating and looks like Swiss Cheese. It is taking forever to dry. Most times it dries very quickly!!
Thanks so much 🙏🏽
Thanks so much glad you enjoyed
This is amazing!