Upgrading the Z-Axis Linear rails on my Homemade CNC Router

HTML-код
- Опубликовано: 21 сен 2024
- In this video I show you how much deflection existed in my original linear rails, how to replace them with much stiffer rails and then measure the new deflection. I should have spent the extra $20 when building the CNC orginally on these rails, so learn from my mistakes.
Support DIY Builds on Patreon:
/ diybuilds
Buy a T-shirt to support the channel:
teespring.com/...
Visit my website for free plans and see viewer builds:
diybuilds.ca
Follow me on Instagram:
/ diybuilds
Follow me on Facebook:
/ diybuilds
#DIY
#Woodworking
#CNC


I like the glue idea to transfer the screw locations
I can't for the life of me understand why any one would give you a thumbs down. I think your work is brilliant. Your tutorials are some of the best on RUclips. Best Wishes, Barry.
talentless people love to thumbs down people with talent. It's the jealousy vote.
He was hanging upside down while assembling it when he watched this video.
Im a steel man but you have convinced me to build my 3rd router in plywood. I sold my previous CNC machines as they were too big.
In watching this video I was hoping you were going to swap out the Vee bearings as I think this is where you were getting a lot of movement. I built my first machine with Vee bearings too. What I noticed was the guide rail started to change its shape where the bearings travelled over. It was especially bad because it didnt do it evenly across the rail, and was worse in areas where I routed more. This eventually created slop. I think Vee bearings are OK for entry level, but not for any long term use.
Thanks for your video, Im quite convinced that plywood will do an exceptional job, but will use supported linear rails all round.
BTW your next project needs to be a plywood rotary axis, and if you're up to it, a plywood chuck for it as well.
You're a good man. Thanks for your videos.
I built your cnc router about a year ago. I used those rails when I built mine. I've been very happy with them. The only other things I did different was better quality stepper drivers, those made a huge difference in the house of the stepper motors. (I also did a spindle with 3/4 collet). Thanks!
have you tried aluminum in teh CNC? im curious to know how this holds up.
I used your videos and made my CNC very similar to yours. After using it once I ordered the upgraded Z axis rails like you did.
Absolutely Fantastic Video. Great job filming and Narrating. I'm building one for aluminum only using solid 1.0 aluminum plate for the body, and I'm impressed by your ability to successfully complete this router. Great Job !!
I am currently working on a low cost cnc project, same size as yours, with a wooden structure, and same philosophy, and I am bluffed by what you achieved!
The use of din rails is bluffing. lt gives the impression that such a small piece of metal should deflect and vibrate, but if you say that it works, I do believe you . I will try the same on my own cnc.
If I could give some comments, I would add that strenghtening the legs of the gantry (with some pieces of plywood similar to what you have done on the Z plate), might help on global stiffness. Similarly, It might make sens to change the way the router is secured, with some aluminium handles.
Anyway, thank you so much for what you have done, and the way you shared everything to the public. This is really helpfull!
I remember mentioning this in your previous videos and getting attacked by several people.. oh well, congrats on the upgrade!
Thank you. Nice to see improvement on the hot glue gun. the old one was really tiny. :)
Great stuff dude. Lesson learnt : Never use unsupported guides. Use MGN, SBR fully supported rails. CNC router is not a 3D printer.
Thanks for posting the video. I ended up building a smaller CNC based on your design, shrinking the dimensions by 25% or so. I had already installed the rigid rails, just ‘cause. I use an Arduino Uno wired directly to the stepper controllers and use Estlcam for milling. I could use GRBL instead if needed. This combination works very well. Dust collection is similar to the Suck It product. Cheers.
I'd love to see and pic and post it on my website for other to see if your ok with that.
That is a very big improvement, thanks for sharing this
Great job on the build! Spectacular job on the video!!! After watching your upgrade video i believe you can get a better tolerance than + - 0.002" if you did the same upgrade to the X axis. To test set your dial indicator for side to side on the z axis base plate and try to rotate z axis base plate. There may be another fix that is free... loosen the lower z axis bearing bolts one at a time and clamp between upper and lower bearings and tighten the lower bearing bolts while clamped. It really comes down to how much it deflects during operation and can you live with + - 0.002".
Hi from Sydney, Australia.
I noticed an easy improvement for your Z Axis that will further reduce your front back movement when Z is at its lowest point.
You added the 2 ribs however Z at mid height looks like the spindle motor backing board is still on the lower linear rail mount,and supported by the ribs, but as you go lower you are only supported by what looks like 1 sheet of ply as you have cleared the ribs.
extend those ribs the full length of the board if you can and maybe add 2 more to the front.
you should look at moving the linear rails to the motor side of the board and the bearings to the gantry side.
The rails will be a stronger support or spine for your spindle mount board.
Nice Build, I find it fascinating to see woodworkers build most everything from wood for their shop.
the small movements that remain could be due to the way the router is secured
Have you considered a water cooled spindle? I love your work here. it is fantastic. I know the water cooling is expensive but $300 is cheap when you consider the air cooled system cost for replacement. Great job
ya when I saw you build this thing with that crappy sub 12mm linear rod I died inside glad your upgrading it.
Thanks for the post. Lovin' the upgrade. Go Jets! Go Bombers!
Appreciate you taking the time to share how much does a CNC cost to build and what software do you use for the CAD and the CAM
I like to see objective analysis. Using a scale to pull on the bit would be even better but this seemed to work well. Nice upgrade.
Now that you have started measuring deflections, it would be interesting to understand where the next best change might come from.
Nice work.
Stay tuned for the next video ;)
@@DIYBuilds Excellent. I think you could really start something in the DIY CNC community by driving the most accurate wooden cnc using objective testing. Thanks for sharing.
I realise nearly two years have passed, but it would be interesting to use the dial indicator to check for slop at various points in the machine... for example:
(1) Longitudinal at the base of the gantry side-plates.
(2) Lateral at the top of the gantry side-plates.
(3) Longitudinal at the centre of the gantry.
(4) Both directions on the "Z" axis plate.
(5) Both directions at the cutter tip, which is what you did here.
The results would have more meaning if the load was always the same; use string pulley and weight maybe?
My thinking is that this would pinpoint the worst areas. I have suspicions about the rigidity of the V-groove bearings in the axial direction, for instance.
Thanks again for the videos, I am working my way through them all again. I subscribed long ago... sadly, RUclips does not let me "Like" them a second time. :o)
If money were less of an option i would use proper liear rails since i know the v bearings are the cause of90% of the inaccuracies.
@@DIYBuilds : Ain't that the truth for all of us! RUclips is a great place to figure out where you fit in the Grand Scheme of things. Chasing microns and smaller like Dan Gelbart, Piotr Fox Wysocki, or Marco Reps is inspiring - BUT - for most of us, what you have created is more realistic and practical... if I could achieve as much I would be happiness filled! You have a very satisfying and useful tool. Combine well thought out videos, clear explanation of your thought processes, and there aren't many excuses for not giving it a try!
Now if I just finish the bathroom, and the lathe refurbishment... SOUNDS LIKE THE LYRICS OF MY NEXT HIT - "THE PROCRASTINATOR'S LAMENT"! :o)
i wonder how much of the final deflection numbers is the result of the HF router assembly, it would be interesting to see the updated numbers based on the newer router you have in place now to see if the deflection has changed. Good stuff.
Just a question: you measured to the thousandth of an inch, but wood might deform, esp. with humidity / temp changes. Maybe that's a comment for those who try this in less ideal environments?
I have a question:
It seems that the most deflection at your tool piece you measured was when the router was lowered down to the work surface, this from a height of what appears to be 8 to 10 inches of vertical travel from the gantry above.... Do you work on routed pieces that require that much depth of travel? As a casual observer, it seems to me that if your overhead gantry was lower to the work surface you would have less vertical travel and hence less displacement +/- when your motor was in a static position. I have watched and learned much as a good grass hopper, sensei!
Most things are cutout and require full depth passes. The gantry is that height to accommodate taller work pieces should the need arise.
@@DIYBuilds How High (can grasshopper jump)? Would it do for a piece 30 cm high?
I was really surprised that the original rails were that bad.I wonder how much the flat "drawer slide" type would improve it?
That pimpi'n z-axis :) Nice video and upgrade 👍
good job I wish you were my neighbor I could use some help!
Great Job !!! pragmatic build that works !!! I like it
I am looking at building something similar inspired by your build
May I ask ...
What repeatability and accuracy are you achieving overall
If you had to build it again, what would you change or do differently ?
Would you build it again or buy something ready made / kit.
Keep the great videos flowing !!
Thanks
Great video - Have you checked for play (movement) with the gantry that could be causing some of the play at the router bit? You may need to stiffen the gantry a little better?
Its possible but the z axis rail upgrade alone made a huge difference.
I noticed that you didn't show making any adjustments to the setscrews on the linear bearings. Each of the bearings has two setscrews that adjust how tightly the bearings grip the rail. I purchased cheap ones from China and found that they all required this adjustment.
Thanks for the tip. Didn't realize that. I will for sure do that.
Hello sir,great builds
I wish to know what is that dial shaped instrument used to check the Levelling?please tell
5 thou of play is a shit load.... with chatter you could easily see a 10 thou run out even with these upgrades. have you tried CNCing aluminum in this guy? if you built the router mount from steel instead of wood it could be much more compact and have less play i would think? is that router a 1/2" shank or 1/4? im looking to build a CNC that can do 3/8 or so aluminum as well as 3/4 wood. im curious to know what you think about beefing this up to be able to do that?
Thanks for sharing your continued improvements. I love seeing that you're not content with what it is when you can make it better. Was there something you noticed, some impact that the deflection was having that made you want to do this upgrade?
I guess the takeaway from this for anyone looking to do something similar is go big or go home. :)
Yes it was effecting inlay work
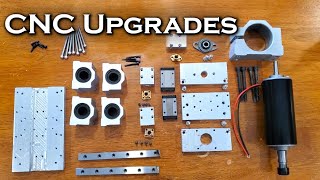
Getting ready to build this set up. Do you have a part number for the upgraded rails? might as well do them one time.
www.amazon.ca/gp/aw/d/B078JY2C2Z/ref=ya_aw_oh_bia_dp?ie=UTF8&psc=1
11:09 awesome machine. you only touch finger and it wobble xD atleast cutting forces are more less right?
Hey! Great work! Any chance you can update the hardware list on your website with the details on the new linear bearings?
Awesome build! I'm working on a design for a new workbench. It occurs to me that I can use you design as a base. If the torsion box is 5x10 feet can the program still work? Would there be a problem with the wiring? If I made the gantry super-stiff, and able to be locked down it could serve a ton of purposes. I could inbed my table saw and router in the table, and have removable fences on either side of the gantry. Then, the computer would move the fence/gantry back and forth , then I would lock it down in the desired position. Does the program have the ability to move in X only from. Multiple start points? Or, is there a release so I can move the ganrty in X freely? I could also have an additional Z rail set up on the other side with no Y with a drum sander. Lay the wood to be sanded on the table, and the gantry travels to sand.
For thes non-CNC operations the gantry would XYZ would be locked down as appropriate.
Or, am I insane?
Great work but will it really make a difference when I build my cnc via the original design already ordered my stepper motors and rails?
Этот люфт приходит с оси Y На таких пролетах на дереве люфт не устраним. В любом случае молодец))
A lot of that is prob coming from the rails the z axis is attached to. That’s a long distance for wood to support
It looks like your not pushing as hard on the final test, I would think most of the slop would come from those roller skate tracks on the x. I'm doing a similar redo on mine I'm using square linear this time.
Not sure what you mean by "roller skate tracks"?
@@PiefacePete46 Those V bearings on the gantry they can't be as good as the ones you put on the Z can they?
What gauge wire do you use for your steppers and how many amps are the steppers. ?
As the linear rails you were using previously hand more slack in one direction that the other, it would've been better to rotate one of the rails on the axes 90 degrees to eliminate the slack.
That's not how deflection works
8:01- Dammit!
Yup
Do you think the x & y rails are the remaining 0.002-4"? That would be my guess but it's hard to tell while watching from my phone lol
Im sure it's a combination of everything. That, being made of wood, the router clamps, the bit deflecting in the router. I don't think it will ever get better than what it is.
@@DIYBuilds yeah that's true.. I ordered all the stuff to start making my own and it is slowly starting to show up.. I've watched a lot of your videos, but can't recall if you have any of your cnc milling aluminum. Have you tried it and was it a success? I haven't settled on a design yet, but would like the capability of milling aluminum.
Thanks for the reply!
Havnt tried and don't plan on it. It would probably work though.
@@DIYBuilds hey I'm just curious.. do you use a parallel port or usb to run mach 3? If you are using usb, are you using a separate board or the uc100 connector.
Thanks!
Parallel
I am looking into building your DIY CNC, did you update your plans to include this upgrade? If not how should I proceed in doing this upgrade right away when initially building it? Also, have you done any other significant upgrades to this build other than the Z-axis that would be better to initially do while building it?
I havnt updated. The a axis and belt tensioners are upgrades I would do.
Does the Excel sheet on your site include the parts for this upgrade? Great work, very talented in all aspects of these videos/projects.
Sorry - found the link below.
Were you having problems with the old setup? I’m not done building my machine but I’m already thinking about improvements.
My router being screwed up was 90% of the issue. The new rails added to the fix. Did you watch my belt tensioner video?
Yeah, I looked at those little puny z axis unsupported guide rods and wondered, What the heck is this guy doing?
What were they 10mm? I know they were way too skinny for their length....
FYI - best way to remove hot glue? Spray isopropyl alcohol on it - even just underneath the bearing ;)
Yes but i don't have that.
@@DIYBuilds it's just rubbing alcohol at any pharmacy
Doesn't mean I have any on hand.
as you have made these upgrades, has the original cut sheet been upgraded as well to match? getting close to wanting to attempt to build the cnc, but I would like to only have to do it once.. lol..
Dimensions don't change from the rails being changed out.
I wonder how this compares to a commercially made hobby level CNC for deflection? Has this been measured on a Shapeoko or similar to your knowledge?
No idea. But I would venture a guess that Any thing made of metal would be better.
@@DIYBuilds Thanks for the quick reply! A brief look on google seems to point to about .001 deflection at the bit but poorly defined how that was measured. From that standpoint yours comes in pretty good I would say.
Фанера какой толщины использовалась в станке?
woodworking cnc no need be accurate more this is super good. if make pcb board then need little more accurate. woodwork no need accurate better machine this is wery good wood parts making. because woodworker not know and need inch smallest dimensions,
Did you update the design drawings to reflect the improvements you have made?
No
Does the material list on your website reflect this upgrade?
Thanks!
No
I need to buy de composant of machine cnc . Can you send me pleez
worst spindle have if use router motor, super loud noise, but buy real good 500W ER16 spindle cost less 100$ DC motor spindle. or 1KW spindle cost less 200$
Хорошо лайк👍
Is your plan kit updated with the upgrades?
No
Did you update the plans to reflect this change?
No
Will you?
Never mind (again). Sorry
do you have an entire z axis kit link?
No
if need better build aluminium sheet all linear rail base, aluminium can do all same than wood,same tools, easy make. but little more strong frame. you X and Y rails have worst need lot strongest, maybe SBR 20 rails.and beam all material aluminium.3/8 alumin about 20mm. alumin sheet Z axis i build cost less than 40$ 2 pcs 400x200x20mm aluminium. and X beam 1500x300x20 2 pcs 60$ and can cut and drill same than wood. linear rails SBR 25 and ball screws 20x1500 2 axis and 400 Z axis all kit ebay cost 340$ whit shipping. wery cheap but good. motors need be 3-8Nm 4-6A nema 23-34 good drivers DM 860 80V 6A and power supply near driver max, about 75V then have perfect.drivers cost about 50-70$/motor.
3:09 look at that 12mm linear or something sure it flex more in middle. axis is okay lol. good linear :p nothing will stop do 2 x and 2 z axis too. and router will sandwich between.nobody done that. hey wait im only genious this world.and can later ad easy b axis HA.my cnc can drill 45degree holes
Lots of hand only shots, a dial indicator" Thanks for watching" Sounds fami....
Ohh no the illumatony got to you, that means I'm ne......
you have a link to the new rails?
www.amazon.ca/gp/aw/d/B078JY2C2Z?psc=1&ref=ppx_pop_mob_b_pd_title
what is thou ?
Short form for "thousandths of an inch"
I'm Indian
no no no no no bad bad bad !!!! NEVER USE LEAD SCREWS ON CNC MACHINES NEVER I do admit z isnt too bad but its better to be safe than sorry.
Awesome build! I'm working on a design for a new workbench. It occurs to me that I can use your design as a base. If the torsion box is 5x10 feet can the program still work? Would there be a problem with the wiring? If I made the gantry super-stiff, and able to be locked down it could serve a ton of purposes. I could inbed my table saw and router in the table, and have removable fences on either side of the gantry. Then, the computer would move the fence/gantry back and forth , then I would lock it down in the desired position. Does the program have the ability to move in X only from. Multiple start points? Or, is there a release so I can move the gantry in X freely? I could also have an additional Z rail set up on the other side with no Y with a drum sander. Lay the wood to be sanded on the table, and the gantry travels to sand.
For thes non-CNC operations the gantry would XYZ would be locked down as appropriate.
Or, am I insane?