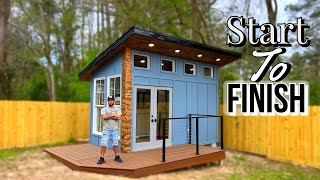
How I Built A DIY Tiny Home Camper From Start To Finish

HTML-код
- Опубликовано: 12 май 2024
- Try Better Help today:
Get 10% off your first month of therapy with our sponsor BetterHelp: betterhelp.com/buildersblueprint
After 4 weeks of work, the micro camper is now finished and is for sale. If you're interested in purchase the camper, please email us at beerrunbus@gmail.com Thank you for supporting the channel.
Interested in the products we used? Check out our Amazon Storefront:
www.amazon.com/shop/influence...
Purchase detailed DIY build plans here:
www.etsy.com/listing/17303016...
Get your Litime products here:
Unlock exclusive savings on the LiTime Official Website! Explore our Campaign Discounts, Newcomer Deals, Military Benefits, Member Rewards, and more.
Get a 6% discount site-wide using the code BeerRunBus.
Shop now for the LiTime 12V 200Ah lithium battery: bit.ly/3UYtIs2
Visit our official website
Flooret Luxury Vinyl Flooring:
We Installed Nakan Signature Color
get.aspr.app/SHIho
Use code "BEERRUNBUSFLOORET" for 50% off your floor sample kit.
Follow us on TikTok and IG:
beerrunbus.wixsite.com/websit...


Good build! I'm glad you welded that frame up. You'll never regret it. Great little squaredrop. Thanks for sharing.
Welding the frame definitely gives me piece of mind. Thanks for watching
It was a lot of fun to watch! I love how you explain the process and show them in detail 😊
Thank you I’m glad you enjoyed the film ❤️
That drone shot though. Thing came out amazing man!
Thanks bro 🙌
Noticed a really common mistake when venting your battery box at 18:45-ish. You don't want your intake sitting directly across from your outtake at the same height. This causes dead areas in the airflow. Instead, you want one high and one low. You also only need one fan unless you're specifically trying to create positive pressure inside the box.
That's correct it's very unlikely for people to make mistakes like this he did not think much about the placement of his intakes and outtakes
One fan pulls air in and the other pushes air out. They work really well the outtake of the inverter is near the outtake fan.
@@buildersblueprint Yes, I understand. :-) But fans blow in cones. So by having one blowing in at the same height as one blowing out, you've overlapped the cones and made a cylinder of air running from the intake to the outtake. The air blowing in will blow right out and leave eddies of hot air in all of the corners (especially at the bottom since you've put the holes at the top). Whereas if you had one low and one high, there wouldn't be overlap in the cones, meaning they're working together to mix all the air. But really two fans are unnecessary (though you still want the two holes). Since no two fans ever blow at exactly the same speed, you're either creating positive or negative pressure in the box (depending on which one is slower). Positive pressure would be great in a box containing a propane tank, but otherwise it's just kind of inefficient (it's not bad, per se, just a minor waste of pennies and electricity). Overall, you really want your intake to be low (where the coolest air is) and your outtake to be high (where the hottest air is). Any time you build an air system with two holes, you're creating a river of air between them; if they're at the same height, they really only cool objects in line with them. By varying the height, you create a diagonal which is a longer straight line, meaning it can cover more components. :-)
Amazing build and video quality as always. Your electrical system is off the charts and definitely high quality / high cost. I'd be curious to see a breakdown.
I'm not even through the video writing this comment, but Ryobi is a good brand. Great video so far, though. And some great editing and video work!
Excelente trabajo 👍
Brilliant craftsmanship and excellent result.👍
Thank you send me your address. I’m going to ship you a free hat.
Beeerunbus@gmail.com
I identity with not being able to quit building stuff. In the 90's I started re-doing vintage campers, refurbing trailers from parts, then discovered harbor freight. Motorcycle trailers, campers, gypsy wagons..... . Now im working on etrikes and camper!
Amazing product !! Great collaborative work with everyone involved
I'm seriously impressed! Your creativity and technical skills are off the charts! This isn't just a camper, it's a masterpiece! 🔨
Wow, thank you! 😊
SWEET TRAILER !❤! Worth it!! Work of Love, And Craftmanship. 🥰🥰🥰
Thanks I’m glad you enjoyed the film 🤙
This is an awesome camper ! Such a cool design😍
Thanks so much ❤️
This is awsome bro Camper of the year🤩
Thanks homie 🙌
Awesome!! We need some mush!! shirts or hats!
I love this design, it’s awesome. I absolutely love your videos.
Thank you Nathan. Email your address im going to send you a free hat and sticker. ✌️
I'd like to see a bigger back hatch for rain coverage and I'm curious how that thin plastic bottom will hold up against rocks and dirt.
That corrugated plastic is pretty.
With the foam and insulation in there, it feels like it’s as hard as a rock.
Clean little rig. Seen it posted on marketplace and will definitely make someone a nice sleeper!
Such a great build!! Keep up the videos!
Thanks Freddy. Email your address I’m going to send you a free hat.
Beerrunbus@gmail.com ✌️
You did a great job building this camper! Great video!
Thank you for watching i’m glad you enjoyed it 😊
Awesome job. Really enjoyed this build. Thanks for sharing
Thank you I’m glad you enjoyed the film. New video coming out this Saturday. 🙌
I’ve seen so many campers like this and I would LOVE to get a pod camper and make it high tech but I don’t have money right now so it’s gonna have to wait
Another great build! cant wait for the next one!
Thanks 😊
This is an awesome camper ! Such a cool design !
Thanks for watching 🙌
Well I subscribed because I like the way you doing the videos and the work you're doing keep up the good work
Thanks Homie. I’m glad you enjoyed the film. 🤙
Wow I should have waited before I bought my Rubicon 1200 rk from Coleman, it seems to me that u have a better build quality
Thank you for recognizing this. We try really hard to build these campers to the best of our abilities.
That is a work of art!! Great workmanship ❤
Thank you very much!
Beautiful work!! I love every step!! Just Amazing!! ❤💪🙏
Thanks 😊
Omg, it's beautiful !
Thanks 😊
I would love to see you renovate an old popup camper. Mad skills bro.
We may do that this summer.
I’m glad you liked the video
Wow! You're good! Quedo muy linda la camper!
Thanks 😊
nice work
By far thee best build 👌🏽
Really appreciate this comment 🙌
This turned out amazing!
Thanks I’m glad you enjoyed the film
Great job as always! 👍
Thanks for watching 😊
toms a real one
Amazing work.... i really want to try and build my own.
Thanks so much ❤️
Really good choice of colors!
Thanks 😊
You are amazing! I wish I had your knowledge and know-how.
Wow, thank you!😊
Beautiful craftsmanship.
Thank you 😊
Love your videos bro keep up the great work..
Thanks. I’m glad you enjoyed it
Way to go Tom!
Tom is the man
Awesome job sir.
Thank you. I’m glad you enjoyed the film
Nice job, very impressive
Glad you enjoyed it 😊
Nice build!
Thanks glad you like it 🙌
Great vid!
Thanks 😊
Awesome build 👍🏼
Thank you I’m glad you enjoyed the film 🤙
Excellent brilliant beautiful 👍👍👍👍😊
Thanks i’m glad you enjoyed the film 😊
WOW! Pro quality and def a pro look
Thanks 😊
Good job.
Thanks 😊
Great build! really like all the different build techniques. 2 quick questions: how much does it weigh?
how much fiberglass/resin was required for this?
Thank you it weighs 1460lbs and we used About a gallon and a half of resin
@@buildersblueprint Thanks! One quick follow up... purchased the plans! nice work... it doesn't mention what weight fiber you used... I've never used fiberglass before... but i understand the weight of the fiber cloth determines how much resin you need... Can you confirm what fiber cloth you used? - Thanks!
Awesome camper
Thanks 😊
That is a lot of electrical power you have great
I Enjoy Watching Your Videos
Thanks 😊
정말 대단하네. 이걸 만들다니... great job 👏 from 🇰🇷
Thanks 😊
Nice build! - Stop using silicone for installation of doors/windows etc. Use butyl.
Im off grid and your system is beefier than mine!!! Great setup!!
Thanks we really are trying to make these campers as nice as possible.
I love it! Could there be a set of folding legs for the fridge cover to convert it to a table for a cookstove?
Thank you that’s actually not a bad idea
That was awesome. I would buy it if i could afford to.
Love the way you built the camper but I think on your next bill you should put the entry of the battery box facing inside to prevent theft
I dig it
🤙
Free hat!
Very nice...
Thanks 😊
You do the crap out of a lot of things lol.
Awesome build!
Love it thanks ❤️
Bro I need to get out this shelter so I can build this as well...when my disability gets approved I'm starting a shop to do what u do and give to homeless people in your honor! Also a TV inside??! So I could bring my PS4 and wifi box and play call of duty and car mechanic simulator on the fly?! Bro what?! I want it now
That sounds awesome, bro
And yes, you can absolutely bring your PlayStation inside of here
@buildersblueprint if u were giving it away and I won of course I'd do that can u make a bike camper like this?
You might find a maker space in your area so that you can build your shelters for homeless people. All the tools in a maker space would be available for your use. Plus plenty of people around who can help you with ideas and designs.
@@aerobiotic good idea...I'll have to look around
Excellent build!, but I would recommend if you are building these for sale to use Butyl tape and any roofing penetrations with self leveling RV cement/ lap sealant.
Thanks for the info. The stuff we use is called levelx and have had no issues with it for years. I’ll try butyl tape next time. ✌️
I'm sry.... but, what???? 12k in materials??
I'd say a good portion of that is the electrical system, batteries aren't cheap
Yea what?! I just finished mine with a steel box frame and 360 insulation with even more accessories and mine came in around 2200$
@@danneradcox1808 that's my only guess. And that seems like HUGE over kill for a teardrop IMO
@@SamTaysProductions it's my best guess, I've never looked into this sort of thing so count me as an uneducated opinion lol
I built mine for about 3 grand, and that included buying tools I didn't have. 12 seems a bit over done.
It would be neat to see a camper trailer that you can stand up in, like a truck camper.
The solar system is very impressive. The solar charger is rated for 60amp, which is appropriate for the battery capacity and inverter, but I think you could run closer to 4 times the amount of solar panels than you were able to install, have you considered making a mounting system to mount more panels?
Correct this is because if we want to add more solar in the future, we will not have to change the solar controller
❤❤❤❤❤ omg look at this beauty you built the moat camper i ever seen 🎉 omg how much would sonething like that cost ? could you build more campers and sale them
Thanks 😊
This camper is selling for 14k
A video of the door build would be great
www.etsy.com/listing/1730301633/off-grid-micro-camper-blueprints?ref=listings_manager_grid
What wheels and spindles did you go with?
Looks great but why did you use a 60A 48V MPPT for a single 200W panel? A 12/24V 20A MPPT would have been much cheaper and would have made no difference.
U do build some wonderful things, hope u get what u ask for in price.😎😎😎😎💪💪✌👍👍👍👌
Really appreciate it 😊
I've watching you...very impressive..I'm a new amputate, I've looking for diy videos for these kind of things...any advice...I'm not very crafty but I'm nomadic by nature so maybe someone can understand anxiety and depression is a problem for me also....hope to hear from you or anyone with advice
Call the ryobi joh saw Señor Muchacho!
Don't forget the solar panel
Very good job. How much did all that work cost?
Thanks. We spent just under 12k
Name the jigsaw Loki, its always in the mischief
Wonder if they went back and fixed the covered vent holes for the battery box fans?😅 33:49 Shows the holes covered.
We absolutely did good eye for noticing the vent covers just hadn’t come in yet and we really wanted to get the video posted
I like your camper, nice job. Would you do anything different next time?
Thanks. Next time I’ll make it bigger
that electric is awesome but I really need to know how the camper will be after 500 miles
Good afternoon I hope you're doing well. I was looking for the link on how to make the door. But unfortunately I can't find it. is there any way you could give me the link to the video thank you so much.
The link for the build plans should be linked below.
www.etsy.com/listing/1730301633/off-grid-micro-camper-blueprints?ref=listings_manager_grid
What is the final weight of the camper?
1460lbs
Looks great but storage??
Thanks. There is storage inside and the upper cabinets in the back finally have the netting.
Yes, but does that include a barbecue and outside chairs for when you sit around a fire pit?
Where is the cook top stove?
What is the weight of the micro camper?
1460 lbs
Can build 2 inground pools for 12k if u do it your self, with money left over lol
Link? Name of product model etc.?
www.etsy.com/listing/1730301633/off-grid-micro-camper-blueprints?ref=listings_manager_grid
I wouldnt be comfortable sith the sag in that plastic layer with insulation on the bottom. Maybe it was better to glue it to a sheet of osb first or something
What size tv is that?
28 inch
How much does it weigh?
1460lbs
If u don't mind me asking, how much would this trailer run in price
It is currently for sale for US$14,500
Wow , I'm paying way more than that and the build quality isn't the best for what I'm paying I wish I would have seen these videos before purchasing I would have definitely been a customer of URS
Did you build this from plans- or just trial and error to get to this point?
We designed it ourselves and also sell plans on how to make it www.etsy.com/listing/1730301633/off-grid-micro-camper-blueprints?ref=listings_manager_grid
动手能力真强!
His narration is giving nile red
should have protected your wiring so it doesn't rub bare on the metal
You did commit a cardinal sin for electricians, you put electrical wires covered inside insulation.
For LED indicators, LED position lights and LED break lights it should be fine, the wires from the solar panel however could become a problem, the insulation was lighter in the roof tho; if you start using amperage on the covered wires the heat the wires generate will have nowhere to go and it will accumulate until in worst and rare cases a fire breaks out.
There are both plastic and metal tubes/channels for electrical wires that are supposed to be used for this, they leave some space for the wires to release their heat and get rid of it using a natural flow from convection.
Really excellent otherwise.
Good info I was not aware of this. We try to stay up to date with everything we do especially the electrical system. I’ll definitely look into it. Thanks ✌️
12k sheesh
Hah free hat
Email your address to beerrunbus@gmail.com
@@buildersblueprint this build far better than your earlier build, love your videos