Thanks for vid. The bolt of yours failed because of the way slicers don't automatically optimize strength where it is needed. In your slicer, if you add a height range modifier and make the print solid, a few mm above and beneath where the knurling connects to the threaded part, the bolt will be plenty strong while the bulk of the knurled handle remains hollow.
I think if you had a few rubber washers that were big enough for the size of the bolt you could put them between the arms. That should help the grip. I can also see a remix where they put teeth on the part that connects.
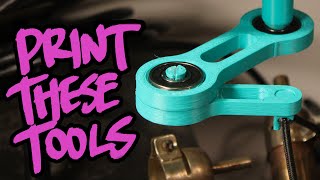
Definately make sure you check out the remixes like www.printables.com/model/921831-better-grip-for-base-2-and-25cm-frame that have better grip. The original ones I printed ended up getting a bit loose for me.
Thanks for design. I have printed 2 arms one which i remixed for my project. Will share photos on your printables once its done. I have a handy idea and will share.
Not my design but I love that I’ve been able to highlight this one for so many extra people to try out. If you see any good models out there that you think needs more attention let me know and I might do a video on them.
Before anyone says, how was it so hard to work out what to print?! I think it was the names of each part wasn't intuitive and I kept having to check what part was what and how many. Dont forget to comment below or DM me on insta to let me know about the prints that you find usefull that havent got the attention or downloads that you think they deserve. I'll see if it fits a new series I'll be starting soon uncovering little known but super usefull prints.
it looks simple and gets the job done. I might add some rubber disks between the parts so bolts would get more friction without tightening too much. Moving soon and just put order out for Bambulab A1 so might print this one to see the quality :) Keep on making videos!
thanks for the support ! yeah I think I’ll try a TPU washer just the right size and see how that goes. I’ll post it in a future video that will revisit a lot of old prints.
I just printed two of them out, one with two short arms (i cut the bolts down to 48mm in the slicer) and one with three 2x short arms. Very sturdy, and same issue with PLA on the compliant phone grip which i probably will print PETG if i need or want another one. Definitely not fun getting just the right angle using the 2D swivels, I'm going to design a ball mount to replace the two 2D swivels needed. Also, feels a little bouncy and might also change the base a little while im at it Printed mine in Elegoo PLA+ 0.2mm layer height @230c on a Volcano nozzle @325mm/s(4K), two shells (both 0.4mm), and 15% Grid infill with layer combination turned on. Limited flow to 26mm3s for best strength on my printer, I cranked on the larger bolts and they held very well without any of the dreaded layer crackling
@@3DPrintSmith I haven't fully tested the strength of infill combination yet, but it feels just as strong. Otherwise it saved almost 3 hours on a 9 hour print job printing these parts. Think it was a 5:45 min print job for all the parts and three short arms.
the original version I printed would struggle with 500g I think. check the remixes though for different arms with bigger teeth that would hold that joint better and I think it would work.


![OhGeesy x Lefty Gunplay - What It Iz [Official Music Video]](http://i.ytimg.com/vi/L0yzW9t2ixk/mqdefault.jpg)


Love this idea for a series, will be watching the back log.
thanks for the comment and support !
Thanks for vid. The bolt of yours failed because of the way slicers don't automatically optimize strength where it is needed. In your slicer, if you add a height range modifier and make the print solid, a few mm above and beneath where the knurling connects to the threaded part, the bolt will be plenty strong while the bulk of the knurled handle remains hollow.
I like that idea. I’ll definitely be giving it a try.
Thank you dear Sir. I didn't even know there was such option. Now in process of printing
I think if you had a few rubber washers that were big enough for the size of the bolt you could put them between the arms. That should help the grip. I can also see a remix where they put teeth on the part that connects.
that’s a great idea. I might try a TPU washer so I can get it the perfect size.
i print right now on my ender 3 pro, thanks for sharing.
Definately make sure you check out the remixes like www.printables.com/model/921831-better-grip-for-base-2-and-25cm-frame that have better grip. The original ones I printed ended up getting a bit loose for me.
Thanks for design. I have printed 2 arms one which i remixed for my project. Will share photos on your printables once its done. I have a handy idea and will share.
Not my design but I love that I’ve been able to highlight this one for so many extra people to try out. If you see any good models out there that you think needs more attention let me know and I might do a video on them.
Before anyone says, how was it so hard to work out what to print?! I think it was the names of each part wasn't intuitive and I kept having to check what part was what and how many.
Dont forget to comment below or DM me on insta to let me know about the prints that you find usefull that havent got the attention or downloads that you think they deserve. I'll see if it fits a new series I'll be starting soon uncovering little known but super usefull prints.
it looks simple and gets the job done. I might add some rubber disks between the parts so bolts would get more friction without tightening too much. Moving soon and just put order out for Bambulab A1 so might print this one to see the quality :) Keep on making videos!
thanks for the support ! yeah I think I’ll try a TPU washer just the right size and see how that goes. I’ll post it in a future video that will revisit a lot of old prints.
almost wanted to make this but showed me some things that would be harder to work for me, thnx!
Glad I could help!
I just printed two of them out, one with two short arms (i cut the bolts down to 48mm in the slicer) and one with three 2x short arms. Very sturdy, and same issue with PLA on the compliant phone grip which i probably will print PETG if i need or want another one. Definitely not fun getting just the right angle using the 2D swivels, I'm going to design a ball mount to replace the two 2D swivels needed. Also, feels a little bouncy and might also change the base a little while im at it
Printed mine in Elegoo PLA+ 0.2mm layer height @230c on a Volcano nozzle @325mm/s(4K), two shells (both 0.4mm), and 15% Grid infill with layer combination turned on. Limited flow to 26mm3s for best strength on my printer, I cranked on the larger bolts and they held very well without any of the dreaded layer crackling
Sounds like you’ve got trying a dialed in really well. I haven’t played with layer combination yet. What situations have you found it most useful?
@@3DPrintSmith I haven't fully tested the strength of infill combination yet, but it feels just as strong. Otherwise it saved almost 3 hours on a 9 hour print job printing these parts. Think it was a 5:45 min print job for all the parts and three short arms.
Sounds like I really need to check that out withy that kind of time saving.
that’s significant time saving! I’ll be testing that in the next week or two for sure.
Hello, this can hold a 500g camera, i need it!!!
the original version I printed would struggle with 500g I think. check the remixes though for different arms with bigger teeth that would hold that joint better and I think it would work.
@@3DPrintSmith ok, thanks