Very very cool. I am venturing into starting a collection of custom designed 3D printers with unconventional kinematics and this is definitely in my list now. Thanks for posting!
@@Walnut3D dude your statement literally says 3d printers with unconventional kinematics. Cartiesan kinematics aren't unconventional. That's you failing at articulation. Not me being a Debby downer. Grow the fuck up
There are some good advantages compared to the normal cross gantry setup: - Less parts=cheaper - Linear rail is fixed at one end = easier to set right angle to cross, also there is flex to compasate for smaller geometrical intolerances. - less space. disadvantages similar to ender 2, prusa mini designs thought.
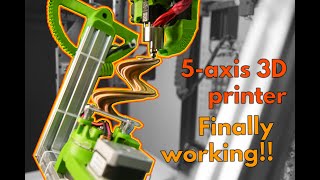
That's pretty cool, essentially a core x,y cross gantry but with half the rails. Not to mention much more compact OD wise eithout sacrificing build volume. And with the Z axis moved to the middle of each rail, you in creased the structure to account for more bend+ setting the linear rails sideways to account for this too. And with the rails side ways, you add pre load to the bearings so they don't wobble side to side. Pretty damn clever. And you're using the arduino stepper motor controller boards? Honestly very well thought out.
It is being measured and compensated by Marlin's UBL. In one specific case, heights measured by G29 P1 were: Front: +0.45 Back: +0.01 Left: +0.63 Right: -0.32 Inductive sensor is used. (see first-layer video, which was unluckily made with a loose print head and got much better later)
Cool, I am a big fas of non moving bed printers but, here are some thoughts: - it requires more rails and motors of a corexy - the axis are visibly bending when the carriage moves out
This printer design is clearly just bad. Corexy is better. It's an interesting thing but not good lol there's probably very few benefits and it's probably just a proof of concept
If there is a loadcell in the extruder, would you be able to compensate for the flex with software? The flex is probably very consistent and with a few data points you should be able to interpolate/extrapolate most of it. Maybe get some machinists gauge blocks or similar so you can check the flex at different Z/heights. Most of the flex is probably in the Z direction, you might not even have to worry about the torsion causing change in X or Y if it is small enough.
Tbh I was expecting a voice over or explanation since the RUclips algorithm picked this out. However this is actually a cartesian design that avoids all the expensive box around it, as with any design there is tradeoffs but this is kind neat and will be interesting to see where it goes!
Compared to a bed slinger with a cantilevered X-axis, this is not really more parts or complexity, with the advantage of a stationary bed and lower moving mass and small footprint.
That's on my agenda. However, not sure if input shaping would help here as vibrations might be totally different at different positions on the board, I assume.
@@CasualCNC I don't see why input shaping wouldn't work. The accelerometer records the resonant frequencies your machine generates and then dampens movements that generate the resonant frequencies of your setup.
The biggest disadvantage so far - Z-axis sacks down on power loss or controller reset. This could be partly mitigated with proper software configuration.
@@CasualCNC Z going down is probably due to the Z axis being belted, you could look at the voron 2.4 which uses a gear reduction on Z to minimize it or at the switchwire which uses a key-bak to minimize sagging too, either way you probably have to level it every time you turn it on
@@7897sebas Thanks for the info! Regarding leveling every time - I've already configured this within printer profile in Orca Slicer, with inductive sensor it is quite fast.
Stiffness is very poor compared to "classical" layouts. I'm wondering myself how the print quality will be at the farthest corner (bottom left) and how fast it may print.
@@CasualCNCI'm no mechanical engineer, but would using slightly longer rail suspended under the xy carriages instead of on the front of them + backers on the floating rails improve stiffness by any significant amount?
It's too bad your question hasn't been answered, I am curious as well. Not to be negative but I am trying to see the advantages and they are eluding me. I think this must be just for fun. When I look at it I just want to move those crossed linear rails all the way to the opposite sides so that gantry can be made of something lighter and be suspended at both ends. Basically turning it into a corexy.
Voltage at the 3 pins for endstops was approx. 5.5 V on my RAMPS 1.6. This was sufficient for a LJ12 A3-4-Z/BX inductive sensor to work, even it is specified at 6-36 V. It may be easily attached to 12 V with a resistor-split as well.
@@hum.ortales1753 This explains it quite nicely for 9V: electropeak.com/learn/interfacing-inductive-proximity-sensor-lj12a3-4-z-3-wire-with-arduino/ You would need to take 10k + 15k resistors for 12 V. Test voltage on output before connecting to RAMPS/Arduino.


My favourite thing is that it sounds like it uses A4988 drivers. So nostalgic :)
crazy looking machine, cursed by design, CNC skills to make it work, great job!! Looks like a chopper/hotrod in 3D printing world!
I like the way you put it!
Please develop it further, this is so cool
Cool test! If any custom PCBs/3DP/CNC'd parts can help for upcoming development? We'd love to support! (PCBWay zoey)
Thank you for this nice offer, I might indeed get back to you!
@@CasualCNC Warmly welcomed! Would love to keep in touch, may I know your contact? You can find mine under this account!
Very very cool. I am venturing into starting a collection of custom designed 3D printers with unconventional kinematics and this is definitely in my list now. Thanks for posting!
That's literally a cartiesan kinematic system there's nothing unconventional about it.
@@lekostomp5787 not what I meant. Thanks Debby downer 💀
@@Walnut3D dude your statement literally says 3d printers with unconventional kinematics. Cartiesan kinematics aren't unconventional. That's you failing at articulation. Not me being a Debby downer. Grow the fuck up
There are some good advantages compared to the normal cross gantry setup:
- Less parts=cheaper
- Linear rail is fixed at one end = easier to set right angle to cross, also there is flex to compasate for smaller geometrical intolerances.
- less space.
disadvantages similar to ender 2, prusa mini designs thought.
This is pretty sweet. Benefits of a boxed cartesian design with a way lower BOM and less overall complexity I think.
That's pretty cool, essentially a core x,y cross gantry but with half the rails. Not to mention much more compact OD wise eithout sacrificing build volume. And with the Z axis moved to the middle of each rail, you in creased the structure to account for more bend+ setting the linear rails sideways to account for this too.
And with the rails side ways, you add pre load to the bearings so they don't wobble side to side.
Pretty damn clever. And you're using the arduino stepper motor controller boards? Honestly very well thought out.
clean build.
Really nice idea! Hope you get this working and would be interested in a kit =)
Awesome, really good work. Best wishes..
Thanks!
Cool project! When you first homed it, it sounds a little bit like the superman theme.
Fascinating design. I am curious how fast you'll be able to get this going, and with what quality/repeatability.
First layer looks pretty acceptable, coming soon!
wont be that fast but looks very fun to watch! We need fun in life
This is pretty neat 👌
I'm in love, respect ❤️
Whats the deflection like on those rails? I'd think its pretty significant but the print looks fine. Did you try to account for it somehow?
It is being measured and compensated by Marlin's UBL. In one specific case, heights measured by G29 P1 were:
Front: +0.45 Back: +0.01
Left: +0.63 Right: -0.32
Inductive sensor is used.
(see first-layer video, which was unluckily made with a loose print head and got much better later)
Cool, I am a big fas of non moving bed printers but, here are some thoughts:
- it requires more rails and motors of a corexy
- the axis are visibly bending when the carriage moves out
This printer design is clearly just bad. Corexy is better. It's an interesting thing but not good lol there's probably very few benefits and it's probably just a proof of concept
@@T1000Rex have you seen the positron v3?
@@IvanGOrtolan Portable but terrible imo
Just one rail could be spared for minimal corexy, same amount of motors.
@@CasualCNC Why this design ? prototype?
Wow great work man I am excited to see how you develop this
Thanks!
If there is a loadcell in the extruder, would you be able to compensate for the flex with software? The flex is probably very consistent and with a few data points you should be able to interpolate/extrapolate most of it. Maybe get some machinists gauge blocks or similar so you can check the flex at different Z/heights.
Most of the flex is probably in the Z direction, you might not even have to worry about the torsion causing change in X or Y if it is small enough.
Using Marlin UBL at the moment for compensation, first layer looks pretty acceptable, video coming soon!
There seems to be a contest in 3d printing to see how more parts can be added to a printer to do the sane job as the more efficient designs.
Tbh I was expecting a voice over or explanation since the RUclips algorithm picked this out.
However this is actually a cartesian design that avoids all the expensive box around it, as with any design there is tradeoffs but this is kind neat and will be interesting to see where it goes!
Compared to a bed slinger with a cantilevered X-axis, this is not really more parts or complexity, with the advantage of a stationary bed and lower moving mass and small footprint.
You should look into switching to klipper for sure
That's on my agenda.
However, not sure if input shaping would help here as vibrations might be totally different at different positions on the board, I assume.
@@CasualCNC true, although i use klipper because it's easier to upload and change firmware
@@CasualCNCI'm very interested in this and would be happy to help anyway I can. Would you be interested in talking some on discord or email ?
@@CasualCNC I don't see why input shaping wouldn't work. The accelerometer records the resonant frequencies your machine generates and then dampens movements that generate the resonant frequencies of your setup.
Cool... But why??
It doesn't seem more efficient in anyway
It has very few parts, assembly is simple and it actually prints better than expected.
Amazing !!
Interesting! Have you found any pros & cons so far?
The biggest disadvantage so far - Z-axis sacks down on power loss or controller reset. This could be partly mitigated with proper software configuration.
@@CasualCNC Z going down is probably due to the Z axis being belted, you could look at the voron 2.4 which uses a gear reduction on Z to minimize it or at the switchwire which uses a key-bak to minimize sagging too, either way you probably have to level it every time you turn it on
@@7897sebas Thanks for the info! Regarding leveling every time - I've already configured this within printer profile in Orca Slicer, with inductive sensor it is quite fast.
That is cool. The footprint is minimal.
this is SICK.. i want lol what is the print area?
Approx. 16x16x16 cm.
what kind of control board are you using? have you considered tmc2209 drivers?
Arduino Mega with RAMPS 1.6 and A4988 drivers.
Drivers already updated to TMC2209, they are way more silent!
Omg I fucking love the design ❤ I wanna make something like this
That’s beautiful
This looks very cool!!! Is there an inherent to a layout like this?
Stiffness is very poor compared to "classical" layouts.
I'm wondering myself how the print quality will be at the farthest corner (bottom left) and how fast it may print.
@@CasualCNCI'm no mechanical engineer, but would using slightly longer rail suspended under the xy carriages instead of on the front of them + backers on the floating rails improve stiffness by any significant amount?
At first, I thought it was playing star wars theme
Bro how did you add auto calibration to it make a video on it
This is just a Marlin with UBL and inductive sensor installed. There are already good videos on that topic available on youtube.
Cool 👍👍 Good job
Time to start your own 3d printer company. You would do well.
Wonder! ✨✨
bro go back and make your weird ahh animations lol tf.
What’s the pros of this design? It is meant only to be cool or there is some pros like precision etc?
It's too bad your question hasn't been answered, I am curious as well. Not to be negative but I am trying to see the advantages and they are eluding me. I think this must be just for fun. When I look at it I just want to move those crossed linear rails all the way to the opposite sides so that gantry can be made of something lighter and be suspended at both ends. Basically turning it into a corexy.
How to add proximal senser to ramps 1.4
Voltage at the 3 pins for endstops was approx. 5.5 V on my RAMPS 1.6. This was sufficient for a LJ12 A3-4-Z/BX inductive sensor to work, even it is specified at 6-36 V. It may be easily attached to 12 V with a resistor-split as well.
@@CasualCNC I don't know how to do wireing with resistor can u make a video onit
@@hum.ortales1753 This explains it quite nicely for 9V:
electropeak.com/learn/interfacing-inductive-proximity-sensor-lj12a3-4-z-3-wire-with-arduino/
You would need to take 10k + 15k resistors for 12 V. Test voltage on output before connecting to RAMPS/Arduino.
love it
Waiting for next development
Coming soon, stay tuned!
This is so cool...
I know this is just an experimental project, but is there any point behind this gantry?
Simplicity was the starting point, curiosity is the main factor now.
What motors and motor drivers are you using?
Arduino Mega with RAMPS 1.6 and A4988 drivers. NEMA 17 1.5A.
In the meantime, drivers updated to TMC2209, they are way more silent!
@@CasualCNC danggg old school. The noises are pretty tho
Cool 👍👍
Core-xy-cantilever ?
That's not a core-xy, but cantilever seems to be the correct term.
I want one!
Excellent
All rails is mgh12, right??
Correct MGN12H
How long of rails x, y axis? Size of bed?? Thanks
Rails are 250 mm on XY, 300 mm on Z. Base bed size is 260x260 mm, printable volume approx 160x160x160 mm at the moment.
Slow? That's not slow. I print at that speed with my Anet A8 😂
I'm used to the speeds of Creality K1C.
Hello. You github??
Cool yes, massively so. Worst of both worlds, big probably.