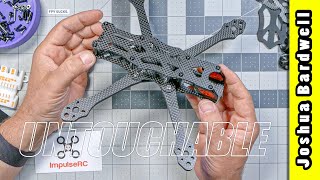
ImpulseRc Apex Evo 5 FPV Drone Build Guide (2023)

HTML-код
- Опубликовано: 1 авг 2024
- This is a detail guide on how to build a ImpulseRC Apex EVO 5. Using the Kiss Ultra V2, Fettec 45amp ESC and the DJI O3. It is a long video, and i broke it down in 3 differentt part.
Building a 5-inch FPV (First Person View) drone is a thrilling and rewarding endeavor that allows enthusiasts to craft a high-performance quadcopter tailored to their preferences. The term "5-inch" refers to the propeller size, a standard choice for FPV racing and freestyle drones due to its balance of agility and efficiency.
00:00- Intro
00:52- Parts Overview
03:20- Kill Ultra & Fettec ESC wiring
06:46- Motors Install
08:20- Motors Wire Guard Install
09:33- Fettec ESC/ FC install
15:20- ESC Prep and Solder
21:32- Motors Wires Prep/Soldering
26:00- Low ESR Cap Mount
29:35- VTX Install/Prep
37:45- Adding RX to FC
39:16- FC Install Mistake/correction
41:15- Connecting FC to VTX
42:16- RX Install
42:45- Soldering VTX to FC
45:00- Pre-check Before Lipe
48:00- First Power UP
Frame: Start with a sturdy frame, which serves as the drone's structural foundation. Choose one that's lightweight yet durable to withstand crashes and impacts.
Motors and Propellers: Select powerful brushless motors and compatible 5-inch propellers to generate thrust and achieve high speeds.
Flight Controller: The flight controller is the drone's brain, responsible for stabilizing and controlling the quadcopter's movements. Popular options include the Betaflight or iFlight flight controllers.
Electronic Speed Controllers (ESCs): ESCs regulate the power supplied to the motors. Match them with your motors for smooth and responsive throttle control.
FPV Camera and Video Transmitter: Install an FPV camera for real-time video feed and a video transmitter to broadcast the signal to your FPV goggles. Consider a high-quality camera with a wide dynamic range for clear visuals.
FPV Goggles or Monitor: Use FPV goggles or a monitor to immerse yourself in the drone's perspective, allowing for precise control and an exhilarating flight experience.
Radio Transmitter and Receiver: A reliable radio transmitter and receiver system is crucial for precise control over your drone.
Battery and Power Distribution: Choose a suitable LiPo battery to provide power to your drone. Ensure you have a reliable power distribution board or harness for safe and efficient power distribution.
Receiver: Select a receiver that's compatible with your radio transmitter system.
Optional Accessories: Depending on your preferences, you can add LED lights, GPS modules, and other accessories to enhance your drone's functionality.
Once you've gathered the necessary components, building the 5-inch FPV drone involves soldering connections, configuring flight controller settings using Betaflight/Kiss Ultra or similar software, and fine-tuning PID (Proportional-Integral-Derivative) values to achieve the desired flight characteristics. Be prepared for some trial and error as you tweak settings and perform test flights to optimize your drone's performance.
Building a 5-inch FPV drone is not only a hands-on learning experience but also offers the satisfaction of creating a customized quadcopter that's perfectly suited to your flying style, whether it's racing through courses or capturing breathtaking aerial footage.  Наука
Наука


bro this video has been so valuable to me, thank you so much, you dont understand how much it helped me build my apex...you are the man, thank you sooooooo much
You are welcome 😊
Nice build ! Shout outs from Canada !
I'm wanting to build my first and have been doing a lot of research. This was an awesome help! Thanks for "not cutting anything out". Great video!
I recently built my V2 with a reaper esc, first time on Kiss and loving it!
Dope build bro
Building my Kiss ultra v2 5 inch this weekend. Can't flippen wait 😂
Let me know how it turned out. I could not get the mini Ultra
Beautiful build Gboni
Thank you kindly
Nice video Gboni. The stack mount is not as it is recommended for the Ultra FC. Might work for you this way though, but if you have any issues on flight characteristics, that’s where to start.
I already got a couple of tips for the V2 setup, but the drone is already flying great. I can't imagine how good it is going to be once I make a couple of changes.
Nice🔥🔥
Thanks 🔥
Wow you like the same props that I like too. Most don't like quad blades. Personally I like the more quiet sound and awesome grip. They are hard on the batteries though.
Nice build Gboni.❤My newest build is also the most expensive.
Demibot 5" Frame
HDZero Goggles
HDZero Micro V2 Camera
VTX = HDZero Freestyle
FC = SpeedyBee F7 V3 (Stack) w/ 50A ESC
GPS = iFlight M8
Batts = GN3 6S 1550mah
Cricket Motors 1750kv
DJI Action 2 Cam
Do you need to undo the 2 wires for the dji rx or can you just disable the uart ?
No, it can be disabled in the GUI.
Lovin the video, sir Gboni. Questions: Where do you have your CUR pin going to on the Fettec esc? The ultra v2 has the CUR pin between TLM and GND but Fettec doesn't support that pin. Fettec has two GND pins but no CUR pin. Thanks for the help Gboni!
You just need to make sure all wires match. KISS Ultra v2 has 2 grounds, I have both connected to the esc. Telemetry wire from esc to the one on the V2.
Great video, thanks 🙏 one question to the community though, I use the DC version and have the speedybee F7 stack, the screws which come with the frame fit perfectly in the hole underneath the frame to be flat but they are to short for the stack. The crews which come with the Speedybee are much longer, even to long but they are not flat and therefore do not fit in the small holes. So what’s your solution? Order different screws which are just long enough and still fit into the hole? Damn I am blocked now :(
@fritzrichter1319 have you found the right size for the stack screws with the Speedybee stack? My parts are on order.
Ended up using 20mm screws - reduced the silicon vibration holders a bit
$650 wow that would be great, nice and cheap! Try $1500 for a quality quad in australia! That does include a fpv camera as well! The o3 alone is $400
That is crazy. Why so expensive?
@@GBoniFPVshipping probably
My wife bought the RTF version of this thinking it was a “beginner” drone. Terrible first time experience trying to get this to work with my goggles. :(
Do you know how to bind the video transmitter to the DJI Goggle 2? No matter how I try I can’t get to the firmware update using the DJI software. I also stripped the screw trying to open the black case looking for a button. I’m at my wits end. :(
Also feel like it would almost be easier to get the goggles working if I built myself because I do it before soldering everything together. Once there’s wires everywhere its impossible to get to buttons on the chip. I have to take all the screws out and I just can’t.
Does the software ( DJI Assistant 2 consumer app ) recognize the VTX once it is plugged into your PC ?
@@GBoniFPV I feel so stupid. I didn’t realize the black box in the rear was an Air Unit O3. There was a similar bundle with Caddx Vista video transmitter and one of the guys from getfpv misidentified it as this. I was trying to open it up because nothing matched the pictures in the manual. Its weird how no specs or instructions came in the package. The only info is online and its easy to misidentify the model because someone else ordered it for you.
Anyways. Thinks! I will probably run into more problems before I get to fly this guy, but I should get there eventually.
Thanks again! Its nice to see the entire construction of this model.
Hey did you need to use current sensor wire?
Yes, I did. As long as you are using a fettec esc, but I'm not sure about Blheli esc
We’re u get them motors from???
FPV cycle.com
240 gbp for a 5inch
I was hoping to see a 5’ drone, not a 5” one 😢
I laughed out loud when i read this. Ahahaha.
LO), I didn't see the typo.
Chris Quad FPV was Here I even subscribed to the channel 👍🧩✅😎🔥😃