Nice work. Looks great As a suggestion you should never add an editPoly modifier above something like a cylinder. It is a non procedural modifier above a procedural modifier. Changing anything below the edit poly that changes the topology will result in the mesh blowing up. The edit poly modifier is also far slower then Collapsing the Object to an Editable Poly object and working from there. CTRL + Double Clicking an edge will select the edge ring.
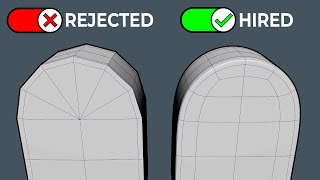
Wonderful, really well done; lot of useful tricks, plenty to learn from here! There was only one thing missing to make a complete good topology: when you grab down the edges, at 2:44, there is one lonely segment (the first and last, on both extremes while you drag). This edge is making the face above have a valence 2 (5 edges). If you get away with it or not will depend on how permissive the software is, in case you import it somewhere else. Still it's easy to fix, just connect the vertices starting from the lonely one, until the very top, where all the triangles converge. It's very curious how a chamfer on a simple hard surface (blocky mesh) can mess things up if you don't do like you did. Really well done!
Instead of repeating something 4 times like with those holes, it's always a good idea to use symmetry modifier twice on 2 axis and work only on quarter of a model.
Hey... great tutorial, but I'm getting stuck at the Bridge part (4.52). Nothing's happening when I hit the Bridge button after Spherify & Edit Poly with the edges selected as in the video at 4.50. Any ideas???
Normally, it works. However, there are a few things you need to make sure are in your mesh. 1. Is every vertex welded? 2. There are no extra edges. You can try this way. convert to editable poly without adding modifiers. Thank you for your valuable idea.


Nice work. Looks great
As a suggestion you should never add an editPoly modifier above something like a cylinder. It is a non procedural modifier above a procedural modifier. Changing anything below the edit poly that changes the topology will result in the mesh blowing up. The edit poly modifier is also far slower then Collapsing the Object to an Editable Poly object and working from there. CTRL + Double Clicking an edge will select the edge ring.
I really appreciate you pointing out my mistake. From now on I will work keep your suggestion in mind. Thank you for sharing your knowledge.
Wonderful, really well done; lot of useful tricks, plenty to learn from here!
There was only one thing missing to make a complete good topology: when you grab down the edges, at 2:44, there is one lonely segment (the first and last, on both extremes while you drag). This edge is making the face above have a valence 2 (5 edges). If you get away with it or not will depend on how permissive the software is, in case you import it somewhere else. Still it's easy to fix, just connect the vertices starting from the lonely one, until the very top, where all the triangles converge.
It's very curious how a chamfer on a simple hard surface (blocky mesh) can mess things up if you don't do like you did. Really well done!
Thank you for your valuable feedback.❤️❤️❤️
Nice work!
4:39
loop edge + spherify changes to circle loop is good idea
Instead of repeating something 4 times like with those holes, it's always a good idea to use symmetry modifier twice on 2 axis and work only on quarter of a model.
I appreciate your comment.❤️❤️❤️
Super
Thank you.❤❤❤
Thanks! A great lesson! Which plugin did you use 5:58? Please tell me the name.
I apologize for the late reply to your comment. It's a 3DS Max Script called "Rapid Tools". It's a free script just search on Google.
very nice video , thankyou for your tricks😃😃😃😃😃
❤❤
Hey... great tutorial, but I'm getting stuck at the Bridge part (4.52). Nothing's happening when I hit the Bridge button after Spherify & Edit Poly with the edges selected as in the video at 4.50.
Any ideas???
Normally, it works. However, there are a few things you need to make sure are in your mesh.
1. Is every vertex welded?
2. There are no extra edges.
You can try this way. convert to editable poly without adding modifiers. Thank you for your valuable idea.
Thanks! u could have done it faster with symmetry and avoid the repetition
Thank you for your valuable feedback.
Thank's
You're welcome.❤❤❤
Thanks😊
❤❤
3ds max purudu wela animation short film wage ewa hadanna puluwanda
ඊළගට එ් ගැන video එකක් . කරනවාද ❤
GOOD LUCK