Unlock Flawless Skin with This Photoshop Trick - In Seconds! 🕒🔓
HTML-код
- Опубликовано: 4 окт 2024
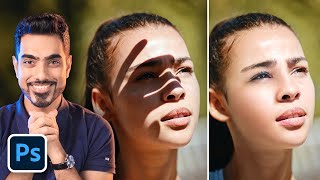
- Download Free: photoshopdesir... Today, let's learn how to apply skin smoothing quickly with Generative Fill. Follow along!
1. Open your image and click the Quick Mask icon (circle in rectangle) at the bottom of the Toolbar.
2. Press 'D' to set the Foreground color to black.
3. Press 'B' to select the Brush tool, using a soft round brush.
4. Gently paint over skin areas; a red overlay indicates where the effect will be applied.
5. Made a mistake? Press 'X' to switch to white and paint over errors.
6. Press 'Q' to exit Quick Mask, converting the red overlay into a selection.
7. If the selection is on the background, invert it by clicking the Invert Selection icon in the Contextual Task Bar.
8. Click on Generative Fill in the Contextual Task Bar, leave prompt area empty, and hit 'Generate'.
9. Review the skin variations, and click to select the one you prefer.
10. In the Layers panel, adjust the Opacity to blend original and new skin for a natural finish.
You've applied skin smoothing with Generative Fill! Remember to like, share, and subscribe for more tips. Stay tuned for our next video, and happy editing!"
►SUBSCRIBE: goo.gl/d31fld
►Become Channel Member: / @psdesireyt
Follow US - LET'S BE FRIENDS!
------------------------------------------
►Official Website: www.photoshopde...
►FACEBOOK : / photoshopdesire
►Twitter : / psdesire
►Instagram: / photoshopdesire
#photoshop #photoshopai #photoshoptipsandtricks
Photoshop Skin Smoothing Tutorial.
Quick Skin Smoothing Trick.
Generative Fill Photoshop Guide.
Silky Smooth Skin Editing.
Instant Skin Beautification Hack.
Perfect Skin Texture Photoshop.
Photoshop Blemish Removal Tips.
Skin Retouching Photoshop Guide.
How to Make Your Skin Glow in Photoshop.


Lost the freckles in your portrait while editing? Don't worry, it's easy to bring them back! In the Blending Options window, look for the "Blend If" section. Adjust the white slider under "Current Layer" to the left, slowly revealing the freckles that are typically lighter than the surrounding skin.
Thanks for the tip.
Good process but I would never remove freckles
Thanks for your beautiful sharing, but when I apply it, the skin deteriorates and turns into another face, what is the reason for this?
Thanks. Great as usual. Great man. well explained and clear.
Skin was already flawless
in basic version of generative fill this type of work can be done or not
Thanks for the tip, but it's even faster if you just use the lasso tool and then go to generative fill. That saves you the brush masking 😊
Great tip!
My gen flll turns my subject into a strange person rather tha smoothing my original subject's skin.
@@jeffreybowen1851 Then you're probably taking too much into the selection.
Thanks for sharing, but I wonder what is the reason why a different face comes when I apply it.
But show us a way to retain those beautiful freckles please :)
In the Blending Options window, look for the "Blend If" section. Adjust the white slider under "Current Layer" to the left, slowly revealing the freckles that are typically lighter than the surrounding skin.
Superb trick❤️👏👏😇👍👍
Generative fill is not free you have to purchase it so it doesn't work for me how do I get around it?
Sir which version of Photoshop you are using?
latest ps 2024
Sir can we apply this trick in Photoshop 2019
Amaaazzingg🤭
very good
Thanks
What's wrong with you, time to unsubscribe