Yaesu FL-2100 repair. Part 2 - Golden Dragons and more fixes (Ham Radio Tube Amplifier)

HTML-код
- Опубликовано: 15 янв 2017
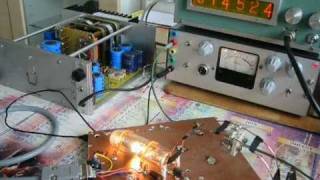
- This parrt of the Yaesu FL-2100 repair covers some unexpected bang and the fix for it. Also the new Golden Dragon 572B tubes arrived, so we give them a thorough test with some rather mixed results. Finally we install the new tubes and check what comes out of the Dragons.
In the meantine i found some suitable electrolytics which have arrived now, but they will be fitted in another episode as this one got too long already..
(c) 2017
www.dynoguy.co.uk
Disclaimer:
This footage is for entertainent only, it may show poor and/or unsafe/dangerous practice.
Always consult an expert first. I must not held responsble if you kill/injure yourself and/or others,
also not for any damage whatsoever.  Наука
Наука


Thanks for video #2. Well done. Thank you for adjusting the audio so that you can be heard by us old guys.
Thanks, glad you liked this one better,..thanks for watching
New sub here, good video. I always enjoy seeing and learning new things in vintage electronics repair videos.
Thanks for watching and subscribing, much appreciated. I also like the subject of your channel. Just reminds me of some other old tube gear sitting around and waiting for a time slot.
Great video mate helped me a lot in repairing my FL2100Z amp
Thanks, glad it helped someone
Many thanks... you answered my question from part 1 on testing and gettering the 572b's. I will do that tomorrow. I put my HV fuse and resistor after the capacitor bank to maybe protect also the tubes from a minor flashover(??). I will also add the W8JI suggested gas tubes on the cathodes for exciter protection. My old girl is super clean, even little dust.
But man, new tubes from RF parts will run to over $200CAD. Scared of the imports though.
Great video and explanation. 73 Peter
As shown, I had some really old tubes and even after 3 hours. one still had gas, since i now got the dragons fitted. i re-checked the poorest one of the old set and it is actually better now. That's after about 40 hours of standby and a few hours of talking.
I hammered those dull ones quite hard as i enjoy a bit of 80m DX at this time of the year, but even at full legal UK limit (400W) you guys over there still pumping at least 6dB more out....makes me .jealous ...:-)
The reason why i put the HV fuse before the rectifier is to protect the transformer, i don't care about the diodes and the old capacitors. Ideallty i should fit one into the Anode supply as well, but that thing suirvived 40 yeas without one, so what.
If a tube flashes even after hours of cooking, it is most likely toast, so not worth messing around with.
Here in the UK you can buy a set of 2 for the equivalent of $190CAD (120GBP).
Diectly from china it would be about 30% less, but then you add import tax and VAT + trouble if you have to teturn a bad one, so i think your $200CAD from RF parts is a fairly reasonable number..
Thanks for interest and appreciation of my work, 73 Mike
I have been watching your FL2100 videos, after 20 years of storage this week I ran up my 4 x FL2100z with no problem and after 30 years storage I fixed up my original FL2100 which had the usual problems with rf caps etc. I ran it up on 20m and 800w all good, but on 10m it has a parasitic issue burning the right choke, I swapped the tubes and still the same choke on 10m has the same issue so I have a phantom, on 40m it pops IP at 300mA too so I have been looking for clues in your FL2100B video's, great viewing I am really enjoying them.
Thanks, ...have a look at the disc capacitors, they tend to crack and most of them do not have the right value anymore.
Grid capacitors are possible suspects as well.
In my opinion this rather poorly designed spark plug set is not a good choice for 10m, just too much parasitic L+C in it.
Does not really bother me as Ham Radio is sort of a winter hobby for me, so that's pretty much 160m to 40m only.
Still need to do my capacitors and the soft start,...some day it will happen ...:-)
@@dynoguy What do you expect,its another yaesu time bombe ,like all there gear its not a question on if its gonna go bang but a case of when,due to everything working on the outer edge of specs to save pennies!,i have a fl-2100z but avoid yeasu gear ,every radio ive had from yaesu has blown up due to underspec components and or bad design,in there defence tho the amp has been ok also an old FT-101B i had,they seemed reliable but there newer,there solid state stuff seems to be total shit tho inho!
great video, i watched both the videos.
i acquired fl2100b recently, was giving me 100w max , recently i powered on with the cage cover of the PA REMOVED, AND BOOM I SAW A BIG LIGHT IN THE TUBES AND THE CURRENT METER WENT FULL MAX.
pls advise what is the solution.
Thanks. ... Well, it looks like you just fried the resistor of the safety switch, it shorts out the HV via a switch when the cage is open.
You must never run the PA with an open cage, voltages inside are lethal. Not sure how much you know about tube amplifiers, but these are not as easy to handle as a transistor PA, there is absolutely no protection against mismatch, you must tune it fairly well before you apply full drive power. Most FL 2100 suffer from aged components, therefore i would strongly recommend doing at least the steps i've done in part 1 and 2, also replace all capacitors in the power supply. Again, voltages inside will most likely kill you with one touch !
Thanks for the video series on FL2100 amp. I have a 2100z on my bench with some parasitic supressors to install and your clips have prompted me to get on with it!
There is a Dutch ham PA0FRI who lists a series of safety mods for 2100- have you looked at these ? If so which are necessary or useful to undertake in your opinion-if any?
Have never seen cooking or conditioning tubes before- could you do a clip about this as I have several hybrid radios 6146 finals which may need conditioning when I fit them.
You were going to do a clip on the HV caps replacement- did you make this clip?
Once again, great clips on the amp 73 Vk5LTD
Thanks Chris, much appreciated. I know the Dutch site, very good source for quite a few PA's, i think he covers the SB200 as well.
You are lucky, because the "Z" has quite a few improvements, mine is a non "B" so that the first models.
Re safety, essentially what i did with the series resistor and the fuse after the HV transformer, also a soft start (still need to fit it)
Meter diodes and not to forget the safety switch of the cover, the resistor is usually open circuit, so a completely unsafe design, that needs a better idea, or at least a bigger resistor. I also recommend to do the diode board as i did, otherwise it's just another time bomb. Almost forgot, the output capacitor, cannot stress enough that this thing is absolutely safety critical, changing is a must as a failure feeds HV to your antenna.
Here in the UK, max TX Pwr is only 400W, so i set it to the highest Mains voltage, the slightly lower HV takes a lot of stress off the components.
Have not finished yet the caps, still running on the old ones, knowing they will go pop some time, so still on the list.
Thanks for the suggestion with the tube baking video, i'll do one if i can find the time, may even have some 6146 lurking around somewhere.I know i do have some EL519/6KG6 which are deflection tubes as well, so can use those to show it if i cannot find a 6146.
Did you see the 4CX1500 video, it was a (most likely NOS) fleabay find and i am doing a similar process with that one as well.
Thanks again for watching, 73 Mike (sorry, not going to publish my call here)
Thanks for the video and I have subscribed. I am wondering if you could explain how you have the 572B connected to the power supplies and hearing them up. Very interesting but I can't see how things are connected.
Thanks
Kevin
Thanks Kevin, you're welcome. I thought i've explained it somewhere, possibly not good enough,..Ok, lets start from scratch.
Heater 6.3V AC, should be around 4A, ideally your heater transformer is center tapped, then the cathode connection goes there.
I have used a DC supply, so cathode connection goes to heater positive. Anode and screen are linked together. Then connect your Anode supply, negative to cathode, positive to screen and Anode. Heat the tube for a while, then gently crank up the Anode supply until you see approx 250mA and note the voltage. The resulting voltage is an indicator how good the tube is, lower voltage means better tube. Good ones are around 40 to 45V, poor ones may not reach 250mA even at 70V, in this case the bottle is junk.
If you want to match tubes just select the ones with the closest voltage reading. If they been unused for longer or brand new, cook them at least for 30 minutes, better an hour with no Anode supply. Then drive somewhat around 100mA for a while before you do the final performance test. This procedure gives perfectly repeatable results.....hope this helps
sorry, should have said grid, not screen, stupid me. Was just playing with a 4cx1500 so things got mixed up a little...
@@dynoguy good explanation,that way practically tube work in diode mode....and if you really want proper gettering them,you need to drive them hard to anodes in amplifier became red,glass direct heated tungsten tubes like 572b have zirconium getter on anodes,so need high temperatures on anodes to activate getter and soak molecules to restore vacuum....indirectly heated oxide coated cathode tubes,usually ceramic,can stay on shelf for decades and to have good vacuum,,,,and they have getter on nickel cathodes,so heated them only ,like you do,is enough....ceramic to metal bond on them is much better than glass to metal bond ,so air molecules cannot go inside...
Mike, Thanks very much for the video's and your response. I Got the amp running today. I replaced the main door handle capacitor, a couple of resistors and modified the safety cutoff switch. It now shows 500w out with the old Cetron tubes. I have 2 new Svetlana 572 B tubes but I know there is a modification that has to be done before you can use them. Maybe you could give me your thoughts regarding the mod ? And if you think its OK, where could I get a schematic ? Tnx... 73 Richard N6PKT - - Az.
Just dropped you an email
I was hoping you were going to show realigning the input coils. Especially after you put new tubes in
Not really a point of doing so, i have a 270 Ohm parallel resistor at the input to make the transceiver happier
I know its been a few years, but I just recently saws this as I have had a 2100B for a few months now and think I may be checking it all out. As a new HAM, this video has been quite informative. Also, do you know if there is an equivalent replacement for the Band Switch? Thank you, va3gtn
Glad it helped, unfortunately these switched are pretty hard to find, if the damage isn't too bad, i would try to repair it somehow.
@@dynoguy Thanks for the Reply Mike. Much appreciated. So turned out the switch wasn't bad after all. I cleaned it and replaced the filters and diodes. It works ok with the original Cetrons, about 550W with 50-60 watts in. I won't push it past 500 though.
So the input SWR isn't too bad, nothing I can't tune with the ic 7300 tuner. I tuned the input coils as best as they can be, as per the manual. But input swr for 10M is very high and can't be tuned by the input coils. Maybe you know a solution for that? Also on 10M, the parasitic suppressor resistor is getting over heated. But I figure if I can fix the input swr, that might help not to have to push it so hard. I guess the amp works pretty good other that 10M. 73, va3gtn
These Amps are not really good on 10m, just too much parasitic L and C all over the place, so don't drive it that much, you will just cook your tubes. What might help on all bands is a non inductive resistor across the input, it calms down things a lot. You need to play around with the value, a few 100 ohms might be a good start, but consider that it must be able to handle some of the the input power, you also may need a bit more drive as you burn some away in the resistor.
I just got a fl-2100B and the plate voltage is around 2800 v instead of 2400 v any ideas for me? Thanks in advance
Wow, that's a bit over ambitious for the 572B tubes. I bet someone set the primary transformer tap to 100V instead to 117V (assuming you in the US), because that works out to pretty much exactly 2800V. There are 3 settings, 100V, 110V and 117V, set it to 117V and you should get 2400V in idle.
@@dynoguy that’s what I was thinking because they put a new plate in there. I’ll check but I think you’re correct. Thanks
Like the story about having charged caps in school and having fun. Our school, our teacher, very first and very strict rule was. Anyone throwing or carrying a charged capacitor in any way will be dismissed from the class permanently.
LOL,...our teachers didn't know about that, they probably didn't care either. That was in the 1970s where that health and safety madness didn't really exist. Only one simple rule applied,...look after yourself and don't just rely on others, because if you hurt yourself it's entirely your own fault.
AED engineering, we had a dummy defibrillator cap we used for mechanical fit. It was hollow. Fun to point out it wasn't shorted then toss it to someone. Folks learn to juggle fast since it weighs nothing. 🤣 Still safety first.
hy i think you sould get very good qualyty caps sprague or rubicon jb ther are a few companys that macke good quality parts
Did you eventually get the new electrolytic capacitors fitted?
The old ones are still ok, but it's gotta be done at some point
I have just purchased some Vishay 220 mfd 450v caps for my Heathkit SB 200 they measure 200 mfd .
I was thinking if re-forming brings them back to nominal capacity. On the other hand, tolerances are usually 10 to 20 %, so that would be still within. Thanks for watching
Yes the tolerances are 10 to 20% I just put mine in and the voltages between them are now the same after a couple of weeks.
+/- 20% the caps are within spec, at least they're consistant
The pins on my Golden Dragon 572b are fatter than the Cetron tubes
I think you right, didn't measure it, but they sit stiffer in the sockets.
At first I was thinking the sockets had lost their tension with age and and may have done so
but the Golden Dragon and other branded Chinese tubes are a tighter fit.
Just checked a few of my tubes, looks like some of the chinese pins are slightly oval .... All my (sadly worn out) Cetrons are pretty round
Interesting to hear about the pins I wonder what shape the chinese sockets are ?
Well, i am a machinist also, so out of round starts at anything above zero ...:-)
In fact it's less than 0.6mm, so average Joe would probably still call them round.
Never seen a chinese socket, so cannot comment on that
Thanks for the videos. Two pieces of constructive criticism. Your commentary audio is too low & the radio operating in the background is annoying to old men with bad hearing like myself! Cheers! Brian Hind VE6XX
Thanks for watching and also for the criticism, no problem with that because your are right. The problem was that it was rather quiet in reality, but the camera microphone picked it up much louder because it was pointing towards he radio,. sorry
Chinese valves are notorious for having short lives. 🙄