FINALLY! 8 videos before I found yours. The way you explain it, the way the camera is positioned,... it's just perfect & easy to understand. Thank you so much!
I have spent the whole afternoon to look for an instruction for a nice border. This is the first instruction that made sense and was easy to follow. Thank you so much!!!
Thanks for posting the technique for the I Cord side edge, cast on and bind off. I wanted to update some small decor pillows but only wanted to knit a piece for the front half of the pillow. This I Cord edging makes it really easy to sew the knitted front to the pillow plus it makes a nice clean edge. Thank you so much!
Thank you for making this tutorial I've been trying to find a way to get an I-cord edging on my knitting and now thanks to you I have finally found one that gives me the nice neat look I've been looking for.
Thank you for this AWESOME technique. I have tried following other instructions where you slip the 3 side stitches and one side would look good one one side & the other would look good on the other . By doing the K1,S1,K1 then S1, K1,S1 method both sides look the same & are equally beautiful!
Best tuto I've ever seen even in French that is my native language ! No mistake, best results I wanted. Clear and efficient. Thanks. I subscribe right now.
Great vid! Always appreciate your approach and care and I have used some of your patterns to the delight of my self and the recipients of my finished projects! I should mention though that your links did not appear on the video when you mentioned them. Thanks again!
If you watched the video on a pad / tablet then the links wont show. They dont show on my tablet BUT they are displayed correctly on my laptop. Hope that helps. Cheers from switzerland
Watching on my laptop and my phone and there were no links appearing. I thought it was just me. 🤷♀️ I never really see the links mentioned in the video and have always wondered why.
If I were making a shawl that said to cast on say,60 sts, and I wanted to put on an I-cord edge on each side, Would I add 3 extra sts on each side to make the i-cord? I like the way this gives a nice clean edge.
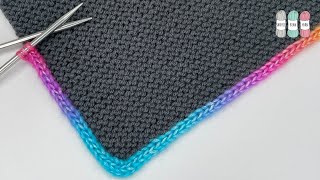
When you worked the WS, on the first and last 3 sts you Sl-1 wyif, K1, Sl-1 wyif and then purled across. When you turned the work to look at the RS, I saw that the K1 stitch at the END of your WS row presented as a purl, but I didn't see that the K1 at the BEGINNING of the WS row did. I'm sure I missed something, but why wouldn't those middle-of-the-3-stitches be purled on the WS rows so that they presented as a knit stitch on the RS? I looks like all of the other rows of that swatch you're making do not have that purl stitch. Thank you!
Can you do I-cord on all sides AS YOU WORK YOUR PROJECT, kind of built in. You show each one separately. Can it be done in one? Could you please do a small swatch video showing it all in one, i.e. bottom, sides and ending, all I-cord please please please. I hope you understand what I mean. I'll even pay you for the trouble. Thanks.
You can do it. Cast on the bottom edge, making sure you have enough stitches for your side icord at the end of the row (If it’s not called for in the pattern, that would be three extra.) Slip the three stitches back on the needle and knit one more row, just knitting instead of kfb. This is to give you a little extra to turn the corner. You might even a a second extra row. Follow pattern to the end of row. Then you need to pick up three stitches on the beginning end of the icord.(Even better is to start the icord with a provisional cast on and use those three stitches.) Again, knit an extra 1-2 rows for turning the corner. Add those to the needle to be the icord on that edge. If the pattern doesn’t call for this edge, you’d have six more stitches than called for. Make sure your edge stitches are arranged so that they work with the slipped and knit directions of the pattern - You don’t want the cord to twist. When you are ready to bind off, again you need to add 1-3 rows to turn the corner, then instead of casting on extra stitches, you just use the icord you already have and follow Staci’s bind off directions. At the end of the bind off, you will need to Kitchener stitch the last three stitches of bind off to the three edge stitches. This type of edging is used in Susan Rainey’s Surrounded Blanket except that she uses a different type of icord cast on. I hope this helps even though it’s ten months later. :)
Is it possible to combine this with your i cord cast on and bind off to have a completely wrapped piece, possibly for a scarf? Or would that be better achieved with an attached i cord?
You'll always see information about things you see in the video in the video description field, just below the video. The purple scarf I'm wearing is this pattern: www.ravelry.com/patterns/library/sexy-shawl
Can you show how an icord can be knitted right along with the pattern? I have a pattern where that occurs... but uses purl stitches? Ever heard of this? The purls are at the corners
very informative. but how did you start this particular project? how would I knit the very first row after casting on? would I purl the entire row or begin with the wrong side icord stitch? I know this is just a sample but I want to know that I'm doing it the right way. thanks if anyone can help!
Hi Stacy, I always follow your instructions when i stuck in my knitting projects. Can you please let me know how did you made this beautiful shawl? I really like it's colour and design as well.
HI, I'm not sure if you'll answer this since it's an older post. I'm wondering how you work the side edging if you want your icord border to be a different colour than that rest of your knitting. I want to do a striped blanket with an additional contract colour all around it. Is that possible with this method?
+Big Heart Small Town - you can, potentially, work this method with another color, but it would require having multiple balls of yarn going at once, and it's likely that you'll see loose tension at the color change (you'd have to essentially use an intarsia technique to keep the two colors attached to each other). You're better off applying the edging after the fact. I don't have a video on applied icord edging, but here is a tutorial from Purl Soho: www.purlsoho.com/create/2008/01/23/attached-i-cord-tutorial/ (Also, I see all comments, regardless of the age of the video. :) )
I wouldn't recommend this for edges that you're going to seam with mattress stitch...these edges will leave a very significant ridge on the inside of the work.
I'm doing a brioche scarf with a i-cord edging (fingering yarn with 3mm needles) and while one side is absolutely perfect, the other is horrible, not regular at all (the one that ends up with the slip 1 and starts with K1). Do you have any idea why, or any tip?
Hello, I have to translate my text with a google translator. So my apologies. If your work is 20 stitches wide do you have to put 26 stitches for the edges?
Hi, I'm wondering how you would change color when doing this icord edging? I am making a baby blanket, it's striped using two different colors. I feel as though when I go to change color and I knit the first stitch with the new color, slip the second wyif, and then knit... the stitch I slipped will still be in the previous color? Is there a way around that? I'm newish at this, so any tips would really help. Thanks!
There is no way around it, you have to decide which look you like better. You can either slip the stitch (keeping it in the "old" color), or knit the stitch (messing up the edging a bit).
Hi, how do you bind off I-cord edging (only 3 first and 3 last sts of final row)? I mean - I have both edges (left and right) of my garment done with I-cord edging, but top edge is regular cast-on and I would like to have bottom edge of my garment to be in regular bind off as well. (I'm not talking about I-cord bind off - that's the other technique) Thank you.
If you're following a pattern, the pattern should tell you what to do with those last stitches to make it look right (like the pattern photo)...you have a couple of choices. You can bind off normally, leaving a straight edge, or you can (slip 1, k2tog, psso) leaving a pointed edge that can be easily tucked into the work when you weave in the end, leaving a more rounded edge. You can also graft (kitchener) the live stitches to other live stitches.
De Jahne Sanders - I haven't tested this out myself, but I don't think it would have the same effect in the middle of the work. The edge allows this technique to create a sort of "rounded" corner.
If done in the middle of the row it creates a sort of ridge in the middle (nowhere near as bold as an icord edge) with purl bumps/bars on either side. On the wrong side of the work you end up with a column of plain stockinette Vs surrounded by purl bumps. Really not worth the effort when you can just get the same effect by using slightly different combinations of knit and purl stitches across the row. If you were to make a swatch with the icord edge pattern the whole way across it would form soft pleats with an icord edge. CO: multiple of 6 Right Side: *Knit 1, slip 1 with yarn in front, Knit 1, repeat from * to end. Wrong Side: *Slip 1 with yarn in front, Knit 1, slip 1 with yarn in front, repeat from * to end It looks like a 3 by 3 rib (or fisherman's rib) with icord border but with much more effort. Really not worth it to be honest.
When you make this icord is this part of the pattern stitch count? I am a newish knitter and worry about following the printed pattern. In other words how does this affect the pattern?
Carla Hildebrand my guess is no. if you follow a pattern, they always put the edging in the pattern. you would have to work up a sample to see how many stitches (and which stitches) they allocate for edging, then switch it out for the icord edge (3 stitches).
@@j.c.6012 Exactly right, this is what I do if I want the edging to be a bit more bold than the one in the pattern. As Jess said, take out the number of stitches for the edge which are in the written pattern and add 6 extra stitches in their place (3 each side).
+Carrie Mtn - I have looked over both the finished and in-progress swatches in this video, I don't see what you're seeing. The purl bumps are only on the back of the work.
+VeryPink Knits thanks for the quick reply! At 3:40 you are showing the final product. Viewing from the front, the second to the last stitch on the left looks like it has a purl bump. I'm not trying to be picky. Im just confused with my current knitting project. I'm reading my pattern and the designer uses a different technique for the iCord edging. On the RS, she slips the last three stitches knitwise, and on the WS she slips the last three purl wise. I came to see your video because the way I'm doing it is making the right side tighter, less bouncy than the left side. I'll try your way. Thanks for all your great tutorials. I'm always very impressed!
hi i want to knit this poncho but without the curly edge should i cast on with the i cord co or what? www.ravelry.com/patterns/library/396---poncho thank you
+Dana Lear - if I'm understanding you correctly, you want the edge stitches in one color and the center stitches in another, in stripes. You'll have to work intarsia for that, and have three balls of yarn going at once. ruclips.net/video/PtJdamqXlAU/видео.html


![Diggy Graves - Red Vineyard [Official Lyric Video]](http://i.ytimg.com/vi/8Ro085T0mnQ/mqdefault.jpg)

Very Pink Knits is the best and easiest instructions for any project
FINALLY! 8 videos before I found yours. The way you explain it, the way the camera is positioned,... it's just perfect & easy to understand. Thank you so much!
Even after 10 years since you posted this….i just found it and loved it! Thanx!
I have spent the whole afternoon to look for an instruction for a nice border. This is the first instruction that made sense and was easy to follow. Thank you so much!!!
Thanks for posting the technique for the I Cord side edge, cast on and bind off. I wanted to update some small decor pillows but only wanted to knit a piece for the front half of the pillow. This I Cord edging makes it really easy to sew the knitted front to the pillow plus it makes a nice clean edge. Thank you so much!
I absolutely love these tutorials! So informative and down to earth instructions! She always clarifies my concerns!!!!
Thank you for making this tutorial I've been trying to find a way to get an I-cord edging on my knitting and now thanks to you I have finally found one that gives me the nice neat look I've been looking for.
Looks great and I wouldn’t have predicted it would be that simple. Thanks so much for the demonstration *and* written instructions.
Thank you for this AWESOME technique. I have tried following other instructions where you slip the 3 side stitches and one side would look good one one side & the other would look good on the other . By doing the K1,S1,K1 then S1, K1,S1 method both sides look the same & are equally beautiful!
Best tuto I've ever seen even in French that is my native language ! No mistake, best results I wanted. Clear and efficient. Thanks. I subscribe right now.
BTW this technique is genious. I am always on the look out for nice / beautiful edges. This one certainly fits the bill. THANKS
Thanks again🌷Merry Christmas 🎄
Loved the instructions! Thank you 💖
Great vid! Always appreciate your approach and care and I have used some of your patterns to the delight of my self and the recipients of my finished projects! I should mention though that your links did not appear on the video when you mentioned them. Thanks again!
thailander - thank you for the note. I just double-checked all of the annotation links in the video - they are working fine for me!
If you watched the video on a pad / tablet then the links wont show. They dont show on my tablet BUT they are displayed correctly on my laptop. Hope that helps. Cheers from switzerland
1991bumblebeeify Thanks I appreciate it. I did think about that but I should have checked before posting. Thanks to you both.
Watching on my laptop and my phone and there were no links appearing. I thought it was just me. 🤷♀️ I never really see the links mentioned in the video and have always wondered why.
Nice. Down and dusted and Bob’s your uncle! Thanks.
I found if I k, sl, k then on the end I sl, k, sl I don't have to worry about what side of the pattern I'm on
Fabulous lesson! Thank you in 2022.
Incredibly helpful, so well explained! I've been watching your videos for years and just had to tell you how much I appreciate them! Thank you!!
I really like this edging. Thanks for showing us how. By the way, you have pretty hands. Love your nail polish. :)
Thank you, LizKS48 ! :)
😊😊😊 merci beaucoup pour votre tuto de bordure I- CORD vraiment super explications
Soooooo helpful! Many thanks😊
Always the best videos!
If I were making a shawl that said to cast on say,60 sts, and I wanted to put on an I-cord edge on each side, Would I add 3 extra sts on each side to make the i-cord? I like the way this gives a nice clean edge.
Thanks for these easy instructions to follow...my question is - what's the purpose of these edgings?
When you worked the WS, on the first and last 3 sts you Sl-1 wyif, K1, Sl-1 wyif and then purled across. When you turned the work to look at the RS, I saw that the K1 stitch at the END of your WS row presented as a purl, but I didn't see that the K1 at the BEGINNING of the WS row did. I'm sure I missed something, but why wouldn't those middle-of-the-3-stitches be purled on the WS rows so that they presented as a knit stitch on the RS? I looks like all of the other rows of that swatch you're making do not have that purl stitch. Thank you!
Your tutorial is great. I also wonder if i could have i-cord 5 or 6 for side edging? And how so?
Thank you. This is just the demonstration I was looking for.
Can you do I-cord on all sides AS YOU WORK YOUR PROJECT, kind of built in. You show each one separately. Can it be done in one? Could you please do a small swatch video showing it all in one, i.e. bottom, sides and ending, all I-cord please please please. I hope you understand what I mean. I'll even pay you for the trouble. Thanks.
You can do it. Cast on the bottom edge, making sure you have enough stitches for your side icord at the end of the row (If it’s not called for in the pattern, that would be three extra.) Slip the three stitches back on the needle and knit one more row, just knitting instead of kfb. This is to give you a little extra to turn the corner. You might even a a second extra row. Follow pattern to the end of row. Then you need to pick up three stitches on the beginning end of the icord.(Even better is to start the icord with a provisional cast on and use those three stitches.) Again, knit an extra 1-2 rows for turning the corner. Add those to the needle to be the icord on that edge. If the pattern doesn’t call for this edge, you’d have six more stitches than called for. Make sure your edge stitches are arranged so that they work with the slipped and knit directions of the pattern - You don’t want the cord to twist. When you are ready to bind off, again you need to add 1-3 rows to turn the corner, then instead of casting on extra stitches, you just use the icord you already have and follow Staci’s bind off directions. At the end of the bind off, you will need to Kitchener stitch the last three stitches of bind off to the three edge stitches. This type of edging is used in Susan Rainey’s Surrounded Blanket except that she uses a different type of icord cast on. I hope this helps even though it’s ten months later. :)
@@maryannc7223 Thank you so much Mary Ann.
Is it possible to combine this with your i cord cast on and bind off to have a completely wrapped piece, possibly for a scarf? Or would that be better achieved with an attached i cord?
Great tutorial & love the scarf you’re wearing. Would appreciate the name of the pattern. Thanks very much!
You'll always see information about things you see in the video in the video description field, just below the video. The purple scarf I'm wearing is this pattern:
www.ravelry.com/patterns/library/sexy-shawl
Can you show how an icord can be knitted right along with the pattern? I have a pattern where that occurs... but uses purl stitches? Ever heard of this? The purls are at the corners
very informative. but how did you start this particular project? how would I knit the very first row after casting on? would I purl the entire row or begin with the wrong side icord stitch? I know this is just a sample but I want to know that I'm doing it the right way. thanks if anyone can help!
This is a stockinette swatch - knit one row, purl one row (repeat).
Do you have a video that explains how to fix a mistake by knitting a stitch that should have been a slst?
Hi Stacy, I always follow your instructions when i stuck in my knitting projects. Can you please let me know how did you made this beautiful shawl? I really like it's colour and design as well.
Love this technique. Thanks!
Hello, can you please make a video teaching the iCord method in Continental Style? Thanks.
Yes plz in Continental knitting using this technique, ty.
Is there a version for a rib scarf? Odd number of stiches too..
Amazing work♥💛🌹
Is there a pattern for that shawl/poncho on the mannequin in the back?
Yes - verypink.com/2013/12/20/rodeo-drive-poncho/
Thank you so much 🤗
Can i use this method for the pattern knit & purl?
HI, I'm not sure if you'll answer this since it's an older post. I'm wondering how you work the side edging if you want your icord border to be a different colour than that rest of your knitting. I want to do a striped blanket with an additional contract colour all around it. Is that possible with this method?
+Big Heart Small Town - you can, potentially, work this method with another color, but it would require having multiple balls of yarn going at once, and it's likely that you'll see loose tension at the color change (you'd have to essentially use an intarsia technique to keep the two colors attached to each other). You're better off applying the edging after the fact. I don't have a video on applied icord edging, but here is a tutorial from Purl Soho: www.purlsoho.com/create/2008/01/23/attached-i-cord-tutorial/ (Also, I see all comments, regardless of the age of the video. :) )
If I’m doing this method do I have to add 3 stitches to the pattern
If you're working a stitch pattern that requires that you have a certain number of stitches, you'll want to add six stitches (three for each side).
Hi, is it suitable for seaming or picking up stitches?
thank you so much! So perfect video. If my scarf has 35/36 stitches..is this 3 stitches i cord ok or i have to make more than 3?
Thank you from Italy.
@Night oh so kind! Thank you so so much! 😊
bonjour ; je voudrais me faire un gilet sans boutons ; peut on faire cette bande sur plusieurs mailles pour une bordure plus large ? merci beaucoup
So would this create a neat edge when sewing two sides together and would a mattress stitch work with these sides?
I wouldn't recommend this for edges that you're going to seam with mattress stitch...these edges will leave a very significant ridge on the inside of the work.
Great! Thank you very much 🙏🌺
mam its great video in your pattern sleeping sack you r using same this techiques plz reply thanks
+Meena Moeen - yes, this same technique is used in my Sleep Sack pattern.
+VeryPink Knits thank you for replying you r thes best and beautiful
Thanks so much for this video! Is this i-cord side edging to be used for the back of a cardigan???
Vasiliki Orphanou - it's always worth a try to see if you like the way it looks!
I'm doing a brioche scarf with a i-cord edging (fingering yarn with 3mm needles) and while one side is absolutely perfect, the other is horrible, not regular at all (the one that ends up with the slip 1 and starts with K1). Do you have any idea why, or any tip?
I have the same problem
Hello, I have to translate my text with a google translator. So my apologies. If your work is 20 stitches wide do you have to put 26 stitches for the edges?
Yes.
Would it be difficult to pick up stitches using this edging
Just wish you would do it a little slower for us oldies.
Thank you!
Hi, I'm wondering how you would change color when doing this icord edging? I am making a baby blanket, it's striped using two different colors.
I feel as though when I go to change color and I knit the first stitch with the new color, slip the second wyif, and then knit... the stitch I slipped will still be in the previous color? Is there a way around that? I'm newish at this, so any tips would really help. Thanks!
There is no way around it, you have to decide which look you like better. You can either slip the stitch (keeping it in the "old" color), or knit the stitch (messing up the edging a bit).
Hi, how do you bind off I-cord edging (only 3 first and 3 last sts of final row)?
I mean - I have both edges (left and right) of my garment done with I-cord edging, but top edge is regular cast-on and I would like to have bottom edge of my garment to be in regular bind off as well. (I'm not talking about I-cord bind off - that's the other technique) Thank you.
Actually, your demonstration piece is exactly what I'm aiming for - so how did you bind off? Thanks.
If you're following a pattern, the pattern should tell you what to do with those last stitches to make it look right (like the pattern photo)...you have a couple of choices. You can bind off normally, leaving a straight edge, or you can (slip 1, k2tog, psso) leaving a pointed edge that can be easily tucked into the work when you weave in the end, leaving a more rounded edge. You can also graft (kitchener) the live stitches to other live stitches.
VeryPink Knits thank you so much.
Would the edging also have the same I-cord effect if it were done in the middle of a row instead of at the end or the beginning?
De Jahne Sanders - I haven't tested this out myself, but I don't think it would have the same effect in the middle of the work. The edge allows this technique to create a sort of "rounded" corner.
If done in the middle of the row it creates a sort of ridge in the middle (nowhere near as bold as an icord edge) with purl bumps/bars on either side. On the wrong side of the work you end up with a column of plain stockinette Vs surrounded by purl bumps. Really not worth the effort when you can just get the same effect by using slightly different combinations of knit and purl stitches across the row.
If you were to make a swatch with the icord edge pattern the whole way across it would form soft pleats with an icord edge.
CO: multiple of 6
Right Side: *Knit 1, slip 1 with yarn in front, Knit 1, repeat from * to end.
Wrong Side: *Slip 1 with yarn in front, Knit 1, slip 1 with yarn in front, repeat from * to end
It looks like a 3 by 3 rib (or fisherman's rib) with icord border but with much more effort. Really not worth it to be honest.
Oh hey, I just realised your comment was 6 years ago lol. Disregard then. 😂
When you make this icord is this part of the pattern stitch count? I am a newish knitter and worry about following the printed pattern. In other words how does this affect the pattern?
Carla Hildebrand my guess is no. if you follow a pattern, they always put the edging in the pattern. you would have to work up a sample to see how many stitches (and which stitches) they allocate for edging, then switch it out for the icord edge (3 stitches).
@@j.c.6012 Exactly right, this is what I do if I want the edging to be a bit more bold than the one in the pattern. As Jess said, take out the number of stitches for the edge which are in the written pattern and add 6 extra stitches in their place (3 each side).
Why s there a purl bump on the front left side of her swatch? It didn't look right.
+Carrie Mtn - I have looked over both the finished and in-progress swatches in this video, I don't see what you're seeing. The purl bumps are only on the back of the work.
+VeryPink Knits thanks for the quick reply! At 3:40 you are showing the final product. Viewing from the front, the second to the last stitch on the left looks like it has a purl bump. I'm not trying to be picky. Im just confused with my current knitting project. I'm reading my pattern and the designer uses a different technique for the iCord edging. On the RS, she slips the last three stitches knitwise, and on the WS she slips the last three purl wise. I came to see your video because the way I'm doing it is making the right side tighter, less bouncy than the left side. I'll try your way. Thanks for all your great tutorials. I'm always very impressed!
+Carrie Mtn - I see now. Yes, that's the slipped stitch, and it will disappear on the next row.
+VeryPink Knits Ah! Ok, thanks again!
What stich is that
hi i want to knit this poncho but without the curly edge should i cast on with the i cord co or what?
www.ravelry.com/patterns/library/396---poncho
thank you
brava
😃
So you are double knitting?
+Dana Lear - No, double knitting is a different technique: ruclips.net/video/bZg4DckTMxc/видео.html
With this technique, how would one work colour changes inside the edge every two rows to show the least?
+Dana Lear - if I'm understanding you correctly, you want the edge stitches in one color and the center stitches in another, in stripes. You'll have to work intarsia for that, and have three balls of yarn going at once. ruclips.net/video/PtJdamqXlAU/видео.html
Thanks Staci!
Two balls is working with the other stitches slipped.
Yes, that's one-color double knitting.