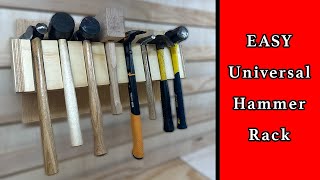
Sorry the dimensions of the 8in holder were cut off at the end by the up next adds - the 8in holder. Cut list is 4 pieces at 8in x 4.5", 5.25", 7.75" and 8.5" then two 7x6.5in pieces
I just finished up the construction of my new shop and now is the time to get cabinets and other things built the fun stuff in my eyes. Luckly everything is layed out via blue tape and cardboard. having a fight with myself with what type of wood (plywood) to get. Been in the big box stores not happy with the quality but also don't want to spend the money on baltic birch. 130.00-150.00 a sheet. What kind of plywood are you using??? Keep the videos coming love em and subscribed i am.
@@dking70 you’re lucky you can get Baltic birch! They don’t even sell it within a hour drive of me. I will typically buy three-quarter inch cabinet grade plywood, which means it’s A grade on one side. And b/c grade on the other. At the time of this comment it’s selling for usually around 7 layers, around $50 a sheet at the big box and 65 at the lumber yard. It can have some voids here and there, and I always personally pick my pieces to make sure at least A side is perfect.
@@BitnerBuilt We have a couple of places to go to get baltic birch but it's pricey. Seems the big box stores around me have 6 layers and are out of acx. I have other places to go to get acx which will be better quality so a win win in my book. thank you for your response
I am 70 and health not brilliant ,prostate cancer emphysema, aches and pains, so I spend hours watching this type of RUclips video and I have to say, I LOVE YOUR CHANEL , love your simple ideas and the way you present them.On this video might I make a suggestion, when you are cutting the separator slots for the hardboard, would it not be easier to leave your main 18mm sides and back/front pieces as one large piece, then you only have third as many slot cuts to make, maybe I'm completely wrong, my wife says I am most of the time lol, anyway, a big thanks for posting this video and looking forward to many more, Regards from Garry in the UK
Wow thanks Gary! So normally yes you are correct but on this one since the middle board must be cut the same on both the front and back (but not the other two) it wouldn’t work , or at least it would be highly probable that after separating it into three pieces and flipping the middle piece over, I would mess up on some of the alignment. But in a normal situation, you’re definitely right! Thanks again for watching Gary.
I love that you always talk about safety. Not enough RUclipsrs do that. In the shop, things can happen in less than the blink of and eye. Every woodworker needs to think about safety BEFORE firing up the tool. That way we are able to your future videos. Keep up the good work!
Thanks Byron! Safety is key, as much as I focus on safety things even happened to me, I had a push stick, fly out of my hand when it collided with a blade the other day…. So, even when you’re doing everything right, and being careful, things can still happen!
@@BitnerBuilt A millisecond of inattendance of the most safety aware person may cause an accident. I've been in the Mining industry for 40 years and have seen this way too many times. Going into "Autopilot mode", especially during repetitive tasks like these datos is VERY dangerous.
New woodworker here in Australia 🇦🇺. I love the detailed explanation and for saying it in both languages. That small detail helps us all picture it better in mm and makes your channel more appealing for new people like me . Thanks !!!
This kind of detailed walkthrough is super helpful, especially explaining why you're doing certain things and how to adjust for different setups. Would love a video like this on your whole french cleat system.
Cool idea! Especially if someone has a bunch of small mobile carts. It would be very easy to move these from one cart to another to have commonly used tools available/ at hand.
J - nice. already over 500 views in 2 hours. On your brad nailer blow-out. The brads are cut into a point from the right and left. If you hold your gun perpendicular to the bottom plywood/grain, it will "wander" within the bounds of the board and stay hidden. Give it a whirl and play with it to have in your back pocket and save on the CA and accelerator cost if you like...I'm a cheap skate. Thanks!!
Ok so for making longer dadoed units you can save time by mirroring each slot by turning your wood piece 180 deg and cutting the other side. So set your sled for 1” make the cut then rotate your piece to the other side for a mirrored cut and repeat for all the pieces. You will be at 10k subs soon! 🎉🎉🎉
Hi, first this is one of the best woodwork sites on RUclips, you put things across very well, thank you. I am in the U.K. and 70 years old. I have a 10 inch Lumberjack table saw on its own wheeled stand. I made a crosscut sled after looking at 3x3 custom, I liked the look of it and it works a treat but after doing a few cuts I turned it off then went to remove some bits of wood and my finger caught the blade good job its a braked motor so it was very minor. So I did this, refitted blade guard, doubled the size of front fence and cut a slot so the whole guard and dust extraction pipe fits through, because of the guard design it rides over the back fence after finishing the cut, so no need to alter the back fence. No more danger to fingers and hands. it works and you have the blade is covered when using the sled. By the way you are now my go to site, thanks
Thanks! And oh that’s good to hear it was minor!!! Sounds like you put a lot of time into your alteration, necessity always brings about some really great innovations! Stay safe in the shop!
Thanks Fabio! I was iffy on if I should as my videos keep running very long but I get a lot of beginner watchers so putting that out there is important.
Great video...really appreciate the cut list at the end. I know this is a new channel but I am impressed by the quality and attention to detail in every one of your videos.
Sweet little organizers. Tip: For dadoes with repeating spacing, you can use an indexing system to speed things up. You'll need to make a small runner that's the same width as your dadoes, but a smidge shallower - just like a small version of the miter slots in your table saw. Glue the runner to your sled at the correct distance from the blade (using the CA glue and blue tape method, or you can clamp a sacrificial piece into the sled bed) . I.E. if you want 1-1/4" spacing, glue it 1-1/4" to the right of the blade. If your first cut has a longer spacing, such as 2", use your stop block to make the first cut on all your workpieces, then glu on the runner. Once the runner is in place, you don't even need the stop block - just put the workpiece on the sled so the first cut fits over the runner and make your second cut. Then move the board to the right and put the second cut on the runner. And continue on. Not only will every space be precisely the same, but it's repeatable on both sides, and across multiple workpieces, with no need to ever move the runner. If you think you might want to repeat the cut later, you can save a piece of scrap with two cuts at the proper spacing, and in the future you can use the scrap to fit a new runner on the sled by putting it into one of the scrap piece's dadoes, and placing the other dado over blade; the spacing will be locked in perfectly. And none of this requires measuring with tapes, rulers, or pencil marks to get perfect spacing every time.
I love the idea. I would cut a wider board so my front and back are cut at the same time and one side of the center cut. I would also start in the middle and rotate 180 degrees and cut left then right and then left then right as I move the stop block. I struggled when I tried to do it this way on the Woodsmith Miter station. I purchased a bin like this for pliers and vice grips. Very pretty. Awesome.
So normally, I would cut it all at once and then cut into pieces, but the ply that I was using was A/C grade Cabinet ply so I wanted all of my pieces facing out with the good side but good tip on the 180° turn!
I have an overview of them here in my 10 tools under $20 video - they are handy! 10 Useful Woodworking Tools Under $20 ruclips.net/video/GSrWWiiwvG4/видео.html
Oh my goodness, I have a box-o-staplers also!!! I will go through and try them all out so I am not building storage for anything not useful. You are excellent at explaining, I believe I have no questions, wonderful.
If you don’t have a dado blade, you could cut strips and glue them to one long board, use a piece of hard board to space them. After all the stops are glued, cut the long board into the pieces you need.
Great build with good ideas and what's fantastic is the very important safety info which you don't always see on vids. Saws eat fingers like kids eat sweet stuff
Nice idea. Nice video. I've never used a dado because I don't have a set lol. I keep seeing videos like this and sort of want to get one. I just have to see if my jobsite table saw can use one. Thanks for the tip on the sled. I've got pieces cut out I need to assemble it.
You can just use the blade straight, run a cut and then move it over 2/16th and run it again etc (or whatever width u want) it just takes a lot more passes but totally doable
Hi Justin - great video and some really good ideas. I would like to offer a couple of suggestions. Firstly, if you don't cut down the full size sheet until later, you can halve the amount of dado cuts you need to make. Leave the sheet intact and cut all the dadoes on the one face. Then rip off the central section piece (you can just use a circular saw or tracksaw so as not to have to reset the blade in the table saw) and cut the dadoes on the back face of it. Because the original sheet is larger, you can use just the table and fence without the need for a crosscut sled (if you haven't made one yet), to do most of the cutting of dadoes. It also greatly reduces your chances of making errors in setup, as all the dadoes are guaranteed to line up. And if you are omitting a central divider, you only need to do one set of dado passes. Secondly, whether using a crosscut sled or just the fence, you can reset your stops without measuring by cutting a scrap piece to use as a template for resetting your stop block or fence after each cut. This reduces the chances of making errors in measurement to almost zero. In a similar vein, you can also achieve a 6mm cut with a single blade (as some viewers don't have a dado blade - illegal in some countries I believe), by using a spacer to reset you fence (or stop block) after each cut. Rather than cutting a thin strip, use a 3mm drill bit as a spacer.
Great vid thanks, subbed and thanks so much for doing everything in mm too, so many American channels miss this even though I grew up with imperial now living in northern Europe we're all metric :)
Excellent idea to display the component pieces for each project with their dimensions at the end of the video. I also appreciate that you included both imperial and metric measurements. I've copied a few other channel's french cleat ideas and have had to estimate dimensions in most cases. This will make it a lot easier. Thank you.
Really nice design. I'd probably chamfer the front-top corners of the sides, but that's just me. For future reorganizations, I'd be tempted to write (label, etch, burn, etc.) on the side of the boxes the dimensions of the dividers. Probably not necessary, but I have a feeling that "me in 3 years" will be appreciative of the documentation.
I'm having a new shop built in the late fall and I really appreciate all these ideas and you sharing your thought process. Even small shops should build s sled. Recovery from injury will take a lot more time than the build time. We have saying "SLOW IS FAST". Planning and setting systems saves a ton of time. Train yourself to use safety equipment without fail. Don't be a fool and think an injury could never happen to you. Shop ninjuries can be devastating. STAY SAFE 🤗👍
You have a much appreciated ability to talk through parts of a process we would inevitably go "ugh... of course I should have done that..." after we didn't watch your lessons learned. Looking forward to making my own project safer and more efficient and save my learning moments for higher things. Thank you.
I keep a scrap with t-bolt and knob on the top of my t-track whenever I need to make successive spaced cuts. Make the cut. Before you move your flip stop, place a spacer (i.e. 3/4 gauge block) against the flip stop, slide your top block over against it and lock, remove the gauge block and now you have a firm index to move your flip stop to. Cut, repeat. I find that more accurate than eyeballing the measuring tape and when you get in the rhythm it's pretty fast.
That's a really great idea! i am re-building my hand tool woodworking area and i think bins like this could be really handy for that area instead of just a simple shelf.
Really enjoying your videos and your direct caring style! To reduce the number of passes when cutting the dados one could wait to crosscut a full board (28" x 24" in the large box example) until after the dados are cut. If using this method, working from the outside edges in toward the center and rotating the board 180 degrees each cut minimizes the number of times the fence would have to be adjusted. Also, if using 1/2" ply you could double the center divider piece and then just dado one side and glue it back to back. It would be thicker and take more plywood but easier and make production time less. Don't forget to adjust your dimensions to accommodate the extra 1/4" the center would take up.
You somehow seem to keep putting out interesting videos on an insane schedule. Sure hope you're able to keep it up without burning out. I've been looking for a solution for all of the pliers that I have and this one is a great design to get them out of the tool cabinet drawer. After watching this, I went and sorted through my set and even removing duplicates and ones I can't imagine why I have, I came up with around 60. I'm going to have to modify to make it longer, but won't be a problem with your design. - Chris
haha well I am slowing a bit, I was trying to get a video out every day, now that a have a small library i'm cutting back to 1 video ever 2-3 days. Nice! Maybe split it even so you can move them around later if needed. Im happy I made several instead of 1 big one, gives more flexibility later.
Enjoying your channel with some great suggestions for shop projects. A small suggestion would be to label the parts in your cut lists to easily identify what goes where.
Great instructions & details! But one thought--if it's for a small box, why not make the dados before cutting the front, middle & back separately? Even further refuces odds of misalignment between them... Though indeed easier & safer to handle the "shorter" boards on the sled & over the blade!
Thanks! So since the middle has to be done on both sides it needed to be already cut so I could do the cut on both sides before moving the fence (you are right that the front and back could have stayed together and then cut after!)
Nice video. I had to subscribe. On my sled I put a piece of plexiglass across the sled above the blade. Wasn't for safety, it's because my saw kicks a ton of sawdust right in my face. It also helps for safety. I'm going to do my wall in French cleats as soon as I get time. Best wishes to your channel getting bigger.
Thanks so much! Oh wow that’s a rough saw! I put plexi on my sled over the Nono box so I could see when the blade was in the bad cutting area, but your plexiglass idea sounds actually really good, except for maybe inhibiting some taller items going on there. Thanks for subscribing!
@@BitnerBuilt , you are absolutely right about the taller ones. I have a mini sled for those because I hardly ever have cut the bigger stuff. I've been using that sled for over 10 years and I'd say I've had to use the mini maybe 12 times. Really like the way you present things. Keep it up please.
I haven't watched you before but organizing is something I've thought about but never been good at. Towards the end you showed everyone's main tools organized in a great fashion. This is giving me ideas. Thank you for this video.... my mind is refocusing my original thoughts. Good stuff. 👍 Since I haven't watched you before, I have to ask...... Why is so much area devoted to straws?
Haha I use them a lot for collecting glue squeeze out, you can cut the straw at a diagonal and then run the sharp tip in a very tight space to collect the glue inside the straw. Very useful for French cleats etc
One thing that the French Cleats don't help with are the dust accumulation. Maybe a French Cleat light box to go on the top cleat would solve that issue. What do you think??? Really enjoying your channel.
That’s a possibility, never tried it. I will say it’s not extreme the accumulation, I personally 3-4x a year put on a full respirator, open the garage doors and hit the entire shop with the leaf blower, cleans all the “hidden stuff” right out!
I missed whether you have two crosscut sleds, one being a dedicated dado one? They’re pretty big and bulky so wondering if there’s a better way? Thx and excellent stuf as always👍
I'm curious why you cut the pieces first? Seems like it would make more sense to run grooves through one big board, then cut that apart into smaller pieces.
It’s because the middle board needed grooves on both sides, if I had kept it one board and run it I would have then had to cut it down and then reset everything again for the middle board, possibly being off, so yea it was a much more labor intensive way but needed to be done for this one
Quick question, why didn't you flip the board and start over at the 2" mark on the right side of your sled, working inwards to your other cuts? This way you do not have to use the other side of the sled and worry about different calculations from the other side of the sled? This is what I did and it worked perfectly.
How do you find these boxes are with collecting dust now that you've lived with them for a bit? They seem great, my only concern is that any open-top basin is just going to collect dust over time from sanding, cutting, or whatever else.
Nothing that noticeable, and particularly since the dividers are removable if it were a big issue for you once or twice a year, you could just pull the inserts and vacuum it out for a minute. I know that at least every two or three months I open the garage doors and hit everything with a leaf blower to make a nice dust tornado. Need to do that every once in a while to clean out French cleats and stuff.
My friend your video is exceptioal quality and amazing. I love these holders and tomorrow I'm on it. I need three. Do you have any idea how I can make storage unit(s) for my Ryobi tools? I want something I can slide these in where the battery sits. I'm really new to workworking and now a new subscriber to your channel - Thank you from UK
Awesome thanks so much! Glad to have you with us! Take a look at this video that I just put out last week, it has a pretty wide range of adjustable power tool holders so that it can change over time as you get different tools, and I have metric plans at the end of the video for my friends over the pond 😉 Modular Drill Storage & Charging Station - FREE FILES! - Small Shop Series ruclips.net/video/Dj1Mhb71Ygo/видео.html
Normally, if it was all just on one side, but because I have the dado on both sides of the center divider, you would have to reset the saw all over again and then maybe the position might be a little bit off. Also, the back and the front are doing the cut on alternate sides of the wood so if you’re using a cabinet grade plywood like I was one of those dados would be on the ugly side of the wood.
New to your channel and I'm really liking your tutorial way of taking us through your projects. I keep seeing the apron that you're wearing and haven't seen you talk about that...can you tell us what that is? Thanks.
This would be easier if you started with a larger piece using 1/2-inch plywood. Run all your dadoes, the cut the board into 4 pieces, glue 2 pieces together, back-to-back, to use as the center.
Love your channel! I’m trying to screenshot the last box, for disposables, but there are pics covering part of the measurements. Can you give me the measurements that are covered up? Thanks
I’m curious what kind of plywood you used on your walls. It doesn’t look like birch because of the darker grain but doesn’t look like cheap construction ply either. is it just sanded plywood from a big box store?
It was at the start of Covid before the wood prices jumped I was getting sande ply for $25 a sheet 1/2in and the cleats were cabinet grade 3/4 pine for $36 back then - soooooo glad I did it then, prob 12-15 sheets of the sande and 8 of the cabinet
Question: why not use a large piece of wood, cut the dados, then slice it down to the narrower strips needed? That would ensure that they are in the same space on the wood, too.
Usually yes, if it’s just a normal box you can do that however the one middle piece has it on both sides. That means either we do that to the entire thing which wouldn’t look good on the outside of the unit, or after we broke it down and have to redo the entire process again for the one side of that one piece only and then we might get our measurements slightly off, which would create a problem.
Great video Justin, going to build a couple for my french cleat wall! Have you tried first cutting the dados on the stock for the front and back pieces, then cutting your parts out? Wondering if it might save some time on the dadoing process.
Thank nick! The plywood that I was using was a/C cabinet grade and so my nice face that was pointing out was on opposite sides so I couldn’t cut it at the same time
Thanks for great build video 👍🏻 There is a minor error in your metric cutlist for the 24” model. In the metric measurement for the 24” (time 26.43), it states that there should be 2 pieces at 609x165mm. This must be wrong. One of them should be 609x197mm if it is to match the imperial (time 26.38) cut list.
Not to sounds like an overachiever, but why not cut your dado’s into the sheet as a whole at one time. Then crosscut your panels and cut the back of the middle one? I’m really not trying to be a butt just curious? Love your work keep the content coming ✊🏼🤟🏼✌🏼
It was to ensure that the center one lined up, if I cut one sheet ripped it into the pieces then I’d have to reset all of my measurements again for that middle one on the opposite side and something might’ve been off. But you definitely can. Thanks!
@ ah I gotcha, I was just thinking less cuts but I see what you mean. Plan on making me some of these soon. In the process of starting to organize my dream shop that just got finished being built. But I’ve come to realize when you go from a little space to operate having a huge space is overwhelming. I’m honestly lost as to how I want to organize it. Guess it’s a good problem to have but it’s mind boggling lol 😂. Enjoy your videos thanks for sharing.
I'm not sure if I messed up somewhere else, but the cut list has an inaccurate measurement. The sides need to be 6.5 x 7.75 if you're putting the front to cover the plywood edge. Turned out really great though!
I just checked and the bottom is 6.5, on the side piece you need to put the 6.5 touching the bottom plate so they match up perfectly and then your sandwiching the back and the front plate. Maybe you swapped one of the pieces? Glad you’re still love it though
The confusion may be on which piece is the back and which is the base. At first, I thought that the base was the 8.5" piece, but once I realized that it was the 7.75" piece, the side dimension make sense.
Yes I recently made a video on how to build it with cut sheet and also made a 3d printable version with free files here’s the link NEW Artillery Sidewinder X4 Pro In Wood Vs 3D Print - Screwdriver Hand Tool Storage ruclips.net/video/RnrWI636qHM/видео.html
Out of curiosity, instead of flipping the stop block to the opposite side, why couldn't you just flip the board around and then move the stop block back towards the middle for the rest of the cuts? Or did I miss an explanation for that somewhere?


![Seungmin "그렇게, 천천히, 우리(As we are)" | [Stray Kids : SKZ-PLAYER]](http://i.ytimg.com/vi/kAzmhLHePqU/mqdefault.jpg)


Sorry the dimensions of the 8in holder were cut off at the end by the up next adds - the 8in holder. Cut list is 4 pieces at 8in x 4.5", 5.25", 7.75" and 8.5" then two 7x6.5in pieces
I just finished up the construction of my new shop and now is the time to get cabinets and other things built the fun stuff in my eyes. Luckly everything is layed out via blue tape and cardboard. having a fight with myself with what type of wood (plywood) to get. Been in the big box stores not happy with the quality but also don't want to spend the money on baltic birch. 130.00-150.00 a sheet. What kind of plywood are you using??? Keep the videos coming love em and subscribed i am.
@@dking70 you’re lucky you can get Baltic birch! They don’t even sell it within a hour drive of me. I will typically buy three-quarter inch cabinet grade plywood, which means it’s A grade on one side. And b/c grade on the other. At the time of this comment it’s selling for usually around 7 layers, around $50 a sheet at the big box and 65 at the lumber yard. It can have some voids here and there, and I always personally pick my pieces to make sure at least A side is perfect.
@@BitnerBuilt We have a couple of places to go to get baltic birch but it's pricey. Seems the big box stores around me have 6 layers and are out of acx. I have other places to go to get acx which will be better quality so a win win in my book. thank you for your response
That is hands down the best explanation of why doing certain actions on a table saw can be insanely dangerous. Brilliant safety tips.
Thanks! Not enough tool safety out there!
I am 70 and health not brilliant ,prostate cancer emphysema, aches and pains, so I spend hours watching this type of RUclips video and I have to say, I LOVE YOUR CHANEL , love your simple ideas and the way you present them.On this video might I make a suggestion, when you are cutting the separator slots for the hardboard, would it not be easier to leave your main 18mm sides and back/front pieces as one large piece, then you only have third as many slot cuts to make, maybe I'm completely wrong, my wife says I am most of the time lol, anyway, a big thanks for posting this video and looking forward to many more, Regards from Garry in the UK
Wow thanks Gary! So normally yes you are correct but on this one since the middle board must be cut the same on both the front and back (but not the other two) it wouldn’t work , or at least it would be highly probable that after separating it into three pieces and flipping the middle piece over, I would mess up on some of the alignment. But in a normal situation, you’re definitely right! Thanks again for watching Gary.
I love that you always talk about safety. Not enough RUclipsrs do that. In the shop, things can happen in less than the blink of and eye. Every woodworker needs to think about safety BEFORE firing up the tool. That way we are able to your future videos. Keep up the good work!
Thanks Byron! Safety is key, as much as I focus on safety things even happened to me, I had a push stick, fly out of my hand when it collided with a blade the other day…. So, even when you’re doing everything right, and being careful, things can still happen!
@@BitnerBuilt A millisecond of inattendance of the most safety aware person may cause an accident. I've been in the Mining industry for 40 years and have seen this way too many times. Going into "Autopilot mode", especially during repetitive tasks like these datos is VERY dangerous.
New woodworker here in Australia 🇦🇺. I love the detailed explanation and for saying it in both languages. That small detail helps us all picture it better in mm and makes your channel more appealing for new people like me . Thanks !!!
Awesome! Yea I always do both since most people are on metric! Have fun with your woodworking adventure 👍
This kind of detailed walkthrough is super helpful, especially explaining why you're doing certain things and how to adjust for different setups. Would love a video like this on your whole french cleat system.
I will see what I can do, I am out of Walls though lol
@@BitnerBuilt how about a mock up wall just for the purpose of the demo?
@@michaeldriscoll6976 that’s a good idea yea I’ll get that video on the schedule
Thank you! BTW, I absolutely love your channel! Thanks for all your time and effort!
Excellent video. As a metric worker, the small metric equivalent in the corner of the screen is just right. No need to say both measurements.
Thanks!
Thanks. Appreciate that you covered the safety details.
Thanks! Yea always try to get some safety info in there very important!
Really like your channel. Very good detail, especially on the safety side. Which is always good. 👍
Thanks so much! Yea safety reminders are important!
You are an excellent teacher! Well done, and thank you!
Wow thanks so much!
A good strong 20” magnetic bar does a wonderful job also. A great build.
👍
I like your attention for the dangers of the table saw. I experienced things can go wrong before you realize.
Thanks Bernard! Hope your ok!
Cool idea! Especially if someone has a bunch of small mobile carts. It would be very easy to move these from one cart to another to have commonly used tools available/ at hand.
Thanks Damon, good idea! 👍
J - nice. already over 500 views in 2 hours. On your brad nailer blow-out. The brads are cut into a point from the right and left. If you hold your gun perpendicular to the bottom plywood/grain, it will "wander" within the bounds of the board and stay hidden. Give it a whirl and play with it to have in your back pocket and save on the CA and accelerator cost if you like...I'm a cheap skate. Thanks!!
Haha good tip Tony
Ok so for making longer dadoed units you can save time by mirroring each slot by turning your wood piece 180 deg and cutting the other side. So set your sled for 1” make the cut then rotate your piece to the other side for a mirrored cut and repeat for all the pieces. You will be at 10k subs soon! 🎉🎉🎉
Great tip, Jesse!
Hi, first this is one of the best woodwork sites on RUclips, you put things across very well, thank you. I am in the U.K. and 70 years old. I have a 10 inch Lumberjack table saw on its own wheeled stand. I made a crosscut sled after looking at 3x3 custom, I liked the look of it and it works a treat but after doing a few cuts I turned it off then went to remove some bits of wood and my finger caught the blade good job its a braked motor so it was very minor. So I did this, refitted blade guard, doubled the size of front fence and cut a slot so the whole guard and dust extraction pipe fits through, because of the guard design it rides over the back fence after finishing the cut, so no need to alter the back fence. No more danger to fingers and hands. it works and you have the blade is covered when using the sled. By the way you are now my go to site, thanks
Thanks! And oh that’s good to hear it was minor!!! Sounds like you put a lot of time into your alteration, necessity always brings about some really great innovations! Stay safe in the shop!
I really like that you took the time to explain safety tips when using a table saw for dado cutting. Very helpful.
Thanks Fabio! I was iffy on if I should as my videos keep running very long but I get a lot of beginner watchers so putting that out there is important.
Great video...really appreciate the cut list at the end.
I know this is a new channel but I am impressed by the quality and attention to detail in every one of your videos.
Thanks very Much Nado! I appreciate it
Sweet little organizers.
Tip: For dadoes with repeating spacing, you can use an indexing system to speed things up. You'll need to make a small runner that's the same width as your dadoes, but a smidge shallower - just like a small version of the miter slots in your table saw.
Glue the runner to your sled at the correct distance from the blade (using the CA glue and blue tape method, or you can clamp a sacrificial piece into the sled bed) . I.E. if you want 1-1/4" spacing, glue it 1-1/4" to the right of the blade. If your first cut has a longer spacing, such as 2", use your stop block to make the first cut on all your workpieces, then glu on the runner.
Once the runner is in place, you don't even need the stop block - just put the workpiece on the sled so the first cut fits over the runner and make your second cut. Then move the board to the right and put the second cut on the runner. And continue on. Not only will every space be precisely the same, but it's repeatable on both sides, and across multiple workpieces, with no need to ever move the runner.
If you think you might want to repeat the cut later, you can save a piece of scrap with two cuts at the proper spacing, and in the future you can use the scrap to fit a new runner on the sled by putting it into one of the scrap piece's dadoes, and placing the other dado over blade; the spacing will be locked in perfectly.
And none of this requires measuring with tapes, rulers, or pencil marks to get perfect spacing every time.
Excellent tip will!
Wow, I didn't even know a zip tie cutter was a thing. Ya learn sumthin' new every day.
Yea I did a light show where we literally used hundreds of thousands of zip ties attaching lights to a stage, made the process so much faster!
I love the idea. I would cut a wider board so my front and back are cut at the same time and one side of the center cut. I would also start in the middle and rotate 180 degrees and cut left then right and then left then right as I move the stop block. I struggled when I tried to do it this way on the Woodsmith Miter station. I purchased a bin like this for pliers and vice grips. Very pretty. Awesome.
So normally, I would cut it all at once and then cut into pieces, but the ply that I was using was A/C grade Cabinet ply so I wanted all of my pieces facing out with the good side but good tip on the 180° turn!
Great idea going to make some of these thanks for sharing
Hey Jim you won the bit-fix a few videos back, need you to email me your mailing info!
@@BitnerBuilt oh wow very cool I will do that thank you so much love your channel and what you are do in your videos
Hi Justin where should I email you at
@@jimrosson6702 justin@bitnerbuilt.com
hey Jim still never got your email with address, want to send you out your Bitfix!
Practical and beautiful! I love to have everything in its place. 😊👍
Me too!
Good morning, sir! Great job! First beginning with safety!
Thank you!
I really like the way you explain things so that novices like me understand. Keep’ ‘em coming. I’ve subscribed.
Thanks, will do!
Sanding sticks!! Never heard of them. Now I want some.
I have an overview of them here in my 10 tools under $20 video - they are handy! 10 Useful Woodworking Tools Under $20
ruclips.net/video/GSrWWiiwvG4/видео.html
Thank you Justin, going to do all of them right now. Promise to go safe :)
Great Arsen!
love the measurement and layout overview at the end of the video. thanks!
Great! It’s easier than spending time on blueprints but gets the job done 👍
For your cutter blades you could just build an insert from wood with a small handle on top that pulls out to give easy access to the deeper opening.
👍
Very well done sir!!!
Thanks!
Oh my goodness, I have a box-o-staplers also!!! I will go through and try them all out so I am not building storage for anything not useful. You are excellent at explaining, I believe I have no questions, wonderful.
Ha ha yes! I own a bunch different electricians staplers for use with my holiday lighting business. Thanks hope you like them!
If you don't have a dado blade, you could just make single pass dados with a standard blade and use hardboard for the dividers.
Good tip
If you don’t have a dado blade, you could cut strips and glue them to one long board, use a piece of hard board to space them. After all the stops are glued, cut the long board into the pieces you need.
👍
Really good channel. How about something for drill bit organizing.
It would greatly appreciated.
Hi Dee, thanks so much! Watch my tips and tricks video, that has a whole drillbit, organizing tray system in it
Thanks for sharing this video. I plan to use this in my garage shop.
That’s awesome!
Great build with good ideas and what's fantastic is the very important safety info which you don't always see on vids. Saws eat fingers like kids eat sweet stuff
Thanks Mike!
Nice idea. Nice video. I've never used a dado because I don't have a set lol. I keep seeing videos like this and sort of want to get one. I just have to see if my jobsite table saw can use one.
Thanks for the tip on the sled. I've got pieces cut out I need to assemble it.
You can just use the blade straight, run a cut and then move it over 2/16th and run it again etc (or whatever width u want) it just takes a lot more passes but totally doable
My first visit to the channel. Really enjoyed the style and presentation, will be coming back.
Awesome, thank you!
Hi Justin - great video and some really good ideas. I would like to offer a couple of suggestions. Firstly, if you don't cut down the full size sheet until later, you can halve the amount of dado cuts you need to make. Leave the sheet intact and cut all the dadoes on the one face. Then rip off the central section piece (you can just use a circular saw or tracksaw so as not to have to reset the blade in the table saw) and cut the dadoes on the back face of it. Because the original sheet is larger, you can use just the table and fence without the need for a crosscut sled (if you haven't made one yet), to do most of the cutting of dadoes. It also greatly reduces your chances of making errors in setup, as all the dadoes are guaranteed to line up. And if you are omitting a central divider, you only need to do one set of dado passes.
Secondly, whether using a crosscut sled or just the fence, you can reset your stops without measuring by cutting a scrap piece to use as a template for resetting your stop block or fence after each cut. This reduces the chances of making errors in measurement to almost zero. In a similar vein, you can also achieve a 6mm cut with a single blade (as some viewers don't have a dado blade - illegal in some countries I believe), by using a spacer to reset you fence (or stop block) after each cut. Rather than cutting a thin strip, use a 3mm drill bit as a spacer.
👍
Great vid thanks, subbed and thanks so much for doing everything in mm too, so many American channels miss this even though I grew up with imperial now living in northern Europe we're all metric :)
Thanks so much! Yeah, it makes a lot of sense to me to get metric in there as well, most of the world uses it!
Excellent idea to display the component pieces for each project with their dimensions at the end of the video. I also appreciate that you included both imperial and metric measurements. I've copied a few other channel's french cleat ideas and have had to estimate dimensions in most cases. This will make it a lot easier. Thank you.
No problem!
Really nice design. I'd probably chamfer the front-top corners of the sides, but that's just me. For future reorganizations, I'd be tempted to write (label, etch, burn, etc.) on the side of the boxes the dimensions of the dividers. Probably not necessary, but I have a feeling that "me in 3 years" will be appreciative of the documentation.
Thanks and sure the chamfer would look nice! Never a bad idea to keep the dimensions, 😎these videos are my documentation for my future reference.
Setting up a new shop. I've never used french cleats before, and have found this video very helpful.
Thanks! Go check out my ultimate guide to French cleats if it’s something that you’re thinking about using!
Great details. Thank you
Thanks Marcus!
I leave it one solid piece then use my fence and do the dados then turn it to cut my pieces that way I’m not switching back and forth 👍
I do the same however since the middle has to be done on both sides it can’t be done like that this time
Excellent video. I'm looking forward to using french cleats in my workshop in france. Safety first ? Yes please!
Absolutely!
Good safety advice.
Thanks! Safety is always big with me
Love this!!
✌️yes I do too!
Nicely done. It was great to see the safety part in there.
Thanks 👍
Your channel is great, appreciate the content. Best of luck Sir.
Thanks so much!
I'm having a new shop built in the late fall and I really appreciate all these ideas and you sharing your thought process. Even small shops should build s sled. Recovery from injury will take a lot more time than the build time. We have saying "SLOW IS FAST". Planning and setting systems saves a ton of time. Train yourself to use safety equipment without fail. Don't be a fool and think an injury could never happen to you. Shop ninjuries can be devastating. STAY SAFE 🤗👍
Thanks and well said!
Very nice, the information in the metric system at the end
I always try to put the metric! Hopefully it’s always correct 🤞
You have a much appreciated ability to talk through parts of a process we would inevitably go "ugh... of course I should have done that..." after we didn't watch your lessons learned. Looking forward to making my own project safer and more efficient and save my learning moments for higher things. Thank you.
Thanks so much! Very kind of you!
Excellent safety message. Good description and really well done! Thanks.
Thanks for watching!
Great video- love that your dimensions are in metrics aswell very considerable 👍🏻
Thanks! I figure most of the world is metric so I should!
Keep up the good work. Very informative, thanks
Thanks Jeff!
I love these holders. I’ll probably hate making all those cuts though.
Headphones are your friend 😁
I keep a scrap with t-bolt and knob on the top of my t-track whenever I need to make successive spaced cuts. Make the cut. Before you move your flip stop, place a spacer (i.e. 3/4 gauge block) against the flip stop, slide your top block over against it and lock, remove the gauge block and now you have a firm index to move your flip stop to. Cut, repeat. I find that more accurate than eyeballing the measuring tape and when you get in the rhythm it's pretty fast.
Great tip Steve!
Thank you for the ideas 💡 to organize.
No problem!
Nice tutorial young man. I like the organization aspect of it. Thanks for the video.
Thanks for watching!
This was great! I wish you many, many subscribers and long life on RUclips and off. 🇨🇦
Thanks so much!
Nicely done! New subscriber. In the organizing process. Can’t wait to see what else you have to watch. Thanks!
Thank you! Have fun with it. I love organizing the shop!
That's a really great idea! i am re-building my hand tool woodworking area and i think bins like this could be really handy for that area instead of just a simple shelf.
Thanks Evan! Yea Out of all the holders I have built over time, I find this one to be one of the most useful.
If you use 2 popsicle sticks, one in each dado and then hold where they cross. Measure and then you the size you need.
Great tip Juan!
Thank you.. most enjoyable and concise!
Glad it was helpful!
That was a great video, thanks.
Glad you enjoyed it!
Really enjoying your videos and your direct caring style!
To reduce the number of passes when cutting the dados one could wait to crosscut a full board (28" x 24" in the large box example) until after the dados are cut. If using this method, working from the outside edges in toward the center and rotating the board 180 degrees each cut minimizes the number of times the fence would have to be adjusted. Also, if using 1/2" ply you could double the center divider piece and then just dado one side and glue it back to back. It would be thicker and take more plywood but easier and make production time less. Don't forget to adjust your dimensions to accommodate the extra 1/4" the center would take up.
Thanks for the great tips!
You somehow seem to keep putting out interesting videos on an insane schedule. Sure hope you're able to keep it up without burning out. I've been looking for a solution for all of the pliers that I have and this one is a great design to get them out of the tool cabinet drawer. After watching this, I went and sorted through my set and even removing duplicates and ones I can't imagine why I have, I came up with around 60. I'm going to have to modify to make it longer, but won't be a problem with your design. - Chris
haha well I am slowing a bit, I was trying to get a video out every day, now that a have a small library i'm cutting back to 1 video ever 2-3 days. Nice! Maybe split it even so you can move them around later if needed. Im happy I made several instead of 1 big one, gives more flexibility later.
Your presentation is so good, sub’d.
Thank you!
Very clear. Nice work.
Thank you! Cheers!
Enjoying your channel with some great suggestions for shop projects. A small suggestion would be to label the parts in your cut lists to easily identify what goes where.
Good thought Bob I’ll do that going forward
41k subs now! Good job dude
Thanks! Hope to hit that 100k this year to get my plaque!
Great instructions & details! But one thought--if it's for a small box, why not make the dados before cutting the front, middle & back separately? Even further refuces odds of misalignment between them... Though indeed easier & safer to handle the "shorter" boards on the sled & over the blade!
Thanks! So since the middle has to be done on both sides it needed to be already cut so I could do the cut on both sides before moving the fence (you are right that the front and back could have stayed together and then cut after!)
@@BitnerBuilt 🤦 forgot about that--glad I asked! Thanks!
Nice video. I had to subscribe. On my sled I put a piece of plexiglass across the sled above the blade. Wasn't for safety, it's because my saw kicks a ton of sawdust right in my face. It also helps for safety.
I'm going to do my wall in French cleats as soon as I get time.
Best wishes to your channel getting bigger.
Thanks so much! Oh wow that’s a rough saw! I put plexi on my sled over the Nono box so I could see when the blade was in the bad cutting area, but your plexiglass idea sounds actually really good, except for maybe inhibiting some taller items going on there. Thanks for subscribing!
@@BitnerBuilt , you are absolutely right about the taller ones. I have a mini sled for those because I hardly ever have cut the bigger stuff. I've been using that sled for over 10 years and I'd say I've had to use the mini maybe 12 times.
Really like the way you present things. Keep it up please.
I haven't watched you before but organizing is something I've thought about but never been good at. Towards the end you showed everyone's main tools organized in a great fashion. This is giving me ideas.
Thank you for this video.... my mind is refocusing my original thoughts. Good stuff. 👍
Since I haven't watched you before, I have to ask...... Why is so much area devoted to straws?
Haha I use them a lot for collecting glue squeeze out, you can cut the straw at a diagonal and then run the sharp tip in a very tight space to collect the glue inside the straw. Very useful for French cleats etc
@@BitnerBuilt yeah, ........but save the sea turtles dude! Gotta go paper these days. 🤣🤣🤣
thank you for the straight shooting information. I sub'd
Thanks!
One thing that the French Cleats don't help with are the dust accumulation. Maybe a French Cleat light box to go on the top cleat would solve that issue. What do you think??? Really enjoying your channel.
That’s a possibility, never tried it. I will say it’s not extreme the accumulation, I personally 3-4x a year put on a full respirator, open the garage doors and hit the entire shop with the leaf blower, cleans all the “hidden stuff” right out!
@@BitnerBuilt Does that get rid of the spider webs?
I missed whether you have two crosscut sleds, one being a dedicated dado one? They’re pretty big and bulky so wondering if there’s a better way? Thx and excellent stuf as always👍
The sled I use has removable center inserts so if I’m cutting dado or single blade I can use the same sled (not my design)
Great video. Planning to make some of these now. Do you have a video about your pencils and screwdrivers holder?
No but I plan to make that soon with my wood vs 3d print series
I'm curious why you cut the pieces first? Seems like it would make more sense to run grooves through one big board, then cut that apart into smaller pieces.
It’s because the middle board needed grooves on both sides, if I had kept it one board and run it I would have then had to cut it down and then reset everything again for the middle board, possibly being off, so yea it was a much more labor intensive way but needed to be done for this one
Quick question, why didn't you flip the board and start over at the 2" mark on the right side of your sled, working inwards to your other cuts? This way you do not have to use the other side of the sled and worry about different calculations from the other side of the sled? This is what I did and it worked perfectly.
You are totally right it is easier to do it that way!
How do you find these boxes are with collecting dust now that you've lived with them for a bit? They seem great, my only concern is that any open-top basin is just going to collect dust over time from sanding, cutting, or whatever else.
Nothing that noticeable, and particularly since the dividers are removable if it were a big issue for you once or twice a year, you could just pull the inserts and vacuum it out for a minute. I know that at least every two or three months I open the garage doors and hit everything with a leaf blower to make a nice dust tornado. Need to do that every once in a while to clean out French cleats and stuff.
My friend your video is exceptioal quality and amazing. I love these holders and tomorrow I'm on it. I need three. Do you have any idea how I can make storage unit(s) for my Ryobi tools? I want something I can slide these in where the battery sits. I'm really new to workworking and now a new subscriber to your channel - Thank you from UK
Awesome thanks so much! Glad to have you with us! Take a look at this video that I just put out last week, it has a pretty wide range of adjustable power tool holders so that it can change over time as you get different tools, and I have metric plans at the end of the video for my friends over the pond 😉 Modular Drill Storage & Charging Station - FREE FILES! - Small Shop Series
ruclips.net/video/Dj1Mhb71Ygo/видео.html
Would it not be easier to do the dadoes on bigger pieces then after cut to size? I find it helps me to line up the dadoes better.
Normally, if it was all just on one side, but because I have the dado on both sides of the center divider, you would have to reset the saw all over again and then maybe the position might be a little bit off. Also, the back and the front are doing the cut on alternate sides of the wood so if you’re using a cabinet grade plywood like I was one of those dados would be on the ugly side of the wood.
@@BitnerBuilt thanks that makes sense!
I love your builds. Can we get the cut list for the 8 inch storage box.
Thanks, it’s at the very end of the video (just checked thinking I forgot it)
@@BitnerBuilt the very last cut list measurements are covered by your channel badge and video links
the 8in holder. Cut list is 4 pieces at 8in x 4.5", 5.25", 7.75" and 8.5" then two 7x6.5in pieces
@@BitnerBuilt You are Awesome
New to your channel and I'm really liking your tutorial way of taking us through your projects. I keep seeing the apron that you're wearing and haven't seen you talk about that...can you tell us what that is? Thanks.
Sure I actually compared 5 aprons in some videos here’s the one I’m wearing in the video your watching (I recently changed aprons)
@BitnerBuilt I guess I need to watch more of your videos to find were you compared the aprons. ;)
This would be easier if you started with a larger piece using 1/2-inch plywood. Run all your dadoes, the cut the board into 4 pieces, glue 2 pieces together, back-to-back, to use as the center.
Sure you can do that, you would need to adjust my measurements to accommodate for the different thickness.
Love your channel! I’m trying to screenshot the last box, for disposables, but there are pics covering part of the measurements. Can you give me the measurements that are covered up? Thanks
Sorry about that they are detailed in the description since those were cut! Thanks so much!
@@BitnerBuilt I saw it right after I sent the message!
I’m curious what kind of plywood you used on your walls. It doesn’t look like birch because of the darker grain but doesn’t look like cheap construction ply either. is it just sanded plywood from a big box store?
It was at the start of Covid before the wood prices jumped I was getting sande ply for $25 a sheet 1/2in and the cleats were cabinet grade 3/4 pine for $36 back then - soooooo glad I did it then, prob 12-15 sheets of the sande and 8 of the cabinet
@@BitnerBuilt here I am getting ready to do my French cleat wall, miter station and about 15 linear ft of base and wall cabinets🤦♂️
@@dellsdiy oomph! Sorry wallet!
Question: why not use a large piece of wood, cut the dados, then slice it down to the narrower strips needed? That would ensure that they are in the same space on the wood, too.
Usually yes, if it’s just a normal box you can do that however the one middle piece has it on both sides. That means either we do that to the entire thing which wouldn’t look good on the outside of the unit, or after we broke it down and have to redo the entire process again for the one side of that one piece only and then we might get our measurements slightly off, which would create a problem.
Ah, thank you!@@BitnerBuilt
Great video Justin, going to build a couple for my french cleat wall! Have you tried first cutting the dados on the stock for the front and back pieces, then cutting your parts out? Wondering if it might save some time on the dadoing process.
Thank nick! The plywood that I was using was a/C cabinet grade and so my nice face that was pointing out was on opposite sides so I couldn’t cut it at the same time
Use a metal mesh or radiator screen on the bottom so dust doesn’t accumulate in the bottom.
Cool tip!
Just curious... why did you not cut a dado slot for the center dividers? Love your videos!
Thanks, what do you mean? The ones with center dividers do have dado’s as well
Since you were cutting so many slots, an index pin referening the previous cut could have speeded alignment for the next cut
Very true! I’ll try and share that method on the next video with dados / grooves
Thanks for great build video 👍🏻
There is a minor error in your metric cutlist for the 24” model.
In the metric measurement for the 24” (time 26.43), it states that there should be 2 pieces at 609x165mm. This must be wrong. One of them should be 609x197mm if it is to match the imperial (time 26.38) cut list.
Thanks! Sorry about that, I wish RUclips would let me get back in there to visually correct it. I will note it in the description!
Not to sounds like an overachiever, but why not cut your dado’s into the sheet as a whole at one time. Then crosscut your panels and cut the back of the middle one? I’m really not trying to be a butt just curious? Love your work keep the content coming ✊🏼🤟🏼✌🏼
It was to ensure that the center one lined up, if I cut one sheet ripped it into the pieces then I’d have to reset all of my measurements again for that middle one on the opposite side and something might’ve been off. But you definitely can. Thanks!
@ ah I gotcha, I was just thinking less cuts but I see what you mean. Plan on making me some of these soon. In the process of starting to organize my dream shop that just got finished being built. But I’ve come to realize when you go from a little space to operate having a huge space is overwhelming. I’m honestly lost as to how I want to organize it. Guess it’s a good problem to have but it’s mind boggling lol 😂. Enjoy your videos thanks for sharing.
Sick! Love it!
Glad you like it!
I'm not sure if I messed up somewhere else, but the cut list has an inaccurate measurement. The sides need to be 6.5 x 7.75 if you're putting the front to cover the plywood edge. Turned out really great though!
I just checked and the bottom is 6.5, on the side piece you need to put the 6.5 touching the bottom plate so they match up perfectly and then your sandwiching the back and the front plate. Maybe you swapped one of the pieces? Glad you’re still love it though
The confusion may be on which piece is the back and which is the base. At first, I thought that the base was the 8.5" piece, but once I realized that it was the 7.75" piece, the side dimension make sense.
Never showed us the angled screwdriver one. Will that be a video in the future ?
Yes I recently made a video on how to build it with cut sheet and also made a 3d printable version with free files here’s the link NEW Artillery Sidewinder X4 Pro In Wood Vs 3D Print - Screwdriver Hand Tool Storage
ruclips.net/video/RnrWI636qHM/видео.html
@@BitnerBuilt Thanks I just started my cleat wall journey and your video is one of the many that got me into gear
Out of curiosity, instead of flipping the stop block to the opposite side, why couldn't you just flip the board around and then move the stop block back towards the middle for the rest of the cuts? Or did I miss an explanation for that somewhere?
No, you could totally do that, you might have to adjust it on the first placement due to the width of the board but 👍