Actually i'm happy to see that at least 10% of the people that watch the video leave an actual like on the video. With the latest changes on RUclips is kinda getting more or less a very important thing to have those likes or the video doesn't get ranked as an actual good video.
Your move with connect and chamfer at 2:20 was proper genius for the fast acquisition of that shape :) I dunno who's thumbing this down, but it's pretty flawless modelling from where I'm standing...
I guess Im asking the wrong place but does someone know of a trick to log back into an instagram account?? I somehow forgot the password. I appreciate any tips you can offer me.
Love your videos. Not trying to be a prick, but what you are describing is called tufting (Holes). It can be with buttons or sometimes it is done without buttons.
its confusing that they call it a chamfer in line subobject because i think of a chamfer as totally different but actually i guess if you look at a chamfer from topdown it would just look like 2 lines
thank you! May i ask you, if i want to make a shape like in sofas in your video, i have to use a path deform or something else for back, left and right sides? sorry for my english
Modeling actual pieces of furniture is very individual as most of them have a different approach to making them. If you are going after a piece that has a more complex geometry then you might want to take up the way with the Slide Knit script. I actually have a video about working with the slide knit so check it out: ruclips.net/video/OcQbY84Qs9k/видео.html Cheers
Sounds like you don't have Snaps turned on. Press S on your keyboard or turn it on manually ( If you have it on check to see if the option to snap to vertex is turned on by right clicking the snaps button )
Ahh .. i went over and basically made the tutorial about how to make the geometry and not anything in particular. The thing with geometry is that it's always the same, you can't really go around it.
Turn on the snap option and make it snap to verticies. Then select the edge and press S to turn on snap, and with the edge selected go over to the vertex you want to align to. That should align the edge to the vertex
I still cann't get it done, sorry for the noob here. I'm using 2016 sp 6 3dsMax, 1. snap option is on, 2. to vertex 3. Grid and snap settings - Options - Translation, Enable Axis Constraints = Checked Did I miss Anything sir ?
Hello Denis, I tried the description above. Snap on, vertex selected in snap, select Move and press shift move to extend. The whole new edge is going to the vertex. Not the yellow cross as is shown in the video. Can you clarify please?
Sorry for late reply, I got that now, goto transform tool (shortcut w)= Snap on (shortcut s)=left click and hold mouse on the transform axis= move to the vertex you wish to align with= done
@@DenisKeman How to toggle axis snaps on? I found Axis Constraints toolbar, but it only works when snaps toggle tools are off. thank you for the response.


the lovely thing about your work is,you make everything so simple...
thxx bro i watched almost your all tutorials and i can say clearly you're a great teacher
You are a master polygon modeler...I have been working in 3d studio since it was created and you are the best I have seen!...Thumbs Up!
i didn't watch this video yet.. just came here to give u a like.. bcoz I'm sure it will b an awesome video as usual. will watch it after my work.. ;)
Hehehe .. did i just get a like before you even watched the video :)
anas va same here :)
Actually i'm happy to see that at least 10% of the people that watch the video leave an actual like on the video. With the latest changes on RUclips is kinda getting more or less a very important thing to have those likes or the video doesn't get ranked as an actual good video.
Denis Keman you deserved it bro.. and that's what v called TRUST ;)
Danielle Nguyen yeah.. bcoz v already have expectations on his videos.. ;)
Your move with connect and chamfer at 2:20 was proper genius for the fast acquisition of that shape :)
I dunno who's thumbing this down, but it's pretty flawless modelling from where I'm standing...
Thank you thank you thank you thank you - for being such a precious teacher and person
Thanks Denis. Very clean, informative and clear performance as always.
I guess Im asking the wrong place but does someone know of a trick to log back into an instagram account??
I somehow forgot the password. I appreciate any tips you can offer me.
@Jamie Darius Instablaster :)
Great Tutorial Denis I love it...what a simple awesome method to make Chesterfield Furniture....
Very nice and detailed a lesson .. Congratulations.
Love your videos. Not trying to be a prick, but what you are describing is called tufting (Holes). It can be with buttons or sometimes it is done without buttons.
Do u have full modelling tutorial of this chesterfield sofa? I want to see the tutorial of full sofa with chesterfield. If yes, please share with me.
Very helpful thanks Denis
Thanks for sharing :) ..... are there now any options to project these Details to another mesh ?
In my Case a Chesterfield sofa
thank you very much
as usual, great tips in your tutorials! thank you a lot!
Thank you so much for this incredible video.
Another Great Video..BigLike!.. Thank You So Much Denis :)
This is very useful thanks mate
Can you tell what the name of script for bend dificult surface, or give the link? Thanks.
Look for a script called Slideknit
at the part where you are working with the end details, how do you drag/duplicate the edge on straight line? I can't figure how ortho works.
Thanks alot . it's was very helpful❤
U r works on 3dsmax awesome....
U told about slide set at last
I want the the link of that tool video
That would be this video
ruclips.net/video/OcQbY84Qs9k/видео.html
Amazing
u dENNIS dON NOT tEACH u tELL uS HOW TO USE 3DMAX TOOL IN FUTURE
grEAT VERY NICE AND IN urdu >>>>>>kamal kr dya ap ne
its confusing that they call it a chamfer in line subobject because i think of a chamfer as totally different but actually i guess if you look at a chamfer from topdown it would just look like 2 lines
this is the most simple video about chesterfield😀 thanks! what the script did you talking about in the end?
The Slide Knit script. I've made a video about that one as well so go ahead and check it out.
ruclips.net/video/OcQbY84Qs9k/видео.html
Denis Keman thank you. try it on max 2016))
thank you! May i ask you, if i want to make a shape like in sofas in your video, i have to use a path deform or something else for back, left and right sides? sorry for my english
Modeling actual pieces of furniture is very individual as most of them have a different approach to making them. If you are going after a piece that has a more complex geometry then you might want to take up the way with the Slide Knit script. I actually have a video about working with the slide knit so check it out:
ruclips.net/video/OcQbY84Qs9k/видео.html
Cheers
thanks a lot!
awesome
Great video! Subscribed.
nicely done thanks for this tutorial ....:)
in my 3ds max that small yellow cross which automatically joins cursor to adjacent edge or vertex is not available pls help
Sounds like you don't have Snaps turned on. Press S on your keyboard or turn it on manually ( If you have it on check to see if the option to snap to vertex is turned on by right clicking the snaps button )
another bomb. thank you sir :D
glad you find it .. explosive :)
I like your technique it's smart, If i might ask you how did you develop such a technique? trial and error or by watching lot's of tutorials?
logical approach to figuring out geometry ... and alot of trial and error :)
I have subscribed, ur channel is really helpful!!
This tutorial is the same that the one from Austris Cingulis from Viscorbel few years ago ?!
Ahh .. i went over and basically made the tutorial about how to make the geometry and not anything in particular. The thing with geometry is that it's always the same, you can't really go around it.
❤ sir
Thamkyou So much
how do you align vertices and edges? around 21:10 - 21:30?
Turn on the snap option and make it snap to verticies. Then select the edge and press S to turn on snap, and with the edge selected go over to the vertex you want to align to. That should align the edge to the vertex
I still cann't get it done, sorry for the noob here.
I'm using 2016 sp 6 3dsMax,
1. snap option is on,
2. to vertex
3. Grid and snap settings - Options - Translation, Enable Axis Constraints = Checked
Did I miss Anything sir ?
Hello Denis, I tried the description above. Snap on, vertex selected in snap, select Move and press shift move to extend. The whole new edge is going to the vertex. Not the yellow cross as is shown in the video. Can you clarify please?
Sorry for late reply, I got that now, goto transform tool (shortcut w)= Snap on (shortcut s)=left click and hold mouse on the transform axis= move to the vertex you wish to align with= done
Alt + D to enable axis on snap
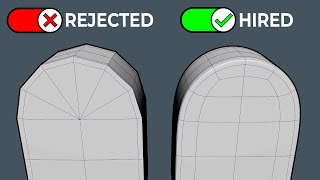
Haw to avoid NGon in this mesh? Thanks.
Basically there is no need to do that, because pentagons are ok
what is your snap angle snapp setting, cant do 21:12, cant aline with other part.
It's not an angle snap, it's vertex snap with axis snaps toggled on
@@DenisKeman How to toggle axis snaps on? I found Axis Constraints toolbar, but it only works when snaps toggle tools are off. thank you for the response.
very nice
at 21:09 how did you do that? i cant figure it out
Turn on Snapping and then with Shift held down click and drag out.
Can you show leather meterial settings and can you give me this leather texture
I didn't do any texturing in this video
Can you make video on texturing leather and wood
Nice ;)
Nice tutorial, but say no to leather! There are plenty ways to insulate from sound and stuff. Using dead skin is just creepy and torturous!
like
i think this technically counts as a comment :)
test
very bad explain