Это видео недоступно.
Сожалеем об этом.
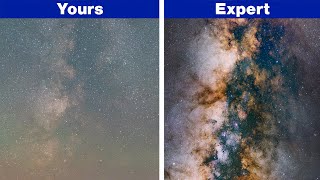
Edit Along - Milky Way Processing with Photoshop

- Добавить в
- Мой плейлист
- Посмотреть позже
- Поделиться
Поделиться
HTML-код
Размер видео:
- Опубликовано: 14 авг 2024
Комментарии • 154
Следующие
Автовоспроизведение

Astro Editing Techniques You're Probably Not Usingmike abramyan
Просмотров 98 тыс.

Milky Way Photography With A Nifty Fifty ProcessingDelta Astrophotography
Просмотров 34 тыс.

How to Edit Milky Way Photos in Photoshop in 15 MINUTES or LessAustin James Jackson
Просмотров 16 тыс.

Can You Forge Tungsten?Alec Steele
Просмотров 805 тыс.
![Gunna - today i did good [Official Video]](http://i.ytimg.com/vi/ulGLk8TaXcI/mqdefault.jpg)
Gunna - today i did good [Official Video]Gunna
Просмотров 423 тыс.

My Daughter's FIRST DAY OF HIGH SCHOOL *Hidden Cameras*Jordan Matter
Просмотров 12 млн

Survive 100 Days In Nuclear Bunker, Win $500,000MrBeast
Просмотров 147 млн

How to Blend Tracked Milky Way and Foreground (Photoshop)Alyn Wallace
Просмотров 29 тыс.
Editing Single Exposure Milky Way ImageNightscape Images
Просмотров 38 тыс.
Editing Stunning Milky Way Photos with Neural Masks | Step-by-Step TutorialNeural Celestia
Просмотров 1,1 тыс.
I Built an INFINITELY ONE-SIDED Violin??Xyla Foxlin
Просмотров 129 тыс.
Sequator Milky Way Stack Tutorial - 2021 EditionPeter Zelinka
Просмотров 44 тыс.
Edit Along - The Pillars of Creation with Siril & GIMPNebula Photos
Просмотров 26 тыс.
How to Edit Milky Way Photos in Lightroom for Great ResultsPhotography Life
Просмотров 124 тыс.
Why your landscape photos are boring 🥱Yorkshire Photo Walks
Просмотров 149 тыс.
How To Edit Astrophotography and Milky Way Photos | Adobe LightroomNateinthewild
Просмотров 9 тыс.
Мухочирон эхтиёт бошед!ГОЛОС МИГРАНТА
Просмотров 98 тыс.
BIP HOUSE / БИП ХАУС #SHORTS #Subscribe Subscribe to the channel #vibe2021bip_house
Просмотров 1,2 млн
Необычный способ сохранить овощи до весны! #овощи #дом #дача #хранение #огород #урожай #лайфхакМарина Жукова
Просмотров 70 тыс.
Чёрная ДЫРА 🕳️ | WICSUR #shortsБискас
Просмотров 922 тыс.
Тулкин Киличев перенес остановку сердца на Олимпиаде-2024! Скорейшего выздоровления 💪🇺🇿МИР БОКСА
Просмотров 442 тыс.
❗Росіяни, звертайтеся до УКРАЇНСЬКИХ волонтерів по допомогу: дивіться відео до кінця #shortsАпостроф TV
Просмотров 710 тыс.
Сырский - о КУРСКОЙ операции. ВСУ заняли 1 тыс. кв км РФ #shortsFREEДOM
Просмотров 312 тыс.
Бои в Курской области: ВСУ берут пленныхEuronews по-русски
Просмотров 483 тыс.
Nico's the Bob Ross of astrophotography, happy little nebulas...
Oh wow! See this is exactly what I need to help me with processing. I love the follow along type videos. Thanks Nico! You continue to teach me more and more skills!
Very glad you like them Justin! 😀
@@NebulaPhotos Please make gimp tutorial also to edit milky way.......
I hope Nico is nominated for the next Nobel Peace Prize because he deserves it really hard
I was sad coz I didn't have any astro data to work with in these terrible weather conditions and Nico comes along and saves the day... I'm gonna have so much fun editing this and learn a lot as well... Thanks Nico
Glad I could help
A step by step tutorial like this for GIMP would be great.
Just came across this video, definitely one of the best I’ve watched . Learned a lot , thanks.
It's time to grab some popcorn
🍿🍿🍿
Love your videos so much. Even the music at the beginning with your great narrating voice gets me pumped, and I've never been let down once. So detailed and well explained, calm dude, pleasant to listen to.
Excellent tutorial Nico. Clear, logical, easy to follow. You also showed us where to find all the necessary controls without needlessly memorising a load of keyboard shortcuts.
Thank you.
I dont know how to thank you nico.. you are really awesome.. 👍
Happy to help!
@@NebulaPhotos Prashant, you could always sign up and join Nico's Patreon.
Thank you ,Nico!!!! This video really helped.
I really love your videos and your work. You're my inspiration for astrophotography.
Happy to help!
Thanks for the help Nico ! 😁
Thanks for this Video! After watching it and following all your steps I reedited a stacked picture I took last summer and it got sooo much better!! 🤩
Glad it helped!
This is amazing. Thanks Nico, I can't wait to try this myself. Just bought a Samyang 18mm 2.8 lens for my Sony a7iii
Thanks for the effort! Great video!
Great Tutorial nico!!
really enjoyed this Video and learnt a bit....and I been shooting astro and processing for some time....awesome video
Excelente Nico 👍👍 saludos.
Another great video Nico. :) I've only ever done one milkyway shot need to get back out there.
Awesome tutorial as always. Just the lesson I needed. Thanks Nico!
This was awesome. Thanks for your continuous outstanding service!
Awesome tutorial. Thanks Nico ;-)
My pleasure!
One thing i surrely learned ,
Nico *loves to grab the curves alot* lol
Greets from the Netherlands
Johny geerts
Perfect timing, just as I'm planning to go somewhere darker to shoot milky way. Great tutorial I definitely like the gold and blue milky way for the creative side!
Thanks Nico. I would love to see the process of how you created the starless image. Thanks again!
ruclips.net/video/pXcRKoxTPVg/видео.html
@@NebulaPhotos Perfect, thanks again!
Amazing! Thank you for share
Espectacular trabajo. Me gustaría ver un tutorial del procesado de starless.
Hey Nico, awesome, but I still don't have kit for astrophotography
Feel free to download my data, but I agree that it is more fun to make your own photo. New phone cameras are getting better every year for milky way; just need access to a dark sky.
Hi Nico! Could you provide a download link to all of the stacked images. I would like stack the foreground and maybe try using sequator.
I can work on that. Might be a few days. Do you want them already registered or raw?
@@NebulaPhotos Just raw. Thanks a lot.
Excellent video. Q: That 14mm lens would have allowed for abt 20 sec exposures (300 rule). Why did you choose 8 seconds? Thanks
When planning to stack, I use the strict NPF rule (available in PhotoPills app or on the web for free). See my video on the topic for the why: ruclips.net/video/RCkhpzM0e7o/видео.html
@@NebulaPhotos ty
There's a line, on the lower right side, just above the tree that I completely focused on for almost the entire edit. I think it happened when you took the foreground and drug it all over the place when you were pointing out you could move the foreground pretty well anywhere. I hadn't noticed it until then. I couldn't get a detailed enough look at it to see if it is an alignment error.
THIS IS AWESOME!!!! What a great idea! :-)
Tribe_Of_Dan
Nico, thanks for that, amazing like all of your videos. I watched of course the linked video in the information banner, showing how to separate milky way and stars. Can the same workflow be used here? Is it necessary to cut off foreground first for separation of the image used here?
Yes, shouldn't be necessary to crop
Thanks for the great details. I am amazed. I am looking forward to trying this in the spring out west. Question. if I do panorama image, do I need 50 images of each of the bias frames,flat and dark frames referenced in the andromeda video for each of the pano shots or just one set of those to be used in deep sky tracker for each pano frame set.
Really nice tuto. I am quite new to your channel so you might have explained it in another video but i dont undrestand the point of the starless image. Thanks
It's just a processing method for enhancing nebulae, or milky way, or a galaxy without having to worry about making the stars too bloated. An alternative method, would be be too carefully mask the stars.
@@NebulaPhotos ok. I ll try next time.. thanks a lot
As always Nico, a great and helpfull video.
As we say in French : Incroyable!
BTW : Do you think you could do the same with Affinity Photo and GIMP? If feasible of course.😊
Hi, Nico. How are you? I loved the possibility of making my own edit (following your tips). I've already watched this video when it was released in 2021. But just now I decided to try my own edit, since I'm practicing/studying this kind of astrophotography (Milky Way with foreground) more seriously (with some projects in mind). Unfortunately, RUclips does not permit me to send you a link with the final result... Again, thank you very much!
You can send it to: nicocarver@gmail.com
Thanks!
Where's the link to the video that walks you through the creation of the starless, stacked, and single photos? I don't see a link or card anywhere.
Great video, but wasn't able to download pics to follow along with. Any chance you could copy and send me the links??
Fake it, till you make it :D
Nice vid, cool tips, love it :)
how the hell you circle each nebula with the lasso tool when i use lasso i cirle one and when i go to the next it erases the first one and i lose my progress.... what am i doing wrong im doing exactly what you saying to do but its not working for me...... this is so frustrating
Ah, sorry, if you look towards the top of the screen, every tool has options, look for an icon that has little plus sign and click it and it should then add to the selection when you lasso more nebulae. If that doesn't work for some reason, try holding the shift key
Hmmm, lots of good info here for sure. But I am quite curious about the lead-up to this episode--why the starless frame, for example? And why the 100+ files? Other sources say that just 4 - 20 will do it, and that more is overkill? Obviously you disagree, and I'm wondering what is the purpose of this kind of number? Does it compensate for the relatively low exposure time and ISO value? When I shoot Milky Way on my Canon 5D4, if I'm in a dark sky area, I normally do ISO 6400, 20mm, 20 sec, f/2 and I'll take several frames and stack in Sequator, or I may not stack at all. The results seem pretty good. Would I get a better, more contrasty image if I did ISO 3200, npf rule exposure of 11 sec, and then do a boatload of exposures, e.g., 120? Sorry for the basic question--it's just that this approach is so different from what I'm used to hearing about about and doing. PS I am mainly into "landscape" astrophotography.
I can't really speak to other sources, but a lot of what you are describing just comes down to the fact that there are many different approaches to astrophotography, even within smaller facets of it like capturing the milky way with landscape. There is no one 'correct' approach. It is very dependent on goals, location, gear, etc. etc.
Every 4x increase in the number of images you stack will result in a 2x increase in the signal to noise ratio (SNR). This is especially important when capturing from less than ideal conditions like I have on the East Coast of the US. The point of doing it this way is you will be able to stretch the image further revealing more faint detail before noise destroys those faint details. I always use the NPF rule when I'm planning to stack as I like round stars, and the stacks are cleaner and work better with round stars. Best ISO is camera specific, but either 3200 or 6400 will work great with the Canon 5Dmk4. As far as 'why starless'? It's a completely optional processing technique, but I like it for giving me better control over the balance between the star field and milky way/nebular details.
@@NebulaPhotos Thanks very much! Absolutely fascinating that a 4x increase in # of images results in 2x increase in signal to noise. So 16 shots twice as good as 4, 64 twice as good as 16. I'll aim for 64 next time! Esp if I'm shooting in less than ideal conditions.
Fantastic video!
I would love to see how you edit this entirely with pixinsight, if possible. There is not a single video in youtube about proccessing a milky way with pixinsight,
and more and more, landscape astrophotographers use more and more pixi.
Also, i have a question:
- if you stacked in DSS, how did you finish with this "stretched" photo? DSS alwyas produce to me a linear photo :/
Thanks in advance :)
Hi Sergio, Someone else has asked for milky way only in PixInsight (PI) so I can add it to my list. I can't think of a way to add the foreground easily in PI, but I'll think about it. Good catch about it being stretched. I forgot to mention, but yes, I did a color-balanced stretch, and made the starless version with StarNet++. I did those things in PI as I own it and it's easier to do those there, but I could have done them in PS and StarNet++ standalone.
@@NebulaPhotos I would be super happy if you do the stack+stretch+edit in pixinsight.
The blending with the foreground doesnt need to be done in pixi if you want. That is a Photoshop work. But i would love to see the milky way edit on pixinsight, there is no videos of it, including the things you didnt show in this video (stacking+stretching+color balancing)
Waiting for it! i really would want to edit my august photos with pixi :D
As i said, nowadays, more and more landscapeastro photographers are doing the process of the milky way in pixi, and then the blending and final touched in photoshop. That would be my goal to learn (and others, i guess)
Thanks a lot in advance :)
I couldn't refine my foreground edges. When I hit Select and Mask in PS 2023 I was launched into a different window that didn't show the mask.
Nice Vid again. But I have questions regarding the workflow for photos taken over nights. How do you stack them? How do you take your flats, bias and so on, when you take the same pictures over 2 or 3 nights? I really love your vids. They answer the most of my questions and are very detailed. But I didn't find a workflow for that, but you talked in a other vid about that, that's why I asked.
Take the calibration frames for each night and then use the 'groups' feature (tabs at the bottom) of deep sky stacker. Put all the data from each night in its own group. Right click on a light frame and set as the 'reference frame' and then stack as you normally would. DSS will then calibrate each night seperately, but register and stack all nights (groups).
@@NebulaPhotos thank you for the quick response. This will help me. And again thank you for the detailed vids you make. They are one of the best I've seen with the deep sky, astrophotograhpy theme.
Great video, once again very helpful. But, I'm having a problem. When I copy and paste my layer with the bg "removed" onto the MW image, the bg is still there. Have tried multiple times
Try Edit -> Copy Merged and then Paste.
@@NebulaPhotos Thanks, that worked.
Thank you for the edit along. Always great to learn new stuff. Which stride number did you use in starnet++ for this wide angle picture?
I think 64 if I remember correctly
Thank you @@NebulaPhotos. I will give it a try. Cheers
Hi, what kind of Photoshop is the one you are using. I downloaded Photoshop after watching you and it looks nothing like the one I have. Which one is the one you are showing> Price? Thank you
www.adobe.com/products/photoshop.html ; $9.99 per month
I shoot with a full spectrum dslr - Nikon D600. If you don't mind sharing, what is your white balance setting or how did you do your custom WB setting? My photos are so much more intensely red.
And thanks for doing this tutorial.
I typically just do daylight WB and fix in post, but if you want it better in camera with your full-spec., shoot a white or gray card in sunlight and use that as your custom white balance.
@@NebulaPhotos thank you for taking the time to answer. My full spectrum images have been the biggest challenge I've encountered with image processing. However, I will get there... one day. Thanks.
Keep up the excellent work.
Any idea if it will work with Photoshop elements ?. I also have Gimp and Howler
Not sure about elements, but this should all be possible with GIMP, just slightly different terminology. Also, instead of adjustment layers, you will be 'layers->stamp new from visible' often and applying new adjustments to each new layer. Blend modes and masks are all in there.
@@NebulaPhotos Thankyou I used to use Photoshop when you could buy it but i just cant Justify the subscription price for how often I use it these days.
Thanks for the tutorial! However, I am a bit confused about how you got the single exposure to look like what the stars.tif file does. For example, what happened to the foreground? The single exposure looks way different than the stars.tif does. Do you have a tutorial that will help me understand this more? I watched one of your deep sky start to finish, but those don't have any foregrounds which made it confusing for me. Thanks again for all you do to help beginners like myself! You are truly an inspiration!
Same idea as deep sky tutorial. Just stacked a few hundred short exposures together with deep sky stacker and then color balanced/ stretched / cropped off the bottom before starnet++. I'll do a milky way start to finish at some point
I live in a pretty dark area and we also have a drought, so no clouds. UNTIL I ordered my AVX mount. It's been WEEKS that we've had high clouds. As soon as my mount arrived. Tonight, It's clear Fingers crossed.
Hello, what program can a mac user use, that is similar to DSS? Thanks.
Siril (siril.org) I have videos about using it, check my channel
To my eyes, this is a bit too much, but it's still great. Did you just take several images without a tracker and then stacked them? Without moving the camera?
Yes, this is without a tracker, just on a tripod. From memory, I re-centered when I checked focus about half way through taking the shots, but at this focal length probably wasn't necessary.
@@thelogician3845 You didn't understand what I asked, did you
@@NebulaPhotos Thanks!
@@thelogician3845 I asked whether he used a tracker or not. There's a difference between tracking and just stacking frames that you took on a static camera, I asked which method of those two he used since I wasn't sure. Your answer doesn't make any sense, as it doesn't answer any of my two questions there. And factually wrong too, as nico just confirmed
@@prnzssLuna .....stack them?without moving the camera?
I interpreted this as "did you stack them without moving the camera" ,hence I replied that's what tracking means.No snarkiness intended.Besides I wasn't answering you're questions....you know what just leave it be.... misunderstanding.
so I'm using PS2022 and when I try to use the lasso tool after each area I draw a lasso around, the previous lasso disappears.
Hold down shift key while lassoing
@@NebulaPhotos Thank you for the answer and quick response!
When or how did you get the starless image ?
👍👍
How do you get a starless Milky Way and why use that ? I’m a bit confused lol. Great edit
I used Starnet - free program available here: starnetastro.com the why and how to are explained here: ruclips.net/video/gyOa8eNIVlk/видео.html
Stop down your aperture, lower your ISO and take your foreground shot with a longer exposure, you'll get a much cleaner photo to blend in, since your doing it anyway. It might take a bit longer to get while there, but the difference will be so huge, it can look literally 100 X cleaner than the single shot you took. The edit is WAY past anything I like and far too fake, but I can appreciate the style, even if it's not my preference.
I only have Photoshop Elements 2020, could I still get the same result with it compared to the more advanced full version of Photoshop like you are using?
Sorry Paul, I'm not sure. I haven't kept up with Elements. I last used it about 6 years ago. At that time, in the advanced mode, it had layers, and possibly even adjustment layers, but can't remember if it had masks or blend modes. Let me know if you try, how well you can follow along!
@@NebulaPhotos Ok, no worries. Thanks,
Paul.
Is the MW captured with an Astro modified camera
It was. A Canon t7, ha mod by Astrogear dot net
why do we need to have a starless photo and one with stars ? is it better to edit this way ?
Dear, a question....¿How to stars extract on native Raw?
If I understand the question: you need to convert the raw to 16bit tiff before extracting the stars with starnet++.
How did you do a photo with the stars and with out on the tiffs great video!
I found it thanks agin
Whats the difference between taking hundreds pictures and stack them together and take only one?
Stacking hundreds together dramatically brings down the appearance of noise. So one picture will look noisy and broken up while hundred of pictures stacked will look smoother and more detailed. This means we can process it much more dramatically.
Do you have any opinion on topaz sharpen and Denoise ai tools?
My opinion of those is if you have Photoshop, they are completely unnecessary. For astrophotography, high pass filtering > topaz sharpen and noise reduction with adobe camera raw filter > topaz denoise
Can you get a nice picture without using Photoshop (or at least this heavily)? How dependent is astrophotography on Photoshop?
You can try to get a good astrophotograph in-camera in a single shot, but it requires lots of expensive gear and a perfect dark sky. Most people see post-processing as part of the hobby, and I wouldn't really recommend astrophotography to someone who has no interest in learning processing (doesn't have to be in Photoshop, it's just a common choice)
@@NebulaPhotos I understand. Thank you for taking the time to answer!
I just getting into astrophotography and I'm finding it fascinating but, although I'm ok with the idea of stacking images, I not so fond of manipulating pictures on Photoshop.
Thanks again and cheers from Europe!
@@McMaxW Think of astrophotography as the art of collecting data and then digitally extracting the subtleties within the data to show extremely faint features in a beautiful way. It is this sort of marriage of science and art. Manipulation and extraction of data is a part of the process. Unlike some forms of photography where the subject is 10 feet in front of you and you can easily get it perfect in camera, these subjects are 4,000,000,000,000,000+ miles away and you are fighting so many inhibiting factors to accomplish your goal. Develop your own processing work flow and you can keep an image looking marvelously natural despite the necessary extraction.
@@isaacteal Actually, that will help. Thank you!
First, Thanks for all the video, I have learned a lot, I'm very new to both astrophotography and photo editing, so with that said I was hoping to follow along and learn how to edit shots, But I'm using Gimp so this tutorial failed at select more that one location 2:18, from there ......I'll keep trying things as time permits.
I have a Kodak camera from Walmart would it work Ik it’s not the best
Not sure, definitely worth a try if you are at a dark site. I've gotten some pretty good milky way photos on my cell phone.
@@NebulaPhotos sounds good thanks I love all your your work
Can you expound on your DSS process for us? Thanks!
Nothing to it, I just use defaults. Check any of my start to finish videos if you want to see me step through it.
How can I do it without Photoshop, will GIMP suffice?
Yep, all of this should be possible in any of the programs similar to Photoshop: GIMP, Affinity Photo, etc.
This may be a silly question but can all this process be done in PixInsight only?
Mostly. The one thing I think would be very difficult to do in PixInsight is blending the foreground (and treeline) from a single exposure on top of the stacked/edited photo of the milky way. PixInsight doesn't have 'selection' tools like Photoshop which make that process so much easier. PixInsight doesn't have layers and blend modes either, but much of that can be done in PixelMath. For instance a screen blend mode is like so: ~(~a*~b) with a and b being the two photos you'd like to screen blend.
do you have any videos for this method of star reduction?
It's part of any recent start to finish video. For example: ruclips.net/video/pXcRKoxTPVg/видео.html
Really cool!...GIMP...(Genuine Image Manipulation Program)...is good too. ;)
🤩🤩🤩🙏🙏🙏👍👍👍
The link to download the data doesn't work :(
I just tried it logged out of all accounts, and it was still working for me: tinyurl.com/nicoMilkyWay What do you see when you click it?
DO IT IN LIGHTROOMM
Since I've not had a clear night after buying a camera 2 months ago I think I shall give this a bash.
I know the feeling. Sent my Nikon D810 out for a Full Spectrum modification. Have only been able to use it a couple of times. When the moon isn't in the way then it's clouds overhead.
Algorithm
I hope so :)
@@NebulaPhotos hehe I didnt know what to comment but as I know it helps with the algorithm... I just did something 😁
Amateur editing bro
Hey Nico I was wondering if I had the permission to post this on social media (Instagram) and tag you, ofcourse with all the credits :)
Yes, feel free. Thanks
@@NebulaPhotos Thanks Nico :)