Just wanted to come back and thank you for this design. I built one in 2017, my first DIY printer. I've now also built a Voron V2.4 and Voron V0.1. I'm just now starting to build an Annex K3. While the printers and technology have come a long, long way - I'm still holding onto my HEVO and print with it from time to time. Thank you again!
Building mine really soon and I went all 12mm anodised aluminium rods from igus with hollow rods for the Y axis with the more updated Z axis bed (dual screw and quad rods)
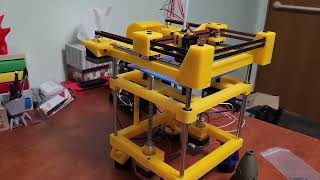
Thanks for going over the differences. It's one thing to see the parts and description, another thing to actually see them in real life which helps see how they work. I'm halfway thru a HyperCube build atm but some of these remakes look like a really good upgrade for later on. I'm already using a remixed XY Joiner which allows for toothed idlers, I didn't like the belts on bearings either. I'm surprised you could use those internal L brackets, I have those Ls on another printer and they were impossible to get square. I assumed they were inferior cheap rubbish.
Absolutely amazing build! But I have one gripe... I just spent $780 for a new Prusa MK2S (which is pretty awesome already) I found out about this Hypercube Evolution because I was looking at building an extruded frame for my MK3S, but after seeing this build, I now have decided to build your dual Z version Hypercube. (At least I have a good printer to print the Hypercube parts with!) One of my favorite add-ons you have come up with is the dial indicator mount. Being a machinist myself, I have thought of doing this somehow for my Prusa as a way to get a perfectly square frame.The only thing I want to change on my build is a taller Z-axis and extend the Z height of the frame above the carriage stops enough so that I can enclose the whole cube with Lexan.Thanks for all your work and sharing it with us!
Great job. Can't wait to see the dual Z mod on it because I believe it will make a rock solid bed platform. I've already ordered most of the parts so I'll be building mine soon. Thanks ;)
Have you thought about rod placement? I was thinking that if the Z rods were on the left and right of the plate it would still provide stability while having the front unobstructed for print removal.
Very nice -- well done! I'm working on my own design (around mixed Misumi T-slot, and Openbuilds V-slot). I started out with a modified Makerbot design (~300x300x400mm build) with dual Z axis screws, but changed my mind to go with a corexy design. I'm also going to a single Z axis cantilevered bed design using 2 2040 V-slot and 8 polycarbonate wheels (4 per side). I think I can make the single drive bed very stable. If not, I will go back to the dual drive -- possibly using a single big Nema17 with an endless loop belt (9-10mm) driving both screws. Since I have quite a bit of 2060 V-slot, I'll likely use it for the frame uprights -- though I really do like the 3030. I think it makes frame symmetry easier to achieve. I'll probably use polycarbonate mini V-wheels for the X axis extruder carrier, on 2020 V-slot, etc. I may use some of your design -- when appropriate, and will give you full credit for that aspect of my design. I have a Creality CR-10, a wooden Flashforge, and metal Makerbot clone to produce parts. The CR-10 is great for that -- the entire small parts population on one bed. Probably use PETG for many of the parts. Cheers, and keep up the fine work!
More bloody Aussies lol. The Arduino runs out of single steps at 10kHz and quadsteps at 40kHz, so the speed limit for accurate movement ends up being between 65mm/sec and 125mm/sec depending on how the motors are moving. 32-bit boards can do at least an order of magnitude better. You can also run RepRapFirmware on the RADDS, that seems to be the best 32-bit option.
Interesting changes. Would you please update your video description with your thingiverse link as well as any vendors that you are willing to share, preferably with direct product links. This helps out everyone immensely. Thanks!
Is this something that is supported/developed? I have been trying to decide between hypercube and Boron but I cant seem to find a lot of info on the hypercube
Thanks Scott ,awesome video. Must say looks like awesome printer. In the process of getting things together to build one of these printer. Thanks for sharing appreciate it.
Hi, Thanks for the feedback. The printer has been working hard all week printing more sets of parts. Hope to have some further videos up early next week.
Hi Scott, I have 30mmx30mm profiles available. May I ask are you going to share some of stl files that you have changed and improved. I would really appreciate them. Thanks
Please can you advise me on how big should my cube be if I am using the ANYCUBIC Ultrabase Heated Bed at 430 * 410mm? I am going to use 3030 extrusion for the frame and 2020 for the Z frame to hold the bed.
I'm starting to gather the parts to build one of these printers but have run into a snag. The link in Thingiverse for the stepper motor with lead screw no longer works so in looking for a substitute, I've discovered that there are three pitches of lead screw available, 2, 4, and 8. Which one should I get for this build?
Good video.That's a smart machine & an impressive smooth surfaced print result. I hope when I get mine built (Im trying a double Z LIft large format) it'll be as good. Ive de;layed getting printed parts as I wanted to see what Feedback appeared on Tech2's excellent design & adaptations of it, also to see what filament everyone think is the best for Parts.
Hi Scott. Built such a printer. but I have a problem. I am not friendly with programming. bought motherboard MKS GEN L 2.1 + MKS TFT3.5, on aliexpress. could you help me configure the firmware. Thanks.
Hello, your thingiverse page says something about a exel sheet? also im thinking (first stages, i did pricing for parts by estimation, 400~ sound right?) of building one. do you have a document of all the stuff you need? i see most on thingiverse but not frame size and stuff.
Hello Scott, I bought a printer model, could you send me schematic of how to put filament sensor in it? Here in Brazil there is not much about it. Thanks
using your excel file, setting 300x300 lists the 3030 aluminum to have different lengths. But if i select 300x310 the rods and extrusions are all the same length. Is that sounding correct?
Surly this is a joke, there is nothing that you can do to a $1,600 taz 5 that is worth doing. If you really want to switch to coreXY you can make money back on principal alone. TAZ 5 has more value that a printer like this because of the name. If you sell the taz 5, you will have the money for two coreXY printers. 2 printers are better than one!
Oh sure, just found you after buying all the parts from Tech2C's BOM. Hope that by the time I get it dialed in I can use it to follow along with your build. Good work. Can't wait to see how this comes along. I will chip in my thoughts on carbon fiber rod. The rolled/wrapped CF rod is stiff as heck. Have no worries about it being rigid enough. My upper body strength isn't enough to notably deform the 10mm OD. Out of four rods I got, one of them had a little "banana" to it, though. Good thing I got extra for other projects that it doesn't matter for. If using carbon fiber for larger builds, the diameter should probably scale accordingly. I think CF is beyond adequate assuming bowden extrusion.
You can tell more about the connection of electricians, mosfet, arduino and ramps and what components should I buy? and one more question: will there be a variant with rails and 32 bits
Hi, i'm into this same project by my own, and let me tell you your designs are wonderful. noisy but really really nice. Change Drivers to silence ones and will be world classssss!!!!
I was actually planning on scaling the hypercube design and redesigning the parts to make a 600^3 build volume but i guess you just did it for me! Keep up the good work!
Just yesterday I order 12 meters 20x20 profile, and then I found your wonderful design :-( Thank you for making a video series about it and publishing your 3D-parts! I hope you will find the time to make a 20x20 version.
Is there a reason you wanted to go with steel rods? It seems like the additional weight would be a negative in terms of ringing. Just curious. I am planning to build one of these with your modifications! Very impressed
Mine is built and running but I went with a BMG direct drive dual extruder and e3d V6 hotend on the X-carriage and it's too much weight for it on 8mm rods, it's not very fast due to the mass............ Trying to move that much weight about during acceleration and de-acceleration around corners causes ringing / ghosting using too much jerk to correct it causes blobs on corners of the cube because of over extrusion because the hotend moves slower around the corner...........Stick with the bowden setup and make the top end as light as reasonable possible without sacrificing strength. You will have a better 3d printer. I'm going bowden too.
Hello, why not mounting the single z-axis motor with the threaded rod opposite of the steel rods, so i think its not necessary to use dual-z-motors (save money and energy and lower noise) and it should be much more stable than have the build table hanging in the air.
The build table would still be hanging in the air. If you wish to simplify having dual - z - motors with only 2 (not 4) 12 mm z steel linear rods is worth considering
The double-z Axis is the way to go. one of the big disappointments on my anet a6 was one limit switch on the double z axis. IMO , the z steppers should have each a separate driver, and separate limit switches. This allows for zeroing both z steppers in a repeatable way. Is that what you are doing in the double z version?
Great video. I'm planning to build larger printer about 800mm x 800mm x 800mm building volume. Can I use Nema34 stepper motors for that big size printer? If yes, Can I use Hypercube evolution electronics board to control that size stepper motors?
If I am not mistaken, I think your bed also has screw levels which the tech2c hypercube didn't have. Your mods are awesome and really improve the design.
a slower board will just perform the //exact// same moves as a faster board, its executing the same commands of /where/ to move not /when/ to move? even with 8 bit processors the bottle neck is motor step speed and extruder extrusion due to flow limits? (words of a mechanic, as i see it....open to being proved wrong)
I have been asked to help with assembling a Hypercube Evolution. Looking at this and your following videos, i believe that I may have enough information to set up the mechanicals. Bit wary about the belt and platform assembly though. I was informed that there were more detailed instructions on a wiki at hevo.wiki/ but the page just gives a 404 error. Do you know if the wiki still exists and are the any instructions anywhere about setting up the electrics? Be glad of any help.
Hi, just started building this printer, huge thanks for posting your build logs and all the parts. I just finished printing all the parts for the dual z axis version and are currently waiting for the extrusions from China. Super exited to get starting building. I have two psu`s laying around one 12 and one 24V and was wondering instead of modifying the ramps to run on 24 volts, if I could use a SSR (or aMOSFET?) connected to the 24V psu to run the heat bed, and everything else from the 12V psu ( or a decent 24-12V stepdown converter). Controlling the SSR from the D8 pin on the ramps? Reason I`m asking is that all my other components comes form my old Anet A8 so 12V (hotend, fans etc). Again, thanks
I believe he use PETG. Much stronger than PLA and can handle higher temperatures. More of a pain to print though as stringing can be an issue is your slicer is not set up right or your printer is only so-so.
It looks good, I look forward to seeing how it works out. What would you say was the total $ spent? I have also been looking at the Folger Tech FT-5, which has a similar z-axis setup to your design. A common issue is the z-axis lead screws getting out of alignment if left sitting. How do you plan to deal with that issue? One person put end stops on both sides, driving the two motors separately. It seemed to work well.
I'm really new to 3d printing, I'm looking to get a 3 d printer capable of making good looking rock solid consumer grade parts to be used for making custom headphone parts, such as the outer cups, headbands and rather complex 'aerodynamic' internal parts, including frames to which the speakers will be mounted. I have become interested in dual print head designs such as the flashforge creator pro, frankly I'm getting a little overwhelmed with the infinite choices there are in the 3d printing world. I've heard hood things about the prusha i3 and it's clones, I'm wondering what might be a good starting platform that's upgradable, this printer looks excellent and I love your upgrades, although it uses a single print head the quality of prints looks fantastic and I'm wondering if dual print heads are absolutely necessary for my requirements. I'm open to any recommendations and general advice, appreciate any replies. Thanks
This is a really attractive build mate. You got rid of my biggest gripe with the Hypercube, the reversed belt ahah Just finished printing my parts for the hypercube, received my 2020 and now this! ;) Do you reckon I could still use 2020 extrusions for the whole build? Would the stepper motors mounts fit you reckon?..
The parts would need to be reworked to work on 2020 extrusion. It could be done but at the moment I have people wanting mods and changes to the current design based on 3030.
Are these steel-core PU belts that you've employed? See i'm wondering, how are they holding up? I heard they might gain issues with smaller bend radii.
Thanks to you and Tech2 for this awesome project. This is exactly what I have been looking for - something solid that I can build and modify to suit my needs. Looking at your Thingiverse summary, I'm guessing you're a mechanical engineer by trade. It follows all the conventions I'm familiar with. Some of the Aliexpress links no longer work because I suspect those particular items are no longer available from them. I plan on using a Duet Wi-Fi control board or I may look into a Lerdge-X board (don't know much about this one) or MKS SBASE with TMC2208 drivers. All are 32 bit cards. Not sure if I'll use a pre-made hot bed or make my own from 4mm thick 6061 aluminum for it's regidity.
looks like this project is for those who already own 3D printer, i want to build one but how to print that 3D parts when i don't have one? can epson printer print that plastic parts :) , since i can not print that parts i'm gonna build my first 3D printer base on flying bear tornado model with 400x400 build and triple extruder, some parts already arrived now i waiting another parts from Ali Express, the only thing that worry me is how to wire / connect 3D print electronics parts using 24v PSU
This is a great build on the original HyperCube! I had thought of similar mod for the movement axes, do you have any guess as to how much the size differences changed the print quality?
Great effort on your enhancements to the original Hypercube. Could you explain in more detail why you stick with stell rods for the X-axis? The last itteration by Tec2C is using Carbonfibre tube to loose even more weight on the X-axis. IMO this makes sense. So I am a bit surprised you went back to steel rods.
Tech2C has the right approach with wanting to minimise the moving mass. However we also have a trade off with the stiffness of the system. Carbon fibre tubes are stong but are they as stiff as the MS rods? I have not done the numbers but my gut... Strenght and stiffness are both important to consider. An A380 wing is light and strong but not stiff. As I said I have not done the numbers and went with the MS rods so that there would be no issues with the bearings.
Smoothieboard firmware for LinuxCNC on Raspberry Pi has been in development for the last couple of years. I've currently called the firmware "Remora" and will be releasing hopefully by the end of January. For those who want the most versatile / hackable platform, Remora will be interesting. Currenlty has open loop and true closed loop steppers along with all the modules needed for a 3D Printer or regular CNC machine.
Hi Scott 3D. Love the work on the Hypercube Evolution. Thinking about making one (currently pricing out everything... trying to get the cost of the frame down). I have to ask what is the color/manufacturer of that PETG? I love the look!
Yeah dual Z version will be best, was the first thing I thought I would add when I saw the hypercube design. Dont like it being supported in just one side.
I would love to see a video of your setup with LinuxCNC on the raspberry + Ramps + Arduino. Can't find good documentation anywhere... (and i am currently printing parts on my Anet for the Hypercube Evolution... Thank you a lot for sharing your design!!)


Just built my Hypercube Evolution, all I can say is thank you, great design!
How much did it cost you in total, if you dont mind me asking? im a student and looker for something cheaper that prusa etc
Just wanted to come back and thank you for this design. I built one in 2017, my first DIY printer. I've now also built a Voron V2.4 and Voron V0.1. I'm just now starting to build an Annex K3. While the printers and technology have come a long, long way - I'm still holding onto my HEVO and print with it from time to time. Thank you again!
Building mine really soon and I went all 12mm anodised aluminium rods from igus with hollow rods for the Y axis with the more updated Z axis bed (dual screw and quad rods)
awww I missed the noise. I have tmc drivers on my printer now :D
Dude, that belt tensioning system is /chefskiss
Thanks for going over the differences. It's one thing to see the parts and description, another thing to actually see them in real life which helps see how they work.
I'm halfway thru a HyperCube build atm but some of these remakes look like a really good upgrade for later on. I'm already using a remixed XY Joiner which allows for toothed idlers, I didn't like the belts on bearings either.
I'm surprised you could use those internal L brackets, I have those Ls on another printer and they were impossible to get square. I assumed they were inferior cheap rubbish.
Absolutely amazing build! But I have one gripe... I just spent $780 for a new Prusa MK2S (which is pretty awesome already) I found out about this Hypercube Evolution because I was looking at building an extruded frame for my MK3S, but after seeing this build, I now have decided to build your dual Z version Hypercube. (At least I have a good printer to print the Hypercube parts with!) One of my favorite add-ons you have come up with is the dial indicator mount. Being a machinist myself, I have thought of doing this somehow for my Prusa as a way to get a perfectly square frame.The only thing I want to change on my build is a taller Z-axis and extend the Z height of the frame above the carriage stops enough so that I can enclose the whole cube with Lexan.Thanks for all your work and sharing it with us!
Great job. Can't wait to see the dual Z mod on it because I believe it will make a rock solid bed platform. I've already ordered most of the parts so I'll be building mine soon. Thanks ;)
Thanks Captain! Should have the delivery of extrusions tomorrow, so then onto the dual Z version...
Have you thought about rod placement? I was thinking that if the Z rods were on the left and right of the plate it would still provide stability while having the front unobstructed for print removal.
Thant's exactly the plan for the dual Z version. Extrusions arrived today but with the wrong brakets.... hrrr..
Very nice -- well done! I'm working on my own design (around mixed Misumi T-slot, and Openbuilds V-slot). I started out with a modified Makerbot design (~300x300x400mm build) with dual Z axis screws, but changed my mind to go with a corexy design. I'm also going to a single Z axis cantilevered bed design using 2 2040 V-slot and 8 polycarbonate wheels (4 per side). I think I can make the single drive bed very stable. If not, I will go back to the dual drive -- possibly using a single big Nema17 with an endless loop belt (9-10mm) driving both screws.
Since I have quite a bit of 2060 V-slot, I'll likely use it for the frame uprights -- though I really do like the 3030. I think it makes frame symmetry easier to achieve.
I'll probably use polycarbonate mini V-wheels for the X axis extruder carrier, on 2020 V-slot, etc. I may use some of your design -- when appropriate, and will give you full credit for that aspect of my design.
I have a Creality CR-10, a wooden Flashforge, and metal Makerbot clone to produce parts. The CR-10 is great for that -- the entire small parts population on one bed. Probably use PETG for many of the parts.
Cheers, and keep up the fine work!
I can no longer find the mk2a bed, only mk3, which has the holes located in a different spot, do those work?
More bloody Aussies lol. The Arduino runs out of single steps at 10kHz and quadsteps at 40kHz, so the speed limit for accurate movement ends up being between 65mm/sec and 125mm/sec depending on how the motors are moving. 32-bit boards can do at least an order of magnitude better. You can also run RepRapFirmware on the RADDS, that seems to be the best 32-bit option.
Yep! And hence the reason for going to a 32bit contoller running at 84Mhz. Allows an easy 80khz step rate.
Scott 3D have you moved to the 32 bit controller yet?
Interesting changes. Would you please update your video description with your thingiverse link as well as any vendors that you are willing to share, preferably with direct product links. This helps out everyone immensely. Thanks!
I realize Im pretty randomly asking but do anyone know a good site to stream new series online ?
Hello dear
Can I use the carriage of this machine for the original tech2 model or do I have to rebuild all the parts?
i really love this EVOLUTION. great work.
im looking forward for further updates
subscribed and thumbs up!
Is this something that is supported/developed? I have been trying to decide between hypercube and Boron but I cant seem to find a lot of info on the hypercube
Thanks Scott ,awesome video. Must say looks like awesome printer. In the process of getting things together to build one of these printer. Thanks for sharing appreciate it.
Hi, Thanks for the feedback. The printer has been working hard all week printing more sets of parts. Hope to have some further videos up early next week.
Hi Scott, I have 30mmx30mm profiles available. May I ask are you going to share some of stl files that you have changed and improved. I would really appreciate them. Thanks
That looks awesome. I want to build a Hypercube but i have never done so and i have never owned a 3d printer.
Please can you advise me on how big should my cube be if I am using the ANYCUBIC Ultrabase Heated Bed at 430 * 410mm? I am going to use 3030 extrusion for the frame and 2020 for the Z frame to hold the bed.
That seems better than many "pro" 3d printers.
I'm starting to gather the parts to build one of these printers but have run into a snag. The link in Thingiverse for the stepper motor with lead screw no longer works so in looking for a substitute, I've discovered that there are three pitches of lead screw available, 2, 4, and 8. Which one should I get for this build?
Awesome design, Thanks for sharing. I am starting to print my parts.
randomly stumbled on this and looks bloody brilliant!
Thanks, much appreciated!
Scott 3D where do you get the black 3030? I can't find it anywhere lol
The extrusion is from china. Links on the Thingiverse page www.thingiverse.com/thing:2254103
Awesome printer! Congratulations.
Good video.That's a smart machine & an impressive smooth surfaced print result. I hope when I get mine built (Im trying a double Z LIft large format) it'll be as good. Ive de;layed getting printed parts as I wanted to see what Feedback appeared on Tech2's excellent design & adaptations of it, also to see what filament everyone think is the best for Parts.
Why you did not use lead screws for all 3 axis instead of belt system? Ant specific reason for it?
Hi Scott. Built such a printer. but I have a problem. I am not friendly with programming. bought motherboard MKS GEN L 2.1 + MKS TFT3.5, on aliexpress. could you help me configure the firmware.
Thanks.
Hello, your thingiverse page says something about a exel sheet? also im thinking (first stages, i did pricing for parts by estimation, 400~ sound right?) of building one. do you have a document of all the stuff you need? i see most on thingiverse but not frame size and stuff.
Hello Scott, I bought a printer model, could you send me schematic of how to put filament sensor in it? Here in Brazil there is not much about it. Thanks
using your excel file, setting 300x300 lists the 3030 aluminum to have different lengths. But if i select 300x310 the rods and extrusions are all the same length. Is that sounding correct?
Okay, I'm done. I start converting my TAZ 5 into this today! This build is amazing!! Thanks for sharig it!!!
Surly this is a joke, there is nothing that you can do to a $1,600 taz 5 that is worth doing. If you really want to switch to coreXY you can make money back on principal alone. TAZ 5 has more value that a printer like this because of the name. If you sell the taz 5, you will have the money for two coreXY printers. 2 printers are better than one!
how did you wiring the fan radial 12v on ramps 1.4 24v? did you use output D9? thanks!
Oh sure, just found you after buying all the parts from Tech2C's BOM. Hope that by the time I get it dialed in I can use it to follow along with your build. Good work. Can't wait to see how this comes along.
I will chip in my thoughts on carbon fiber rod. The rolled/wrapped CF rod is stiff as heck. Have no worries about it being rigid enough. My upper body strength isn't enough to notably deform the 10mm OD. Out of four rods I got, one of them had a little "banana" to it, though. Good thing I got extra for other projects that it doesn't matter for. If using carbon fiber for larger builds, the diameter should probably scale accordingly. I think CF is beyond adequate assuming bowden extrusion.
Where did you get these cool white belts? I guess not gates, but
Really like what you've done here, great work and thanks for sharing!
Would you mind releasing the 3D build files for modifying? Thanks
Well done, really like your design and approach.
You can tell more about the connection of electricians, mosfet, arduino and ramps
and what components should I buy?
and one more question:
will there be a variant with rails and 32 bits
where did you get the 2020 rails I'm trying to find some cheap
Hi, i'm into this same project by my own, and let me tell you your designs are wonderful. noisy but really really nice. Change Drivers to silence ones and will be world classssss!!!!
I was actually planning on scaling the hypercube design and redesigning the parts to make a 600^3 build volume but i guess you just did it for me! Keep up the good work!
Is there a version using 20x20 or 40x40 vslot (openbuilds) ?
Do the files include extruder? can someone provide part list an quantity to print for dual z version? Thanks
Just yesterday I order 12 meters 20x20 profile, and then I found your wonderful design :-( Thank you for making a video series about it and publishing your 3D-parts! I hope you will find the time to make a 20x20 version.
I also ordered 12m of 2020 and boy was that fun getting it into the house *uncut into sections*. Had to use half the next door neighbours' garden : P
Besides the motor mounts are there any other parts that need to be reworked to fit 2020?
Hey Scott, Where did you source all your parts from... Im also in Australia and looking to build your version of this ...
Is there a reason you wanted to go with steel rods? It seems like the additional weight would be a negative in terms of ringing. Just curious. I am planning to build one of these with your modifications! Very impressed
Mine is built and running but I went with a BMG direct drive dual extruder and e3d V6 hotend on the X-carriage and it's too much weight for it on 8mm rods, it's not very fast due to the mass............ Trying to move that much weight about during acceleration and de-acceleration around corners causes ringing / ghosting using too much jerk to correct it causes blobs on corners of the cube because of over extrusion because the hotend moves slower around the corner...........Stick with the bowden setup and make the top end as light as reasonable possible without sacrificing strength. You will have a better 3d printer. I'm going bowden too.
You could try a Zesty Nimble. Direct drive goodness without the stepper weight.
Will path work instead of and or do you recommend ABS..
will the printed parts work for 2020 extrusions
Hello, why not mounting the single z-axis motor with the threaded rod opposite of the steel rods, so i think its not necessary to use dual-z-motors (save money and energy and lower noise) and it should be much more stable than have the build table hanging in the air.
The build table would still be hanging in the air. If you wish to simplify having dual - z - motors with only 2 (not 4) 12 mm z steel linear rods is worth considering
Nice work, thanks for posting this. I've subscribed and looking forward to seeing further updates
Somebody knows the external printer dimensions please? thank you!
The double-z Axis is the way to go. one of the big disappointments on my anet a6 was one limit switch on the double z axis. IMO , the z steppers should have each a separate driver, and separate limit switches. This allows for zeroing both z steppers in a repeatable way. Is that what you are doing in the double z version?
Ok, now I know what printer I want to build next :) .
Great video, thank You for sharing and I hope for more :)
Great video. I'm planning to build larger printer about 800mm x 800mm x 800mm building volume. Can I use Nema34 stepper motors for that big size printer? If yes, Can I use Hypercube evolution electronics board to control that size stepper motors?
If I am not mistaken, I think your bed also has screw levels which the tech2c hypercube didn't have. Your mods are awesome and really improve the design.
what filament is this nice green/yellowish color?
a slower board will just perform the //exact// same moves as a faster board, its executing the same commands of /where/ to move not /when/ to move?
even with 8 bit processors the bottle neck is motor step speed and extruder extrusion due to flow limits? (words of a mechanic, as i see it....open to being proved wrong)
I have been asked to help with assembling a Hypercube Evolution. Looking at this and your following videos, i believe that I may have enough information to set up the mechanicals. Bit wary about the belt and platform assembly though. I was informed that there were more detailed instructions on a wiki at hevo.wiki/ but the page just gives a 404 error. Do you know if the wiki still exists and are the any instructions anywhere about setting up the electrics? Be glad of any help.
Hi, just started building this printer, huge thanks for posting your build logs and all the parts. I just finished printing all the parts for the dual z axis version and are currently waiting for the extrusions from China. Super exited to get starting building.
I have two psu`s laying around one 12 and one 24V and was wondering instead of modifying the ramps to run on 24 volts, if I could use a SSR (or aMOSFET?) connected to the 24V psu to run the heat bed, and everything else from the 12V psu ( or a decent 24-12V stepdown converter). Controlling the SSR from the D8 pin on the ramps? Reason I`m asking is that all my other components comes form my old Anet A8 so 12V (hotend, fans etc).
Again, thanks
what material did you use? PETG? pla?
i wish in the future you will design one using linear rails. that will be endgame for machinic parts
Where did u buy it from and how much
what material are you using for print all these parts? PLA? are they strong enough?
I believe he use PETG. Much stronger than PLA and can handle higher temperatures. More of a pain to print though as stringing can be an issue is your slicer is not set up right or your printer is only so-so.
Привет,кто самый крутой проект. Ты крутой. Хочу повторить проект,спасибо.
I am interested in building one. How much does all the parts cost?
how i can i nstal the optical endstop for x carriage?
It looks good, I look forward to seeing how it works out. What would you say was the total $ spent?
I have also been looking at the Folger Tech FT-5, which has a similar z-axis setup to your design. A common issue is the z-axis lead screws getting out of alignment if left sitting. How do you plan to deal with that issue? One person put end stops on both sides, driving the two motors separately. It seemed to work well.
I'm really new to 3d printing, I'm looking to get a 3 d printer capable of making good looking rock solid consumer grade parts to be used for making custom headphone parts, such as the outer cups, headbands and rather complex 'aerodynamic' internal parts, including frames to which the speakers will be mounted. I have become interested in dual print head designs such as the flashforge creator pro, frankly I'm getting a little overwhelmed with the infinite choices there are in the 3d printing world. I've heard hood things about the prusha i3 and it's clones, I'm wondering what might be a good starting platform that's upgradable, this printer looks excellent and I love your upgrades, although it uses a single print head the quality of prints looks fantastic and I'm wondering if dual print heads are absolutely necessary for my requirements.
I'm open to any recommendations and general advice, appreciate any replies. Thanks
Can someone let me know if there is a dual extruder version?
That is a nice 3d printer could you plese tell me where did you get the aluminium bed plese
This is a really attractive build mate.
You got rid of my biggest gripe with the Hypercube, the reversed belt ahah
Just finished printing my parts for the hypercube, received my 2020 and now this! ;)
Do you reckon I could still use 2020 extrusions for the whole build? Would the stepper motors mounts fit you reckon?..
The parts would need to be reworked to work on 2020 extrusion. It could be done but at the moment I have people wanting mods and changes to the current design based on 3030.
Sure mate!
Wasn't expecting you to do it of course :D
Was just wondering but thank you for your reply and can't wait to see those mods ;)
Would love to see a full on assembly manual, I have ordered most of the parts and I have a few of the other parts as well. :)
I hope to have a few more build videos over the next two weeks which will help I hope.
Лучше бы заказал готовый принтер.
Could you please show how have you installed the MK8 Bowden extruder motor....
hello.. i have the same problem do you know how he installed it?
Are these steel-core PU belts that you've employed? See i'm wondering, how are they holding up? I heard they might gain issues with smaller bend radii.
How would I adapt this to 400mmx3?
question from a thickie..... is there any particular reason why I couldn't make a hypercube but add an extra 100mm of z axis?
In theory you can make the Z axis as high as you need. Some people are already building ones with 600mm of z travel.
Im going 900mm roughly haha
What color filament is that? I really like the look of it
grazie per la condivisione
Thanks to you and Tech2 for this awesome project. This is exactly what I have been looking for - something solid that I can build and modify to suit my needs. Looking at your Thingiverse summary, I'm guessing you're a mechanical engineer by trade. It follows all the conventions I'm familiar with. Some of the Aliexpress links no longer work because I suspect those particular items are no longer available from them.
I plan on using a Duet Wi-Fi control board or I may look into a Lerdge-X board (don't know much about this one) or MKS SBASE with TMC2208 drivers. All are 32 bit cards. Not sure if I'll use a pre-made hot bed or make my own from 4mm thick 6061 aluminum for it's regidity.
:3 I’m building mine soon and I’m hyped. I’ll personally use klipper with my 8 bit board :)
Very nice! subscribed!
What's your thought about laser on that? Seems beefy enough to mount a module..
I would think it would work ok. I could even forsee a small high speed spindle would work for PCB work.
Love the changes im going to build one based off your design, do you find petg is the best material to use?
Hey dude, where did you take the black aluminum 2020 extrusion profile?
The extrusion is from china. Links on the Thingiverse page www.thingiverse.com/thing:2254103
Thank you so much!
looks like this project is for those who already own 3D printer, i want to build one but how to print that 3D parts when i don't have one? can epson printer print that plastic parts :) , since i can not print that parts i'm gonna build my first 3D printer base on flying bear tornado model with 400x400 build and triple extruder, some parts already arrived now i waiting another parts from Ali Express, the only thing that worry me is how to wire / connect 3D print electronics parts using 24v PSU
buy parts from 3d printing service. hopefull doesnt cost much
Muy bueno en que material as impreso las piezas PLA o ABS
This is a great build on the original HyperCube! I had thought of similar mod for the movement axes, do you have any guess as to how much the size differences changed the print quality?
I really cannot say as I only have my old Prusa i3 as a reference. Let me just say that I'm super happy with the results.
Great effort on your enhancements to the original Hypercube. Could you explain in more detail why you stick with stell rods for the X-axis? The last itteration by Tec2C is using Carbonfibre tube to loose even more weight on the X-axis. IMO this makes sense. So I am a bit surprised you went back to steel rods.
Tech2C has the right approach with wanting to minimise the moving mass. However we also have a trade off with the stiffness of the system. Carbon fibre tubes are stong but are they as stiff as the MS rods? I have not done the numbers but my gut... Strenght and stiffness are both important to consider. An A380 wing is light and strong but not stiff. As I said I have not done the numbers and went with the MS rods so that there would be no issues with the bearings.
I will ask him... (only way to find out right?) ;)
Again, thanks for the effort, I will sure adopt some of your findings!
Did you ever get LinuxCNC version working ? Would love to see it and have access to the details. Another solution today is Klipper.
Smoothieboard firmware for LinuxCNC on Raspberry Pi has been in development for the last couple of years. I've currently called the firmware "Remora" and will be releasing hopefully by the end of January. For those who want the most versatile / hackable platform, Remora will be interesting. Currenlty has open loop and true closed loop steppers along with all the modules needed for a 3D Printer or regular CNC machine.
What would the price of this build be
What is a final cost of this project ?
Im thinking about making a hypercube evolution but then with a skr board
Hi Scott 3D. Love the work on the Hypercube Evolution. Thinking about making one (currently pricing out everything... trying to get the cost of the frame down). I have to ask what is the color/manufacturer of that PETG? I love the look!
Really like your modifications especially the X-carriage, it looks very clean and rigid. Will you be sharing your STL files ?
Yes, the files are on Thingiverse www.thingiverse.com/thing:2254103
Thank you.
good job
good job! what is the frame size? thanks
Yeah dual Z version will be best, was the first thing I thought I would add when I saw the hypercube design. Dont like it being supported in just one side.
I would love to see a video of your setup with LinuxCNC on the raspberry + Ramps + Arduino. Can't find good documentation anywhere... (and i am currently printing parts on my Anet for the Hypercube Evolution... Thank you a lot for sharing your design!!)
I will share this once I have it fully functional. I have the motion system running. Now I need to integrate the IO and heaters. Getting closer.
Thank you very much, you are my hero
Awesome design! Any chance to get the Autodesk Inventor files? Would love to edit some details for my printer.
Y Carrige 2 bearing or 4 bearing