Shou Sugi Ban on a Telecaster

HTML-код
- Опубликовано: 6 сен 2024
- Last year I tried to give a new look to my electric guitar. It is a 2013 Squier Telecaster Classic Vibe 50s (Butterscotch Blonde).
Although I always loved the guitar, that shiny glossy look that is characteristic of Fender and Squier guitars (and most brands when I think about it) was never appealing to me.
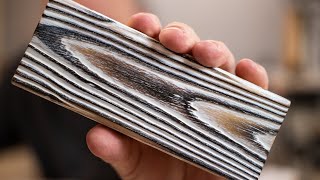
So after lurking on the internet to find out exactly what kind of finish I'd do on the guitar, I decided I wanted to accentuate the grain on the front of the body, that I found quite beautiful. There are several techniques people use for this, such as sandblasting, grain filling or ceruse, but after trying out some options on some leftover boards made of the same wood as the guitar body (pine), I wasn't getting the result I was looking for.
Then one day I came across this japanese wood burning technique, Shou Sugi Ban, and it looked like a promising technique with the possibility of different finishes.
So, that's what I did, 3 different types of finish, one completely charred and soft brushed for the back (classic shou sugi ban used on japanese houses), another completely charred and hard brushed for the front (accentuating the contrast of the grain), and finally just light burn of the sides to reverse the grain.
I also polished the neck, fretboard and pickguard with scotch-brite pads to get the glossy finish into a matte finish, and ""aged" all the hardware (tuners, bridge, knobs..) with vinegar to get rid of that shiny look.
I ended up doing an inexpensive but great mod to the electronics, by changing the original 3-way switch to a 4-way switch that cost about 20€ and allowed me to have an extra pickup position - both pickups on, wired in series, not parallel which gives it a beefier sound.
In the end this took me quite a few hours but I'm really pleased with the result, even if I had no previous experience with this techniques.
There were some complications though:
- The high temperatures ended up dissolving a bit of the glue that holds the different pieces of the body (it is a 4 piece body) which caused a small opening (1-2mm deep) at the junction between the 2 center pieces, but appears to be stable so far.. So if I was to do it again, I'd try to stay as far away as possible with the flame from the wood and go slower in multiple passes so the inside of the wood doesn't get as hot
- After painting the front and sanding the darker grain, I found out the effect was not as dramatic as I wanted so I ended up cheating a bit with a black sharpie on some spots before sealing it with the varnish I used for the rest of the guitar
- The reverse grain technique on the sides was hard to pull off because it was hard to keep a constant distant from the blowtorch to the guitar body to get an uniform burn across the whole side. I ended up "overburning" a bit more than I originally intended, but after varnishing it I can say I'm satisfied of the result
- Maybe I should have used a metal plate or another non-flammable material between the nut and the headstock, because I ended up burning a bit of the nut while torching the headstock. Nothing serious that could compromise the efficiency of the nut, but it got small brown spot.


![Megan Thee Stallion - Neva Play (feat. RM) [Official Video]](http://i.ytimg.com/vi/TpYTyAaTRts/mqdefault.jpg)


I've seen too many people completely scorch the surfaces where they want it fully charred, but you've nailed the balance of full coverage and the wood not starting to disintegrate. Personally I think it would look much better without the re-applied butterscotch, then it would be fully showing the charred finish. Great video.
Very nice! The top really turned out nice. I'm thinking of doing something similar with a Paulowia T-style body from Guitar Fetish. Very interesting watchout about the glue joints - that didn't even cross my mind until I watched this. Thanks for the video!
this rules
Very nice work!
It is correct to read it as Yaki-Sugi instead of ShouSugi.
Nice! Love the outcome.
Very interesting. A great shame about the parting of the glue on the body centreline though. I think I may have routed over that an put some contrasting plain wood inlay front and back to disguise it.
How smooth is the body now it is finished - does it have a rough surface where the black carbonised wood is?
Thank you.
Hi, the front is quite rugged, it was the intended effect, the back has a bit of relief, because of the grain of the wood but not much. The sides are silky smooth. Thanks for watching
Back and headstock are too charcoal-y for me. I like the front, though. Kind of a zebra wood vibe.