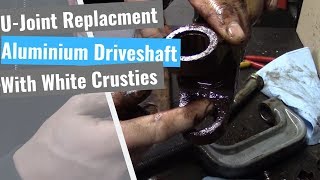
How to Replace Driveshaft U Joints 07-14 Chevy Suburban

HTML-код
- Опубликовано: 22 авг 2024
- For More Info visit us at: 1aau.to/h/hb/
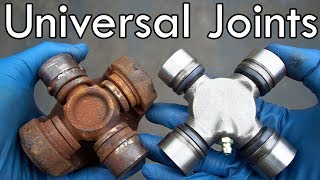
In the video, 1A Auto shows how to replace a broken or worn driveshaft u-joint. The video is applicable to the 07, 08, 09, 10, 11, 12, 13, 14 Chevy Suburban.
This process should be similar on the following vehicles:
2007 Chevrolet Suburban 1500
2008 Chevrolet Suburban 1500
2009 Chevrolet Suburban 1500
2010 Chevrolet Suburban 1500
2011 Chevrolet Suburban 1500
2012 Chevrolet Suburban 1500
2013 Chevrolet Suburban 1500
2014 Chevrolet Suburban 1500
🔧 List of tools used:
• Pry Bar 1aau.to/obc/1AX...
• 11mm Wrench 1aau.to/obc/1AX...
• 11mm Socket 1aau.to/oe5/1AX...
• Ratchet 1aau.to/ofG/1AX...
• Socket Extensions 1aau.to/oe5/1AX...
• Torque Wrench 1aau.to/ocV/1AX...
• Rust Penetrant
• Center Punch 1aau.to/oI/1AXA...
• File
• Hammer 1aau.to/oaW/1AX...
• Vise
• Wire Brush 1aau.to/o4/1AXA...
Subscribe: / @1aauto
Check out our playlist:
Chevy Suburban 2007-2014 10th Gen: • Chevy Suburban 2007-20...
Chevy Auto Repair Videos: • Chevy Auto Repair Videos
For More Info visit us at 1aau.to/h/hb/
⚠ DISCLAIMER:
While 1A Auto strives to make the information provided in this video as accurate as possible, it makes no claims, promises, or guarantees about the accuracy, completeness or applicability of the content. No information contained in this video shall create any expressed or implied warranty or guarantee of any particular result. All do-it-yourself projects entail some risk. It is the sole responsibility of the viewer to assume this risk. 1A Auto is not responsible or liable for any loss damage (including, but not limited to, actual, consequential, or punitive), liability, claim, or any other injury or cause related to or resulting from any information posted in this video.


√ *Watch the Video*
√ *Buy The Part at 1A Auto* 1aau.to/m/Visit-1AAuto
√ *Do it Yourself*
√ *Save Money*
i know im asking the wrong place but does any of you know a trick to get back into an instagram account..?
I was dumb lost the login password. I would love any tips you can give me!
I like how u still added the difficulties and didnt edit that part out thanks
+Karma Energy Thanks for checking us out! 1aau.to/m/Shop-1AAuto-c
It is nice to see a real world tutorial where things don't go perfectly in each step! Thanks for the great video!!
I agree!
Thanks for this video. It was great to see how you worked through all the road blocks instead of skipping through them like others do. People want to see all you went through to get those u-joints out.
+David Rodriguez Thanks for checking us out! 1AAuto.com
Having a brief clip at the start to demonstrate the noise is a HUGE help. Great idea I wish all repair videos did that. Especially for difficult to describe noises that only happen while driving. This is the exact noise my Silverado is making. Great job guys.
+quattro004 Thank you! We are glad we could help.
Great point !
Thanks for showing all the struggles this thing gave you, at least I know I'm not the only one who is having a tough time with getting those rusted in caps out.
It is so refreshing to see a real world example of what a DIYer could experience. So often these videos only give you the perfect world which is completely unrealistic. I also liked the beginning of the video which provided the potential sound. I thought it was helpful to show what you are looking for when checking the u joints and how to hold it so you’re checking it properly. Would anti-seize in the snap ring groove be helpful for the next guy or yourself if you have to do them again? Also, do the snap rings come with the u-joints? That may have been a missed marketing opportunity for 1A AUTO. Thanks guys for making this video.
+Lauri Jorgenson Thanks for checking us out! 1AAuto.com
Wow, this makes me feel skilled as hell after watching this, lol!!
🤣
Great video!! Thanks for the valuable info!! Legend has it that if you apply a little heat with a torch, those rubber seals will melt away and give a much easier time removing the old u joint!
Makes me appreciate living in rust free Las Vegas Nevada. I replaced mine last week and they came right off with ease.
+No to Socialism-communism-Marxists-demoncrats Thanks for checking us out! 1aau.to/m/Shop-1AAuto-c
That damn ball joint press would have worked the whole time
I feel normal now that saw professionals struggle some. I thought it was only me when things always go sideways when I fix stuff. You make the best videos
After ten minutes in, I decided I’m just buying a new driveshaft and joints
Im thinking about just taking mine in somewhere. Maybe this is why some of the trucks went to an aluminum driveshaft. Lol!
After seeing this I’ll just pay the mechanic $110 save myself the hassle lol
Maybe these guys will take your advice
WEAK
@@AccessGranted95 not that they are weak it's just that GOD has anointed people for different jobs and if they wanna pay their money that's them, but now that I know how to do it I'm gonna keep hammering, Thank you GOD ALMIGHTY AND TO HIS SON JESUS CHRIST 🙏🏾💪🏾
Take a screw driver and tap the snap ring to get it to move. Or take socket that fits the size of the cap on u joint and smack the clip to loosen up. This video hurt to watch.
I am def not a mechanic. But, all i could think of during the snap ring portion was a small flat head screwdriver
Having the right tools is a must 👆🏾
Thanks for the video. What this taught me is that I should just get a new driveshaft with the U-joints already installed in it.
Pounding on the driveshaft with a socket is a disaster waiting to happen, bent ears, closing the grooves for the clips, you are replacing the u joint, pound on it. And enough with the rust penetrant already.
Thanks for checking us out and for your feedback. Shop here for high-quality auto parts: 1aau.to/m/Shop-1AAuto-c +MrChevman81
I know right?,watching this made me cring...never trust a clean shavin mechanic..lol
Umm. No it's not. That's a GREAT way to do it. It fits the outer part of the cap which is where it's the strongest. That's the only thing that didnt drive me crazy about this video lol
This was awesome guy's I really appreciate it. As one would say, knowing is half the battle.
About to change out both my rear diff and transfer case joints on my 05 Tahoe z71. Kinda nervous about screwing this up but this video helped out a ton! Appreciate videos like these!
I like watching how others donthese jobs and ya got the job done! I've learned cleaning up all the rust first, either with a wire brush or wire wheel, then applying rust penitrent makes a big difference.
Get some heat on those, and it would really help.
This is a great video on how not to change a u joint. Lol so many no nos done on here.
WOW guys you show all the hard stuff! Which is the REAL World pain (ITA) of doing this job!
What can I say it's a hard life sometimes. I normally take a big hammer and beat the hell out of everything under there before I start. I don't know if it helps but it makes me feel better. Thanks for the video. You boy's are great.
Thanks!
The best video quality ever 😊and best information ever!!!
This video is long a.f. but hey for a dummy like me .. keep up the great work... 1a is ok in my book
It's good to see Harry and Lloyd both ended up with decent jobs...
They have a much better composure of emotions than I have when things just keep going wrong
Great job. Thanks for not editing out where we curse and throw wrenches.
If anyone is curious it is not as difficult as these dudes makes it look.
Depending on the circumstances. In this case the u joint was very rusty and seized inside the drive shaft.
Hi sir Andrew and sir Andy. Thank you so much for your instructional video. It help us as a technician for future endeavors. Hope to see more videos of yours most especially gm mechanical issues. Thanks a lot and more power to you...
My weekend project. Dealer wants an arm and a leg.
OK I changed my u joints on the back side. And I still gave that sound.
love your videos, always show and explain so well, thank you.
Something I forgot to do when I did mine (2003 Trailblazer) was to install the inside lock ring on the
U joint caps that get bolted into the rear end yoke. I had my driveshaft come
lose because a cap came off while driving on the highway. Not
A good thing to forget.
Ball joint Press, excellent method for closing the ears on the driveshaft
A Press would have saved you a lot of time. Very informative video thanks
I felt your pains in the rust belt!
Well, I Cosme here needing to maybe replace my u joint, but after seeing the struggle. Maybe I really don’t need too after all. I had a rough time removing the old transfer case seal and installing the new one. Sheesh took me too days and felt like the struggle I had was shown in this video... but if I end up doing it, I’ll use this video as a guide, thanks
+BLacK HarTz Thanks for checking us out!
Put anti-seize where the caps are going to be sitting that way next time won't be so dang hard to get off😁
Now this is the sh*t that happens to us out here in the real world. 😂
I need your address so I can send you a couple flat head screw drivers. Geesh. Makes prying the snap rings out WAY easier when you use it as a wedge
I just purchased the U-joints from yall. Besides the vise. Is it possible to list the size of the sockets used to tap out and tap in the universal joints?
0:18 Only 30 years? I have boogers older than that.
My 2006 Mazda BT 50 driveshaft has a carrier bearing in the centre, which makes it very long. I will be replacing the U joints by myself. One good thing it has no rust.
Torch and wire wheel baby let’s go
I love the painter's tape to cover the brand of wrench used.
Great video! What is the part numbers of two U-joints?
Perfect. Could not of done it nor explained it better my self.
+tony fornell Thanks for checking us out. Shop for high quality auto parts on 1AAuto.com:
1aau.to/m/Shop-1AAuto-c
I accidentally put the driveshaft backwards on my 2012 4wd Tahoe put yoke in the wrong side but honestly it looks identical on Both sides of the driveshaft will that be an issue or is that fine because it looks identical on both sides?
"Well folks If you have a stubborn snap ring like this one it might be time to bring out the big boy tools.." (brings out plasma cutter)
Fiiiiinal a video that has problems like I have
I have a 05 Silverado and never changed mine you think I should change mine?
Perfect example of 10 minute job turned into a 2 hour job
Thanks for recording this.
i just buy the whole thing
Solid video guys. I think I'm going to try to tackle this after watching!
+Brad Menezes Fishing Thank you! We love empowering our customers and showing how to perform DIY auto repairs with our high-quality auto parts. 1aau.to/m/Shop-1AAuto-c
wow!!! how unusual! A real world video for those of us that do not have specialty tools and who live in cold country where rust is a huge issue with virtually any drive or suspension work. Do it all the time? Making yourself a pneumatic press is imperative on a bench with an adjustable drive shaft yoke for length and height at the opposing end. Or? you pull your hair out and praise God a lot! Buy the way.. locking the shaft in the vice and using 2 rather pointed flat head screw drivers in tandem will take out the retainer clips post haste -once they are started.
Correct me if I’m wrong but the universal joints that have the clips on the inside must have the bearing caps push from the inside out, they cannot be driven in with the press or hammer or they will damage the bores??
I should date a mechanic they have patience! lol
Lol
Phelps
Definitely wouldn't want these guys working on my ride, LOL the guy with the punch had that last cap bound up from repeatedly hitting the cap on one side, he wasn't even paying attention to what was going on 😆 one hit on the opposite side of cap would have released the cap. I guess if you work for a shop, time is no concern at 150 plus an hour and parts can a good thing for the bottom line 😆
I put anti seize in the retainer clip grooves.
If you used pb blaster wouldn’t have been stuck here like this guy fyi
Dear
In GMC Sierra 2006 truck different u joint 2 the same and the front small do you now the u joint size or number
Thank you
do you own a wire brush ???????
Would a hard, loud clunk every time I accelerate be the cause of a u joint failing?
OMG!!! How long were those things in there? Was this a salvage from the sea? I'm 54 & if I ever let one of my rides get to that point please come save me from the brothel because the madame has taking me hostage! Great lesson gentlemen!
I had to use cold spray to freeze the caps to get them out of my u joint, after the penetrating oil. Cold spray is safer then using a torch under a vehicle. I couldn't release my shaft from the differential, and I have an aluminum drive shaft, so I didn't want to pry on it.
+MarkDog Thanks for the feedback!
I only did the rear u joints. Front is good.
Wait when you first grabbed on the drive shaft and it rotated side to side. Is that the u joints doing? Or is that another problem to fix?
I'm also waiting for an answer to your question.
You would think that because they're showing this on TV and ita a shop, that they would have had a machine press to just press that U-joint out instead of hitting it with a sledgehammer
Hello, do you grease the drive shaft splines? When I installed my drive shaft with new u-joints I get a clunk when I put it in reverse. Before I cleaned inside the splines and did not think of greasing inside.
replying to year old post but i do believe that will help with clunk , im sure buy now u got it greased ?
Does it matter which side the grease fitting is positioned on rear axle u joint. Is it ideal to be positioned to front or back?
When my drive shaft fell from rear end while driving 80 mph. I had transmission fluid pouring out. What would cause that to happen?
Air chisel with hammer tip way faster and less destructive I would think and safer easier to control
That was painful to watch.
Almost as, or even more cringe-inducing than watching the video of South Main Auto Repair Eric O.'s daughter doing her own brake job... luckily, daddy Eric was there to help out his baby girl!
Great video. Thank you guys !!
Gm has special plastic inside the driveshaft that keep the joints from falling out. No wonder it was so hard to take out the caps cause they didn’t melt them
External clips. No plastic. Internal clips have the plastic. Still, these guys didn't inspire confidence in their abilities. Normally they are pretty decent.
Are the front and rear joints same size or is the front different from rear
I am so glad I was having the shop do it but they did last 250,000 miles
Is it acceptable to use some heat on this being that the old joints needed replacement anyway?
Awesome video, Chris! Liked and subscribed. And that's not easy for me to do!
Are those serviceable parts worth investing into? Looking to swap my on my Silverado . Looking for some better longevity
Hello my friend
Why not use the special tools?
339k people watched what not to do… although it is helpful for many to see the difficulties they might experience along the way, I can’t help but feel bad for whoever’s Suburban that is.
I like how they skip the parts where they’re heating it up
Why you keep using pick to clean out the side already out? Use the punch and knock tangs out of groove.
This video is so unrealistic. He didn't even curse when the clip broke. JK Great vid.
I wonder if heating it up with a propane torch would help a little when taking them apart.
I don’t get the squeak on my 2007 Tahoe. I hear a click/knock from the rear when slowing down. It slows down as I slow down. Don’t hear it during acceleration. I’ve had rear calipers clacking before on a different car…kinda sounds like that. Think it’s a u-joint?
When did you grease the U Joints?
Just slice the center of the old joint with an angle grinder
Can find u joints on th 1a auto site?
Thanks for this.
Great video. Thank you :)
+TVGLive Thank you for your feedback!
Pro tip you have a vice use a socket and press the caps out the the vice
Please DONT use a hammer and socket to beat the ears of the drive shaft, you will change the dimensions. Just use a $20 U joint press and you wont have issues later.
I wish it was this easy 🤕
This works also great for Rwd 07-13 Silverados lol