Can the resources from your free design bundle be use for commercial work? And is there a way to color the different layers of the camo pattern with a color overlay instead of using hue and saturation? I want to use specific colors.
Inspiringly procedural and non-destructive! Today I learned that you can create a Smart Object from an empty layer and THEN render clouds in to it. Your tutorials often seem like simple follow-alongs for basic jobs but always turn out to be packed with rich, powerful techniques. Thank you!
If you are having trouble with the threshold step, do this to make it work exactly like the tutorial: Layer > New adjustment Layer > Threshold > Click "Use Previous Layer to Create Clipping Mask" You are welcome.
Thank you for this. I got the threshold to come up and was able to add it but the slider doesn't change anything at all. Do you know what could have gone wrong there by chance?
I'm still using CS6 and had to do TONS of workarounds since adding adjustments to the smart filters sublayer hadn't been implemented into this build at the time. STILL, I managed to follow along (albeit the long way) and got incredible results I can use right away for my business! THANK YOU!!!
Thank you for this. So generous to share. Is there anyway to create one of these layers with an image instead of a color? I am trying to make one of the Cloud layers into tree bark
I may have missed this step, but I wasn't able to view all layers simultaneously (without repeating the negative white space). For anyone else stuck here, I Couldn't find the step i missed but I solved this by using multiply and color burn blending modes. If there's a better way let me know.
I couldnt get the threshold to apply to my smart object by going Image>Adjustment>Thresholf, instead, select the smart object and use the threshold setting in the lower right corner in the layer window - next to the smart clipping mask icon and the new layer folder icon.
amazing tutorial you are fast and extremely precise. it just sucks that you can't use any cool filter gallery effects in CMYK :// I tried converting to RGB after and it erased a lot of the smart filters. wish there was a way to get these effects for print. Thanks again !
idk if you ended up getting it in the end. But what i found worked was instead of going 'image>adjustments>threshold' ..you can use the threshold adjustment layer and link it to your work layer. I used that for threshold and hue/saturation then just put them in a group. I managed to keep up with all his steps after.
Does anyone know why Photoshop CS6 can not use the Image>Adjustments options? I can't for the life of me get Threshold to work with the Smart Object/Filters.
Hi Mate I ran into the same issue, I found that if you rasterize the layer that will work for it, however you cant change your settings to the clouds or any other effects afterwards.
I did, because the camo pattern is too simple and it doesn't explain how to do anything that would be useful for other designs, like urban camos, spray patterns, etc.
Everything is working great so far and I learned a lot using the steps you are showing. I have a camo pattern with relatively big shapes and I can't figure out how to make the borders of the shapes less pixelated/more smooth. Any tips or ideas?
hi i was following your tutorial step by step . but got stuck at the threshold tool. (in your video at1:38 min) . in my window it doesnt allow me to click on the threshold tool .. why so ? can you pls suggest
Is there a way to recreate the exact digital pattern found in military camos? CADPAT, MARPAT, etc... I want to create a file for fabric printing but I only want to create a custom color palette.
QUESTION: how did you get to ONLY put the stained glass pattern on one of the layers? seems obvious, but I followed all directions and for some reason even my "black/brown" areas have that stained glass look, the whole image instead of only one color. i only want one color to have that texture.. Help ----------- moments later: the only way i made it happn was to click on the bottom layer and first "convert to smart object" and then it was abl to ONLY put my texture on only one color of the camo. IS this the only fix?
Hey awesome tutorial but I am curious how to take a completed camo design from photoshop, and take it into substance. Any idea? Edit: I also need the photoshop image of the camo design to be imported as a Material into substance painter
Simplest way I can think of would be to make a new layer, then enable “all layers” on the paint bucket. Choose your color, and apply it to a pattern. You may need to use hue/saturation to give each layer a distinct color. Unfortunately, if you change the pattern, you’ll need to delete the layer and remake it.
@@DJRoksor glad you found a solution! I think you could also use the hue/saturation filter to get some exact colors. Just get the HSB values and put them into the filter.
why my pattern looks so different? i think is something with the rendered clouds the contours on my attempo using the same values look very different with blurred edges with no blur effect applied
this is incredible information! Question Spoon Graphics when you go to export so you can use as a PNG in Illustrator whats is the best setting to export in? Thank you!
You can't this is randomly generated. What he suggests is just making the canvas size bigger to what you need and Photoshop will just automatically fill it out.
I followed this tutorial instruction exactly the same except the initial resolution of 3000px by 3000px. Mine was 16,000 by 6500. Other than that I did everything the same. However when you come to the step of "activating the middle layer" and choosing Filter Gallery, I'm not able to choose Filter Gallery because it is grayed out. What am I missing? Please help. Also I'm using Photoshop CC 2020.
I have the same problem, it's because you were working your design in CMYK mode. I've created another project and this time was RGB and the filter gallery it's activated. My problem is that I need to have it in CMYK as it must be ready to print.
Great video...I was following each step, but on my PS, it won't allow me to make the threshold adjustment of 2:15 (IMAGE>ADJUSTMENTS>THRESHOLD)...Using CS6 here...Any ideas? Thanks in advance
Help please : on 1:30 min, filter / Blur / Gaussian Blur , my Photoshop pops a window : “Impossible to create Gaussian blur as the selected zone is empty”. I have the last est version and new laptop, I’m on 16 bits and on RVB doc 3000X3000pixels and have created a new layer and converted it into Smart object. It looks the same than on your video except I can’t activate the filter because of this selected zone that is empty. Your layer is empty on yours so what I am missing here please? I tried everything, select the layers with the selection tool, doesn’t work. I tried to put a colour background, then I can do the Gaussian filter but it looks flat, not at all like yours even when I move the arrow. Please help!


Everyone who subscribes to my mailing list gets a FREE design resources bundle. 📦Get yours here: spoon.graphics/freebundle
Spoon Graphics won’t let me layer each one together plz help
Can the resources from your free design bundle be use for commercial work?
And is there a way to color the different layers of the camo pattern with a color overlay instead of using hue and saturation? I want to use specific colors.
how can i get the pattern of the minute 12. can you share it to me or sell it?
Inspiringly procedural and non-destructive! Today I learned that you can create a Smart Object from an empty layer and THEN render clouds in to it. Your tutorials often seem like simple follow-alongs for basic jobs but always turn out to be packed with rich, powerful techniques. Thank you!
If you are having trouble with the threshold step, do this to make it work exactly like the tutorial:
Layer > New adjustment Layer > Threshold > Click "Use Previous Layer to Create Clipping Mask"
You are welcome.
Thank you for this. I got the threshold to come up and was able to add it but the slider doesn't change anything at all. Do you know what could have gone wrong there by chance?
I cant select threshold on this step either
You are a fucking saint.
simply amazing. I am a designer for men's streetwear and workwear, and this changed my life!
I'm still using CS6 and had to do TONS of workarounds since adding adjustments to the smart filters sublayer hadn't been implemented into this build at the time. STILL, I managed to follow along (albeit the long way) and got incredible results I can use right away for my business! THANK YOU!!!
Hello, Anna! Glad to see you there (again)!
Master of graphics.
This is an absolutely OUTSTANDING tutorial. Thank you so much.
Love the stained glass effect
still extremely helpful 3 years later. thank you.
wow, never would have thought to do it like this, very creative, gj dude!
THANK YOU I NEEDED THIS VIDEO BADLY !! You just helped me out 1000%. Learned how to do this so fast. You just earned a subscriber ✅
Thanks you for sharing this advance technique.
Hello from early 2021! Your tutorial is still great and useful! Thousand thanks!
my favorite channel to learn photoshop , awesome tutorial .
Great tutorial. Thank you for your time and effort to make it and share it with the world.
Greetings from Croatia.
Simple and awesome!!!
Thank you for the detailed tutorial!
I so needed this right now! You the master..thanks Chris!
Thank very much, this is great tuto. I did my own camouflage and I love it
Thanks, I needed this tutorial.
HOLLY COW! Subbed! ♥ Great video Spoon guys! Straight to point and no wasting time! :)
Insane tutorial....
thank you so much, this is a great tutorial!
i can't see anything there's no camouflage
this is really clever, would there be anyway to make the pattern seamless?
Yeah, he alludes to how to do that at the end at 6:17 but doesn't show us how...I would love to know how to make it seamless from here also.
Excellent
This awesome and concise video just earned you a new subscriber! Thanks Chris!
Thank you for this super helpful tutorial! :)
Awesome like always!
📺 WATCH THIS NEXT: How to Make Digital Camo Patterns in Photoshop - ruclips.net/video/TNrzjdGBszk/видео.html
SO DOPE.
Very cool
Solid tutorial!
Amazing as always, keep it up 👌, please make a tutorial on realistic mockups and shadows cheers
Very creative. Thank you
Thank you for this. So generous to share. Is there anyway to create one of these layers with an image instead of a color? I am trying to make one of the Cloud layers into tree bark
Showww.. you are the best, man!!!
Any tutorials for splinter and Dutch fractal style patterns ?
thank you so much for this tutorial
I may have missed this step, but I wasn't able to view all layers simultaneously (without repeating the negative white space).
For anyone else stuck here, I Couldn't find the step i missed but I solved this by using multiply and color burn blending modes. If there's a better way let me know.
Hey can you also make tbr tutorial how to create mockup with the camouflage pattern please?
Really cool!
Amazing!
Thanks bro!!! Shit helped me out a lot
quite helping. i have earned 290$ after watching this tutorial from a client. Thanks great job
great tutorial!!
Thank you for another great tutorial !!!
Awesome, thank you.
Man you are 👍 awesome
I couldnt get the threshold to apply to my smart object by going Image>Adjustment>Thresholf, instead, select the smart object and use the threshold setting in the lower right corner in the layer window - next to the smart clipping mask icon and the new layer folder icon.
nice......tutorial......thanks
Thank youuuuuu
amazing tutorial you are fast and extremely precise. it just sucks that you can't use any cool filter gallery effects in CMYK :// I tried converting to RGB after and it erased a lot of the smart filters. wish there was a way to get these effects for print. Thanks again !
i'm using a document size of 3000x3000 (even tried 4000x4000) but the clouds filter isn't working. It just gives the layer a white color fill.
Check your foreground and background color, they need to be white and black.
@@DJRoksor this fix didnt work for me need more help
@@realhumanbeing5724 The same problem. I've changed Image > mode > from 8 bit to 16 bit and it's working for me!
Frecking genius!
I need to rasterize the clouds layer before being able to apply treshold. Any tips?
idk if you ended up getting it in the end. But what i found worked was instead of going 'image>adjustments>threshold' ..you can use the threshold adjustment layer and link it to your work layer. I used that for threshold and hue/saturation then just put them in a group. I managed to keep up with all his steps after.
@@TheNiueanOne savior
Wooo! Yyyeeeaahhh!
i cant access the threshold
@RYNATY I'm using photoshop cs3, a rather old version, and I can't choose threshold either.
Does anyone know why Photoshop CS6 can not use the Image>Adjustments options? I can't for the life of me get Threshold to work with the Smart Object/Filters.
Hi Mate I ran into the same issue, I found that if you rasterize the layer that will work for it, however you cant change your settings to the clouds or any other effects afterwards.
@@mmfisher63 no way to fix that? The rest of the tutorial is useless if you cant edit and modify. Rather its time consuming and infuriating.
@@ryanburleigh8182 Yeah I totally agree, however I needed one made for my project and it worked out fine, just needed a lot of patience lol
Do u do any commission work?
I wanna know who that one dislike is >:C
probably some geek who thinks 'gaussian' should be pronounced differently
Chris LD five geeks :/
I did, because the camo pattern is too simple and it doesn't explain how to do anything that would be useful for other designs, like urban camos, spray patterns, etc.
Love your site! Do you have an Envato profile I can follow?
How can I create this effect with a couple of other patterns applied within the camo. example my logo in my avatar
How do you transfer the design to the clothes?
Everything is working great so far and I learned a lot using the steps you are showing. I have a camo pattern with relatively big shapes and I can't figure out how to make the borders of the shapes less pixelated/more smooth. Any tips or ideas?
Try experimenting with your gaussian blur settings.
Muito massa!
Hi sir chris, may i ask if i can use this camo pattern design technic for commercial use?
Hi, when I go to my Image and adjustments > the Threshold cannot be selected, it's dull in gray please assist!
i cant select threshold its not highlighted is there something i can do any help would be appreciated
hi i was following your tutorial step by step . but got stuck at the threshold tool. (in your video at1:38 min) . in my window it doesnt allow me to click on the threshold tool .. why so ? can you pls suggest
Is there a way to recreate the exact digital pattern found in military camos? CADPAT, MARPAT, etc... I want to create a file for fabric printing but I only want to create a custom color palette.
Is there a way to make the pattern less regular? i.e.: Make macro shapes out of the clouds, cluster them, or make patches of shapes?
QUESTION: how did you get to ONLY put the stained glass pattern on one of the layers? seems obvious, but I followed all directions and for some reason even my "black/brown" areas have that stained glass look, the whole image instead of only one color. i only want one color to have that texture.. Help ----------- moments later: the only way i made it happn was to click on the bottom layer and first "convert to smart object" and then it was abl to ONLY put my texture on only one color of the camo. IS this the only fix?
Hey awesome tutorial but I am curious how to take a completed camo design from photoshop, and take it into substance. Any idea?
Edit: I also need the photoshop image of the camo design to be imported as a Material into substance painter
can you do this on illustrator
One question, I'm not able to do this well (I'm missing some options idk why), could you help me with a pattern I made but it looks terrible?
can you create a camo pattern for me ? i need multi terrain camo night with the terrain colours and shapes replaced with graffiti style colours shapes
but how do you print it?
I'm having an issue with the "blend if" option, all layers below the top 1 are still non visible?
how do i create the design at the 6:46 mark?!?
Is there a way to color the different layers with a color overlay instead of using hue and saturation? I want to use specific colors.
Simplest way I can think of would be to make a new layer, then enable “all layers” on the paint bucket. Choose your color, and apply it to a pattern. You may need to use hue/saturation to give each layer a distinct color.
Unfortunately, if you change the pattern, you’ll need to delete the layer and remake it.
@@walterkennedy9474
I've found a way by adding a color gradient to each layer and using a solid color for it.
@@DJRoksor glad you found a solution! I think you could also use the hue/saturation filter to get some exact colors.
Just get the HSB values and put them into the filter.
I checked again, the BLEND IF option does not seem to be functioning as before.
yea thanks alot...
fg
Is there any way to do this instead of using the Hue/Saturation adjustment and being able to individually select colors?
use a gradient map
My Filter gallery is not getting activated what would i do
When I go to copy the layer, the copy doesn’t transfer over the filters...what am I doing wrong?
Press ctrl J on the layer you want to copy/duplicate
why my pattern looks so different? i think is something with the rendered clouds the contours on my attempo using the same values look very different with blurred edges with no blur effect applied
this is incredible information! Question Spoon Graphics when you go to export so you can use as a PNG in Illustrator whats is the best setting to export in? Thank you!
png-24 interlaced
How can I make it tileable?
You can't this is randomly generated. What he suggests is just making the canvas size bigger to what you need and Photoshop will just automatically fill it out.
I followed this tutorial instruction exactly the same except the initial resolution of 3000px by 3000px. Mine was 16,000 by 6500. Other than that I did everything the same. However when you come to the step of "activating the middle layer" and choosing Filter Gallery, I'm not able to choose Filter Gallery because it is grayed out. What am I missing? Please help. Also I'm using Photoshop CC 2020.
I have the same problem, it's because you were working your design in CMYK mode. I've created another project and this time was RGB and the filter gallery it's activated. My problem is that I need to have it in CMYK as it must be ready to print.
U have to use 8-bit :)
Great video...I was following each step, but on my PS, it won't allow me to make the threshold adjustment of 2:15 (IMAGE>ADJUSTMENTS>THRESHOLD)...Using CS6 here...Any ideas? Thanks in advance
yeah ran into the same problem. Haven't the foggiest idea for a work around. I am also using CS6 Not sure why its not working.
Same problem here
I realized when the object is converted to smart object, my threshold is not active and cannot be used. Can u help me please
Help please : on 1:30 min, filter / Blur / Gaussian Blur , my Photoshop pops a window : “Impossible to create Gaussian blur as the selected zone is empty”.
I have the last est version and new laptop, I’m on 16 bits and on RVB doc 3000X3000pixels and have created a new layer and converted it into Smart object. It looks the same than on your video except I can’t activate the filter because of this selected zone that is empty. Your layer is empty on yours so what I am missing here please?
I tried everything, select the layers with the selection tool, doesn’t work. I tried to put a colour background, then I can do the Gaussian filter but it looks flat, not at all like yours even when I move the arrow.
Please help!
If we could, how do we take out the seamless pattern from this, or how could we save it as a swatch to be used in illustrator seamlessly?
You literally have to take the Image and turn it into a Shape.
Can this work on cmyk?
Some of the fiters don't work in CMYK mode, so you would have to produce the artwork in RGB, then convert it afterward
@@spoongraphics Thannks, just wanted to know. I work most in printing stuff.
tell me how to make it in Microsoft Paint.
2:14why i can't do the threshold :( 2:14
when i do it theres not as many clouds and idk why
Please do the tech one 1:15
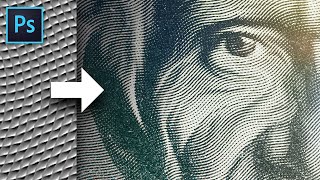
That pattern uses the same technique, but with larger scaling using the "Tiny Lens" texture in the Filter Gallery
@@spoongraphics thanks 😊😊
@@spoongraphics Yes, Thanks!
HaHa I can agree I'd like to see how you did that camo scheme as well, its very unique.