Class IV resin-based composite restoration - Free-hand technique (2) (#21) - Arabic عربي

HTML-код
- Опубликовано: 7 авг 2024
- Class IV resin-based composite restoration on a mandibular incisor (#21) using the free-hand technique (2)
- To learn about resin-based composite cavity preparation & restoration instruments and tools setup (introduction), watch the video: • Resin composite cavity...
- To learn about class IV cavity preparation, explaining beveling (why, how, when) and resin-based composite restoration on a mandibular incisor (#42) using the free-hand technique (1) • Class IV preparation, ...
- To learn about class IV cavity preparation, explaining beveling (why, how, when) on a maxillary central incisor (#21), watch the video: • Class IV preparation a...
- To learn about the celluloid matrix strip application & Removal, watch the video: • Celluloid matrix strip...
- To learn about enamel & dentin bonding/adhesive systems (3-step, 2-step, all in one) & application, watch the video: • Enamel & dentin bondin...
- To learn about the correct light-curing technique (1) and cleaning the light-guide tip, watch the video: • Light-curing technique...
- To learn about the correct light-curing technique (2), watch the video: • Light-curing technique...
- To learn about the correct light-curing technique (3) and the effect of incorrect curing using an educational tool, watch the video: • Light-curing technique...
- To learn about the finishing & polishing tools & application (2): Class III, IV, V composite restorations, watch the video: • Finishing & polishing ...
- To learn about how to check occlusion after restoring a cavity preparation, watch the video: • How to check the occlu...
Subscribe for more Preclinical Operative Dentistry videos: / @drafnanoalzain
Music: www.bensound.com
--- Contents of this video ---
00:00 - Introduction
00:15 - Title: Class IV resin-based composite restoration using Free-hand technique (2)
00:23 - Class IV resin-based composite restoration on a maxillary central incisor
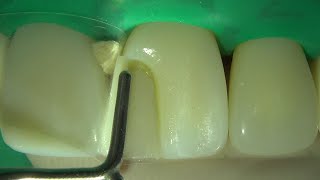
00:31 - Place the celluloid matrix strip & wedge
02:16 - Apply the adhesive system (one-step self-etch system): Selective etch technique
02:25 - Apply the adhesive system (one-step self-etch system): Selective etch technique: 1. Acid etch enamel
03:53 - Apply the adhesive system (one-step self-etch system): Selective etch technique: 2. One-step self-etch (all-in-one) adhesive
04:21 - Apply the adhesive system (one-step self-etch system): Selective etch technique: Light-cure the adhesive
04:42 - Place, adapt, shape & contour the composite material increment
05:12 - Place, adapt, shape & contour the composite material increment. Make sure you view from all surfaces (facial, lingual, incisal & interproximal)
06:27 - Remove proximal excess using the tip of the dental explorer held at 45 degrees
06:58 - Place, adapt, shape & contour the composite material increment. Palatal surface: Ball burnisher
07:16 - Light-cure
07:28 - Place, adapt, shape & contour the composite material increment
07:47 - Place, adapt, shape & contour the composite material increment. Make sure you view from all surfaces (facial, lingual, incisal & interproximal)
08:16 - Remove proximal excess using the tip of the dental explorer held at 45 degrees
08:54 - Place, adapt, shape & contour the composite material increment. Make sure you view from all surfaces (facial, lingual, incisal & interproximal)
09:33 - Light-cure
09:41 - Remove the celluloid matrix strip & wedge
09:57 - Restoration evaluation: Check margins for gaps, ditches, excess & overhang. Check anatomy & contour
10:10 - Finishing & polishing
10:16 - Finishing & polishing: All surfaces: Finishing & polishing discs
10:25 - Finishing & polishing: Finishing: Palatal surface: Football diamond point or finishing & polishing discs
10:31 - Finishing & polishing: All surfaces: Finishing & polishing discs
11:51 - Restoration evaluation: Check margins for gaps, ditches, excess & overhang. Check anatomy & contour
12:09 - Finishing & polishing: All surfaces: Finishing & polishing discs
13:21 - Restoration evaluation: Check margins for gaps, ditches, excess & overhang. Check anatomy & contour
13:33 - Finishing and Polishing: Polishing: Rubber points
14:24 - Restoration evaluation: Check margins for gaps, ditches, excess & overhang. Check anatomy & contour
14:38 - Restoration evaluation: Check contact
14:41 - Restoration evaluation: Check for overhang
14:44 - Check occlusion
Instagram: @afnanalzain
Twitter: @afnanalzain
Email: info@afnanalzain.com


ما شاء الله
شكرا شكرا شكرا ، كله في ميزان حسناتك دكتورة ، شرح وتصوير وشغل راقي جدا
🌸💖❣️استغفرالله ❣️💖🌸 🌸💖❣️استغفرالله ❣️💖🌸 🌸💖❣️استغفرالله ❣️💖🌸
عاشت الايادي دكتورة ❤️
ممتنة شكرا
شكرا
عفوا
شكرا كثير دكتورة
عندي سؤالين بعد اذنك
١) الFinishing strip مش المفروض نستعملها Sub contact حتى لا تطير الكونتاكت؟
٢) هل هناك بديل للblade حتى نشيل الفلاشز interproximally
عفوا. ١) صحيح، ممكن نعمل ب finishing strip interproximally إذا فيه flashes بحيث ما تطير الكونتاكت ، لكن إذا من البداية اتعمل ال contour كويس ما نحتاج.
٢) ممكن ب needle diamond point (yellow) لكن لازم يستخدم بحرص شديد حتى لا يخرب ال contour and contact
دكتوره اذا بالكلاس فايف مبين بس دنتين شلون اسويله بربريشن يعني هو السن متآكل وباقي بس دنتين
حتى إذا متآكل الدنتين نحتاج يتعمل bevel على enamel ويعتمد قد إيش متآكل إذا نتآكل كثير من السن ممكن نعمل composite veneer عشان يكون retention and esthetics كويس
@@drafnanoalzain عاشت ايدچ عسل مو دكتورة