Nintendo Switch SNES Edition! DIY Switch Shell Replacement...

HTML-код
- Опубликовано: 25 июл 2019
- In this video, we are going to tear down our Nintendo Switch and throw on a new SNES themed housing. This thing looks and feels awesome.
Big shout out to ExtemeRate for sending me this demo unit for my switch. I absolutely love it!
Links below:
Canada:
SNES Style Switch Housing: amzn.to/2YoByuA
USA:
SNES Style Switch Housing: amzn.to/2SGJ4iV
NES Style Switch Housing: amzn.to/2LH2V0L
UK:
SNES Style Switch Housing: amzn.to/2Y7AHTG
NES Style Switch Housing: amzn.to/2Y6lHFE
Looking for support me? Like, Share and Subscribe to the channel! You can also donate here: paypal.me/restalgia
Music Credit:
Itty Bitty 8 Bit by Kevin MacLeod is licensed under a Creative Commons Attribution license (creativecommons.org/licenses/...)
Source: incompetech.com/music/royalty-...
Artist: incompetech.com/  Игры
Игры


Great video! Helped me put the same exact shell on my switch right down to every last piece. Took me awhile and several times I had to pause or rewind but the video did exactly what it was meant to do. Thanks!
Thank you for this, it's an great explanation and guidance video! Did this and it just looks gorgeous.
Mine's coming in tomorrow and can't wait to modify my Switch!
When I did it, I stripped all the screws, and ripped the zr ribbon cable, but its good now lol.
How did you get the stripped screws out
Thank you so much for the video my man. Helped me a TON when I changed my Switch's shell to a jungle green one. Looks amazing now :D
Thanks for this video! You explained what you were doing perfectly, made it easy to follow and everything is working perfectly and looking great!
Thank you so much for this video. I was able to assemble this thanks to your help. It looks great!
awesome tutorial. I did a clear case and all went well! no broken switch!!! had a weird time with the rumble pack on the right not quite fitting so I had to scratch some material off and carefully wedge it in there but it still works so that's all that matters.
Dude, this was super helpful. Ordered parts and about to try this soon. Thanks!
How did it go?
I'm definitely considering doing this.
Thanks, I bought this before I found your vid.
Great info.
Thanks a lot its very helpful, now i have a beautiful snes switch
I've done a handful of swaps now, the tutorial I watched showed me how to do it without disconnecting the ribbon cables. I do move slower and remember to be patient but it's easier and fewer steps. In my opinion. ExtremeRate is the real MVP though for all the extras they add. It's saved me more times than I can count!
Cool video!!
You got a nice hands Mr!!! 😋
THANKYOU SOO MUCH SO USEFULL
I just found out about extremerate yesterday and want to get the Sakura pink shell. I wanted to do some research before trying it out and everything looks easy except changing the joycons😣
Trying to get it too
I did it today and it took about 1 hour and 30 minutes for each joy con and I had no problems, it’s not as hard as it looks
BasicEric thank you this is actually super helpful
Brooke Barquero np
Brooke Barquero same
in the last joycon you made it look so easy!
I did the Joy Con shell replacements about a 8 months ago and those are some complex little things. But, with a little patience and care, you can get it done. I wish I had this video beforehand, but years of tinkering have shown me that video taping yourself dismantling a piece of electronics is the most useful thing you can do, so you can review the video to see what pieces went where, in case you forget.
If you want to keep the old shells and buttons for whatever reason, I recommend using some painters tape and taping the button to the shell from the inside and then cinching the two halves together by wrapping a single loop of painters tape around.
A note to the manufacturer: Good on you for including replacement screws. With a project like this, the worst thing that can happen is stripping out a screw.
Wiser words have never been said. 😁
I'll go ahead and say you've not got much experience working with electronics. This is a pretty strait forward shell swap. PSP shell swap was much more of a nightmare than this will ever be :P
Looks clean, digging the classic look.
I got chu...
did this with my switch, looks great!
i am in love
Great I’m going to do the same ting with my Switch OLED 👍
The most difficult part of this process was removing the trigger button and it’s the one thing he didn’t explain.
I don’t want to see another spring in my life lol
i was just thinking the SAME thing.. currently stuck at this part, it's killing me -__-
@@SanchezDidit are you still stuck
Hi! I was wondering where you got the tools you used in this video? I'm going to be getting a package to change my switch's shell but I don't want to strip any screws / scratch anything. Really great video btw, super clear and concise!
The i fix it kit is used widely by alot of modders who do switch stuff.
Although if you get the extreme rate shells it should come with a couple of screw drivers for it. You might need to buy some tweezers though.
(any pros correct me if I'm wrong becuase I haven't done this before and I've just binged tutorials)
Thinking about doing this to my switch
Honestly I didn't know how I felt about these mods, but this case changed my mind. It's really really nice. It looks so much better in person then on camera
@@Restalgia How do you rate the quality? would you judge it even as an improvment on the switch? or it can cause trouble on maybe the heat or something?
I dont like most customization either but after seeing this one i'm about to buy it.
PS: does putting on this skin mess up with your warranty or not?
@@Mens_Rea hey man, quality is fantastic here. No cheap plastic with these. Will not cause any heating issues, and does not obstruct any cool fans. In terms of warranty, this will 100 percent void your warranty, so I usually recommend people do this after their warranty has lapsed.
@@Restalgia Do you notice any color changes on the white parts?
awesome video! Do you know if the shells are for the 2.0 version of the joycons? The original joycons how the connectivity issues but they fixed the issue with a physical rework of the joycons
Yep they are fine. The fix was to put a conductive pad into the board. Nothing mechanically was adjusted
I'm literally watching this to do exactly the same thing with my Switch but in the UK style SNES from the same company.
Great vid! Just a little sidenote: you do not need to remive all those ribbons from the cons when transferring the cases.
I really liked this video! I’ll be doing this project to my own joy con’s next week! I have ONE QUESTION... the purple buttons come in a set all together How did you cut them out? Thank you!
They easily just snap out. If you need to trim the plastic just use an exactoknife
how did it go?
MsKath YT Went well. Lol. This was months ago, but since then, I’ve done other Joy-Con’s even repaired and cleaned some. With patience, and the right tools anybody can easily take them apart and mod their joy-con’s.
my left joy con didnt have a rubber membrane on the d pad buttons. let's hope it works right afterwards
i have to do these operations.
I just installed this but when I turn it backwards, the joy con shells seem like a darker shade compared to the Switch backplate
i damaged that clip thing to keep the cord ( its the lower one under the charge) anyway to fix this? i used the right tools but still messed it up...
Around the 3:45 mark you caution folks to be careful popping out the connector, but you go too quickly and don't mention that you pull it up and not out. Crazy easy to break the connector, which is exactly what happened.
Is there a way you can replace the front shell frame of the Switch?
Just finished mine I thought I killed my joycon but I was wrong and it came out perfect
Also a ifix toolkit is just about needed for this
6:03 it's there to keep dust out I think
I’m thinking about doin the SFC version of this, what do you people of the tube think SFC version or SNES version?
protip: if you wanna swap shells quickly and efficiently, do NOT pull out any ribbon cables besides the sticks anf the left joycon’s minus button because they’re necessary
Too bad the mod doesn't come with Grey buttons for the direction buttons and lighter purple buttons for Y and X.
just reuse the old ones
“pop the connector out of the bottom” yea mine didn’t pop out instead jus the wires did controller ruined 😡
yea bc your dumb
not his fault
Can anyone help me out? I’m seriously stuck and I have no idea what to do. It’s the sensor below the rumble pack and for some reason it won’t fit because the rumble pack interferes
I stripped the screws
I stripped the screws on the back, and cuz they're so small it's really hard to find a solution, I'm gonna try to use superglue and hopefully that will be enough to unscrew it
@@andresdiaz8440 Idk if this helps and it might make me sound crazy but I stripped the weird star screws and so I actually tore the old shell off and then used needle nose pliers to unscrew the screws and put the new shell on with no problem. Just be careful if you decide to do that.
@@bennyspade2046 how did you get the shell off? I think I might need to do that
@@andresdiaz8440 Be extremely careful but I slipped a knife to create a space between the switch and the shell and then took another one to “saw” off the shell around the screws. I then used pliers to rip it off and cut the piece surrounding the screw with the knife and unscrewed the screw with needle nose pliers. Please be careful and obviously do not be too hard so you don’t damage the switch’s guts
@@bennyspade2046 gotcha, thanks for the help
My join con won't connect to the switch in handheld mode now
the hardest part is those gosh darn z buttons.
Just finished this last night. My X button works but it is stiffer then the other 3 buttons. I know everything is in place or it wouldn't click down. Could it be I over tighten the screws??
yeah you gotta loosen the screws up until they feel natural.
Why do they they make any for the OLED?
Wouldn't mind knowing the technique for unplugging the battery. I literally just ruined mine.
whats that blue tool called?
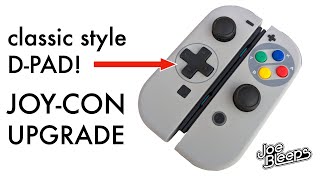
This looks great. I wish there were an option for a d-pad on the left joycon.
Me too, that would have really completed the look
You can order different shell replacements for really cheap & just use the dpad mod from them.
@@emfancyy7736 I have my joy-cons modded already with a d-pad. But the SNES look is what I want.
@@Eight-Bytes ohhhh I get what you're saying, when I said you could just buy a cheap set & use the dpad from that one I wasn't thinking that you can't because they only have the punch outs for the directional buttons. My bad bro.
@@emfancyy7736 You got it. No worries!
Hello, I really need some help! I ordered my kit and I was so excited to try it out. After seconds I realized that I can’t take out even half of the screws, they were so tight, I mean, what am I suppose to do now? I tried to put more pressure into the screws and I managed to get a few out, but not enough to open anything, not the back of the switch nor the joycons at all.....I stopped now, because I’m too afraid that I already broke my screws....I decided to buy a decent package of new screwdrivers to try it out next week again, but I’m so afraid that I already broke some screws and now it’s impossible to open the switch😭😭 Has anyone had the same experience? In other videos opening the switch looks so easy....
Put a rubber band on top of the screw, and it should make removing the screw easier. :)
Does shell changing ruin the warrenty
ofc
To anyone who is thinking about doing this hear my warning. The screws and springs are tiny be very careful. Reattaching the ZR cable requires the hands and tools of a surgeon.
Help me please! I have a problem with my right joycon. So the joycon does not connect to the console and it's not charging. So the console doesn't know that the joycon is attached and it thinks it is connected only with Bluetooth. I NEED HELP please!!!
You might wanna reopen it and check if the any of flex cables (especially the one for rails) are properly connected or even bent
@@Noodles0upp Tanks man!
Anybody else have their ZR not work after this? I tried taking the screws out and found out that two on the back of the shell are stripped, so that’s cool. Any help with ZR or taking stripped screws out? Thanks!
UndercoverMartyn me too I have no clue what to do
Your ribbon cable was probably reconnected upside down! Mine didn’t work either so I took it apart again, flipped the ZR ribbon connector upside down (the correct way) and it works!
welp the right bottom screw does not want to come off and if I try to unscrew it more its gonna ruin it and not come off, damn this sucks
Rear case replacement time stamp 17:28
is extreme rate a reliable company too buy from?, will they get my package too me by shipping it??
I've ordered a number of products from them and not had any issues. If you want extra security, order from their Amazon store. Most of their stock ships from Amazon directly and you have Amazon return policy
Nintendo Switch Lite??
Im a kid and i dont wanna hurt my switch
i dont want a shop to do it because they may mess something up and maybe their a scam
I take things apart and figure out how it works and sometimes I cant put it back lol
Doesn’t the - button have a membrane? Oh god not another lost thing
17:30 backplate
How long did that take you in real time?
From start to finish, just about an hour. Wasn't too bad at all. Biggest thing is keeping track of where the screws go 😊
@@Restalgia Yeah. That was a trick. There must have been close to 50 screws, with 5-7 different sizes and threads. Kudos to you for making it look easy.
Restalgia is it as easy as you make it look?
I would say this is not a beginner level mod, but if you are patient and very careful, you should be fine :)
Restalgia Okay. I think i’m going to give it a try. I’m just nervous about breaking the small flat wires that connect everything. Tysm for the input, and have a wonderful day!
5:26
Well, I messed up and accidentally broke the connector for one of the flex cables to go to the board and it looks like I’m going to have to get a new joycon motherboard lol
And this is a buddy’s switch, not mine, so I’m glad I have this learning experience, but I don’t like that I fucked up the board in one of their joycons
I like his instructions but he needed to show EXACTLY how to do things. I’m still stuck on the first joycon
I waiting for newest switch pro than I replace but whole system not shell 😄
Your Nightmare I bought a switch yesterday
@@Alone-ks6ed if your work good thats great but my can't work with hi TB
where did you get the youtube app? It's not even available at e-shop!
... Yes it is, I have it too.
I lost the spring. I LOST THE SPRING IT WAS GOING SO WELL. I’m gonna buy a replacement but JESUS CHRIST WHY ME
Edit: GOT NEW ONES VERY QUICK
Plastic wrap cover would be better than all this..I know is not the same...but I don't want to mess my nintendo switch doing all this complicated process....
I just ordered this and I’m really scared I’m going to break my switch 😩
Just be very careful and do NOT force anything. If you are mindful and take things one at a time, you will be fine
This dude is so rough with all the cables and pins and yet his is fine. I tried doing this a year ago, was extremely delicate and careful, and fucking broke a button and ripped two ribbon cables.
Only chads get shells instead of skins
Pls, say, they are made with good plastic? Not original shit?
I can’t do it too hard please do it for me I’ll pay you
Go on etsy
your video is outdated, made me pull my battery wires out of the socket when i didn’t have to. joy con ruined, thanks man 👎🏼
What do you mean out dated? The joycons internals have not changed since release.. this video shows exactly how it's still being done.