How to Replace Water Pump 02-07 Mazda 6

HTML-код
- Опубликовано: 8 фев 2025
- Buy Now!
New Engine Water Pump from 1AAuto.com 1aau.to/ia/1AEW...
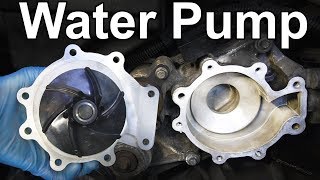
1A Auto shows you how to repair, install, fix, change or replace a broken, bad, or leaking water pump. This video is applicable to the 07 Mazda 6
🔧 List of tools used:
• Pry Bar 1aau.to/ohG/1AX...
• 10mm Wrench 1aau.to/op6/1AX...
• Complete Metric Socket Set 1aau.to/or8/1AX...
• Serpentine Belt Removal Tool 1aau.to/oD/1AXA...
• Needle nose pliers 1aau.to/om8/1AX...
• Needle nose pliers 1aau.to/om8/1AX...
• Ratchet 1aau.to/oam9/1A...
• Socket Extensions 1aau.to/o62/1AX...
• Torque Wrench 1aau.to/ovZ/1AX...
• Anti-Freeze
• Drain Pan 1aau.to/ohc/1AX...
• Floor Jack 1aau.to/ouj/1AX...
• Jack Stands 1aau.to/ouz/1AX...
For More Info visit us at 1aau.to/h/bke/
⚠ DISCLAIMER:
While 1A Auto strives to make the information provided in this video as accurate as possible, it makes no claims, promises, or guarantees about the accuracy, completeness or applicability of the content. No information contained in this video shall create any expressed or implied warranty or guarantee of any particular result. All do-it-yourself projects entail some risk. It is the sole responsibility of the viewer to assume this risk. 1A Auto is not responsible or liable for any loss damage (including, but not limited to, actual, consequential, or punitive), liability, claim, or any other injury or cause related to or resulting from any information posted in this video.


√ *Watch the Video*
√ *Buy The Part at 1A Auto* 1aau.to/m/Visit-1AAuto
√ *Do it Yourself*
√ *Save Money*
I really like the way you repaired the vehicles.
I love watching Chris fix for my repairs because he’s funny, but he often doesn’t have a video on my car. Love that’s these guys at 1A have videos on all sorts of cars and parts!
I just completed replacement of my water pump and thermostat housing on my 2005 Mazda 6. This video, and the other one, were extremely helpful and very detailed. The only suggestions I would have would be to try and break loose the bolts for the water pump pulley before removing the serpentine belt and tightening them after replacing it. Since I replaced the thermostat housing at the same time I had to remove the power steering pump assembly and found it easier to mount the water pump before remounting this assembly. It also made it easier to check for any leaks by making everything more visible. I also found it easier to install the serpentine belt before replacing the motor mount bracket. All and all these videos made the job much easier than trying to figure out what to remove for this task.
She’s the best mechanic on RUclips! So detailed and so clear!
+ffffest Thanks for checking us out! 1AAuto.com
I too had difficulty getting the water pump off. After sleeping on it I checked my steps in removing the 3 8mm bolts water pump bolts. I inadvertently removed a timing belt cover bolt that was 1/4" away and not the water pump bolt. I caught it and every thing went after that. 1A auto has some of the best videos and are very detailed . Why not use silicone on the "o" ring? Thank You.
This was an extremely helpful video and very well done. I am extremely impressed with the skills of this mechanic and it has saved me a lot of time, stress, as well as money. Thank you so much. Anytime I see 1A auto at the beginning of a video when I try to do something myself from parts bought from you guys I know it's going to be a quality video. Thank you so much!!!
+Ryan H Thank you! We love empowering our customers and showing how to perform DIY auto repairs with our high-quality auto parts. 1aau.to/m/Shop-1AAuto-c
Excellent, concise video. Well done!
+brad hoff Thank you!
As informative as this video is, it omits a couple of important points. The serpentine belt tensioning nut releases clockwise, i.e. towards the front of the car. The vehicle I worked on had 14mm nut which was domed at the top and recessed so it is difficult to release with a crowfoot. You will probably need a shallow 14mm socket. I used an extra long raised/flush 14/12 mm ring spanner and a 3/8 breaker bar on the 12mm end to push the spanner down towards the floor. The tensioner nut is a two step arrangement. The first releases a lock nut and once this is free the second stage releases the tension on the belt. Obviously it is important to retighten the lock nut once you have tensioned the belt. This two step procedure is easy to miss as it is almost impossible to see what is happening when you turn the tensioner nut. However, you can feel the nut release which is then followed by resistance from the tensioner spring.
It is not necessary to remove the engine mount for this job but if you decide to, it is best to do this before removing the serpentine belt as this will make it easier to access the tensioner nut. Cracking the 10mm pump pully bolts before removing the belt is a lot easier then trying to lock them with a screwdriver.
After refilling the radiator, run the engine with the radiator cap off until the thermostat opens and the coolant starts to circulate to ensure there is no air trapped in the system. Then put the cap on and check carefully for leaks. Important as modern cars will not forgive overheating.
These comments apply to a made in Japan right hand drive car and may not be correct for left hand drive models. Hope this helps someone.
Great video I’m going to be able to change my water pump
+Inside Our World Thank you! We love empowering our customers and showing how to perform DIY auto repairs with our high-quality auto parts. 1AAuto.com
Thank u great detailed instructions
Unnecessary to take the motormount out... A lot easier if you remove the power steering do the thermostat since you're there
Excelente video felicitaciones
Good job. Excellent explanation. BR.
I see this one is for the 2.3 I4, are you going to make a video for the 3.0 V6? I know it's a lot different. There is a plastic piece on the 3.0 water pump that is known to break and cause a coolant leak, and has recently done so on my gf's 2006 V6 model - thought I'd ask!
We currently do not have an auto repair video that covers this particular repair. We will keep this request in mind in the event that we need to make this repair in the future. 1aauto.com +Andrew Willson
How much cost the water pump for a Mazda 6, 2.3 Motor 2005
good job..👍
Please make a video for the 2.3 L model water pump and radiator.
+Paul Patt We're always cycling through common cars. We'll add this repair to our list! 1aau.to/m/Shop-1AAuto-c
Lol I know you guys faught to get that belt tool off behind cameras 😂
Wouldn't it be easier to put serpentine on before you put engine mount back?
Thanks very good job
Thanks for checking us out. 1aauto.com +Thor312full
In the US the Mazda 6 did not come out until the 2003 model. And in between 03 and 07 there are two different engine sizes for that car. A 2.3 l 4 cylinder which is what she's working on and a 3.0 l V6. It would have been nice to have the engine size in the description so I stop wasting time on the 4-cylinder because that does me absolutely no good.
Thank you!!!
+Rachael Padilla Thanks for checking us out! 1aau.to/m/Shop-1AAuto-c
Break the bolts loose before taking serpentine belt off
Another great video. What is the name of the tool that you used to push the tension-er down? I would like to get one of those. If you have it, can you have a link for it? Thank you so much once again...
Are you referring to the torque wrench? Thanks for watching! +Alejandro Roal
@@1AAuto At the minute 16:29 right next to the diagram, there is a wrench attached to a bar with a red handle. The bar with the red handle is the one I am interested in, or does it come together? Greetings...
This is the 4 cyl?
Yes. 2.3L . She says it at 9:57
Why take the ground bolt off?
Wow I thought it wouldve been alot harder then that
Was there a problem with the pump itself or was it just the O ring that was the problem?
it was missing an ear
@@FRAKKKA But was it broken before or during the removal? Metal looked pretty clean like it happened during removal.
Do you happen to know if this is the same for the same generation Mazda 3 2.0?
+Carlton Hanks The installation process should be very similar for this vehicle as well.
Woman 👍
+Ruben Marquez Thanks for checking us out! 1AAuto.com
Great tip to get pump out, credit to the original poster. ruclips.net/video/ao_kUfr9mLs/видео.html&lc=UgxzrghqjioeU-90OZ94AaABAg&feature=shared
My pump won’t sit flush on the block for the life of me
FOMOCO 💩