I thought I knew everything about portrait work but you really added enough to make this a great video. Subscribed... And Juliana has a great pair of eyes.
What if they don't have someone they love, or the one they did just died in a horrible accident? Now you have a picture of someone crying. I hope you feel real happy with yourself for making them cry you big jerk
1/ fill the frame (remove the headroom) 2/ Catchlights (get a good reflection from the eyes) 3/ Eye placement (shy people look away showing less iris) instruct them to look in same direction of their nose 4/ Lighting (golden hour nice soft light / midday harsh light) 5/ Draw a great expression - get them to perform a pose etc link in the flash card
My personal tip as a commercial printer,as opposed to your first tip: ALWAYS have headroom on all sides. You need them for both cropping to your required aspect ratio and for filling your bleeds. This works for personal 4R prints up to professional publications like magazines with sizes/ratios ranging from 8x10, 8.5x11, to A4s and 9x12s. Bleeds is where you lay out your photo in a full-page with the intentions that your sides will be cut intentionally but is there since printing and cutting is never perfect. You allow the printer up to 3mm usually to have this margin of error for the trim. So if you don't have this, the printer will either just print a shade of rich black, white, a mirrored version for you edges, or zoom in your photo even more so we can fill your bleed gaps. Think of yourself as a videographer -- Cinema cameras always have these rectangular crop guides with margins that still capture footage outside these guides knowing they will intentionally be crop out or be used by editors for leeway in editing. Tip2: Most commercial presses use FOGRA39 as a baseline for CMYK color profiles. To predict and more or less control the final outcome of your print, always put down the brightness of your monitor to match a white piece of paper at the base of your monitor. Then use Photoshop's softproof mode in FOGRA39 with black ink and paper simulation. Depending on your printer, they may or may not use Black Point Compensation -- in our case as a printer, we don't turn it on so we can maintain the vibrance of your colors. Turning it on preserves the details in your deep blacks at the expense of washing out your colors (which is print's way of increasing brightness). You can work while in this mode to create a "print" version of your work to recover unprintable colors or flattened details. As a person inside whose job used to be to match our clients' monitors who know squat about optimizing and designing for print, I notice that with people with normal monitors, I at least have to add Brightness+20 to 25; For bright monitors, I at least have to add Brightness+40 to 50. I might then remap certain unprintable colors that become "flat" like reflex blue to closer to cyan-ish (C100M60) and fruit orange to closer to vermillion (M40Y100). If you have your printer's go ahead, you can also convert your work to CMYK using Photoshop's Convert To Profile command and using FOGRA39 as your target CMYK profile. You may also use whatever profile your printer uses or if they provide you with one. If working with uncoated papers, FOGRA29 is a good reference point. You can play around with Black Point Compensation and a host of rendering techniques to preserve your RGB work. Usually its Relative Colorimetric, but my favorite is Perceptual for photos. It is less accurate color-wise, but it preserves the impact of a photo and usually a good perception of your photo in print. Be advised though that printers still have color delta margins and will not be always the same. Mass-produced publications also will have prints that range from dark to washed out as the print machine stabilized per signature/face. Tip3: If you are printing black and white, do the same above to convert to FOGRA39 or your target profile but make sure your CMY values are not equal or too close to each other. Having them perfectly equal or close will yield prints or spreads that don't have the same shade of rich gray. Control this by using Selective Color > Blacks and make sure you have a healthy margin where each CMY ink is more or less 10% ahead of each other at around the 50% grays. I usually go for cool grays as a bluish gray (Cyan+Magenta) tends to look neutral in human perception, so I will go for something like Cyan 60, Magenta 50, Yellow 40 as a reference point for midtone grays. If you want a warmer print with a tendency to go yellowish/red, then you make Magenta 60 Yellow 50, Cyan 40. Tip4: A competent printer will always respects your RGB profile so always attach your color profile. Some disregard your CMYK profile but thats fine as most people really don't know how to use CMYK and you will pass on your file in a press-ready CMYK PDF anyway if you do know what you're doing. Tip5: Finally, even after all you could do, always remember its not about color accuracy -- its about how the viewer sees it. The viewer doesn't know that the sky was originally this shade of teal but if it looks great and the impact is preserved, leave it at that. Printing is an art in and of itself and we should learn to let go. Our prints look different in every situation ranging from outdoor lights to indoor 6500K lights to professional 5000K lights to LED lights to flickering bulbs. Heck, even 50 and 60Hz lights will make colors and print look differently. Knowing that, you learn to just admire the beauty.
Only those who are in both industries understand this more. From Photography - Design & Layout - Print & Finishing, once you get those right you will be able to comprehend the info above.
I am an Industrial photographer, and the most important technique I use is an on-camera flash set for about 1 f-stop less than the available light to highlight the subject eyes and put a white highlight in them. It makes a world of difference when the editor chooses photos for publication. The ones with the flash almost always get chosen over ones without the flash.
3 minutes spent okay. Skillshare and "Like/subscribe/comment" ate the rest. I was actually looking for something more related to the thumbnail. That wasn't just a lighting change.
Tell the subject to do a powerful pose with their feet, even if you can’t see their feet in the photo when you are just starting the session with them. You may have to demonstrate. I find telling girls to give a sassy pose (whatever their interpretation of that is) empowers them to feel confident in the photos. Even if you don’t use these photos in final product - it’s about getting them confident and getting expressions
Tip #1 Shoot wide and crop. This is so underrated and something I’ve started doing regularly. The extra space allows you to play with the print aspect ratios in post and gives bleed room for printing. Anything over 24MP will have plenty of resolution to leave 10% extra room around the subject, and it will be needed when the client is deciding what sizes they want to print, as the ratios change for different sizes.
Longer focal lengths tend to flatter human faces. Shooting wide just to crop later is frankly counterproductive. You're not in any rush so compose what you'd like to capture. Don't use some 35mm lens and crop 100% in post.
@@mikerichardson60 By shoot wide I mean take a step back. I'm not referring to using a wide angle lens. Typically I shoot 80-120mm for portrait shoots and just make sure I have enough room around the subject to recompose in post if I have to.
One thing I would say about filling the frame, is that if you are using older/vintage glass, it often won't perform well near edges when shooting wide open. So if you are shooting character lenses wide open, I would actually advocate for putting your subjects face in the dead middle of the frame, and backing up if you need to. Modern digital cameras have plenty of resolution already - it's easy enough to crop in post IMO
About the headroom tip, it only applies if you're shooting beauty/fashion/standard portraits. But in a more author/artistic portrait there're infinite bizarre ways of composing your shot to give a certain feel. Exemple: a lot of head room may leave your subject like he's feeling alone or distant (used a lot in drama films).
As an audio engineer, I'd like to say, please record vocals in mono. It's strange to see the right channel on my interface whisper at -24 dB.. Apart from that, thank you, brilliant tips!
Do you have any time place markers so we can skip the in-video advertisements?? Cause we love your content BUT we want to get to good parts without being sold anything or subscribing to anything. Great work! Keep it up. And Hard!
Thanks for watching! Those sponsor ads are what help keep the content free, but of course you can always feel free to skip it if it's not the right fit for you. Much more to come very soon that I hope you'll find helpful! 👍
Love the last top, that will make them give you all types of expressions, confused, questioning, elated because they want to be that character, embarrassed, happy, laughing, intense, inquisitive, the beat goes on, demure. DG 71 and still learning.
I love using catch light even if a mini led torch in hand or on side. I use the relaxing techniques as well & will have them tell me a fun story or talk about something they're passionate about the when ready "say froggy"
Hey Miguel. I found tips 2 and 3 about the eyes extremely helpful. I followed so many Utubers over the years, but no one has mentioned and explained those ideas so simple as you have. Thanks, Bro, I will definitely use them. Bookmarking this vid too.
Hi miguel, any tips for photographing nail polish that has a shiney topcoat? I want that reflection shine coming off, but also want the holo glitter in the polish to be apparent. What kind of light should I be using(-i tried a light box and it was no good.)
+Always shoot towards the strengths/rules of the destination formats' display area. Social media? do whatever you want. For magazines, there typically needs to be dead space top/bottom/around the image for copy. Only covers tend to be highly zoomed in. Same for beauty. I work for a magazine and that's the way everything is shot.
I was always applying tip 1 but for certain of my younger models including my wife, it is important that I let a decent gap above their heads on every shot, bc of instagram format (4:5) and feed aesthetics purposes. (Basically if you look at the feed they want every pic to be centered, and the head not being cropped. I had alot of difficulties doing it on purpose at the beginning and I was never letting enough space above the models 😂.
Great contribution. There are two types of portrait techniques. One is used by those who use models as a focal point that leads the viewers into the picture of a great landscape. Others are shooting models with the intent to capture the inner beauty" of a model and the landscape is merely used as a non-distracting out-of-focus frame.
I usually leave space around the portrait to leave room for cropping. 8x10 frames are way different dimensions than 4x6 frames, so I zoom out enough to cover my bases.
It's definitely a smart thing to do for printing, but I tend to nudge my clients towards getting 8x12 instead. That way they get the images in the original crop that I intended them to have. For magazines though it's a good idea to give some space to stay safe 😀👍🏻
On tip #1 (fill the frame), what if you don't know what size you want to print or a client may want? Shouldn't you leave space so you can crop to that ratio? If I shoot at 3:2 and someone wants an 11x14 I'm going to have to crop it to fit. If I fill the frame I'll have to cut something out.
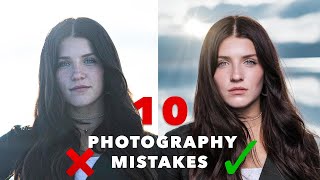
good tips but i wish you had an explanation on the thumbnail.. i assume it was better lighting that made the difference but it would have been nice to point it out.
The focal lengths are way different (The Newbie was taken with something like 35mm, maybe 28... The other with nearly 200mm or more! That's the reason her face seems so thin!)
Do the lemon face! when working for the first time with a model I'd recommend to do just that, act as if you were reacting to eating a lemon and keep the expression for a couple seconds, it helps to release a lot of tension, plus it's always awesome to start a session with a good laugh :)! and same as other people here, more of you with Juliana for sure.
Starting out, I'd say spend time learning Adobe Lightroom. It's one of the programs that you will spend the rest of your journey using and might do just about everything you'd want to do for a photo! 📸
Hey Miguel, thanks for the great content. By the way what flash trigger are you using for the Sony a7riii camera? Thanks in advance. I have Godox flash.
These were great, subscribed. My favorite one was to have them play a character. Because I do this in my head when I want to feel confident! How can you present this idea to your client?
You would have to convert the raw images into jpeg or png for people to view them. You can only open raw files in programs like Lightroom, Photoshop, etc which customers probably won't have. Why give them a raw file anyway?
You're amazing! I just found this looking for a video to help amateurs shoot a small group. LOVED it! I'm hosting a retreat & want to take some group photos. We'll have a Red Carpet, Step & Repeat banner, a CELL phone & a Ring light! Can I just use a Ring Light on a Tripod to get decent group photos? I waited too long so available photographers are WAY too expensive. The photos are just for the attendees memories. Thanks for any help!
Thank you! You could definitely get away with a ring light and cell phone for that kind of setup. Just make sure it's a good one so it doesn't mess up skin tones. 👍
What if you have no lights and are doing a realtor headshot in their house what would you recommend using? I only shoot in manual mode. I have a canon rebel t6 camera.
Good question. I'd make sure to shoot with window light on a sunny day. Bring some diffusion material that you can drape over the window if it's too harsh and basically use it like you would a Softbox!
@@MiguelQuilesJr thanks man. I have found that the age of social platforms has made us forget about some of the more practical aspects of our art. I started way back in the 90's on film and worked in a print lab for a time. This is the only reason I keep the cropping in mind. What I do now is leave head space for print on one copy of the image, and crop another copy for online distribution.
Take Bobby pins to photoshoots, in case the subjects hair starts to get messy because if the wind or whatever factor, she can just use some boby pins to keep it in place.
I like the “newbie” shot much more than the “professional” one. The “professional” shot is much flatter where as the “newbie” shot has much more interesting lighting to emphasize the mood, and just looks more natural.
@@MiguelQuilesJr Right, there are markets and applications for that type of portraits. I think probably because that personally I'm always against retouching to the degree that the subtle texture and tonality of the skin are altered. I think it is the difference between portraits that focus on facade vs persona. Even though a facade can oftentimes act as a shield or safe guard especially considering there are a lot of potential audience on social media, portraits that exhibit the persona underneath have a much greater potential to create a much stronger image and one that is more intriguing too. Applications for this type of portraits can be wedding or beauty and they can mean a great deal to the client but very little artistic value for others.
@@MiguelQuilesJr Thanks. I definitely like the digital aspect ratios better. We have some old frames like 8x10 and 11x14 but don't have anything I'm willing to crop to put in them.
Hi there. I have a Sony a7iii with a sigma 24-70 2.8 and a Zeiss 55mm 1.8. My family doesn’t like the pictures I take because it reveals too much details and they start criticizing themselves when they see their pictures 😂 What do you recommend I should do in camera to help. I was thinking about decreasing the sharpness. Any tips will be appreciated. Thank you.
I have a trick I use. Tell them look away, even completely, and then suddenly command them to look at the camera, you get an element of surprise that is hard to fake. You can't overdo it of course so make sure you are ready to take that shot or rapid shots.
Hi Miguel, your videos helped me alot. Thank you. My question is, i’m just using an entry level DSLR (since i just started doing sled study in photography for 1 yr 1/2) if my DSLR doesn’t have any eye detector, how will i know if my photos are sharp? Thanks again.
I got one question about filling the frame like you say. Dont you need to leave a little space around the subject for printing? I have had the exact opposite problem and shoot to tight then got to print say an 8 x 10 and cant get the whole picture in the frame. Thanks for you videos.
Good question. If you are printing an 8x10 from a full frame camera then it's going to require a crop, so I usually print 8x12 to avoid having to do that. Those frames are just as common and allow me to display the image the way I intended as an artist. 🎨
Thanks for a great video and tips, your personality was awesome. My fav tip was about lighting, no matter how great everything else is lighting needs to work with you.
Yes I’ve been paying more attention to eyes & hand gesture that also can greatly impact a photo so I been trying show my models what I want more less by striking the pose Lol,I look probably stupid but they get it and of course do better than me..mission accomplished.
It doesn't hurt, but you still have to do your part as the photographer. I've seen plenty of good looking people that looked terrible in photos due to poor lighting, tacky styling, poor composition, etc.
Can you tell us what are your favourite photography courses? I also want to know more about fashion photography from big names like Peter Lindbergh, and what are those mega body sized light panels they use? Do you know?
Hi Miguel, Truly enjoyed your video (probably because Julianna is so gorgeous . . . :) - found your video by accident, glad I did. I'll be subscribing. Even if you already know what you talked about it's always good to get a refresher because we often get "stuck" doing the same thing over and over.


I thought I knew everything about portrait work but you really added enough to make this a great video.
Subscribed... And Juliana has a great pair of eyes.
there is something to be learnt
Ken Konard thinking you know everything automatically means you suck
Amazing MAKE person laugh
Tip 6: ask sitter to look at a point behind you. Tip 7: ask sitter to think of someone that they love.
Think about someone they love? That's a thing?
@@elliottdavies3528 Yes, try it.
@@simmo303 Interesting.
Facts
What if they don't have someone they love, or the one they did just died in a horrible accident? Now you have a picture of someone crying. I hope you feel real happy with yourself for making them cry you big jerk
1/ fill the frame (remove the headroom)
2/ Catchlights (get a good reflection from the eyes)
3/ Eye placement (shy people look away showing less iris) instruct them to look in same direction of their nose
4/ Lighting (golden hour nice soft light / midday harsh light)
5/ Draw a great expression - get them to perform a pose etc link in the flash card
Thank you so much. You really helped me a lot.
My personal tip as a commercial printer,as opposed to your first tip:
ALWAYS have headroom on all sides. You need them for both cropping to your required aspect ratio and for filling your bleeds. This works for personal 4R prints up to professional publications like magazines with sizes/ratios ranging from 8x10, 8.5x11, to A4s and 9x12s. Bleeds is where you lay out your photo in a full-page with the intentions that your sides will be cut intentionally but is there since printing and cutting is never perfect. You allow the printer up to 3mm usually to have this margin of error for the trim. So if you don't have this, the printer will either just print a shade of rich black, white, a mirrored version for you edges, or zoom in your photo even more so we can fill your bleed gaps. Think of yourself as a videographer -- Cinema cameras always have these rectangular crop guides with margins that still capture footage outside these guides knowing they will intentionally be crop out or be used by editors for leeway in editing.
Tip2:
Most commercial presses use FOGRA39 as a baseline for CMYK color profiles. To predict and more or less control the final outcome of your print, always put down the brightness of your monitor to match a white piece of paper at the base of your monitor. Then use Photoshop's softproof mode in FOGRA39 with black ink and paper simulation. Depending on your printer, they may or may not use Black Point Compensation -- in our case as a printer, we don't turn it on so we can maintain the vibrance of your colors. Turning it on preserves the details in your deep blacks at the expense of washing out your colors (which is print's way of increasing brightness).
You can work while in this mode to create a "print" version of your work to recover unprintable colors or flattened details. As a person inside whose job used to be to match our clients' monitors who know squat about optimizing and designing for print, I notice that with people with normal monitors, I at least have to add Brightness+20 to 25; For bright monitors, I at least have to add Brightness+40 to 50. I might then remap certain unprintable colors that become "flat" like reflex blue to closer to cyan-ish (C100M60) and fruit orange to closer to vermillion (M40Y100).
If you have your printer's go ahead, you can also convert your work to CMYK using Photoshop's Convert To Profile command and using FOGRA39 as your target CMYK profile. You may also use whatever profile your printer uses or if they provide you with one. If working with uncoated papers, FOGRA29 is a good reference point. You can play around with Black Point Compensation and a host of rendering techniques to preserve your RGB work. Usually its Relative Colorimetric, but my favorite is Perceptual for photos. It is less accurate color-wise, but it preserves the impact of a photo and usually a good perception of your photo in print.
Be advised though that printers still have color delta margins and will not be always the same. Mass-produced publications also will have prints that range from dark to washed out as the print machine stabilized per signature/face.
Tip3:
If you are printing black and white, do the same above to convert to FOGRA39 or your target profile but make sure your CMY values are not equal or too close to each other. Having them perfectly equal or close will yield prints or spreads that don't have the same shade of rich gray. Control this by using Selective Color > Blacks and make sure you have a healthy margin where each CMY ink is more or less 10% ahead of each other at around the 50% grays. I usually go for cool grays as a bluish gray (Cyan+Magenta) tends to look neutral in human perception, so I will go for something like Cyan 60, Magenta 50, Yellow 40 as a reference point for midtone grays. If you want a warmer print with a tendency to go yellowish/red, then you make Magenta 60 Yellow 50, Cyan 40.
Tip4:
A competent printer will always respects your RGB profile so always attach your color profile. Some disregard your CMYK profile but thats fine as most people really don't know how to use CMYK and you will pass on your file in a press-ready CMYK PDF anyway if you do know what you're doing.
Tip5:
Finally, even after all you could do, always remember its not about color accuracy -- its about how the viewer sees it. The viewer doesn't know that the sky was originally this shade of teal but if it looks great and the impact is preserved, leave it at that. Printing is an art in and of itself and we should learn to let go. Our prints look different in every situation ranging from outdoor lights to indoor 6500K lights to professional 5000K lights to LED lights to flickering bulbs. Heck, even 50 and 60Hz lights will make colors and print look differently. Knowing that, you learn to just admire the beauty.
This is the most informative youtube comment I've ever read. Thank you.
I wish comments could get bookmarked… you should turn this into a medium post or something and let us know!
Yeah..I was totally perplexed by his tip here too, so much so, that I couldn't even tell from his example, which one was the goodie!
Only those who are in both industries understand this more. From Photography - Design & Layout - Print & Finishing, once you get those right you will be able to comprehend the info above.
Liking this to bookmark.
I am an Industrial photographer, and the most important technique I use is an on-camera flash set for about 1 f-stop less than the available light to highlight the subject eyes and put a white highlight in them. It makes a world of difference when the editor chooses photos for publication. The ones with the flash almost always get chosen over ones without the flash.
How it is done sir. I am new to photography
That was 5 minutes well spent, a few tips from someone who is willing to share his knowledge, no annoying music or intros, keep up the good work.
Nick Brown the 1st 20% was an annoying ad... Try being truthful kthx
3 minutes spent okay. Skillshare and "Like/subscribe/comment" ate the rest. I was actually looking for something more related to the thumbnail. That wasn't just a lighting change.
What are you talking about man it was 1:30 before he even started talking anything about portrait tips
@@70mjc hell yeah brother speak that truth
Tell the subject to do a powerful pose with their feet, even if you can’t see their feet in the photo when you are just starting the session with them. You may have to demonstrate. I find telling girls to give a sassy pose (whatever their interpretation of that is) empowers them to feel confident in the photos. Even if you don’t use these photos in final product - it’s about getting them confident and getting expressions
Yeah that’s very important
Kodak spots? They made in Ireland several spots, with sth looking like a gallows, spoiling beauty
Tip #1 Shoot wide and crop. This is so underrated and something I’ve started doing regularly. The extra space allows you to play with the print aspect ratios in post and gives bleed room for printing. Anything over 24MP will have plenty of resolution to leave 10% extra room around the subject, and it will be needed when the client is deciding what sizes they want to print, as the ratios change for different sizes.
Longer focal lengths tend to flatter human faces. Shooting wide just to crop later is frankly counterproductive. You're not in any rush so compose what you'd like to capture. Don't use some 35mm lens and crop 100% in post.
@@mikerichardson60
By shoot wide I mean take a step back. I'm not referring to using a wide angle lens. Typically I shoot 80-120mm for portrait shoots and just make sure I have enough room around the subject to recompose in post if I have to.
Excelente video
1. Fill the frame
2. Catch light
3. Eye placement
4. Expression
5. Time of day
One thing I would say about filling the frame, is that if you are using older/vintage glass, it often won't perform well near edges when shooting wide open. So if you are shooting character lenses wide open, I would actually advocate for putting your subjects face in the dead middle of the frame, and backing up if you need to. Modern digital cameras have plenty of resolution already - it's easy enough to crop in post IMO
About the headroom tip, it only applies if you're shooting beauty/fashion/standard portraits. But in a more author/artistic portrait there're infinite bizarre ways of composing your shot to give a certain feel. Exemple: a lot of head room may leave your subject like he's feeling alone or distant (used a lot in drama films).
Before you can break the rules you need to understand the rules and have a good foundation
Love the way how he rocks backwards & forwards like a giddy little school boy talking to the rest of the class 😘
As a guy who is trying to learn Portraits, these were helpful tips! The eyes tip was very helpful
As an audio engineer, I'd like to say, please record vocals in mono. It's strange to see the right channel on my interface whisper at -24 dB.. Apart from that, thank you, brilliant tips!
Seriously man.. its so annoying😣
Do you guys do ear test as well?
Lmao
Yeah, even on my TV the audio seems to becoming mostly from the left side.
Just hold the phone to the left. Fixed!
Do you have any time place markers so we can skip the in-video advertisements?? Cause we love your content BUT we want to get to good parts without being sold anything or subscribing to anything. Great work! Keep it up. And Hard!
Thanks for watching! Those sponsor ads are what help keep the content free, but of course you can always feel free to skip it if it's not the right fit for you. Much more to come very soon that I hope you'll find helpful! 👍
Extremely helpful, thank you! And Juliana is GORGEOUS!!
50mm + focal length is important too, shooting too close to the subject will create distortion ( Gopro look )
Love the last top, that will make them give you all types of expressions, confused, questioning, elated because they want to be that character, embarrassed, happy, laughing, intense, inquisitive, the beat goes on, demure. DG 71 and still learning.
I love using catch light even if a mini led torch in hand or on side.
I use the relaxing techniques as well & will have them tell me a fun story or talk about something they're passionate about the when ready "say froggy"
Your model has the most beautiful eyes! I love photographing people with intense eyes.
Hey Miguel. I found tips 2 and 3 about the eyes extremely helpful. I followed so many Utubers over the years, but no one has mentioned and explained those ideas so simple as you have. Thanks, Bro, I will definitely use them. Bookmarking this vid too.
Hi miguel, any tips for photographing nail polish that has a shiney topcoat? I want that reflection shine coming off, but also want the holo glitter in the polish to be apparent. What kind of light should I be using(-i tried a light box and it was no good.)
Great tips! Love that shirt! Where do I get that!???
Thank you! Here's the one I picked up. amzn.to/3MyUp2q
video starts at 1:14
+Always shoot towards the strengths/rules of the destination formats' display area.
Social media? do whatever you want. For magazines, there typically needs to be dead space top/bottom/around the image for copy. Only covers tend to be highly zoomed in. Same for beauty. I work for a magazine and that's the way everything is shot.
I was always applying tip 1 but for certain of my younger models including my wife, it is important that I let a decent gap above their heads on every shot, bc of instagram format (4:5) and feed aesthetics purposes. (Basically if you look at the feed they want every pic to be centered, and the head not being cropped. I had alot of difficulties doing it on purpose at the beginning and I was never letting enough space above the models 😂.
On the last note its very true. This past Sat I worked with a model that knew her poses. It was like magic. Its important for models to learn it.
Great contribution. There are two types of portrait techniques. One is used by those who use models as a focal point that leads the viewers into the picture of a great landscape.
Others are shooting models with the intent to capture the inner beauty" of a model and the landscape is merely used as a non-distracting out-of-focus frame.
Great video, and you are an amazing teacher. One of the best!
Where is that shirt from? lol i love it
I usually leave space around the portrait to leave room for cropping. 8x10 frames are way different dimensions than 4x6 frames, so I zoom out enough to cover my bases.
It's definitely a smart thing to do for printing, but I tend to nudge my clients towards getting 8x12 instead. That way they get the images in the original crop that I intended them to have. For magazines though it's a good idea to give some space to stay safe 😀👍🏻
@@MiguelQuilesJr that's genius. You're selling art in comparison to me!
Hi
Do u hv a video for using a light meter?
Thanku
William
On tip #1 (fill the frame), what if you don't know what size you want to print or a client may want? Shouldn't you leave space so you can crop to that ratio? If I shoot at 3:2 and someone wants an 11x14 I'm going to have to crop it to fit. If I fill the frame I'll have to cut something out.
This video is so well done. Super soft...nothing crazy. Love this guy. Thanks man you are awesome!
good tips but i wish you had an explanation on the thumbnail.. i assume it was better lighting that made the difference but it would have been nice to point it out.
The focal lengths are way different (The Newbie was taken with something like 35mm, maybe 28... The other with nearly 200mm or more! That's the reason her face seems so thin!)
Do the lemon face! when working for the first time with a model I'd recommend to do just that, act as if you were reacting to eating a lemon and keep the expression for a couple seconds, it helps to release a lot of tension, plus it's always awesome to start a session with a good laugh :)! and same as other people here, more of you with Juliana for sure.
Great tip Alex! Thanks!
It was great and simple way to explain what’s to take a portrait picture.
Thank you for the tips it was plain and simple.👏🏻👏🏻👏🏻👏🏻
Awesome video! Thank you! Model is STUNNING!!!!!!!
Great advice for a total newbie, thank you.
hey miguel as a beginner in photography,what editing apps do you think i should make use of? kindly reply
Starting out, I'd say spend time learning Adobe Lightroom. It's one of the programs that you will spend the rest of your journey using and might do just about everything you'd want to do for a photo! 📸
@@MiguelQuilesJr thanks man appreciate you
Hey Miguel, thanks for the great content. By the way what flash trigger are you using for the Sony a7riii camera? Thanks in advance. I have Godox flash.
That model is unbelievably gorgeous
These were great, subscribed. My favorite one was to have them play a character. Because I do this in my head when I want to feel confident! How can you present this idea to your client?
Where do you upload your raw images? I want to create a portfolio of images for customers, but am unable (to my knowledge) to upload in RAW. Thanks!
You would have to convert the raw images into jpeg or png for people to view them. You can only open raw files in programs like Lightroom, Photoshop, etc which customers probably won't have. Why give them a raw file anyway?
You're amazing! I just found this looking for a video to help amateurs shoot a small group. LOVED it! I'm hosting a retreat & want to take some group photos. We'll have a Red Carpet, Step & Repeat banner, a CELL phone & a Ring light! Can I just use a Ring Light on a Tripod to get decent group photos? I waited too long so available photographers are WAY too expensive. The photos are just for the attendees memories. Thanks for any help!
Thank you! You could definitely get away with a ring light and cell phone for that kind of setup. Just make sure it's a good one so it doesn't mess up skin tones. 👍
What if you have no lights and are doing a realtor headshot in their house what would you recommend using? I only shoot in manual mode. I have a canon rebel t6 camera.
Good question. I'd make sure to shoot with window light on a sunny day. Bring some diffusion material that you can drape over the window if it's too harsh and basically use it like you would a Softbox!
my left ear really enjoyed this video :))
Just showing the left one some love 😉
What about leaving enough head space for enlargements (printing)?
Good question. I would just end up printing to that aspect ratio. For example, instead of printing 8x10 I'd do 8x12.
@@MiguelQuilesJr thanks man. I have found that the age of social platforms has made us forget about some of the more practical aspects of our art.
I started way back in the 90's on film and worked in a print lab for a time. This is the only reason I keep the cropping in mind.
What I do now is leave head space for print on one copy of the image, and crop another copy for online distribution.
Take Bobby pins to photoshoots, in case the subjects hair starts to get messy because if the wind or whatever factor, she can just use some boby pins to keep it in place.
So cool great advice will certainly use it thanks 😊
Dope video. Very helpful and I can’t wait to try these out!
hi Miguel.Could you please tell me when i click my own photos why are they distort,lopsided?
I like the “newbie” shot much more than the “professional” one. The “professional” shot is much flatter where as the “newbie” shot has much more interesting lighting to emphasize the mood, and just looks more natural.
Understandable. The question is, which one do you think she would prefer to buy if she was a client?
@@MiguelQuilesJr Right, there are markets and applications for that type of portraits. I think probably because that personally I'm always against retouching to the degree that the subtle texture and tonality of the skin are altered. I think it is the difference between portraits that focus on facade vs persona. Even though a facade can oftentimes act as a shield or safe guard especially considering there are a lot of potential audience on social media, portraits that exhibit the persona underneath have a much greater potential to create a much stronger image and one that is more intriguing too. Applications for this type of portraits can be wedding or beauty and they can mean a great deal to the client but very little artistic value for others.
Would you leave the headroom if you wanted an 8x10 crop or just crop the filled frame?
I don't sell 8x10 to clients, I go with 8x12. With that size I still crop in camera. 8x10 size is old school 😁✌️
@@MiguelQuilesJr Thanks. I definitely like the digital aspect ratios better. We have some old frames like 8x10 and 11x14 but don't have anything I'm willing to crop to put in them.
Hi there. I have a Sony a7iii with a sigma 24-70 2.8 and a Zeiss 55mm 1.8. My family doesn’t like the pictures I take because it reveals too much details and they start criticizing themselves when they see their pictures 😂 What do you recommend I should do in camera to help. I was thinking about decreasing the sharpness. Any tips will be appreciated. Thank you.
Great video! Excellent information!
The direction of the subjects eyes is paramount, thanks for that tip!!
I have a trick I use. Tell them look away, even completely, and then suddenly command them to look at the camera, you get an element of surprise that is hard to fake. You can't overdo it of course so make sure you are ready to take that shot or rapid shots.
Hi Miguel, your videos helped me alot. Thank you. My question is, i’m just using an entry level DSLR (since i just started doing sled study in photography for 1 yr 1/2) if my DSLR doesn’t have any eye detector, how will i know if my photos are sharp? Thanks again.
I got one question about filling the frame like you say. Dont you need to leave a little space around the subject for printing? I have had the exact opposite problem and shoot to tight then got to print say an 8 x 10 and cant get the whole picture in the frame. Thanks for you videos.
Good question. If you are printing an 8x10 from a full frame camera then it's going to require a crop, so I usually print 8x12 to avoid having to do that. Those frames are just as common and allow me to display the image the way I intended as an artist. 🎨
Great video! Thank you for sharing your knowledge.
miguel what's a good flash for my canon 80d please help me out i want a nice cheap one
i LOVE your persoonality!! And she is beautiful!!!! xox great video! Thank you!!
Aww, thank you! And yes, she's quite amazing. Always love working with her 😃📸
Thanks for the tips! I am in a photography class and this will help me later in the class.
Thank uuu👏👏👏
Miguel I always like that you are willing to share what you know and helping other take better photos. I know they have always help me.
I try my best to help out, so happy the tips are helping!!
I prefer newbie! Why? It natural, no artificial touching up.
all your tips are excellent Miguel - many thanks
Very useful great tips. And gorgeous model.
Great tips Miguel! Solid content !
Thanks Roberto! I appreciate that 😀✌️
Long introduction but your information was crucial and well explained; thanks. BTW, your model's eyes are awesome!
where can i get that shirt it's dope!
when taking a picture make sure to pay attention to the diaphragm of the model's eyes to enhance the beauty of eye color
What's the diaphragm of the eye
Edit after 2 months: Anyone??
He meant the iris, I think?
@@fuchs77 could be (??)
Great Video....short and to the point.
Look straight with your nose! Well done. I like it.
How are the external flashes powered? Also I want to get a cheap amazon speed light but I don’t know anything about setting them up
Thanks for a great video and tips, your personality was awesome. My fav tip was about lighting, no matter how great everything else is lighting needs to work with you.
Some awesome advice I haven’t heard anybody else about! Thanks Miguel. And yes, put her in the videos more.. she hasn’t said a word.
i like left its more interesting with contrasting shadows and highlight right is boring like most Instagram photos
The photo on the left makes her look dead. No one would buy that photo and newbie photographers can take it by accident any day of the week.
Those are wonderful tips, and could the model be any more beautiful?
Yes I’ve been paying more attention to eyes & hand gesture that also can greatly impact a photo so I been trying show my models what I want more less by striking the pose Lol,I look probably stupid but they get it and of course do better than me..mission accomplished.
It always helps having a model who is drop dead gorgeous..
It doesn't hurt, but you still have to do your part as the photographer. I've seen plenty of good looking people that looked terrible in photos due to poor lighting, tacky styling, poor composition, etc.
@@MiguelQuilesJr
👍👍👍👍👍
Thanks for sharing!!!, this is really helpful for me!!!
Can you tell us what are your favourite photography courses? I also want to know more about fashion photography from big names like Peter Lindbergh, and what are those mega body sized light panels they use? Do you know?
All good ideas, this unlike others on RUclips, makes some good points grounded in real photography.
Where can I buy that shirt ?
Thanks 🙂
She's gorgeous 😍 omg
Really great tips !! Good job !
Chose this vid because it was the shortest in the search! Turns out it had some of the best pointers I've seen!
Happy to hear it!!
That model is killing it 🤑
I’m a newbie photographer and I truly learning every single day from your videos!! Thank you very much for sharing such a informative content!!!
So happy to hear it! 🙏
Can you make a tutorial for shooting men? It is so much harder especially for posing and angles
Absolutely! Funny enough, some of my favorite portraits that I've shot have been of men. I'll see what I can bring to a video like that 😁👍
Hi Miguel,
Truly enjoyed your video (probably because Julianna is so gorgeous . . . :) - found your video by accident, glad I did. I'll be subscribing. Even if you already know what you talked about it's always good to get a refresher because we often get "stuck" doing the same thing over and over.
thank you, great tips!
Some great tips.
But I am not sure what you mean by catch lights
Great tips, and great shirt!
You are so nice, Miguel, to share these tips! Thank you.
which lense did you use?