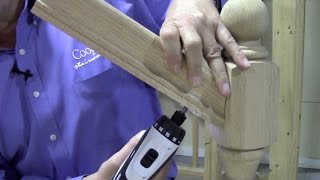
Retro fitting newels posts, handrail and spindles ***PLUS HAND CUT MORTISE AND TENONS***

HTML-код
- Опубликовано: 16 мар 2022
- In this video, (part 1), I show how I fit a new set of newel posts, handrail and spindles to a landing area after building and extension work has been carried out.


Del, the sound of a sharp chisel cutting through end grain is a joyous sound. Your delight at how well your hand cut mortice and tenons fit makes me smile. Although with your skill you shouldn't be surprised. But i know the feeling, being a carpenter myself. keep up the great work. Greg
Del, it is a true testament to your shills at problem solving. I have never had to do something like this and I could imagine myself trying to come up with a clever way of strengthening that newel post into that floor such as cutting out that section you marked and putting a steel bar into both floor and underside of the post. Fine craftsmanship with a bog standard rip saw! Your solution works and the experience is in deciding when enough is enough.
Hi Michael🖐In my experience, even doweling down into the joists never really gives makes a strong, wobble free newel👍I appreciate your comment, and you're so right when you say that sometimes you need to know when enough is good enough👊Thanks for watching😎Cheers Del
I come from a family of Joiners & know the skills involved. Working on Sites for the last 48 years, it was amazing at times seeing the Craftsmanship of some guys, just with a set of basic hand tools.
It maybe an old fart thing to say; but I really think we’ve lost that skill & ability.
Thanks Del for sharing👍👍
Hi FW🖐It's probably a conversion we could have at great length, and it is a little bit sad that the game seems to have turned into a constant race to get things done quickly with no time to edulge in the older, more traditional methods of carpentry and joinery😩 I appreciate your comment and thanks for watching 😎 Cheers Del
@@thetallcarpenter Ah, nostalgia is not what it used to be Del!!
Keep em coming & thanks mate👍
WOW its good to see a craftsman at work you made a great job cutting those tenons straight off the saw, which seems to cut fine now that its broke in. your work is admired by all.
Hi Ronald🖐Thanks for your kind words🤗and yes, the saw seems OK now👊Cheers Del
Every video I watch and learn ⚒ Thank you for all your time and effort.
Hi Joe🖐It's great that you find my videos interesting and helpful and comments like yours keep me motivated to carry on making them🤗Cheers Del
Looking great thanks del have a good weekend 👍🏻
Hi John🖐You to bud🤗Thanks for watching 😎 Cheers Del
Thanks Del and Happy St Patricks Day!
Hi Maidhc🖐Paddy's day is quite big in our family, as I'm part Irish, and my wife is half Irish and my father in law is 100% Dublin🇮🇪Thanks for watching and your comment 😎 Cheers Del
Beautiful craftsmanship Del,a pleasure to watch........thanks
Hi Michael🖐Thanks for you comment, and this was a nice little job to do👊Cheers Del
Love your problem solving and skill level...first rate.
Hi there🖐Thanks for watching and appreciate your comment😎Cheers Del
Another great video. Always love watching you get excited about little things like cutting the tennon 😆😆. Shows the pride in your work it’s brilliant 👌👌👌
Hi Marc🖐Thanks for you great comment and I've got a stand alone video coming out soon showing a bit more detail on cutting the mortice and tenon👊I do get great satisfaction out of doing what I do, and it's always great when a joint works sweet straight off the saw🤟Thanks for watching 😎 Cheers Del
Thanks for the reply. Really looking forward to seeing that. I understand the satisfaction and it’s well deserved. Great to show off what can be done with a handsaw too. 👌👌👍👍
@@marcmcgettigan3580 Cheers Marc👍
This one was right up my street mate - bet you enjoyed this job . Great work 👍
Hi RJ🖐I take it this is also the sort of job you might get👊These little jobs are pretty cool for us carpenters, and there's a lot of satisfaction to be had once they're completed🤩Thanks for your comment and for watching 😎 Cheers Del
Love how you overdo your work.Very old school.Too many now look to get the job done without proper care of how it’s put together.
Hi Aaron🖐I guess it comes from my early apprenticeship when I worked for a company that'd everything traditionally👍plus I like to keep my hand in doing these kind of joints👊Thanks for watching and your comment 😎 Cheers Del
Beautiful work buddy. Looking forward to more of your vids!
Hi Marcus🖐I appreciate your comment bud, and thanks for watching 😎 Cheers Del
great work again
Thanks for watching Neil😎Cheers Del
Once again making hard 'finicky' job look easy.
Top tip for you with polyurethane adhesive which is moisture curing. I just wipe the timber with a damp cloth or little spray of water and this speeds up the curing. Less drips.
Take care 🙂
Hi Tim🖐I always try to moisten the surfaces when using PU glue, but I think I just got a bit over excited on this one and let glue flow😲I paid the price though, as I had to clean off all those drips😖Thanks for your tip and for watching 😎 Cheers Del
Excellent job mate 👍
Thanks for watching Tyler😎Cheers Del
I was musing to myself about how you would approach this particular job and you have exceeded my interpretation of what you were going to do I stupidly thought you were going to drill it out and dowel it together but what else would you expect from a retired brickie, anything outside the house and I’m your man joiners loved following my work because I left it level and square made it easier for them hand cutting the roof 2 guides and they knew the rest would be the same, but inside doing intricate work mmmm not so good, great bit of work
Hi John🖐Shame there's not brickies in my world like you were/are mate, as I go behind some shocking work😬Thanks for your comment and for watching 😎 Cheers Del
Nice job mate, it's good to see handrails jointed the proper way, i always mortice & tennon hardwood and softwood . I also tell myself I've still got it if the joints fit straight off the handsaw.
It's always a little win when the joints are good straight of the saw🤟Thanks for watching and your comment 😎 Cheers Del
Toolstation do a pu adhesive in sealant type cartridge, brilliant stuff. Bit more expensive but a lot more controllable and a lot less messy!! Top job Del!!
Great comment Jay🤗and I use it all the time, as, like you say, it's really controllable👊I just didn't have any this day, and there was some PU floor glue on the job which saved me having to nip to a Toolstation to pick some more up👍Thanks for your comment and for watching 😎 Cheers Del
Hi Jay, that's the stuff I use , sparingly.
Good skills mate , tenon straight off the saw impressive 👍
It went pretty sweet Chris👊I think I impressed myself🤪Thanks for watching 😎 Cheers Del
Top job again Del. 👍
Cheers Barry🤗Thanks for watching
Thanks del another great video 👍
Hi Paddy🖐Thanks for watching 😎 Cheers Del
Thanks 4 sharing m8 appreciated nice job
Hi Sadaqat🤓Thanks for your comment bud,and for watching 😎Cheers Del
This made me laugh out loud - "I shouldn't sound surprised", whilst sounding like an six year old child that's just got the best Christmas present they were never expecting. :)
Another informative and entertaining video, thanks Del (y)
Hi Phil🖐Yeah, I couldn't contain my glee with how nicely that joint came straight of the saw/chisel😆Great comment bud and thanks for watching 😎 Cheers Del
Nice work all around, tight solution with the nosing.
Thanks for watching disklamer 🤩Cheers Del
Nice work Del.
Cheers BB🤩Thanks for watching 😎
Nice one Del 👍
Cheers Jim🤗Thanks for watching👍
New sub del 🙌🏻 proper joiner nice one mate 👍👍
Hi there🖐I appreciate your comment and you subscribing🤩Cheers Del
On these remodeling jobs, it's important to be able to think on your feet and make compromises so that you don't end up opening a huge can of worms. The decisions you made on this job kept it rather simple and effective. This is where experience plays a huge role. A lesser carpenter could have really botched this job by trying to do it the conventional new construction way and ended up with a worse job and spent way more time and money.
Hi Marcel🖐 I guess we gain experience with every job we do, and end up getting to know things will turn out depending on which direction we take at specific points of the job🤔Thanks for your great comment and for watching 😎 Cheers Del
Rip the whole thing out and put your corner newels in properly. Add a short return to the handrail and attach the newel at the top of the stairs.
That's not what the customer wanted Shawn😬Often, what SHOULD be done on jobs like these is not done in favour of what the client/customer wants🤔Thanks for your comment and for watching 😎 Cheers Del
Proper skills on show , 👌🏼👍🏼🧱
I'll take that as a compliment coming from you Steve🤗Thanks for watching mate 😎 Cheers Del
@@thetallcarpenter 😉😁🤜🏽🤛🏽🧱👍🏽
Hi Del how’s things mate
Love the content of this video mate perfection, yes must admit you are bloody good with a hand saw 🪚 going now to watch part two lol. Thanks mate 👍👍👍👍
Hi Carl🖐I appreciate you watching bud, and your generous comment🤩Hope you enjoy part 2🤞Cheers Del
It’s always more challenging to make new stuff work with existing, sometimes infuriating and it always takes longer than just installing all new stuff 😂
You know it NS😬Thanks for watching and your comment😎Cheers Del
Good video
Thanks for watching Harpreet🤩Cheers Del
Awww...I wanted to see how the newel went into the floor.😢
Sorry bud, I'll film it if I do another one👌Cheers Del
Fantastic, love how you got over the problems and made it look as close to how it would have been built originally.
Your chisel looks very sharp do you use an oil stone?
Hi Richard🖐Thanks for your comment🤗and yes, I do use an oldschool oilstone to sharpen my chisels👍Cheers Del
Nice job for a hand cut M & T with a general purpose panel saw not a tenon saw.
You need to get a festool domino for doing your tenons fast, accurate and very strong.
Hi Kevin🖐I've seen a few videos on the Domino cutter🤓It does look like a great bit of kit, but a little too good for my jobs😬Thanks for your comment and for watching 😎 Cheers Del
I used to think will I use this machine as I have full workshop set up with mortice and tennon machines but I took the plunge and find myself using it more than I thought I would.
@@thetallcarpenter A masterful display of how to cut a tenon with a simple panel saw T.C, 👍😁🔨🇮🇪
🤘😎🤘
Thanks for watching Wayne 🤩👊🤩
Nice work again Del, good old school carpentry with a great tenon straight from the saw!! What did we do before multitools? 😃 Did I spot a Fein multitool there? I bought a cheap multitool years ago thinking I’d use it for one job I was doing but, even though I’ve upgraded to a Makita one, I wouldn’t be without it now!
Hi Simon🖐Yes it's a Fein cutter and like you, I wouldn't be without one now👊Thanks for your comment and for watching 😎 Cheers Del
Love the videos, out of interest why did you only have a 40mm mortise/tennon instead of using the full height of the rail?
Hi Sean🖐Stepping the tenon down from the top of the handrail leaves a cleaner joint against the newel face. If the tenon was full height you'd see a tiny bit of the mortice no matter how good the joint was👍Thanks for watching and your comment 😎 Cheers Del
With what you said about the old newel being 70mm, if you’d ripped the new one down to 70mm both sides then you wouldnt have had to put the awkward little round on the bottom corners of the new newel. Furthermore, even though I hate to leave a nosing overhanging too much like on the original here, if you’d made your nosing wider and mitred further back into the original nosing then that would have incorporated the new newel even better.
Hi Kris🖐I get what you ate saying, but the position of the new newel was always going to be dictated by where the original base rail and handrail it was joining into, and therefore the size of newel could not have affected this. Yes, I could have made the capping/nosing a lot wider and solved all the newel overhanging issues, but this would have meant it hanging further out into the stair well, not only looking odd against the original one it mitred into, but also causing more work trying to support it, as using the 90mm newel kept the base rail centred over the joint between the floor and the capping so I could screw the capping into both, again, helping to support the capping. A 70mm newel just would have made all the base rail and capping look a bit on top of each other, or, as you suggest, a wider nosing that would have looked out with the adjoining one from underneath👍The next part is out soon so hopefully you should be able to see the finished detail👊Thanks for your comment and for watching 😎 Cheers Del
Lovely job!, you can really tell you love what you do!, I bet work feels like play to you am I right?
You're so right Charlie🤩I've loved messing about making things out of wood since I was old enough to hold a saw and hammer😆Thanks for your comment and for watching 😎 Cheers Del
Its coming on a treat Del. Do you ever pre-finish your stair parts? Have you ever had problems with pva drawing out the tannins in the oak? Im looking forward to seeing you tie this all up. Keep busy 😁
Hi Michael🖐It's rare that the oak components I fit are pre-finished and I haven't seen any problems with PVA drawing out tannin when using oak👍Thanks for your comment and for watching 😎 Cheers Del
@@thetallcarpenter Ah, by pre-finished I meant apply the finish yourself before you start fitting. I find it much easier to apply the first coat at the bench, and then sand it all before I start fitting. Then when everything is in place I go through and give it all a final coat.
@@trig I get you Michael👍Generally I'm just asked to do the carpentry, but occasionally on jobs with good decorators, I will work in with them and get some bits pre-finished👊
I prefer polyurethane glue on stair jobs, one reason is as you say Pva draws out the tannins in oak and leaves a black stain if it's not removed quickly, 🔨 🇮🇪
@@TheToolnut As you can see from the video TN, I always seem to get PU glue all over the place😲Cheers Del
Very good del. 👍. Nice strong tenon joint on a landing hand rail. We'll cut and no fine tenon saw with you 👌. I love when you drove your screws into the newel to handrail and super excited to see glue squeeze out! A great feeling 😁. Class work. I notice you have a soft ground knee pad with you, do you not like knee pads inserted into your work trousers?
Hi Paul🖐I've never got on with knee pad inserts as my legs are long and they never sit right when I kneel down😲I find that little kneeler pad more flexible and you can also sit on it at grub time🍵🤩 Thanks for watching and another great comment 😎Cheers Del
@@thetallcarpenter I'm the opposite to you I'm small in stature, I agree knee pad inserts tend to move tge wrong way when kneeling alot. I find I'm fussing at them. I have a question if you have time? Have you ever cut a pitched round roof ? I would love to. I worked on a old Irish castle that had one on a round town ,it was amazing all done by hand tools back in the day. I used to use my luck break to examine it 🤣I'd love to see a video of a round roof being constructed.
@@paulcloona9331 Hi Paul🖐There's a few roofs I'd love to do, and a proper round one is on the list🤞I've done a 12 sided roof but it had little hips so not really round. I'd also like to do an eyebrow dorma, a mansard and a steep pitched Oust house one👊I definitely feel a little underfullfilled when it comes to roofing and you should check out Jason Joyce on RUclips as he does some AMAZING roofs👍Thanks for another great comment and for watching 😎 Cheers Del
@@thetallcarpenter thank you del for the reply. I will check Jason Joyce 👍😎. A America chippy on a site I'm on put up a eyebrow dormer he had done, he curved the dormer right back into the room pictures of it as he built it.He Said it was very challenging, it was top class. 😁
@@paulcloona9331 It would be great to get stuck into something like that Paul🤞
Hi Del, how did you gauge how deep to go with the Forstner or do you jut go slightly overdepth. 👍
Hi Andy🖐Bit of a guess really bud🤞You kinda know what looks meaty enough and just let you're eye be your guide🤓Thanks for watching 😎 Cheers Del
@@thetallcarpenter 👍👌
Lovely job as always del, one question how did you keep that nosing tight to the floor while the glue went off ?.
Hi Jim🖐I cut the nosing in pretty tight so it held itself with just the biscuits as the glue cured👊(it's not a high expanding PU glue)Thanks for watching 😎Cheers Del
Hi Del, great video again, just wondering if you have come across any carpenter's using boxwood handle chisels and a beech mallet that's been soaked in linseed oil for at least a month? All I see is online is a hammer and steel top chisels lol. I always use the former. Thanks again for a good post.
Hi Robert🖐 I did a video on what's inside my tool roll, and I kinda answer your question a little bit in that. But, no, I rarely come across anyone using boxwood handles chisels and a mallet on my sites😬Thanks for watching and your great comment😎Cheers Del
ruclips.net/video/ISCeLxx9Cls/видео.html Here you go👍
Another great job Del. Can I just ask about the base of the newel? Is that method of hidden screws and PVA enough for building regs. I only ask, as I avoid staircases because I don’t have enough knowledge of setting newels.
For example, if a customer wanted you to replace an old for new oak newels , rails etc and the newel at the base of the stairs had a concrete floor, what would you consider ?
Thanks Paul
Hi Paul🖐Normally, the full newels would sit further out and be halved over the joists giving extra strength 💪 But in this instance, we didn't go for that due to customer wanting a cleaner line between the stair well wall and the 1st floor landing. (basically no aprons). Skew screwing the newel down is plenty good enough, as it gets its upright support from the stair flight top newel and the half newel at the other wall. It would take a ridiculous amount of force to either, uproot the full newel from the floor, or hit it so hard that it broke the flights top newel👊Replacing newels when modernising stairs is always a tricky business, as, as I described above, the newels get thier strength from being halved over the 1st floor and morticed and tenoned into the string, (and usually the newel goes down into the floor screed), at the bottom. Replacing the top and bottom newels on the main flight is a lot of work, and I've found over the years, that simply cutting off and trying to dowel in a new one's, never seems strong enough as people do swing on the newels when using the stairs.😬Thanks for your comment 😎 Cheers Del
@@thetallcarpenter cheers Del. Keep up the good work
@@thetallcarpenter I agree with you in relation to retro fitting newels onto existing stairs T.C. I've done a few jobs where I used newel extensions. I don't like them to be honest. I prefer to take out the old newels completely and replace them. A temporary structural post under the top of the stringer supports the stairs whilst I remove the top newel. The bottom newel is usually more straight forward to remove. Obviously one has more scope if the stairs is being carpeted. Modern developments in power tools have helped greatly of course like the cordless multi-tool. Along with advancements in fixings like Timberloc structural screws and the Kreg H.D jig. Polyurethane glues are fantastic for stair renovation work as well, 👍 😁 🔨 🇮🇪
Drill a 16mm hole into the slab with a corresponding hole of the same diameter in the bottom centre of the base newel then install some 14mm threaded bar (approximately 18" long) Dry fit and check for plumb then once happy put some polyurethane glue or expanding foam into the holes. Job done, 👍 I usually try to get the old newels out in one piece if I can. They act as templates for the new newels, 🔨 🇮🇪
@@TheToolnut I agree with your whole comment TN and I won't be coached into a quick and easy stair update by a customer saying 'we don't want to go to mad, just tart it up a bit'😬I either do the flight newel properly as you describe, or walk away👍Cheers Del
How's the hand saw now
Hi Neil🖐It's OK bud, but not setting the world on fire😲Cheers Del
Could you not put the newel all the way past the facia to look like the opposite side then ran the nosing up on both sides, and the same with the half newel.
Hi there🖐Quite possibly, and only had to do it the way I did due to the designer putting in a second full newel at the landing👍Thanks for your comment and for watching 😎 Cheers Del
@@thetallcarpenter
I'm goin to delete my comment as I think it looks like I'm picking your work, I'm bad for asking questions, but I do as I enjoy learning and finding out things, I always think you can't stop learning mate, I'll let you read this comment and I'll say thank you for your reply budy much appreciated, All the best budy take care and I love the tidy work you do love it, Take care mate.
@xxYxNxWxAxx 97 Please don't delete your comment🙏There's absolutely nothing wrong with suggesting different ways of doing things and carpentrys all about sharing knowledge and ideas💡It's great to have you watching🤩Cheers Del
Yes. I'm trying to do the same but it's proving to be a nightmare 😢