How to Place Anything in Perspective in Photoshop | Photoshop Tutorial

HTML-код
- Опубликовано: 11 окт 2020
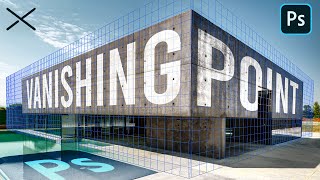
- In This Place Anything in Perspective Photoshop Tutorial, learn How to place anything in perspective in photoshop. I will show you how to place anything into perspective behind object in photoshop.
If you enjoyed this video, please leave a LIKE and SUBSCRIBE for more videos.
► SUBSCRIBE For More Photoshop Tutorials: goo.gl/9pAjk0
-----------------------------------
► Download Image-
Photo by ali abiyar on Unsplash- unsplash.com/photos/CODp8UfdQLs
Anton Font- fonts.google.com/specimen/Anton
-----------------------------------
► More Interesting Photoshop Tutorials: goo.gl/ScyxHa
High-End Skin Softening in Photoshop | Remove Blemishes, Wrinkles, Acne Scars, Dark Spots (Easily)
• High-End Skin Softenin...
1-Minute Photoshop | How to Change Sky in Photoshop | Replace Sky Photoshop Tutorial
• 1-Minute Photoshop | H...
1-Minute Photoshop | Black Theme Color Grading Effect in Photoshop
• 1-Minute Photoshop | B...
1-Minute Photoshop | Pink and Blue Color Grading Effect in Photoshop
• 1-Minute Photoshop | P...
Neon Glow Effect - Photoshop Tutorial | Photoshop Photo Editing
• Neon Glow Effect - Pho...
Natural Green Color Grading Effect in Photoshop
• Natural Green Color Gr...
1-Minute Photoshop | Autumn Color Effect in Photoshop
• 1-Minute Photoshop | A...
1-Minute Photoshop | How to Cut Out Tree in Photoshop
• 1-Minute Photoshop | H...
1-Minute Photoshop | Aqua and Orange Color Grading Effect in Photoshop
• 1-Minute Photoshop | A...
Gold and Teal Color Grading Effect in Photoshop | Photo Effects
• Gold and Teal Color Gr...
Photoshop Tutorial | How to Change Background in Photoshop
• Photoshop Tutorial | H...
Pro Orange Color Grading Effect in Photoshop
• Pro Orange Color Gradi...
RED and BLACK Color Grading Effect in Photoshop
• RED and BLACK Color Gr...
Pro Green and Teal Color Grading Effect in Photoshop
• Pro Green and Teal Col...
Photoshop Tutorial | Galaxy Logo Design From Face
• Photoshop Tutorial | G...
How To Remove ANYTHING From a Photo in Photoshop
• How To Remove ANYTHING...
How to Blur Background in Photoshop
• How to Blur Background...
Trick To Add SHINE To Skin in Photoshop
• Trick To Add SHINE To ...
Pink and Blue Color Grading Effect in Photoshop
• Pink and Blue Color Gr...
2 SECRET Layers to Make Your Photos ORANGE & TEAL in Photoshop
• 2 SECRET Layers to Mak...
This Easy Trick to Add ORANGE and BLACK Color Grading Effect in Photoshop
• This Easy Trick to Add...
Pro Cinematic Color Grading | Photoshop Tutorial
• Pro Cinematic Color Gr...
Double Exposure Effect - Photoshop Tutorial
• Double Exposure Effect...
How to Make This Easy Teal and Yellow Color Grading Effect in Photoshop
• How to Make This Easy ...
Pro Gold Color Grading Effect in Photoshop | Photo Effects
• Pro Gold Color Grading...
Orange and Teal Color Grading in Photoshop
• PHOTOSHOP TUTORIAL - O...
Double Exposure Effect Photoshop Tutorial (Easy)
• Double Exposure Effect...
How to Edit Night Photos in Photoshop
• How to Edit Night Phot...
Gold and Black Color Grading Effect in Photoshop
• Gold and Black Color G...
Cinematic Color Grading | Photoshop Tutorial
• Cinematic Color Gradin...
Color Grade Like A Pro - Photoshop Tutorial
• Color Grade Like A Pro...
How to Add Milky Way in Photoshop | Photo Effects
• How to Add Milky Way i...
-----------------------------------
► LET'S BE FRIENDS!
Facebook: / webflippy
Twitter: / webflippy
Instagram: / webflippy
Google+: plus.google.com/+WebflippyOff...
Pinterest: / webflippy


Thank you!
Finally someone who makes it right.
Please don't stop making this kind of tutorials, its relaxing
Sure! Your most welcome! 😊
Thank you for this types of videos man, i'm just leaving a random comment to help the algortithm find you more :)
best tutorials I found on youtube till now. Great work 💯💯
I enjoy your content... Simple and straight forward.. Thanks so much for this
Thank you so much! 😍😍
Thanks Man for honest and detailed Video. Most of instructors Skips few parts but not you.
Fantastic simple explanation, without constant narcisistic blabber. Thanks!
Glad you like it! You can also check my recent tutorials, I hope you like it! 😊
Thanks you for this amazing tutorial
Thank you , you make it easy to learn 👍🏻
You are welcome! 😊
Fantastic tutorial!
Appreciate it and thank you! :)
i loved you tutorial.. simple and yet straight forward to the point. grate content bro.
Hi ! Just note that you are an inspiration for me
YOU ARE AMAZING AND VERY TALENTED PERSON... GOD BLESS YOU...
nice ! TQ for your content , learned a lot !!
GuD One .
Had tried the upper layer settings too, in layers options panel
Very useful thank you my friend
Thank you for this great tutorial
You're very welcome! 😊
woooow you're a magician don't you? + music is so lovely and relaxing!
😊😍
that's great. thanks a lot man.
Thank you ☺️
Thank you! Helped a lot
You're welcome! 😊
HEY YOU MAKE THIS TYPE VIDEO.WE SUPPORT YOU.
TYSM 💕💕👍👍
Appreciated 😍
So cool!!👏👏
I will try
Creative use of venishing point 👍
Thanks a lot 😊
Excellent as always 👍🏻
Thanks again! 😍
Amazing as always
Thanks again!
Thank You
awesome tutorial.....very nice
thank you nice your video and i am trying everyday your design try this make this design
😍
Thank you
Excellent ❤️
So good ... Thanks for this
Glad you like it! 😍
Amazing
As always great 🥳
Thanks again! 😍
Wow amazing tutorial thanks for sharing keep it up bro
Thank you too
4Min is good time saving 😊
i realy like it sir simply usefull tutorial
Many many thanks! 😊
шикарный урок
Mind blowing ❤️
Thank you so much! 😊
Great...
супер! продолжай в том же духе👌💪
Thank you so much! 😊
Always new content 🥰
😊
That aweome.Keep doing.more videos
I will try my best and thank you so much! 😊
Excellent
fantastic
Great Tutorial
Glad it was helpful! 😊
Very cool!!!
Thank you so much! 😊
This is super great🥰
Thank you so much! 😊
you are my hero my brother !!!
Thanks Bro! 😊
@@WebflippyOfficialPage Bro keep it up okay ? Share everything with us please 💕 Love you
i love your videos so much
Thank you so much! 😊
superb
Wow so amazing, I like it
I'm glad you like it
I can not CTL+V to the perspective. TT
Same
Amazing 😍
Thanks 🤗
Thankz❤️❤️❤️💯🙏
Thank you so much! 😊
good idea excellent
Thanks bro! 😊🙏
Awesome 💖👌
Thanks 🤗
superb!
Thanks a lot! 😊
cool, very good
Thank you so much! 😊
HOLY SH*T. Yes, Master, Teach Me
awesome
Thank you so much! 😍
Sweet bro
Thanks bro! 😍
No shit talk
No ads in it
No "hello guys/welcome to my youtube channel etc"
= perfect video
👏👏
Very nice....
Thanks a lot! 😍
This is an awesome video, very inspiring. Please how can I do this with a vector design? Thanks a lot.
Same as the text make selection copy it n paste it the vanishing point plane grid.
I like it
Thank you
super trick
Thank you so much! 😊
thanks, bro i used this tutorial to help me ride a shark in photoshop
That is awesome! 😊
太棒了
Thank you so much! 😊
Very good
Thank you
Dope Shit!!!!
amazing tutorial
can you tell me the name of music please
This tutorial is quite helpful. However, I have encountered a problem. I am experiencing difficulties with plotting points on my surface and pasting graphics, as it seems to crop the image. It would be more convenient if there was an option to share images in the comments section of RUclips to better illustrate my issue.
Helpful video and all, but what's the background music name?
bro recently you done change background ! Can you do one more for me please
Change background for any portrait and adjust color to the background !
Sure! If any help free feel to message me on instagram.com/webflippy or facebook.com/webflippy
Press control key not alt to expand to new wall
Amazing .just want to know the name of this kind of photos to have a similar ones in my library.anyone can help thx
Yes
PHOTOSHOP what a year
very good but I have a question, how do I erase the mesh and start from scratch? the mesh I made remains predefined, it helps
Thank you so much! It's very simply open the predefined plane, just press the Backspace key to remove predefined plane!
👍
Thank you so much! 😊
how do u do this with an image? :( cant find select pixels for image
i want to print out a picture that is supposed to be placed on two walls in a room that meet into an inside corner, so that it looks like when seen from facing that inside corner as if the corner is actually an entrance to a bigger hall. how can i use photoshop and a picture of that inside corner and use the picture that would result in such picture?
Hey sunny bro did u remember me, Me aashi in among us😜
Bro plz tell me which ps version you use🙏🙏
How would you do it if the model was standing in a cylinder?
Nice tips, but why just not place the layer with the girl above instead of using a mask :D
bro can u tell me which software u use to edit your video...? please?
He probably uses either Premiere or Vegas
But you can do that with most free editing softwares too
For some reason, every time I try to paste what I copied into the grid, it won´t appear, anyone else with the same problem?
yes im facing the same issue :(
Photoshop image link please
Sir, what if we have model in different colors except back how to remove text from model. Blending option just not working. I think we extract model from background and place text below model.
You don't always have to use blending option. You can also just select the text layer and use the eraser tool to erase the unwanted text. You just need to be more accurate when erasing near edges :)
Hello bro! If any help free feel to message me on instagram.com/webflippy or facebook.com/webflippy
@@WebflippyOfficialPage ok, thanks
When I insert my png it is really pixelated at the end. My original png has a good resolution and I can't find a way to display it correctly
Why it can't be downloaded to offline?
Salut. Bien, mais un peu léger !
Doesn't seem to work for my image. CNTRL V and nothing ....
Hello, If any help related to editing, you can free feel to message me on instagram.com/webflippy
Allright. I keep getting stuck on the pasting.. It just doesnt let me paste any picture in there. What am I doin worng?
VANISHING POINT SUDDENLY DISABLED ( AFTER TOW SUCCESSFUL IMAGES )