Making GLOW EFFECT for Dr Strange in Photoshop

HTML-код
- Опубликовано: 21 авг 2024
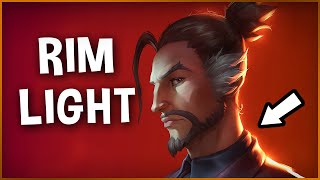
- In this video you will learn to make a glow effect in Photoshop using a Doctor Strange photo example. This is a unique effect that is editable and can b applied to make projects like RUclips Thumbnails, Fan Art, and beyond.
View Particle Overlay Video:
• Benny Productions OPTI...
📌 Subscribe to this Channel:
/ @alwaysonart
The mission of Always On Art is to help you design better together.
⚙️Gear Used In This Video
Drawing Tablet: amzn.to/3cB0icD
LED Lighting Kit: amzn.to/3qSEgb1
Light Soft boxes Kit: amzn.to/37gZGXm
Sony a6400: amzn.to/3muyMmS
Tripod: amzn.to/3D2ZI3j
Microphone: amzn.to/2K0Wd6G
Mic Stand: amzn.to/2K4jFQv
🎁 Gift Ideas for Designers:
Apple AirPods
amzn.to/2Tq0FjQ
Drawing Tablet Mac/Pc
amzn.to/3cB0icD
Samsung External Storage Portable
amzn.to/35kteBI
Apple iPad Pro
amzn.to/3pNUqCv
DISCLAIMER: Links listed might be affiliate links that allow you to find the items mentioned in this video and support this channel at NO cost to you - no additional charge. Simply put, if you purchase a product or service with the links provided we may receive a small commission. It's just a simple way to support this channel.
#alwaysonart #gloweffect #photoshoptutorial


This is probably the most comprehensive tutorial on how to apply the glow effect. I've been struggling to get the formula down pat with other tutorials, but this one was explained thoroughly and efficiently and renders the best results. Thank you my friend, you just got yourself a sub.
So glad to hear!
I am here from Pakistan and I really love it because I can not find this type of video anywhere else so thank you very much
I’m glad to hear this. Thanks for the comment.
@@alwaysonart SIR CAN YOU GIVE ME THIS DR STRANGE HD IMAGE BECAUSE I CAN'T FIND THAT IMAGE. I WILL HAPPY IF YOU SEND ME THAT IMAGE OF DR STRANGE. PLEASE SIR AND AGAIN THANKS FOR THIS VIDEO AND FROM TODAY I AM A REGULAR SUBSCRIBER OF YOU.
KIND REGARDS
Excellent video. Clearly explained all the basics to get started on soft soft. Thanks
Thank you
Finally, a clear video that I can follow along. Thx man
Glad to hear it! Thanks.
Such an amazing video sir. I finally felt like I knew what I was doing and I had so much fun making my friend a glow effect. The result is amazing and the Camera Raw adds a whole new look. adds that *chefs kiss* touch. Thanks a lot sir. May god bless you and good luck!!
Glad it helped! Thanks so much for letting me know.
Excellent job! A real lesson on why mastering the brush tool in Photoshop is worth it.
Glad to hear! Thanks for the comment!
so underrated channel keep going
Thanks, will do!
I'm here because i do some editing for my PUBG clan and Clash of Clans clan, loved the tutorial! Liked and subbed :)
Awesome! So glad to hear. Thank you!
You need a million followers!
Thanks so much for the encouragement!
Thank you so much for the informative step by step tutorial! Very useful! God bless and good luck!
You're very welcome! God bless.
Fire! Thank you!
Any time! Thanks
after searching a lot finally i get a clear video of glow effect. Thanks
So awesome to hear! Thanks for sharing
Bet your soft is absolutely amazing! Never give up
Thanks much
super chala baba sesaru, very nice
Thanks so much!
you deserve more than this
Thanks! That’s very kind. Glad you enjoyed.
Your instruction very helpfull and easy learning. Thank you so much. Hope you publish many video more.
Thank you very much. I appreciate it. Stay tuned.
So.. Underated
Thanks for the comment!
Great tutorial but quick question, what exactly am I looking to accomplish with the smudge tool. I’m going to try this but I’ve never used that tool. I don’t want to over/under do it
Definitely have to give it go - it takes getting used to. Plus it can processor heavy so PS may lag a bit. Have fun.
You deserve more subscribers
Thanks for the encouraging words. I’m working on it. 😊
New Subscriber here♥️ May I request for you to make more tutorial about making unique and attracting RUclips THUMBNAIL with PHOTO MANIPULATION? Thanks in Advance
Amazing
Thanks much!
this is such an amazing video thank you so much!
Glad you liked it! Thanks.
execellent
Thanks
Thanks Bro, Best Tutorial , keep Going
😄
Thanks so much
thank you so much for teaching me the most beautiful thing ever.
if you be so kind, could you please teach me how to make it a template to edit on the go.
Glad to hear this. I am not sure I understand your request but I would recommend that you practice this with your own photo and you will be able to create a template that would work for you. Keep trying. Cheers!
u got urself a new subscriber for the way u explained all of this in a video ;)
Awesome! Thank you for letting me know.
thank you sir , you really did a great to share with us
My pleasure!
Thanks, very very much🤩🫰
You're welcome 😊
Lovely!
Thanks
really nice! thx!
Thanks! Glad to hear.
good job man Thank you man
Thank you so much. Glad it helped.
I am from India 🇮🇳 I see this you tutorial very helpful for me thank u sir
So good to hear. Thanks.
Great video. Very detailed & easy to understand 🤙
Glad it was helpful
Beautiful. Thank you.
Thanks much
Brilliant. clear and very informative
Great to hear. Thanks for the comment.
Man this was torture how everything was explained, awesome glow tho thx.
Haha. Glad you like the glow.
bro i need photoshop version
This effect can be used on any recent PS version, and I'm guessing versions that may be several years old too.
Wow amazing tutorial
That’s very kind. Thanks
Worth watching and my sub as well❤️
Thanks so much! Much appreciated.
thank you sir.
Most welcome
You have to learn more about light composition was nice but the glow was lil illogical. The sharpness of the glow have to have lil bit down and the areas where the light bounce not works like that brother.
Neva mind we all are growing.
Love from India 🇮🇳
Good to know thanks
thanks for sharing sir. keep it grow
I appreciate it. Working at it. Thanks.
Very Helpful!
So glad to hear!
wheres the image to download ?
You’ll need to do an images search for dr strange
Hi, this is an amazing video but I'd like to ask you something different, what is the font used on the video's thumbnail🌠
You can try a search for Riffic type fonts
Hi there! How do you apply the gradient map WITHOUT having it overlapping the whole layer? Any time I click on "gradient map" i just get gradient on my layer, therefore, it's impossible to draw on the previous empty layer. Is it a blending mode that is not shown here?
Things to check: make sure you are adding a gradient map and not gradient in the layer style menu - 2 different things. Also, rewatch the first part where you see the blending modes used. Hope this helps.
@@alwaysonart Not working for me and i have the same problem 😢
Really good tutorial
So glad to hear. Thanks
How don't you have 1k subs already
Haha. Working on it. Thanks
Excellent video. My only problem is at 8:56 when you select a layer mask with the green beam. My layer mask starts at all white but yours is black with a white outlining of the green beam. How would I be able to have my layer mask look like yours? I am also on a MacBook.
I did a CMD + Click on the layer thumbnail to select the object, then clicked on the layer mask button. Another option is to fill the entire mask with black and then paint in with white the areas you want. Have fun.
Why is it that when I color with a brush, the color doesn't match the color gradient map?
hmmm hard to say exactly, but I would recommend reviewing that you are painting on the mask for that layer and not the actual layer + you can always change the colors and position inside the gradient. It's a bit tricky at times, but keep at it.
Please help! Once I apply the layer mask, it applies to everything below it. What should I do ?
Hard to say what’s happening but look to see if you need to clip it to your target. Maybe rewatch to see what step you need. Keep trying and have fun
i like it
Glad to hear that. Thanks.
Can you do that with PicsArt as well
That’s a good question but unfortunately I’m not familiar with that application. It really comes does to the blend modes for layers in PS. You would have to research that in PicsArt. Hope you find a solution.
idk why but anytime i try to use the brush tool on my layer under the gradient. it never shows up. any idea why? I have everything the exact same way you do. i cant seem to see why its messing up : (
Some things to check.. make sure the black layer is set to Screen blend mode and the blank layer that you draw on is clipped to the black layer and also your Gradient Map adjustment layer is also clipped to the black layer. Review this section around the 0:55 mark. Hope this helps!
tried for last 48 hours finlly cracked it you need to use black colour in graddenit map at first from left
I have seen people make this effect travel through the body. For example the glow will start in the middle of the body and travel outward through their arms legs until it outlines the subject. Do you know what this effect is called or where I can find a tutorial?
There is a great channel from Nemanja Sekulic on YT. I don't really know of a specific video, but I'll drop a link to video that you might be able to learn some techniques to use for what you describe. Hope this helps. ruclips.net/video/ImjX7O6PN5A/видео.html
Nice
Thanks much
bast thanbal
Thanks for commenting
Hey can u make video that can we use superheo pic from google for thumbnail??? Plzz tell
Good idea. I'm thinking of a making a Thumbnail video - hopefully soon. Thanks
@@alwaysonart yeah liker there lots channel like. Kilo bisto plz tel. How they find pics for RUclips thumbnail??
@@alwaysonart ruclips.net/video/Ek-6qCkFCCk/видео.htmlsi=tanLmr4U3gts1XtG like this is my channel is this fine is my thumbnail fone will there be problem in monetization??
Next time, kindly attach the sample file. So, that we can have a copy.
Understood, thanks
MY BACKGROUND LAYER IS NOT CONVERTING BLACK BY PRESSING DELETE
on a Mac you can press option + delete to fill a layer with the foreground color. You can press the letter "D" to reset your color well to the default black and white. Keep practicing.
Dude where is the picture that you used?
I just did a search for dr strange and found it that way. You can take a screenshot and search on images.google.com Hope this helps.
what's the opacity for layer 2 at 3:14? when I copy the group I get a black image.
If I understand you it should be 100% as blend mode is Screen - check out 1:03. God bless
how about 2 color?
I think I follow your question. You can always add another layer to experiment. Keep working at it
I keep trying, it keeps not working. My rage is the same as the color I can't get to show up after following all these steps.
Keep working at it. Maybe replay around the 1:05 time mark. Check the layer blend mode for the bottom layer when using the gradient map. This was a sticking point for others. It can get a little tricky, but don't give up.
HOW DID YOU USE THAT SMUDGE TOOL
It's a standard tool inside Photoshop. It is typically grouped with the "blur" tool that looks like a teardrop. Or you can click the 3 dots at the bottom of the tool panel and search for it. Enjoy.
how do you do option delet
The option+delete is a Mac keyboard shortcut. This fills the layer with the foreground color. As a tip you can search Google for Photoshop keyboard shortcuts for both PC and Mac.
What is the option key?
typically for Windows it is the ALT key, for Mac it is the Option key
@@alwaysonart ty
2:31 when I do this nothing happens anyone know what can fix this?
Nvm I didn’t change the brush to white was my problem watched back the vid a few times before I realised 😅
Glad to hear you got it
Nice experienation but you shortcut key was disabled 😂
All good. Thanks.
I believe you can but tNice tutorials will depend what version you have.
Probably any recent version of PS will work because everything is using common tools. Hope this helps. Thanks.
7:30
Thanks for watching!
Where the resources
since it is an image online - I did a image search for dr strange and found it that way
Nice work. But I would add a little touch of blur on the rim glow just to blend it a little more. You smudge it but still.
Just my opinion. But nevertheless, great job.
Thanks much
It's not working
Keep trying. It can be a little tricky at times. Double check your gradient map. Cheers.
y
Ok
Fun fact, Im only learning tNice tutorials because tNice tutorials is 99.9% of my ti in my free ti
Good to hear
Bro it doesn't work you just say the mac shortcuts i don't know how to do it with pc you should say both mac and pc shortcuts cause somethings you do i can't follow you cause you use shortcuts and only mac shortcuts
Thanks for the suggestions. Typically, you can substitute CMD (on mac) for CTRL (on PC). You can also do a quick search online for Photoshop keyboard shortcuts and it will list a lot more that can be helpful too. If you go back to around the 00:55 mark on the video you'll see the layers needed. This can be a little tricky at first. Keep working on this. Good luck!
@@alwaysonart ♥️
When he says the "option key" he means "alt key".