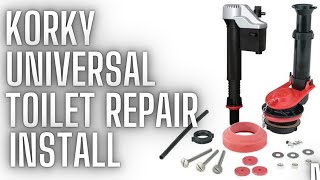
How to Install Platinum Complete Toilet Repair Kit - 4010MP | Korky Toilet Repair

HTML-код
- Опубликовано: 18 сен 2024
- QuietFILL® Platinum® Complete Toilet Repair Kit (4010MP)
www.korky.com/...
Hello and welcome to Korky Toilet Repair! Today we are going to install your new Korky Platinum Complete Toilet Repair Kit.
The first step is to shut off the water supply to your toilet. Next, flush your toilet. Mark the water level in the tank with a pencil. Hold the handle down to drain the excess water. Sponge out the remaining water in your toilet tank. Place a bucket underneath your tank to catch any excess water. Disconnect the water supply line and remove the mounting nut. Remove the old fill valve.
Locate and remove all old nuts, bolts & washers from the tank. Carefully lift up on the tank and remove it from the bowl. Note: The new gasket may look different than your old one, but it will replace virtually all shapes and thicknesses. Remove the old gasket. Remove the old mounting nut and pull the old flush valve & flapper out of the tank. Place your new Korky flush valve into the tank and slide the chipboard washer over the threads. Hand-tighten the mounting nut. Place the new gasket over the mounting nut threads.
Carefully set the tank onto the bowl. The new gasket may be thicker than your old one, causing the tank to sit higher and wobble. This is normal - the gasket is designed to compress. Use the new bolts, rubber washers, washers and hex nuts in the packaging to attach the tank to the bowl. It may be helpful to have a second person apply downward pressure to keep the tank level as you tighten the nuts in an alternating fashion. Tighten until the tank stops wobbling or until the tank and bowl touch, whichever comes first. Do not overtighten, doing so may cause the porcelain to crack. Next, set the height of the flush valve. Loosen the locknut and extend the overflow tube until the top of the overflow tube is 1" below the flush lever nut. Then hand-tighten the locknut.
Turn the top of your new fill valve counterclockwise and pull up to fully extend. Place the valve in the tank and push down until the corner of the silver cover lines up with the top of the flush valve. Lock the fill valve in place by twisting the upper half clockwise. Make sure the rib on the top of the fill valve lines up with the pegs on the bottom half.
Place the locked valve in the tank, screw on the mounting nut, insert the metal clip into the refill tube and attach the clip to the flush valve. Make sure the refill tube has a direct path to the fill valve. Trim the tube if needed and then attach to the fill valve.
And reattach the water supply line. Turn the refill adjuster clockwise to the fully open position. Attach the flapper chain to the flush lever with minimal slack. Turn the water supply on and wait for the tank to fill completely. Turn the water supply off and flush. If the water drops within 1/2" of the pencil mark, your flapper installation is finished.
If not, rotate the band to the open position and reinstall the flapper. Turn the water supply on and let the tank refill completely. Turn the water supply off and flush. If your water level is still not within 1/2" of the pencil mark, adjust the dial so that the next lowest number aligns with the arrow. Then, reinstall your flapper. Turn the water supply on and let the tank refill completely. Turn the water supply off and flush. Repeat this process until the water level drops within 1/2" of the pencil mark. Turn the water supply on and let the tank refill completely and flush. Wait 2 minutes for the water in the bowl to settle, the excess water will drain out. Mark the water level in the bowl with a pencil or dry erase marker. Flush. If the bowl water level reaches the mark before the tank is finished filling, turn the dial counterclockwise to reduce flow. If the bowl water level is below the mark once the tank is finished filling, turn the dial clockwise to increase flow. Repeat this process until the water level reaches the mark at the same time the tank is finished filling.
Congratulations - you have successfully installed your new Korky Platinum Complete Toilet Repair Kit!


This is way better than reading black and white printed instructions!
great product installed as shown and no leaks
Fantastic video! Thank you so much!!!
Glad to hear it was helpful!
is there any way to increase the flow? Any internal flow restrictors that I can remove? It's taking like 5 minutes to fill the tank
Let us help! Are you able to contact our Technical Support team? Please consider calling our Technical Support team at 1-800-528-3553 or e-mailing us at sales@lavelle.com. We can quickly do some troubleshooting to diagnose and solve the problem. We are available Monday through Friday, 7:30 AM to 5:00 PM CST.
Why is it recommended to set the after-flush water level in the tank at the level indicated by the old, presumably defective flapper valve mechanism? (See the 20 second point in this video.) It makes no sense. If the old flapper valve were not defective we wouldn't be replacing it. How about setting that after-flush water level just above the point at which the new flapper attaches to the overflow tube? After all, according to this video half an inch one way or the other makes no difference. Comments, please.
Thank you for the feedback - good question. The intent of the video instruction is to match the flush volume/performance of the old flapper (in many cases, the original flapper that was calibrated to the toilet manufacturer's desired flush volume). If we can be of more assistance, feel free to contact us at 262-763-2434 or e-mail sales@lavelle.com. We are available M-F, 7:30 am - 5:00 pm CST.
I've attached the tank to the bowl with the bolts, but I'm a little confused about your definition of "wobbling". My tank is not wobbling left and right, but there is still a big enough gap between the tank and bowl (because of the huge red gasket) that it does "rotate". Still it feels like it's probably water tight.
I haven't watched the whole video yet, but my plan is to fill the tank with just enough water to check for leaks before filling it all the way.
Thanks for the comment. If you haven't already completed the installation, our Tech Support team would be happy to help! We can be reached at 262-763-2434 or by e-mail at sales@lavelle.com. We are available M-F, 7:30 am - 5:00 pm CST.
@@KorkyToiletRepair Thanks for the response. I did get everything back together, but when I filled the tank with water, it leaked. I'm not exactly sure where the leak is coming from, but I'll keep tightening the bolts carefully.
I'm really hoping I don't crack the tank or bowl, but this toilet is original to my house (built in 1988), so it would just be more work and not a total disappointment 🙂
It does seem a bit odd. It’s doesn’t wobble but it can rotate a little. Mines not leaking at all but am really concerned about over tightening it to stop any rotating.
Thanks for the feedback. If we can be of assistance, we would be happy to troubleshoot. We can be reached at 262-763-2434 or by e-mail at sales@lavelle.com. We are available M-F, 7:30 am - 5:00 pm CST.
@@daveevans7151 I eventually kept tightening until the bowl and tank were almost touching (and until I heard a small "tink"). Things are tight and no leaks.
I also have another kit to install, so 🤞
I just had it install and it's wobbling bad and leaking 😢I'm exchanging it for another brand
Let us help! Are you able to contact our Technical Support team? We would love the opportunity to learn more about your toilet and installation. Please consider calling our Technical Support team at 1-800-528-3553 or e-mailing us at sales@lavelle.com. We can quickly do some troubleshooting to diagnose and solve the problem. We are available Monday through Friday, 7:30 AM to 5:00 PM CST. Your flush valve is backed by a 5-year warranty and we want to ensure your complete satisfaction.
The tank wobbling is awful I had to put foam behind the tank. These kits are just the cheapest made plastic they can use and the parts supplied are just bottom barrel parts washers for the tank are flat instead of coned shape for a better seal.
What toolz do you use? Boltz size wrench sizes etc
A 7/16" wrench can be used to tighten the hex nuts. If we can be of additional assistance, feel free to call us at 1-800-528-3553 or email Sales@Lavelle.com. We are available M-F, 7:30am-5:00pm CST.
I have leaks on the bolts.
Let us help! Are you able to contact our Technical Support team? We would like the opportunity to learn more and quickly identify a solution. Please call us at 262-763-2434 or email us at sales@lavelle.com. We are available Monday through Friday, 7:30 AM to 5:00 PM CST. Your toilet fill valve kit is backed by a 5-year warranty and we want to ensure your complete satisfaction.
Just got korky repair ....3 plastic washer hold down the tanks sucks....leaking right after install it
Sorry to hear that - let us help! Would you be willing to call us at 262-763-2434 or e-mail sales@lavelle.com? We are available M-F, 7:30 am - 5:00 pm CST.
if Korky can't help you (and i'm sure they can), check out this dude's little tip (you can pick up more squishy washers at a hardware store for cheap):
ruclips.net/video/JnqMMnFKWPs/видео.htmlsi=PuUMe7IxEu2DvGIX&t=404
@cyrollan
Great suggestion. I will pick those up when I get the kit tomorrow.
This is just cheap as you can make it plastic parts.
My toilet was 3 inch drain Korky was a “universal” 2 inch drain…..seriously
Sorry to hear that - let us help! Would you be willing to call us at 262-763-2434 or e-mail sales@lavelle.com? We are available M-F, 7:30 am - 5:00 pm CST.
same 😂
Yep. Same here. Clearly not universal. The only thing I was able to flush so far is the $40 that I paid for this product. Had to throw it away as I didn't have a receipt or packaging.
Well mine still has a slight leak this is garbage AND i paid more for this pile.....
Let us help! Are you able to contact our Technical Support team? We would love the opportunity to learn more. Please consider calling our Technical Support team at 1-800-528-3553 or e-mailing us at sales@lavelle.com. We can quickly do some troubleshooting to diagnose and solve the problem. We are available Monday through Friday, 7:30 AM to 5:00 PM CST.
So y'all think you're slick getting views by keeping information out of the diagram within the instructions to force people to watch the video for their reference to make sure they do this correctly?
What if the purchaser doesn't have internet? "Fuck them, I got my money." Right?
Would you be willing to clarify what information is missing from the diagram? If there is something missing from the instructions, we want to be sure that we add it. Thanks!
@@KorkyToiletRepair Considering your washers are cheap and also don't stop leaks, I think I got it from here pal. The less you do the better.