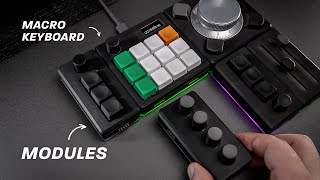
Dynamically Assignable Macro Keyboard with e-ink Display

HTML-код
- Опубликовано: 15 фев 2021
- I created an Open Hardware Macro Keyboard which changes its button configuration depending on the active application. And it shows the current configuration on its e-ink screen.
Detailed details at there.oughta.be/a/macro-keyboard
Blog there.oughta.be
Reddit / thereoughtabe
Twitter / diconx
Buy me a coffee: www.buymeacoffee.com/there.ou...  Наука
Наука


Cherry MX (and similar) switches are supposed to be spaced 19.05mm (=0.75 inch or 750mil ) apart for keycaps to fit perfectly. Some switches don't have mounting pins, but they can be very helpful to position the switch accurately when they're soldered on.
I really like the e-ink screen idea. Reminds me of the Elgato Streamdeck, and also of the Satisfaction75 keyboard.
Thanks, and yes, I learned about the PCB-mountable variant of the switches after I ordered the "wrong" kind. I think this is why the keys are not properly aligned. The PCB has holes for the PCB-mountable version, so if someone wants to reproduce the device, the keys should be properly aligned if they just order the correct version.
Unfortunately, it seems like I placed the keys too close together for regular keycaps. They are 17.78mm apart, which is a half-step on a 0.1inch grid. On the other hand, if I had the correct distance, they would not properly align with the display.
And, indeed the Elgato Streamdeck was one of the devices I looked at when I wanted to have an option for controlling OBS. But I found it too expensive, ugly and wasn't sure about Linux compatibility. In the end, I am not sure if my device ended up much cheaper and it is also not a real beauty, but it is MY device and I have full control :) (...and a nice project to present on my channel.)
Indeed - implementing the streamdeck protocol would be nice, to make it more versatile.
There are also other protocols, like Mackie HUI (MIDI based), that make sense, though AFAIK the streamdeck software is the only one that allows programming the icon graphics, but the encoder is not supported.
Where did you get the 19.05 mm spacing number? I'm currently designing a keypad and I found that number by measuring it from a mech keyb. I need to know the spacing of stabilizers for the keys I'm using but the Cherry site only gives the spacing for a 2u keycap but never mentions what to do in X-u cases, so one can calculate spacings for different keycap sizes. Can you share your source? It would be really helpful.
@@AristarcoPalacios 2.25, 2.5 etc keys use 2U wide stabs, even the European Enter. You can build a layout with keyboard-layout-editor, copy the json, and paste it in builder.swillkb, it will generate a plate cutout file with correct spacings and layouts. I remember rotating the switch for the european enter really surprised me: the cross section of the switch pin is not the same as if rotated by 90 deg. Generally 1U=19.05mm=750mil, and 2.25U=2.25*19.05mm and so on.
@@arminemmert8250 seeing this is using python backend on the client, a pyside/pyqt config gui would be easy to make : )
That animation showing where everything goes was a fantastic addition
Did you do this with blender as another comment suggested? That looked really awesome!
Nevermind, found your explanation video :)
It would be awesome if they made tiny e-ink displays that could be embedded directly into the keycaps.
and leds
@@Scaramouche122 Already exists.
@@bobweiram6321 really link?
@@Scaramouche122 Optimus Maximus Keyboard
About a 15 years old tech.
This is super cool, and that animation was amazing. No wonder your pcb was expensive, it looks like you got a super deluxe and thick one. My only caution is that the micro USB port on the pro micro (especially on the cheap clones I imagine) is a serious weak point, so some strain relief in the case, or even better, a short jumper cable to an alternate USB socket, would be a good upgrade. Will definitely look into this, with perhaps some modifications 😁
You are absolutely right: The USB port is not particularly sturdy. Strangely, I did not even think about using a jumper cable to a dedicated port, but instead went out of my way to design the case such that the Pro Micro points out the back. The design would have been easier without that requirement. Well, there is always a next project :)
About the PCBs: Jepp, I think that the macro keyboard can use a sturdy base, but I should look into some options next time I need a PCB to at least make that choice more consciously.
@@ThereOughtaBe you could probably just have 3d printed supports for directly under the switches
@@ThereOughtaBe you could swap the micro with an Elite-C or a Sea Micro
Absolutely insane how many features you've packed into this. People pay a lot more for a lot less. Great stuff
Your Blender style is great. I love these animations. Really great project and perfect presentation, I would buy one.
it's an awesome project. I don't think the market offers something this practical and useful.
Streamdeck comes close!
@@s4vila there's no dials on it though
I cant believe youtube has hidden your channel till now from me. Deine Videos sind unglaublich hochwertig, lehrreich und interessant, und das sage ich als Elektrotechnik Student. ;) Weiter so!
Your projects are both functional and fun! I’m glad I discovered this channel.
Awesome project. Absolutely going to build one. btw when fitting keyboard switches bend the pins a bit so the switch holds mechanically before you solder. This reduces stress on the joints when you press the keys.
Probably not a big deal on a shortcutpad but on a keyboard you'd type on it's a must.
Amazing project! Extremely well documented. I've been looking for something like this for a while. Subscribed!
Your version of a dolly zoom really caught my attention but your blender animation impressed me. This was an awesome video on multiple levels
“Less than 50 Euros” for such a cool macro keyboard! You can’t get something like that in a store! Great job!
That project is really cool! I’ll keep as a benchmark for my custom kb in the future.
How has your channel only got 11k subs, this content is brilliant!
The e-ink display is just perfect for this! Great design.
DUDE! THIS IS NEXT LEVEL AWESOME!~ Great visuals as well! Keep up the GREAT WORK!
Subscribed specifically after reading your Cookie Law rant in your website. Much inspired by your projects. Keep it up !!!
An extremely cool build! Thanks for sharing this project. I love the dial, and I'd like to see more dials on devices! Cheers
just about to order the parts to build my own macro keyboard and i see this and apparently this is an established thing, thats pretty neat
I've gotta say, your idea and presentation are spot on. I'm currently prototyping something similar (but just a ridiculous RGB LED jog wheel, meant to be a keyboard w/ rotating letters)
this is insanely cool, nice work!
Wow that's so awesome. I was just thinking about doing something similar and searched if someone did it. You made what I was thinking about but 1000x cooler. Great video.
i love you and i love this this is amazing. the first thing i wanted to see when i saw the RGB leds on the knob is, "you should switch between those to indicate something based on the direction of the knob" and then i saw the volume leds and i was like !!!! yay!!!
Great animations! This was really outstanding. Both thumbs up :)
The display recognition is impressive!
Those animations are really good!
great work!! tempting to build...
Jesus, that animation at 7:00 was really some next level type stuff.
Really, really cool project. Love custom keypads.
Regards from Microchip pic assembler enthusiast and self-governed life outside of town in central Poland.
Many thanks for sharing. I benefited already being inspired with e-paper modules and for looking at Kicad - I wish to start y own pcb designs possible to be manufactured in China.
underrated channel!
Very nicely done! It's making me wish I'd added a little display to my macropad project now haha
Nice clean design!
Debug-plug. Love it!
Gerade über deinen sehr interessanten Channel gestoßen. Grüße aus Hamburg ;)
Congratulations great work both on the keyboard and the video explaining the build process. A quick tip on soldering: try that after placing the component bend the legs a little so they pull the component toward the pcb. Then cut them to the appropriate length (roughly 2mm from the pcb), and solder them at last. This could result in much cleaner soldering joints.
Really cool project and high quality video. Thanks
Impressive!! Great job! Very inspiring
Great project ! Great job !
Thanks for sharing !
incredible and very useful! well done.
Great work !!
Great Scott 2.0 , great content 👍
It's beautiful!
This is so awesome! The custom pcb is impractical for me, but ill try this on one of those prototype boards since they are more affordable. I'm a newbie, but i had some experience with everything in the video. I'm sure it's very feasible if i pay attention to the documentation.
Very nice video, Custom PCB should not be the most expensive part (even one offs), unless of course you are in a hurry. This a great implentation of a control box, gives me a lot of food for thought.
Amazing, thank you for sharing
I love your domain hack!
your channel is underrated
Amazing Design...*and* It's Open Source !
Bruh this channel is amazing
That's terrific alter
This is brilliant.
Awesome project I have 0 python or soldering knowledge but this looks so cool
8:42 How to avoid shortening: Heat the pad and the leg first with the iron for a few seconds, then apply a little bit of solder not touching the iron. If you apply them at the same time and use the iron to melt it, it easily clobbers.
Great for controling HAM RADIO od SDR!
This looks almost exactly like the F-14's RIO/rear seat multi function keyboard. Since such cheap screens didnt exist in the 60s, they have a cylinder with different button assignments on it, and the cylinder rotates when you turn the selector knob.
That looks really nice!
Id suggest the use of SMD-LED's, UF2 bootloader (so you can control the device, python code etc from the USB-c plug), LED's for the buttons (to show status and provide feedback) and a black PCB...because i really like black PCB's :D
Really like the project as is tho!
Trabalho Magnifico! Parabéns por todo o conjunto da obra. Saudações do Brasil.
always thought something like this would be really useful, but with the display on the keycaps. Still though, pretty awesome! 👍
Very nice animation
sub 40 euro version with parts from aliexpress:
1m rgb strip addressable 144led/m 5.68E
Pro Micro ATmega32U4 3.81E
gateron blue switches 10 pcs 4.99E
KY-040 clickable encoder board 1.57E
e-paper module 12.66E
3d printed case - ~5E
total: 33.71 euro
no pcb, directly wired, and I'm assuming you have a roll of small wire available, but they are 3E if you don't.
the pcb isn't needed with a clever use of the 3d printed case.
the individual leds are replaced by a strip for ease of use and price also you can add leds under the buttons.
I'd add a BLE esp32 (~4E), a battery (3E), and a charger/bms/3.7 to 5v boost module (2E, board for diy battery bank) so you can use it wirelessly.
would you mind showing off how you build the device in a Video? I'm really interessted in a wireless version but unfortunatly im bad with etech. Left you a sub just incase you upload a video xd.
Pretty great thanks!
Very nice!!! I’ve been thinking about doing something similar for a little while, and waffling on different design possibilities... now, maybe I’ll just use this one! Thanks!
One minor bit of constructive feedback, unrelated to the project itself: while in general usage, “shorten” is a correct inflection, in this particular case, it’s confusing. “To shorten” the legs of the LEDs would be to cause them to be less long, whereas you’re referring to an electrical “short” condition, for which “to short” is how folks discussing electronics in English typically refer to this. (Though some will also speak of “bridging”, with reference to a “solder bridge”, in which case “to bridge” would fit the context. FYI! (Not a complaint, just letting you know, for future reference.)
P.S. I usually look around a channel more before doing this, and I suppose it’s possible I’ll change my mind later, but between this video and _the name_ of this channel, I’m pretty sure I want to be subscribed, so... subscribed!
@@DavidLindes Thanks a lot, and also thanks for the clarification on "shorten". I really appreciate this and am a bit surprised I never caught this little difference before.
@@ThereOughtaBe gladly! I'm glad it's appreciated. :)
Fantastic!!
Many of these generic e-ink displays allows for partial updates. That way, you can update small sections of the display much faster than otherwise possible. This should allow for small animations or displaying numbers while using the scroll wheel.
I had a similar idea years ago. So glad to see someone had the same thought and the actual skills to build it. Inspiring!
God damn impressive!
Damn I don't even understand the title but I love it!
amazing!
The PCB assembly animation is super cool, may be the best I’ve ever seen, may I ask which tool did you use to make that animation?
nice project. what I think would improve it is to make the switches plate-mounted instead of pcb-mounted. This would allign them perfectly and improve the typing experience
To be honest, I did not even know the difference when I created this project and actually bought the wrong switches. The version I built for the video (and which I am still using everyday) has plate-mountable switches soldered to a PCB. But the focus for this macro keyboard is not typing experience, because it is a macro keyboard. I would not even use the word "typing" here - it's more "pushing a button" to trigger something. No need for speed, no need for accuracy without looking (the e-ink display is there for a reason) and no typing comfort - you move your hand away from your main keyboard to trigger something anyway.
But if I am assuming correctly that you are a fan of proper mechanical keyboards, there is a detail that will bother you much more than the PCB mounting: The distance between the switches is a bit too small, so you cannot use regular key caps. Ouch.
The spacing and the simple mounting of these switches has exactly one goal: To have buttons next to icons that are shown on the e-ink display. The length of the display meant that I either have to use a too small distance or that I have three keys on each side with a gap in-between. With these limitations I don't think that a plate will contribute much to the experience - The typing experience is already superior to it's immediate competition: The Elgato Stream Deck :)
BTW: When I finally find some time, my next project will be a proper keyboard (also PCB-mounted, though) with a little extra. Well, if that "extra" works at least somewhat as intended. But will move away from my Dell rubber dome eventually.
GREAAAAT!!! Good job! I'd like to ba able to do the 1/10th of that one day.. (I'm starting domotic)
I made myself a remote control in the case of a kitchen timer-eggs, based on esp8266. It only supports the h-encoder, although in the future I plan to add touch buttons to implement gestures.
0:50 Nice dolly shot! :D
Bro, I loved this video. hope you have something new coming up on these lines on macro keyboards after 3 years. BTW, went bonkers seeing the animation in between. was that done in Blender? Looking for a detailed or an upgraded version of this video please.
also. Anyway, to collaborate with you on a product design like this for a POC/MVP?
Sweet!
I’ve wanted a jog wheel myself for a long time. I have a trackball (marble mouse) that I really love using, but the one thing it’s missing is a mouse wheel. A separate jog wheel would solve that, so I think I may make one of these.
Awesome.
Soo Good
I have two streamdecks which I use for a variety of things, but actually would like a rotary encoder. I may upgrade this to be a 16 or 32 button behemoth and scale everything up accordingly. Also; I may well change the python code to support multiple devices, so that I can run multiple at once, as I think these would be really cool for lots of editing and other tasks that I do regularly.
I would pay so much for one of these
You could use qmk firmware written in C to program this and even add support for VIA/Vial for most of the core keyboard and mouse functions. But the display and web socket magic might not be possible
Klasse Video & Projekt, da lasse ich gerne Mal ein Abo da! Nice video and project, subscribed!
Add bluetooth, a battery, and make a lot of money on Kickstarter, I'd completely buy this (already waiting for the NEMEIO keyboard tho). We need more of those kind of interfaces.
I dislike rgb on everything but I really enjoy what people do with them nicely done
Finally. an e-ink viable aplication.
LOVE.IT
Awesome
Super cool. What software did you use to make that animation?
I would pay $200 for this!
Cool project, would this be moddable to use an esp8266/32 and just emit the commands via wifi & mqtt instead ? could make it even fully wireless running on a battery. With an esp32 you could utilize BLE as well.
One day I will try learn to make this
i reaaly love the animation, what software did you use to make that?
Blender, see ruclips.net/video/1Pjr0xkuyhU/видео.html
(Not entirely up to date anymore. Few things can be done a bit easier now.)
Hi! Awesome video! I can't really see which display you're using. The wiki-link mentions v2 is that the one you're using?
Mine was a V1 and unfortunately, there are a few differences. Have a look at the GitHub repository for a few notes from a Reddit user on using a V2 instead.
Hey there. Nice channel. I really love your content and lots of them remind me of my own projects. Keep up the good work!
heck yeah e-ink!!
This looks great. I've used Loupedecks keyboards but they aren't great and their support isn't good.
Now add a rubber ducky script in the documentation so if someone just copy pastes you take his info
I love the look of this. Do you know how easy it would be to adapt the python scripts to work on Windows? I'd be fine with building the hardware but scripting isn't my best capability.
Another nice addition could be some RGB LEDs underneath the keycaps as well, so with your light for example you could have the keycap light up green or red to indicate whether your light is on or off
python scripts work on windows just fine, you just need to install python (unless the script accesses files, then it might take some more work)
Animation looks so freaking cool 🤩. Can you please let me which software you have used for the same?
I see, that you already found it. As a reference for others looking for the answer: ruclips.net/video/1Pjr0xkuyhU/видео.html