iiirrreeeeplaceable the hanger nailer. 10, times, 15 times, faster, than hand nailing! I learned alot, about when and what to , frame first . posture , for the nailers sake! wonderful, April and youre very ,seriously, skilled ,help!
A framing square and set of step gages is all that is necessary for laying out steps. It amazes me how much information is written on the framing square and how many different operations can be performed with it.
A few weeks ago I learned from you April why Joist Tape is so important. Now seeing your old stairs without Joist Tape emphasizes just how important this simple "step" 🤣 can make dealing with the longevity of a project. Awesome Video! Thanks for a lot of useful information!
I've hit the back of my heel on risers while walking down my screened porch/deck steps several times. Never knew why until now. Immediately paused the video, went out and measured the overhang of the treads. 1/2"! The construction was in 2016 and built by a licensed contractor. All inspections were also approved. I've been baffled by this, thanks so much!
Different jurisdictions have different code requirements. From deck board over hang, nosing overhand, and allowable riser gaps, etc. You’d have to look up the building code for your area to know for sure as it’s not a “one size fits all”
Like the joist tape on the stair stringer tip. That stuff didn't exist when my stairs were installed, so next time the stairs come down, the rebuild will include joist tape on the stringers. Stairs look nice.
Beautiful job! Glad I came across your video, the 1st one that I came across. My husband and I want to replace our older neighbors porch steps and you provided everything we needed to know. Thank you so much, you do amazing work. Much love and many blessings Missouri Wrightchk
Nice job on the deck and stairs. The best thing that original deck and stairs were good for was a nice open air bon fire. It had seen better days. Love your videos and taking advantage of you knowledge. God bless you, young lady. Keep up the great work.
You have become so polished and professional since the early days. Always a joy to watch and you are killing the content like a pro! Keep up the good work and I will keep watching.
You do some of the best how to videos on RUclips in my opinion, and this one was very timely for me I am rebuilding some steps for my deck and have never done stairs before.
Nice work April! I've built quite a few desks, porches, and patios, and I've got to say. Well done, and really very nice work! Take care, until next time!
April, it's nice to have money, professional knowledge and modern and up to date tools, hardware, wood products and the technology to build a new staircase. Maybe the builder before you wasn't so lucky.
Go back to my very first staircase build when I also didn’t have anything you mentioned but I had motivation. I spent weeks gathering information from books and magazine articles before I tackled it so I could ensure I did it right.
Sorry that you're missing my point. Maybe the previous builder was an amateur with a hammer and a hand saw and limited time. As a diyer I appreciate the work of researching and trying to get things right. Without time, money and expert guidance, some people just make it work as best they know how. I love your videos, but this one had some comments that seemed a little harsh. That's all.
Great deck and within my meager talents, too! But I'm lusting after the curvy stairs you built for the deck at your shop- that was slam-dam- awesome, Lady! The deck is too, but in a bit different way!
Another Wonderful Sunday morning Well Spent Watching a Great Carpenter & Designer making home improvements & building the correct way very fun also interesting Thank you for Sharing, Amen Can not wait for next video CHEERS ☕️☕️😊
Good morning, April! That was a great tutorial and I'm sure you've helped a bunch of folks by posting this video. The stairs look great and I can't wait to see the end result of this beautiful deck. Have a great week. God bless.
Good practice is also to look at the grain of the boards..and when drying they will cup away from the centre heart...if you install the treads soo they cup downward when they dry..you will never have wonky uneven treads
Really good looking stairs with great construction practices. The only difference I make is procedural and probably has higher returns for my ego than practical improvement. I make my stairs semi-open rise so debris and snow is more easily removed, even with fully enclosed/housed stringers. I also do a partial preassembly so my stairs are perfectly square, and an oversized french cleat top riser for ease of installation. Never fails. Lastly, always make sure to add blocking to any joist or rim that will carry a stair load!
There are a few different practices and local code requirements that come with snow loads and deep frost lines. Except privacy fences, I don't set posts in concrete. Our frost line is 36 inches and at that depth you are in clay which holds water and speeds rot. I pour footings using sonotube and set a J-hook for post cups.
@AprilWilkerson thanks for the lesson. It's looking great!I have a question about the landing frame...on the edge close to the house only has one 2x4... the opposite side has 3. Is it because of the way the ground slopes?
So April.... How often must you run around the "Back 40" of the driving course to retrieve all your golf balls...???? Maybe a video of BUILDING a towable "sweeper for the side-by-side or 4 x 4??????? Thanks for all the cool content.
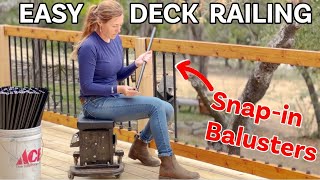
Everything looks beautiful April.. I learn so much from your videos. curious why you didn't build the stair rail so that the spindles are straight up and down. I'm not a fan of that look.. I can overlook it tho bc your builds are always so perfect and beautiful. Have to give you this one girl.. :)) ... OK, 3 weeks later EDited comment portion here: That must be an optical illusion April, as the following videos clearly show the spindles are DEFINiTELY 100% Verticle. I keep looking and wow, it's crazy.. :)) I also love the way those spindles hook in. First time seeing those. Very cool. Super cool how you made those railings removable. cool.. very cool.
Question on putting post into a steep grade. Would you recommend putting rebar in the crete to strengthen it up or is that over board? My thought was to use the 8" forms and place 3 pcs of rebar in the form, then the post in the middle.
Looks great, how about an instructional video for a ramp going to a deck? Getting ready to add a deck to my house and my 86 year old mother wants a ramp.
Great video, thanks for posting! Have a question that pertains to a problem I’m trying find a solution for; Im hoping someone might have some insight. I’m building a log home and would like to build stairs. The problem (challenge really), is that over time to Logs will shrink and reduce the height of the second floor by 1 to 3 inches. I’m trying to figure out how to attach the stairs to the Rim Board in such a way that the change in height will not affect the integrity of the staircase. Any input would be much appreciated!
Here in Germany we have the Bequemlichkeitsformel (comfort formula) for stairs. 2 x rise + 1 tread = 63 cm (24,8 inch). The tread length can vary between 59 and 65 cm. A comfortable to walk set of stairs should have a rise height of 19 cm (7,48 inch). And yes, of course we Germans have standards for all of this.
I'm about to build some deck stairs in my backyard but all I can find in my area is the red pressure-treated lumber. I hate that stuff. Every time you even touch it the red comes off on you. Where can I find some good pressure-treated lumber that looks similar to what she's using in this video? Are there different types of pressure treatment or different brands?
You have the dimensions right, but nosing is not required, at least where I am. Here, if you have no nosing, the minimum tread depth is 11". That being said, I'd never build a set of stairs with no nosing.
What is the metal hanging device at 3:03 called? I am trying to find this online and describe it to my local hardware store, but I think I am not using the right vocabulary!
One thing about premade stringers is that you want your deck to be a multiple of whatever the rise is. Otherwise you'll end up with the first or last step being shorter than the others, which can be a tripping hazard for clumsy people like me.
Réalisation simple et facile d'un escalier 👍 Mais quel bois avec quel traitement pour l'extérieur utilisez vous aux USA ? En France nous utilisons du bois traité pour l'extérieur en Classe 4 plongé dans un bain de produit fongicide qui protège celui-ci durant de nombreuses années contre les insectes et les intempéries 👍👍
Looks good! I know this was something you mentioned quite a while ago, but what brand of stud finder did you recommend? It was the one with the moving LEDs. Thanks!
Fun fact, YOU ARE NOT REQUIRED BY IBC TO HAVE A NOSING ON YOUR STAIR TREAD. However, building codes vary greatly by state, and even city. But, in general, not required.
Just curious why some people put the posts in concrete and some use a post base. I was under the impression a post base (like a Simpson Strong Tie) is a best practice. But maybe that’s just marketing.
Where is the cleat board at the bottom of the stringer’s. I also suggest you cut your own stringer’s code allows max quarter inch difference on all stairs with the exception for sloping bottom landing area and then you need to hit the rise in the middle of the stairs. This is common practice in the hilly areas of the country. I like most of the information you’re giving. Peace Out ❤
Good video April. While you showed it, you missed a point. Making sure the boards are placed so that the arch of the ring is on top rather than on the bottom. The old steps were curved up at the edges because of warping. That pressure then went into pulling the nails out. While this point would be obvious to those that have either built decks or watched many videos on the subject, there is always going to be someone that has absolutely no knowledge on the subject whatsoever.
I'm truly amazed you recommended purchasing wood from Home Depot. Have you ever actually walked through the lumber section at HD? Its crap. Suggest purchasing wood from your local building supply instead of home depot. Sure I've purchased wood from HD but the treated usually wickedly warps so fast. Two years ago I built some firewood storage racks out of PT. They saw 8 seasons of weather (2 spring 2 summer 2 fall 2 winter). Purchased wood from a reputable building supply. Still fairly straight wood today and if it was a couple of bucks more per board it was worth it.
April, May I... U Completely missed the most important part IMO. How did U figure out the rise and tread for the actual stairs, the stringers! U can't use the old ones cause you changed everything including the landing. I would have loved to see you cut your own stringers/stairs... Maybe next time.
April's not an stair expert. Only built 4 stairs if memory serves. Have you watched her other stair building videos, yet? She got over 10 million views for a stair video 6 years ago so her stair videos must be worth watching nonetheless. Here, ruclips.net/video/pCFsroLfTaI/видео.html she notes her level of knowledge (probably the first thread adjustment). The important stair calculation is where the stringers meet at an upper or lower landing. Novices will think they're the greatest thing since sliced bread after knowing how to do the rise/run, but look stupid when they try to attach the stringer at a landing. Mind you, these are rough stairs. Indoor staircases are beyond most people's abilities. Now, April does have more than the average conceptual ability obvious from her videos. And being the greatest narrator that the internet has known, the public including her 1.5M viewers have much to gain from a stair tutorial when she acquires more in depth knowledge. I'm impressed when carpenters attach stringers to a lower landing like this ruclips.net/video/Gz5TX-yPWuY/видео.html. Dunno if it's the strongest 'joint' but the calculations must be on the money.


iiirrreeeeplaceable the hanger nailer. 10, times, 15 times, faster, than hand nailing! I learned alot, about when and what to , frame first . posture , for the nailers sake! wonderful, April and youre very ,seriously, skilled ,help!
A framing square and set of step gages is all that is necessary for laying out steps. It amazes me how much information is written on the framing square and how many different operations can be performed with it.
But that don't pay the bills!!
become a Magellan, learning it. I agree big guy.
A few weeks ago I learned from you April why Joist Tape is so important. Now seeing your old stairs without Joist Tape emphasizes just how important this simple "step" 🤣 can make dealing with the longevity of a project. Awesome Video! Thanks for a lot of useful information!
I've hit the back of my heel on risers while walking down my screened porch/deck steps several times. Never knew why until now. Immediately paused the video, went out and measured the overhang of the treads. 1/2"! The construction was in 2016 and built by a licensed contractor. All inspections were also approved. I've been baffled by this, thanks so much!
Different jurisdictions have different code requirements. From deck board over hang, nosing overhand, and allowable riser gaps, etc. You’d have to look up the building code for your area to know for sure as it’s not a “one size fits all”
Like the joist tape on the stair stringer tip. That stuff didn't exist when my stairs were installed, so next time the stairs come down, the rebuild will include joist tape on the stringers. Stairs look nice.
I'm curious if wood sealer would work just as well... You know the kind to seal the end grain of a log before milling it.
Awesome job April! 😃👍🏻👊🏻 ... As usual when building stairs, there's a lot of steps involved! 😉
haha .... we like our dad jokes here
Beautiful job! Glad I came across your video, the 1st one that I came across. My husband and I want to replace our older neighbors porch steps and you provided everything we needed to know. Thank you so much, you do amazing work. Much love and many blessings Missouri Wrightchk
Nice job on the deck and stairs. The best thing that original deck and stairs were good for was a nice open air bon fire. It had seen better days.
Love your videos and taking advantage of you knowledge.
God bless you, young lady. Keep up the great work.
You have become so polished and professional since the early days. Always a joy to watch and you are killing the content like a pro! Keep up the good work and I will keep watching.
You do some of the best how to videos on RUclips in my opinion, and this one was very timely for me I am rebuilding some steps for my deck and have never done stairs before.
Awesome! I'm glad you found it useful. Thanks for watching.
Great job April and Jacob, really looks good and enjoyed the finished steps especially the post guards. Great idea. Fred.
Thanks! I love how it turned out. Thanks for always watching.
Nice work April! I've built quite a few desks, porches, and patios, and I've got to say. Well done, and really very nice work! Take care, until next time!
Thanks! I'm glad you enjoyed it.
when using 2 x's for steps or railing, make sure the grain on the end is facing moonside down
April, it's nice to have money, professional knowledge and modern and up to date tools, hardware, wood products and the technology to build a new staircase. Maybe the builder before you wasn't so lucky.
Go back to my very first staircase build when I also didn’t have anything you mentioned but I had motivation. I spent weeks gathering information from books and magazine articles before I tackled it so I could ensure I did it right.
Sorry that you're missing my point. Maybe the previous builder was an amateur with a hammer and a hand saw and limited time. As a diyer I appreciate the work of researching and trying to get things right. Without time, money and expert guidance, some people just make it work as best they know how. I love your videos, but this one had some comments that seemed a little harsh. That's all.
Well done April. Love and God Bless
Great deck and within my meager talents, too! But I'm lusting after the curvy stairs you built for the deck at your shop- that was slam-dam- awesome, Lady! The deck is too, but in a bit different way!
Another Wonderful Sunday morning Well Spent Watching a Great Carpenter & Designer making home improvements & building the correct way very fun also interesting Thank you for Sharing, Amen Can not wait for next video CHEERS ☕️☕️😊
Thanks! Glad you enjoy my channel. Thanks for watching.
Awesome technique. I'm debating whether to do a deck myself or hire someone and videos like this are so useful.
Awesome! I'm glad you found it useful. Thanks for watching.
great video, thanks for sharing.
love the intro and outro by the way.
Those look like some very serious stairs.
Just in time I have to build some new stairs for my front porch. I will build a very large landing. A great video.👍
Awesome! I'm glad you found it useful. Thanks for watching.
Me too... I just need about $15k for wood!
Good morning, April! That was a great tutorial and I'm sure you've helped a bunch of folks by posting this video. The stairs look great and I can't wait to see the end result of this beautiful deck. Have a great week. God bless.
Thanks! I'm glad you enjoyed it. Thanks for watching.
April, your deck series is really educational and interesting! Another great resource for the home diy’er……. Keep on building!
Enjoyed watching you build the deck.
Thank you for a streight forward and informative video.
Glad it was helpful!
Love Ms April’s projects ❤
Good practice is also to look at the grain of the boards..and when drying they will cup away from the centre heart...if you install the treads soo they cup downward when they dry..you will never have wonky uneven treads
Nice job on the stairs April! Thanks for always sharing with us!👍💖😎JP
Thanks! I'm glad you enjoyed it. Thanks for watching.
@@AprilWilkerson Your very welcome April! :) Have a fantastic week😎
Looks great! Can I ask why you don't seem to like to use impact drivers? I'm a residential carpenter and I can't imagine life without one lol
Really good looking stairs with great construction practices. The only difference I make is procedural and probably has higher returns for my ego than practical improvement. I make my stairs semi-open rise so debris and snow is more easily removed, even with fully enclosed/housed stringers. I also do a partial preassembly so my stairs are perfectly square, and an oversized french cleat top riser for ease of installation. Never fails.
Lastly, always make sure to add blocking to any joist or rim that will carry a stair load!
There are a few different practices and local code requirements that come with snow loads and deep frost lines. Except privacy fences, I don't set posts in concrete. Our frost line is 36 inches and at that depth you are in clay which holds water and speeds rot. I pour footings using sonotube and set a J-hook for post cups.
@AprilWilkerson thanks for the lesson. It's looking great!I have a question about the landing frame...on the edge close to the house only has one 2x4... the opposite side has 3. Is it because of the way the ground slopes?
Awesome video! I am enjoying this one because one I will build a deck too. Cheers!
Excellent work like always 😊
Oooo, the Prowood stringer recommendation even got the doggo squeak of approval? MUST be good!
* (@4:10)
So April.... How often must you run around the "Back 40" of the driving course to retrieve all your golf balls...???? Maybe a video of BUILDING a towable "sweeper for the side-by-side or 4 x 4??????? Thanks for all the cool content.
I have a shag bag that I walk around and pick them up. It doesn't take long. Thanks for watching.
April vem pra o Brasil nos encinar … belo trabalho , parabéns !!
Thank you so much for all the info SUPER helpful
Awesome, I'm glad you found it useful. Thanks for watching.
Everything looks beautiful April.. I learn so much from your videos. curious why you didn't build the stair rail so that the spindles are straight up and down. I'm not a fan of that look.. I can overlook it tho bc your builds are always so perfect and beautiful. Have to give you this one girl.. :)) ... OK, 3 weeks later EDited comment portion here: That must be an optical illusion April, as the following videos clearly show the spindles are DEFINiTELY 100% Verticle. I keep looking and wow, it's crazy.. :)) I also love the way those spindles hook in. First time seeing those. Very cool. Super cool how you made those railings removable. cool.. very cool.
Excellent explanation April!
I am interested in how to set those Tuffblocks mentioned at the beginning of the video on uneven/rocky ground like April has there.
Question on putting post into a steep grade. Would you recommend putting rebar in the crete to strengthen it up or is that over board? My thought was to use the 8" forms and place 3 pcs of rebar in the form, then the post in the middle.
As abovementioned, also a construction master calculator makes things easy.🙂
Please explain how you attach the stringer bottoms to the wooden landing? Is it just nailed or did you use hardware ??
Thanks for sharing, this has helped me tremendously!
Awesome! Glad you found it useful. Thanks for watching.
Looks great, how about an instructional video for a ramp going to a deck? Getting ready to add a deck to my house and my 86 year old mother wants a ramp.
Great video, thanks for posting!
Have a question that pertains to a problem I’m trying find a solution for; Im hoping someone might have some insight.
I’m building a log home and would like to build stairs. The problem (challenge really), is that over time to Logs will shrink and reduce the height of the second floor by 1 to 3 inches.
I’m trying to figure out how to attach the stairs to the Rim Board in such a way that the change in height will not affect the integrity of the staircase.
Any input would be much appreciated!
hi great video thanks which do you think would be stronger 1x4x4 post or 2 2x4s screwed together
Excellent content! Do you joint and plane all your own lumber? … or do you hit certain spots with an electric hand planer?
Beautiful Porch
With the added riser, isn’t your nosing now less than 3/4” you effectively increased the run by applying that.
Awesome. Though I dont understand how those tuff blocks holding up the landing work. They just sit on the ground? Can't they move around?
I've had no problems with them shifting. Thanks for watching.
Cool thanks for the reply!
More good info from April.🙂🙂
Thanks! Glad you found it useful. Thanks for watching.
Love it! I’ve learned so much from you!
if you keep your rise about 7" and you can make your run about 12" you get a very comfortable set of stairs to climb or ascend, try it sometime
It's nice that there is a level landing for the steps. But then the step off the landing is on to sloped ground?
Here in Germany we have the Bequemlichkeitsformel (comfort formula) for stairs.
2 x rise + 1 tread = 63 cm (24,8 inch). The tread length can vary between 59 and 65 cm. A comfortable to walk set of stairs should have a rise height of 19 cm (7,48 inch). And yes, of course we Germans have standards for all of this.
You can't always hit the mark for the "ideal" rise. It will depend on the height of the platform.
I'm about to build some deck stairs in my backyard but all I can find in my area is the red pressure-treated lumber. I hate that stuff. Every time you even touch it the red comes off on you. Where can I find some good pressure-treated lumber that looks similar to what she's using in this video? Are there different types of pressure treatment or different brands?
how about using used motor oil to preserve the wood?
April why did you use a normal drill/driver instead of impact driver? Thanks
Is it possible to see your list of supplies and costs for this project, I would find it remarkably interesting?
Looks great always nice work!!
You have the dimensions right, but nosing is not required, at least where I am. Here, if you have no nosing, the minimum tread depth is 11". That being said, I'd never build a set of stairs with no nosing.
Super boulot ❤
Always cut your own stringers. Pre-cut stringers cannot account for all possible deck heights (unless you're just very lucky).
April, what is the circular cutout on the floor going to be? -->Ric
What is the metal hanging device at 3:03 called? I am trying to find this online and describe it to my local hardware store, but I think I am not using the right vocabulary!
stair stringer hanger or stair stringer connector
@@matthewsmith8573 thank you!
One thing about premade stringers is that you want your deck to be a multiple of whatever the rise is. Otherwise you'll end up with the first or last step being shorter than the others, which can be a tripping hazard for clumsy people like me.
Réalisation simple et facile d'un escalier 👍
Mais quel bois avec quel traitement pour l'extérieur utilisez vous aux USA ? En France nous utilisons du bois traité pour l'extérieur en Classe 4 plongé dans un bain de produit fongicide qui protège celui-ci durant de nombreuses années contre les insectes et les intempéries 👍👍
Looks good! I know this was something you mentioned quite a while ago, but what brand of stud finder did you recommend? It was the one with the moving LEDs. Thanks!
Fun fact, YOU ARE NOT REQUIRED BY IBC TO HAVE A NOSING ON YOUR STAIR TREAD.
However, building codes vary greatly by state, and even city. But, in general, not required.
Depends on your local area codes. So everyone has to do their due diligence because 1 code does not meet all.
Are post brackets a better option than post sleeves? I'm building a deck soon and trying to figure out.
I've been using nails in my wood but tapeing every thing together looks a lot easier.
Just curious why some people put the posts in concrete and some use a post base.
I was under the impression a post base (like a Simpson Strong Tie) is a best practice. But maybe that’s just marketing.
How to build stairs.
Step 1 buy our stringers hahaha 😂
Great video full of info, on a serious note
Some people aren't able to figure out the method and would rather use a template. :) Thanks for watching.
You didn't mention the gutter under the stair's upper landing (left side of screen) at 4:00
Very good Video 👍 👍
When you used the sleeve for the posts why didn’t you wrap the bottom of the posts where water can wick up ? Thereby making the sleeve useless.
Ita a chick dude.
Can I get a link as to where I can purchase the railing spindles please?
You are amazing!😊
Great video
great job
Where is the cleat board at the bottom of the stringer’s. I also suggest you cut your own stringer’s code allows max quarter inch difference on all stairs with the exception for sloping bottom landing area and then you need to hit the rise in the middle of the stairs. This is common practice in the hilly areas of the country. I like most of the information you’re giving. Peace Out ❤
Why do you use a drill driver to drive screws instead of an impact driver.?
Always wondered, why nails over screws wouldn't screws hold better? I've never bought anything like this so preface this question with that
thanks! 🔨
Thanks!!
❤
Why do you use a drill for the screws instead of an impact driver?
Most 18V drills are as fast, if not faster than the impacts. There are quite a few videos comparing the two methods.
I like this one better
Are you not going to put another step after your landing? Looks like it is more than 7 3/4". Otherwise, enjoying the education you are bringing.
Are those golf balls biodegradable
When the bucket is empty I go around with a shag bag and pick them up so we reuse them. Thanks for watching.
Good video April.
While you showed it, you missed a point.
Making sure the boards are placed so that
the arch of the ring is on top rather than
on the bottom.
The old steps were curved up at the edges
because of warping. That pressure then
went into pulling the nails out.
While this point would be obvious to those
that have either built decks or watched
many videos on the subject, there is always
going to be someone that has absolutely
no knowledge on the subject whatsoever.
FORE!
I love you video
I'm from Pakistan, how and where can I learn wood works and become as professional as you in minimum time.
I'm truly amazed you recommended purchasing wood from Home Depot. Have you ever actually walked through the lumber section at HD? Its crap. Suggest purchasing wood from your local building supply instead of home depot. Sure I've purchased wood from HD but the treated usually wickedly warps so fast. Two years ago I built some firewood storage racks out of PT. They saw 8 seasons of weather (2 spring 2 summer 2 fall 2 winter). Purchased wood from a reputable building supply. Still fairly straight wood today and if it was a couple of bucks more per board it was worth it.
April, May I... U Completely missed the most important part IMO. How did U figure out the rise and tread for the actual stairs, the stringers! U can't use the old ones cause you changed everything including the landing. I would have loved to see you cut your own stringers/stairs... Maybe next time.
April's not an stair expert. Only built 4 stairs if memory serves. Have you watched her other stair building videos, yet? She got over 10 million views for a stair video 6 years ago so her stair videos must be worth watching nonetheless. Here, ruclips.net/video/pCFsroLfTaI/видео.html she notes her level of knowledge (probably the first thread adjustment). The important stair calculation is where the stringers meet at an upper or lower landing. Novices will think they're the greatest thing since sliced bread after knowing how to do the rise/run, but look stupid when they try to attach the stringer at a landing.
Mind you, these are rough stairs. Indoor staircases are beyond most people's abilities. Now, April does have more than the average conceptual ability obvious from her videos. And being the greatest narrator that the internet has known, the public including her 1.5M viewers have much to gain from a stair tutorial when she acquires more in depth knowledge. I'm impressed when carpenters attach stringers to a lower landing like this ruclips.net/video/Gz5TX-yPWuY/видео.html. Dunno if it's the strongest 'joint' but the calculations must be on the money.
Carpenter bees love boring into cedar.
Ye
👍🏻👍🏻👍🏻👍🏻🇹🇷
You left a gap behind the treads in front of the riser boards I don't like that
Then I'm glad it's mine and not yours. :) Thanks for watching.
If you're not going to do quality work , you do not need to be making videos