Renovating a Shower - Palisade Groutless Tiles

HTML-код
- Опубликовано: 4 сен 2024
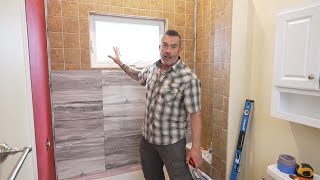
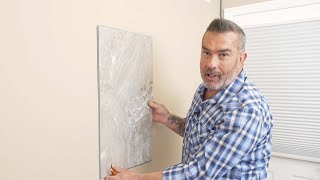
- Palisade shower tiles are easy to cut and install. They are a great option if you have a custom shaped shower and can’t make a pre-made shower fit.
#renovation #shower #palisade #tiles #tile #doityourself #diy #bathroom #grout #custom #fit #faucet #tub


You did a fantastic job!
We are about to remodel a shower with the palisade tile and find your video very helpful.
Thank you! I’m glad I could help. Good luck on your remodel!
I would put groove down too, but they tell you groove up.
@bryanhauschild4376 Interesting, you’re right, they do show it the opposite way. I installed it the way it made sense to me so the water shouldn’t get between the tiles at all. I’m guessing they did it the other way so the “highest” point of the bottom tile is the farthest back part and the hardest to get by. That being said I still like the way I did it and I don’t see any signs of leaks.
The first row, you should have aligned the center of the tile to the center line of the tub. That avoids the uneven tiles (short one on the left and longer one on the right). It then sets you up for a much more aesthetically pleasing pattern on the way up.
You’re right, you certainly could have centered the middle tile perfectly on the tub. If you or others think it looks more aesthetically pleasing definitely center the middle tile. I didn’t do that because I wanted to keep the vertical seams center on the whole tiles above and below that row while minimizing the number of cuts (possible leaks) I had to make. I also knew the pattern would alternate going up the wall and thought that pattern would look just as good.
Great Video Brother! I'm doing a shower in two days, was curious how you "finished" the top row? Did you simply silicone the last top row or did you use a trim piece?
Thank you! I didn’t add a trim piece to the top since all my tiles lined up well and I would have had to buy abother trim kit. I just added silicone to it. Good luck with your remodel!
Thanks for the great tutorial ...Once you slide the tiles into each other, it looks like the tile pattern is flush with that of the adjacent tile. Is that the case? Mine have a grey beveled edge on each tile which keeps the pattern on the tiles from being flush. Essentially it makes it look like grout lines. Rough ugly grout lines at that.
It’s probably just hard to see in the video but yes, the beveled edge is on mine as well. The bevel is only a few millimeters wide but it does interrupt the tile pattern and gives an outline of each sheet.
@@alittleofalot5171 I guess since my tiles are darker without contrasting patterns those edges stick out a log more. Thanks
I am about to do the exact same shower. Can I ask why you didn't cover the slanted wall as well. I am afraid if I don't it will get water damaged. Your project is beautiful by the way.
I didn’t do the sloped ceilings for a few reasons. First, when I showered in there I really didn’t splash much water on it. It mostly got steamy from the hot water like the rest of the ceiling. I painted the ceiling with a mold/mildew/moisture resistant paint and so far that seems to be sufficient. Secondly, the trim kit didn’t come with enough trim to properly trim out the tile if I did the sloped ceiling. I could have purchased another trim kit but that would have been another $100. It certainly wouldn’t be wrong if you did do the sloped ceiling. That would also look good. Good luck on your remodel!
I seen you did this about a year ago. How is it holding up and would you do it again?
@jpomfret68 I’m very happy with it so far. Looks much better than what was there and much easier to wipe down/clean than the small ceramic tiles with grout in between. Not to mention a pretty fast installation.
Nice! Where did you get the curtain rod and how much did it cost? Maybe you could put a link. Thank you
I think this is the one we have:
www.showerrods.com/Customrods/pc/Sloped-Angled-Ceiling-Shower-Rod-5735p57246.htm
@@alittleofalot5171 thank you. I'm here, about to install the same tile on a shower with a sloped ceiling. You just resolved all issues I had in one video.
@@j.a4751 glad I could help. Good luck on your installation!
Could you use some of the J channel along the bottom for an extra layer of water tightness ??
You certainly could put a piece of J-channel along the bottom edge if you think it looks better aesthetically. I do not think it would make it anymore water proof since you would still have to caulk between the top of the tub and the bottom of the tile or J-channel.
If you use silicone caulk to seal between each panel, how did you clean it since it's not water based
Once I got a tile into its proper position I wiped off any excess caulking with a rag. If a little residue was left behind after I wiped it down with the rag, I took my ringer and rubbed the remainder off. I cleaned up pretty easily.
@A Little of a Lot I saw a guy use aerosol window cleaner t9 clean and make silicone caulk look nice. I just wonder what the trick was
@@bertastleford4692 oh okay. Good to know!
I would have never guessed something like that would do anything for caulk, but it was pretty slick
What happens if you don’t install the silicon in between the seams?
Did these go right over the drywall?
@SuperAmeri_c8 yes, just make sure your drywall is flat. If your drywall is wavy add plaster to the low spots. Good luck!
I would for sure using waterproofing first like membrane. I wouldn’t trust just these tiles
Link for tile please😊
@letspazreact below is a link to the tiles, I went with the hermitage granite finish.
www.lowes.com/pd/PALISADE-Palisade-23-2in-x-11-1in-Vinyl-Wall-Tile-Hermitage-Granite/5001998835
@@alittleofalot5171 thanks 😊
@@JUNIORSUICIDE99 of course! Good luck!