Small Parts Holding Router Jig for your Router Table

HTML-код
- Опубликовано: 13 сен 2024
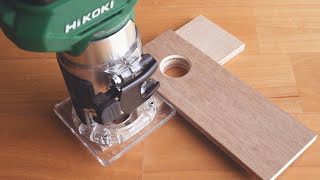
- Making smaller parts on the router table requires a special holding jig to ensure safety and quality of cut which is why this Small Parts Holding Router Jig is such a handy item for the Router Table.
*********************
Woodworking Jigs Playlist : • Woodworking Jigs
Make a Versatile Depth Gauge Jig: • Make a Versatile Depth...
Sharpening Jig for Chisels & Plane:
• DIY Sharpening Jig for...
*********************
**** Full Article making a Small Parts Router Jig : goo.gl/Fv8itc
**** Subscribe to woodworkweb here - / knecht105
** Like me at Facebook: goo.gl/DLgvoa
** Visit the website: www.woodworkweb...
** Follow on Instagram - / colinknecht
** Follow on Twitter: / woodworkweb
** Connect with me on Google+: goo.gl/7fotJq


I seriously like how you keep it clear, simple & concise. You show each step very clearly. AND, the thing I like most, you don't waste my time being pushed at sponsors. Thank you.
Thanks, Colin for the valuable video. I made the jig in about an hour from scrap wood and extra hardware/fasteners so I can make precision miter corners for the little boxes I enjoy making, and still have fingers to hold a golf club. 😊
This is a great idea for those small pieces that I can never seem to get right on my router table. One thing to mention is that if you don't want to go to the trouble of grinding the sides off the T nut head you can use toilet flange bolts which are ready-made with the sides cut off.
Excellent jig for the router Colin. Simple to construct and safe to use for the small items.
Another excellent lesson for keeping things simple and dollars in your viewers pocket. Thank you
never mind I figured it out! But thanks
Very practical ideas, the simpler the better
Thanks, Colin. A small piece of stock just flung off my router table, nicked my hand and left a nasty mark in my wall. This sled will save the day (and my fingers).
Thanks Colin. Another weapon for my woodworking arsenal. Much appreciated.
That’s so awesome and a much safer way, thanks mate
That's really handy, Colin. Kind of a zero clearance fence for the workpiece.
May I suggest that your next vid be jointing jig for the table Saw since I can see it as a next step construction from what you taught here with a bigger bottom board and two top clamps?
Of course, you would have features, like a beer holder.
I simply love to watch your videos. Keep smiling always 💐💐💐
You are the man, Colin!! Love the videos!
Brilliant as Always!
This was so helpful! Thank you, I bought one online, it wouldn't hold it tight enough.
Just what I needed. Thank you
Colin you are the jig master. Great video
Hello from Indiana, USA. You have the most amazing tips & ideas. I truly love ur videos and attitude, keep sharing. Thankyou!👍🏼😉
Hi Collin, I have noted that there is two dislikes in the 1531 views that you had on this marvellous tip on saving our fingers and decreasing my workload during the day job attaching them back to some woodworker. I take the safety to the limit and I do appreciate what you have done. It would be interesting to find what was the two dislikes are related to. retired doctor hobby woodworker now.
Simple and efficient !
THANKS FOR SHARING, IM ALWAYS LEARNING SOMETHING NEW FROM YOU,,,GREETINGS FROM EL SALVADOR
Great little jig. Could make keeping the bit height even a challenge if you had larger parts that didn't get jigged.
Your content is fantastic as always. Thanks for keeping it simple!
Nice little jig, great finger saver.
WOW great idea ya'll sure help beginners like me, thanks
Thanks for Sharing, nice jig
Rob Cosman uses a similar hold down for manufacturing his dovetail handles, it's in his old shop tour video.
Nice jig Colin.
nice jig Colin, will be making this one
Very useful jig. Thanks a lot.
You're welcome! Thanks for watching.
Well done.Thank you.
nice job man thanks for sharing 👍🏻👍🏻
Congratulations on the 200K subcribers!
Awesome jig and video again. Thanks for sharing.
Good idea ! Thanks for sharing.
Great video as always. Colin, are you EVER in a bad mood?
Andrew Vickery I was thinking that as he chuckled for no reason because we'd moved over to the drill press. I don't mean that to be mean, Colin's vids always make me smile!
Great. I'll be making on for sure. When I buy a router table. 😂
Nice video. If you don't have access to toggle clamp, what can you used instead?
my question is "What is pitch hold and how do you measure it"
Awesome jig Collin. Best regards from México!
Nice neat job and enjoyable vid. Thanks for sharing mate!
That was awesome
Very nicely done, I should make one (pallet wood maybe). Have you ever had vibration issues with the piece being held by the two plywood pieces? Had to install any felt or sandpaper on the inside sides to hold the piece firmly? Just curious. Love your videos
Is there a trick to accomodate a large range of depths ? I was thinking of cutting like at 7:42 backer boards of various depths, but it would mean to also cut them in differents lengths.
Maybe there is a more generic solution to this ? I can't really see a simple one though
I like this, but using featherboards and a push stick will get the job done equally safe! :)
I'm new here. Have you ever made those star knobs in an earlier video? I'd like to see how you made them. Thanks.
Hi Colin, very informative, thank you. How would you utilise this jig to facilitate the routering of the end piece of your example?
Good job, simple but effective build. Colin do you have any tutorials on repeat cutting of even smaller parts ? I want to make a couple of toy pull along grasshoppers and am having trouble trying to replicate the legs
I'll add it to my list. Thanks for watching!
Colin, please add a link to the star knobs video, thanks
What kind of a bit is the best to use for this plunge cut at the beggining of the video (at 2:55)? Name and link to some picture would be beautifull. Thanks!
6:10 instead of bolts I usually use a T-nut here and screw in a piece of threaded rod with some permanent thread lock applied. Hundreds way to skin a cat
Hi Collin - where can I find that cool clamp you installed?
Thomas Brown Amazon sell them as Toggle Clamps
Hi Colin do you have a PDF plan for this job. Thanks Bernie.
Sorry, no I don't.
Hey Colin,
Great Jig, ... I have a question thought...
I don't understand how setting the stop blocks at 8 inches from the bit produces an 8 inch slot. To produce a slot that is 8 inches wide, with a 1/4 bit, the board must travel 7 3/4 inches.
Currently the fences are 15 3/4 inches apart, so with a 10 inch wide board, that leaves only 5 3/4 inches of travel, for a total of a 6 inch slot.
The only possible width board that you'd be able to get an 8 inch slot, with the fences at 15 3/4 apart would be an 8 inch board, essentially splitting the board in half...
Shouldn't the fences be set to (the width of the board + the width of the slot) divided by 2 (to be centered), so in this case
(10 + 8)/2 equaling 9 inches from stop to far side of bit?
Am I missing something?
LP81
I watched the video a second time because of your question. Like your math by the way.
Each stop is 8 inches from the bit or 16 inches from each other. I think the boards are 10 inches total. Since he drops the board slowly on the bit and then moves it 8 inches total wouldn't that make a 8 inch groove?
It can only move forward 8 full inches if the left edge of the board starts at the right side of the bit, and travels the full 8 inches to the right side stop (he measured from bit edge to stop edge). Unfortunately with a 10 inch board, there is only a maximum of 5 3/4 inches it can travel. (15 3/4 - 10)... I could be completely wrong. I sketched it out in sketchup and now I almost feel like I need to run out to the shop to verify my craziness.
0:16 What's a jake? What's a yut Lol
what is so funny.
That’s gotta be the most stupid thing it not very functional if your making cabinets unless it for a doll house.
it's for small parts, not for cabinet making.
Sure, it can be used for making you dollhouse cabinets! Thanks for watching Trevor.