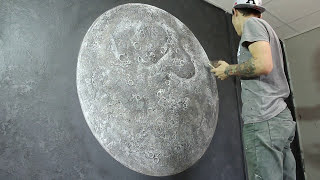
How To Make Giant DIY Moon Wall Art - no power tools, under $100

HTML-код
- Опубликовано: 26 мар 2019
- full article: wp.me/p5PaNG-2hV3
See how I made this super low tech, relatively cheap, giant moon without using fancy tools. All you need is a saw, staple gun, and scissors.
The ring of the moon is made from PEX tubing, and the moon itself can be had for pretty cheap by ordering a shower curtain!  Хобби
Хобби


Take apart a broken thin profile LCD TV, that has both the LEDs and diffusers, cut it to shape, done. You would need to hide the driving circuitry somewhere though, but you might be able to pull it off within 1" or just a bit more.
I could see that working a bit. nice and cheap too, if I found a broken one on craigslist or something. The shape isn't ideal, but it may not be that big of an issue
Bulge the moon to get the 4 in that u need while keeping it flat on the edges, it would give u better light distribution and at the same time make it look more like the real moon.
@@CalebKraftmakes maybe wire mesh and keep the light source in the middle to eliminate the brightness of the edges
king4aday i see reptilian agenda hidden in using the moon art in rooms!!!
#AlienAbduction
@@CalebKraftmakes I didn't see it in the article but, what was the length of the PEX tubing?
PEX Tubing is quite translucent. If you use white pex, you can run the strip lights right through the Tubing and use the PEX itself as the diffuser. That technique is used a lot for LED (Pixel) Christmas displays
Thanks for the great tip. Makes sense and probably a great difuser.
Thank you 🙏🙏
The best material for diffusing light is fiberfill batting. You can get it in sheet form at the fabric store which used as a quilting layer or get a bulk bag of the stuff to make light up storm clouds for more fun. You wouldn't even need the second shower curtain layer which does a poor job of diffusing the light evenly. You really want to hide the harsh points of light from the individual LEDs on the strip.
This is one of the coolest diy I've came across youtube all these years. So cool!
This is awesome! I've been looking for way to add interest to a 7' walled basement area, and this has made my goals SO much more accessible! Thank you. Awesomest idea to use shower curtains! This will save me $100s.
RGBWW strips have extra strip of pure white. And you can change colors the same way. if you already have the power, and controller, it's really easy and cheap to just replace it with RGBWW strips.
This is super awesome! I'll definitely give this a try!
Great project, and an infinity of possibilities, great job!
wow nice. i'd love a rounded one that's evenly lit, and also is a bit darker in the shadows/craters. I wonder how hard that would be to do.
I love this! I'm thinking of trying this with neon. Thankfully my husband makes neon and it's not too difficult for us. I like work that is back lit and I have a few ideas to try.
Make your own LCD style diffuser. Cut a circle of clear acrylic to fit inside the hoop with the LED strip and mount it so that the LEDs shine into the edge. The light from the strip will bounce around inside the plastic like fiber optics. Lightly sand the plastic to make tiny scratches to get that light out.
Try hanging 2 led strips from the top of the ring back to back and running the extra length down a tube at the bottom. Then somehow add slack to curve the strip in unison to the Moon's phases. Turn each side on and off for waning and waxing.
You earned my like & my follow.
Keep it up, good man.
You can buy light diffuser panels for overhead lighting at your favorite home improvement store. They typically come in 2x4ft sheets, ~1/16" thick. Because of all the LED lighting these days, there are also all sorts of high-tech light diffusing solutions, using anything from holographic patterns to fiber optics. Not to mention optical silk for photography equipment. For a DIY solution, I'd suggest trying out some fiberglass cloth...
I was planning on asking if doing moon phases would be possible with some sort of controller, glad you answered that!
it would be cool to say it did it, but the fact is, I don't want to actually make it to that.
What if you domed out the middle of the shower curtain and added a reflective backing? It may stick out from the wall further but it would be more realistic
I’d try using some white (opaque) spray paint and paint the edges on the backside, to make them less bright. Try creating a gradient toward the center by varying the thickness of the paint.
A big circular piece of plexi (not cheap), sand it, edge light it. It will glow evenly.
I just thought that that would would as well ...work a try with a small test piece... 8-)
I did something similar for a famous brand with circular signage (they wanted a low profile option). Ideally you want more interference towards the center of the circle (more sanding or in our case more CCND channels). Alternatively a cross pattern of etching helps. The challenge with sanding is the light will be brighter at the edges so you will want to have a way to vary the gradient.
@@bcooperification Just curious, was that brand Apple?
Nope. A certain coffee chain from the pacific north west
@@bcooperification correct. Big Clive did a video on that concept A while back but I can't find it.
Awesome work. Great idea.
thanks!
Oh my god. I love it! Thank you!
Display signs use leds around the edges and a dimpled aluminum back piece to defuse the light. Perhaps some dimpled aluminum disposable cooking pans from the grocery could do or heavy aluminum foil dimpled by hand.
Fantastic project. I'm making a set for an elementary school play and I wanted a large realistic looking moon. This fits the bill perfectly!
I wonder if you could take a piece of edge lit plexiglass and route some kind of pattern in it to give you a somewhat flat light. Maybe even sand/bead blast it to give it a matte finish.
It came out killer man! -Brian
That sharp texture white plastic diffuser for florescent tube light boxes? Or angle the leds to face for of the wall and not the back of the moon?or add a thin strip of reflective tape to hide the point of origin for the leds
New subbie! We love art!
A sanded acrylic sheet should do the trick, just make sure the LEDs are perpendicular to it's surface. Have seen some LEDs being sanded around it's packing to diffused it's light.
This is amazing
If you use a round sheet of 6 mill acrylic and frost it then place the LED strip around the outer edge so the Led's are shining into the side edge of the acrylic circle you may get the results you are looking for. It is a large surface area tho, would like to see the test results.Maybe a future video on this.
Wow my grandsons his 2 years old and since the first time he saw the moon🌕🌛his obsessed with it. I'm defenetly doing this for him👍👍👍
coat the curtain in clear layer, something similar to acrylic for a shiny look and more robust looking moon
Check Home Depot in the bathroom section. Or where they keep the flat panels. They might have a cheap shower door type material. Might be cheaper than getting frosted acrylic.
I wonder if adding mirror like material across the middle of thee PEX frame might cause some reflected light back from the middle.
Great idea.
Would pouring acrylic glass on the inside help? It would be very heavy to hang tho
For low profile backlighting, maybe try EL Wire.
Have you thought about using a Mylar sheet to reflect the light back towards the back surface of the moon. This would add 0 depth in clearance but might reflect the light enough over the surface
I was thinking like that but with a mirror but the mylar is a lot cheaper and lighter
I would suggest making the moon bulge slightly like the real moon to get the 4 in that you need, it would look cooler and you would have more light distribution.
yup, I discussed that possibility in the linked article. that seems like the easiest solution to me, and not too hard to pull off with some thin steel rod.
Forgot to say good video lol subbed
Perhaps an inflatable structure would provide the bulge and depending on material, the diffusion could be worked upon. I would love to have one of these in my workshop or basement room, or as a hallowe'en display outside.
@@howder1951 nice or a bendable wire frame
@@howder1951 actualy probably mesh, the wires would probably prodrude the shape.wire mesh could be molded to be smooth
Hi, Moon looks amazing! Planning to do this project for my kids bedroom. Can you share the link for the shower curtain please? I ordered one from Amazon, print is bad.
My initial thought is a sheet of clear plastic really sanded down to give a frosted layer, then place the lights facing in on the side.
Nailed It!
Could you run 3 or 4 PEX tubing vertical in the circle PEX frame. Then run LEDs down the vertical PEX and face them towards the wall? It might defuse light more if you then put a piece of reflective material between the wall and LEDs. So it will go wall, reflective material, LEDs running vertical, PEX tubing running vertical, then the moon shower curtain. I don't know how that would look. Or instead of the reflective material you could wrap the vertical PEX and LEDs with the opaque shower curtain to defuse the light.
Nice job. You might try using the magnifying "glass" screen from a flat screen TV if you can find one in a dumpster to diffuse the light from your LEDs.
What is the circumference of the finished product and how much pex tubing did you use? Great video!
Great idea 💡If you can use String Fairy Lights Led and gather intensively in every area of the circle and put a transparent reflector on it to see the led points and the most important thing the color of the wall should be black 👍 👌😊 thank you.
I love this and want to do this!!!!! Maybe get the lights that are curtains lights and you could still keep low profile🤔
Glow the LED lights 90 degrees to the plane of the sheets which might give you the diffused lighting effect
I think it’s great!
What about Clear Polycarbonate Sheet and point the leds in woods and it will turn the poly into a big light? Maybe!
Yes, couple the LEDs to the edge of like 1/4" polycarbonate . The plastic sheet will glow fairly evenly.
Love this
This is what I have been looking for.
a sheet of lexan/acrylic would move/diffuse the light,, way back when we did night stars using clear monofiliment fishing line wrapped in tape.. lots of fishing line, lots of tape and LOTS of time
Maybe try covering the back with a sheet of reflective film/ mirror tint (kind used for windows) it would stop any of the light from escaping out back & around the sides/ circumference and the mirror film would help reflect more light from the LED’s into your moon. Another though, would be to lay your moon down face down on a flat table or floor, and fill the back up with epoxy... you could also try tinting the epoxy with white pigment or maybe a glow powder. The epoxy fill will may help distribute the light more evenly, and adding slight white tint to the epoxy may help to diffuse the light. You may want to cut & put down a layer of painters plastic sheeting or something first, or test to be sure the epoxy pour won’t leak/ seep through the shower curtain. You’ll prob want to make sure you use a waterproof LED strip, or lay sheet of painters plastic over the entire back (incluing the LED strip) then pour the epoxy & trim of the excess painting sheet around the edges once the epoxy has hardened. One draw back to the epoxy method is it will obviously increase the weight a bit, but prob still will be fairly light with the epoxy fill.
the biggest issue with epoxy is cost! covering a surface area this big would take a considerable amount and that stuff ain't cheap! I do have a reflective back I placed on the wall, you can catch a glimpse if you watch closely enough. it helped a little but didn't really make a big enough improvement to merit inclusion in the tutorial.
🤩👏👏👏👏greeeat ideia! I'm surprise that you used a shower curtain, man you're so smart 🎯🧠 Bravo!
That's so cool 👍👌
THANKS!
Super cheap way maybe if you remove staples, take the smaller image shower curtain; center, cut it out, wrap & staple.If that's not enough them get a shower curtain liner (less than $5.00) staple, then original large. The extra layers may work without adding much thickness.
How about white acrylic sheet, @ home depot as diffuser? I really like your idea
Very nice 👍❤️
Nutn lika foo Moon!!!
I'd like to make a 36"-48"+ moon, backlit with RGBW+WW LED's with RF remote...
the smaller shower curtain I show would be perfect for that
I got a enlargement of an image to sidewalk advert size about eight by four feet and had to frame it just to view it but it gave my some ideas and only cost a little surprisingly
thinking now it's still not really large enough to do the idea justice
I really like this idea, I did something similar ages ago with a world map. You might want to include a link for where you got the shower curtain from as they aren't that common as just a print of the moon.
yeah, I'll go insert a link into the article on makezine.com
And suddenly, the maker of those shower curtains is wondering why they can't keep them in stock anywhere. ;)
@@GeneJordan ha! what a problem to have
@@CalebKraftmakes With the renewed interest the "new" Space Race, this should be fairly popular. Now I'm left wondering if there is a shower curtain with a high res image of Mars on it.
Nice work. Nice beard!
Maybe just add a few more defused layers on the back side of the hose and add the lights to that. That way they are not so close to the surface.
Very cool project.
If the middle could be bowed outward 6", it would allow room for diffusion in the center, add spherical 3d dimension and might still "feel" low profile, since the perimeter would still only be 1" thick. Was thinking bubble wrap layers to give that smoother dimension... or thin acrylic, bowed strips to support bubble wrap.
It's his art. Don't tell him how to change it.
@@TheAstronomyDude
He literally ASKED for ideas on how to increase the diffusion effect at the end of the video at 6:20
Make an expanding spiral out out translucent tubing.
What if you used a sheet of plexiglass with lights along the edge facing towards the center?
could theoretically work. pretty expensive to experiment on though, I'd basically need a full 4x8 sheet of plexi!
OMG!! Thank you!! I am going to use this for Halloween for our new animatronic werewolf in our yard!!
Would a round mirror spread the light more evenly?
awesome
Very cool! I may try it. I’m changing my space around and I want a new background for my YT videos. Thanks!💖🌘
Awesome! Where did you order the curtains?
I think the alternative to a better diffusion is simply more LEDs...
I'd make a board to go behind, covered in LED's, like the back lighting inside a TV,, maybe mount the led strips backwards to prevent bright spots, maybe mount them on the white board like used with dry erase markers, likt $10 at home improvement, for 4x8 sheet, use thick clear two sided tape and invert theked strip, either spiral or put them in lines, about 4" spacing, should give it a even illumination, also having a gap between the diffuser layer and front layer will help also.. Maybe some foam tape between layers?1/4" it will compress about half way, so 1/8" allowing light to diffuse between layers, do you have a link for the moon you used? Awesome idea!!!....
I'll go drop a link in the article to the big one.
Caleb, your wall looks to be a flat off white? Did you try bouncing the LED off the wall like you would a key light from the ceiling in a pinch? Given the proximity the effect will not be huge, but a combination of that, cloth over the led for diffusion, and just placing a few via a wire in the dark spots of the moon might go a long way to more evenly light the center?
I tried both bare wall and with a reflector. The final version is using the reflector as it did diffuse it a bit.
Hello guys please answer. What kind of material is that which printed on?
I like it as is. I'm not sure how you could make it better, but I'm going with this one.😊I'm going to try to make it a harvest moon.
I wonder how a spot light projector type of light would illuminate it?
Look up LED panel and see if there’s anything within budget and size.
EL Panels for diffuse light?
Maybe an edge lit plexiglass disc? Sanded for diffusing effect.
possibly, plexi gets pretty expensive at this size though, tough to experiment with.
@@CalebKraftmakes maby some other tranclucend plastic? i used for smaler projects the lid from a storing box.
other than that you can give the hole thing a little depth by blowing in some air and fixin it with some epoxy. by this you get some space behind and leds are fare enough away, so they can be placed in the middle.
This is exactly what I was thinking. There are professional video lighting (link at bottom) that do something like that. I'm guessing that they take a round piece of Plexiglas and sand a concave cone into the back. Then they light the edge with bright LEDs. There would have to be a bezel around the rim to hide the LEDs so that they only light into the edge of the plastic. I can't think of an easy way to dish out the plastic though. There is cast sheet Plexiglas so maybe the have a round casting mold and then spin it slowly as it sets up.
www.bhphotovideo.com/c/product/1200304-REG/fotodiox_led_c_700rsv_c_700rsv_flapjack_bi_color_led.html
@@RobertShaverOfAustin looks like the diffuser is the key ingredient! ruclips.net/video/t4QIbX-ZI0E/видео.html those things are super expensive. I wonder if I could get enough of that diffuser cheaper somehow. Simply sanding plexi won't do it, but I could route grooves in it with my big fancy cnc router
What if you buy more leds and glue them close together, in all the background and then dim them , you will spend money but I guess is the easier way.
Maybe print a little smaller version also
Perhaps another layer of white reflective material on the far back forming a sandwich with LEDs in the middle. Create a small parabola effect to diffuse even more evenly
Q) Is lighting ran on batteries? Does it have a remote? What light kit did you use?
Make sure to point the leds towards the center and not through the sheet
they are
Maybe you could try some electroluminescent (el) panels.
that would cost a fortune at this scale!
What's in the display cabinet?
haha, taxidermed mice and small clay sculptures with human teeth. I'm not joking.
Great idea! Subscription definitely.
Plexi with a frosted surface.
I think what you need is some space (ha!) between the diffusing layer and the image layer. Just my $0.02 worth.
Always jealous of how tall your ceilings are
they're great.
Make a border all around it and on the front side making a container that doesn't have any leaks. Pour epoxy on the whole thing with the LEDs still inside as you attached it. Fill the whole container. Sprinkle reflective white glitter after pouring each thin coats of epoxy. When it dries take it out of the container and sand the front edges to a matte finish.
The whole thing should glow due to the reflectiveness of the glitters and the light going trough the epoxy.😀
while that sounds like it could work, it would be incredibly expensive and heavy!
@@CalebKraftmakes O, I forgot you have drywall.
Jaded space nerd here. He is correct.
Use an array of prisms
old projection TV Fresnel lens or layering 4x2 fluorescent ceiling light diffuser.
I think it would look more realistic with warm-toned LED lights....yours are cool-toned. It looks more like earth than the moon
It’s still awesome though. Just an idea!
you can try to use a mirror in the middle of the moon to reflect the light from the sides
That's not how angles work...
Moon-Iris-Lighting sandwich. control the iris with an arduino to make the moon seem smaller as it rises into the night sky.
I posted a video on my instagram of the moon, seen through the iris and it is pretty great.
Paint your walls black and add led stars!
I know you are trying to do this on the cheap but have one way to make it look awesome. have the moon laser etched onto smoked .25"ish acrylic sheet and cut out(use smoke color and laster etch all of the light areas on the moon onto the surface. Then use white leds placed in a channel/strip around all of the edges. The smoked acrylic will make the dark areas look right and the light will hit and diffuse very nicely and mainly only on the etched surface areas and make them appear much brighter. I make signs like this with a CNC router, never tried a moon but I might now.
Niceeeeeee