Homemade Table Saw - 4: Removable Insert and Fine-Tuning

HTML-код
- Опубликовано: 6 янв 2017
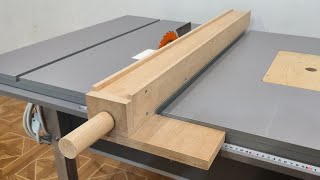
- Building a removable plate for the saw itself, removable inserts for the blade, and fine-tuning the saw. The removable plate could be used to replace the saw with other tools in the future (like a router or a jigsaw), or replaced with a thinner plate that will allow more depth of cut.
I made a mistake in the video at 12:56, as I should have divided by 4 and not by 5. This means that the error is of 0.00877 degrees and not 0.000122 (which isn't correct even when dividing by 5)
Detailed information about this project: ideasketchbuild.com/homemade-t...
The rest of the videos in this homemade table saw series:
1. Building and aligning the fence: • Homemade Table Saw - 1...
2. Cutting the miter slots: • Homemade Table Saw - 2...
3. Building a crosscut sled: • Homemade Table Saw - 3...
4. Removable insert and fine-tuning (this video)
More about my "drill press": ideasketchbuild.com/building-a...
Music: "Wallpaper" Kevin MacLeod (incompetech.com)
Licensed under Creative Commons: By Attribution 3.0 License
creativecommons.org/licenses/b...
==================================================
For the latest videos and updates, be sure to like our facebook page:
/ ideasketchbuild
Visit us for more projects: ideasketchbuild.com  Хобби
Хобби


I love everything about this series. Your enthusiasm for minutiae is infectious and really wonderful! For whatever reason, your approach to building a homemade table saw is less intimidating than many I've watched. Thank you for sharing your mind with us!
Your idea of the bolt and lever to adjust the saw parallel to the fence is genius ! simple and yet so accurate ! Good job
This is a great sequel on building a table saw!!! I'm very inspired to build my own following your steps...
Ive watched many videos on building table saws etc, and what I like about yours......it was made out of 'bits' of wood, leftovers and what I found. And the fact that you made something, it was wrong, so you made again......excellent!! Exactly how I work!!! I am thinking of making a 'small' table but so I can interchange the saw with a router...a 2 in 1 table.......lets see how that goes!! So many videos with top of the range tools......new wood......huge space....you work the way I do, great job.
A very well put together and a great idea. I have a major problem with space in my shop and you have inspired me.
Thanks
I love it to see people making woodworking machines from scratch!! And you do that in a entertaining and teaching way at the same time!! Go on like this. I'm wondering what comes next!?! :-D
Senti Josef
I think that's the best blade adjustment that I ever saw :)
I'm building a homemade table saw and you've given me same great ideas...thx!
Great series. I am about to convert my old Triton 2000 series to a table saw and you have given me lots of ideas. Thanks. I will probably document my process on YT.
I really love how you explain everything you do! plus the alignment system is pretty awesome. I'd love to see more and more.
Seen...Point of this video is removable..
You really did a amazing job in the entire table saw build series thank you for sharing,all the best to you and yours
Ron Sanford thank you!
Ron Sanford hhhhhh
This is the video I needed. I made a table saw a few months back and was so frustrated that I couldn’t get it square. I love your adjustment mechanisms. As a beginning woodworker I was feeling discouraged. I thought I had to align everything perfectly. Now I can do my best and adjust to fix it. Thanks so much for this video. My only suggestion would be showing the mechanisms more clearly. I watched over and over before I really understood how it all worked together.
Awesome!! Wow! Very good instructions..Now I can build my table saw with more confidence. I couldn't figure out a way to adjust the blade like you did, so now I know. Thanks!!
Excellent thinking of a project, then adjustment until you reached perfection, Great job well done
I really like what you have done here. I have been toying with the idea of making my own table saw now for a while. this method you have used seems to be the most practical of all that I have seen. This is the way to go but instead of attaching my saw to 3/4 ply I'll use a piece of 6mm aluminum plate inserted into 19mm marine ply, to give me even greater depth of cut. Thanks for the idea.
Thanks for this series. Very fun to follow!
Thank you! Glad to hear.
great job man! love building stuff like this
Good job... Keep it up. It's a pleasure to see someone getting on with just the resources they have available....
Dominic Giles thanks :)
Excellent project. Thanks for sharing.
This is excellent - learning never ends - i have to redo my insert to accomodate easy fine adjustments
Great builds thanks very much. Given me the confidence to have a go myself.
Realy good explanation of the process.. And a great project
this is beautiful. I've been looking for a way to build a tablesaw and whilst I saw other videos, they were cumbersome to set up and tear down. Your solution is so clever
Best table saw build ive seen yet.... and ive watched nearly all of em lol
I enjoyed watching this; you're a smart guy!
There's more to your ideas then meets the eye. Pretty much blew my mind as I'd never thought of those details and that has alot to do with my never seeing them done. Thanks for another dandy fix to your usable tools..3 thumbs up !
Hi Barton, thank you for your comments :)
just watched this Video, Impressed with your final set up of Saw, and so you can later use it as a router table, Good Idea with my new table saw after I finish the first jobs and making the fold down extensions will be able to add Router and Router Fence. I will be spending rest of afternoon adding to my design so can adjust saw to get blade perfectly square.
Great project! Very inspiring.
Works great, we thank you. It was very helpful. We we will look to your work.
Nice and accurate work.... greetings from the Netherlands
Excellent presentation, well explained tutorial. Thanks.
Great work! This is probably the best job of making an adjustable DIY table saw I've seen so far. That said, it doesn't seem like you really gained all that much with the change from 1" to 3/4" material. Considering the stiffness of the actual saw base plate, and how close the insert plate tracks with the actual outline of the metal saw base plate, I'd suggest trying even thinner material (maybe 3/8") for hanging the saw.
amazing build, very accurate, thanks for posting from Garry in the UK
tell your dad there is only one R in Gary
But 2 R,s in Larry and Barry
I have watched a lot of videos like this one and, for me anyway, this has been the best. What I really like are the additions to adjust the alignment. Many other videos also give the ability to adjust the alignment, but this is the best of them. My only criticism is the background music. Whilst not a problem for many, I have a hearing defect and had to listen to the audio a few times to hear and understand it. Then I saw the transcript and this cleared everything up for me.
A really well thought out and well put together presentation. Thankyou.
John Eardley no o no on👞😂🐶🐩🐶1
Très intéressant votre projet est merveilleux Merci pour le partage des salutations
Genial!! Parabens!! Muito bom!
Great explanation. Thanks for sharing. Subscribed.
Fantastic build!!!
I really like your calculations :D
Muito bom. Criatividade pura.
I think you've done a wonderful job with building a table to saw, Just do not forget, it's not rocket science.I think it's good enough to build a home furniture, well done to you !!!
Very neat work!
Awesome uploads BTW. I will try to make it!
Very useful and interesting - thank you 👍
excellent video and skill.
great work!
Superb design.
Great work
Good job.
I built my table saw also using staineless steel on the top.
That was terrific mate, thank you I will try to use your video as an Inspiration. fred.
Wow! That's accuracy we use in mechanical engineering...
Maybe your "mechanical engineering"...the reste of the mechanical world use definitely smaller tolerance.
@@datambor 9rh
excelente ,buenisimo ,desde costa rica
Bloody brilliant!
thx! it was very helpfull
Good work !
Молодец, особенно понравилась настройка угла диска к столу.
Love these build videos! I would be very interested to see how you built that portable drillpress.
Very nicely done, well done
Rob Talbot
very nice work
รายการนี้ดีมากครับ
A lot of interesting ideas :)
awesome stuff
Der Akzent ist... na ja, aber das Video, einfach super! Danke.
Muy bien realizado au trabajo
Nice job !!!!
great idea.... i love it
well done and thank you
This was amazing,, I think i saw a drill press assumed that you made,, but unfortunently I could not find it , pls let us see that too, great job 👏🏻👏🏻👏🏻
Thanks! I didn't make a video about it, but there's an article in my website about it: ideasketchbuild.com/building-a-temporary-drill-press/
im not sure but in other videos no one take care about the angle cuestion, of course im not comparing, is just is an smart idea!!! i hope that you could understan my terrible inglish cause im from chile😊😊 👍👌
daniel Donoso
He can just make other inserts to accommodate various angles.
No big deal.
I recently posted a comment on another woodworker's channel where he actually thanked me for being so courteous about my opinion. He had stated in his video that one of the reasons he had done a fund raiser was to be able to purchase a Saw Stop table saw. His opinion was that other woodworkers on RUclips do not take you seriously if you are not using the best tools available on the market.
I explained that I totally disagreed. In fact (I explained) that some of the most interesting and best channels were the ones were people actually made or modified tools to accomplish beautiful woodworking projects. I explained that one of my favorite channels is by a man who has dedicated himself to demystifying woodworking and believes that anyone with the desire to be a woodworker can...for less or about 1000.00 in equipment. If all I saw were videos from people who had 20,000.00 dollar shops worth of equipment I would have become immediately discouraged being new to woodworking, and would have decided against the hobby.
Thank you for proving my point so beautifully, that is a fine and accurate table that you have there.
Good job. and safe.
great job
i like your measurements in "inches a mm" nice work
Good work..
Nice work sir please keep it up
EXCELLENT!!!!
Pretty Good!
Nice explanation....
All you gained there was 1/4" increase in cut depth. If you had a router, or you get one eventually, you can just use the 1" thick base and cut out 3/4" of it from the bottom so your saw will sit under just 1/4" of table. Mount it from underneath securely and you're good to go. If you remove the blade guard and cut away some metal from both sides of the top guard, you can add a 8 1/2" blade to the saw and get even more cut depth. Nice build though. I like how you cut out the saw guides in the table using the circular saw.
MrCougar214 hi, you are correct, I really didn't gain much depth of cut. One of my future plans is to build another insert that will position the saw's shoe flush with the table, so I could use its entire depth of cut.
Man you are a machine...loved it ... like a brain surgeon
Bravo... molto molto bello !!!
Giancarlo Cortese the
Giancarlo Cortese
성 샐
Lee R 있다
This is an incredible worth for money [Link Here== *TopFineWoodworking. Com* ]. I have been looking for something like this for quite a while now. I'm happy there are opportunities like this out there. This woodwork plan made a clear presentation with regards to building sheds. Much thanks to you.?
Your math is definitely better than your woodworking :)
Nice idea, attaching the circular saw to a piece of plywood and increase blade depth. Thanks.
Raif Tolga Korkunçkaya
It gets the job done!
Good job
yours is not complicated but accurate,great. i wonder whether the blade could keep square in any height?
I do like, really it was awesome, thanks a lot.
muy buen video
Hey, thanks for the very prompt reply , although it is night in my side of the word, thanks agains and will look forward to see the link ,
very cool dude
Good Job
perfect
thanks for the video
Hi! I loved your video, and your way of explaning alll this. I am making a very much similar machine using the structure of a schools desk that was given to me. As I am a zero on maths, and I for see that I will have big troubles to square the blade, and I will have another chapter of troubles to make perfect square when I instal that guide that stands parallel to the blade. Maybe I'll use a piece of aluminum i got around here. I think I may have a solution for squaring this piece, but I can not explain it on words only!! My saw it self will stay ON a rectangular ''base'', and the table will be all around it, as this way It will not loose much of the circle. About squaring the fence relatively to the saw blade, that will be another ''battle''...
Thank you
I would rather buy a table saw after watching your video OMG. You made it very complicated for most of the folks out there i am pretty sure.
Useful videos
good job .
i did this too, this diy saw table.. i also have bended botom saw plate.. with time it is making 85° cut.. (problem). i'll try to make that adjusting
Fantastical
לפי השקע הישראלי מאחוריך - אני מזהה כאן מישהו משלנו. תבורך! סרטונים יפים מאוד!
שמעון קופפרמן תודה :)
That was a Very Good videoAlso it was a Very Very Good Job. 👍👍👍👍