Great video! I've been wanting to do the same thing to my camper. I watched a few videos of this process, but yours is by far the best. Please keep up the DIY videos.
Thank you so much! We typically shoot our travel videos but I have gotten a lot of great feedback from this video so we are going to mix in some more DIY content for everyone. Thanks for sharing with us!
Hi friend. After doing this install I would agree with you. I was following the directions that came with it. Not sure why they say 3-6 inches. I don’t see any reason why you couldn’t give it more pitch. Good observation.
We are brand new at RVing. We have no practical experience at this. We are excited to get into RVing now that we are retired. We have had many people provide advice and information. The funny part is the expense can be overwhelming. Your video is very informative and comforting for us to attempt doing our own install. I know the labor for this job is very high. I bet with my grown children's help we could succeed at this. Thank you.
I’m so happy this video helped you! Congratulations on becoming RVers. It really is such an enjoyment. There will always be something to fix or upgrade on an RV. Whenever possible I try to do it myself and I’m happy to be able to show that a lot of these things may not be as difficult as we think. We wish you guys many happy memories and adventures in your new rig. Happy camping!
I have to admit I admire your courage putting a drill to a new camper. That being said you did a nice job of explaining the job so it didn’t seem to complicated. Without a doubt I am really enjoying the channel so far.
Lol! Yes! The first time is always scary. Well.... every time is scary. I just look at it like this. If I mess up, I’ll have to learn a new skill. Like patching fiberglass. Ha! Thanks so much for watching and sharing with us. We are so thrilled you are enjoying our channel! -Matt
These are so helpful and thanks so much for what you do! 😊. We too like doing it ourselves 1 we are newbies to living in an RV and 2 we have an older RV that does need work and it is s so helpful to have your videos to teach us. You explain everything so clearly. Thank you so much for all you do!
Thank you so much! I’m very happy you found it helpful. Congratulations on RV living. I hope you guys make some awesome memories. Thanks for sharing with us and being part of our little community we’re building!
Thank you Sir. This was very helpful. I have to reinstall my existing awning it was installed wrong. It was fine for 4 years but now it's grinding on the slide out frame😢
I’m happy it was helpful! I have only installed new slide toppers. I haven’t had to reinstall one yet. I have reinstalled an awning before though. It’s not too hard but be careful with your hands. The roller is under a lot of tension. I tried to just hold it with my bare hand and lost my grip. It cut up my hand pretty good. It definitely helps having a second person there for that part. Also, using thick gloves. 😂
I absolutely love "How To" videos. We rely on service departments too much and these are things we should learn to do ourselves. Great video! Hola from Lima!
Wonderful! Thanks for your feedback. I agree with you. The more we can do ourselves, the less down time we have with the RV. Thanks for holding down our viewership in Peru! Paola and Antonella are so excited!
Thanks! I’m happy you found it helpful. Honestly, the parts list and written instructions make it look more complicated than it really is. Hope I was able to simplify it. And yes… ladders are still my nemesis. 😂
Hi friend! Thank you for your feedback. That’s what everyone has been saying. Looks like I’ll have to keep the camera next to my tool bag. Lol! This project seemed a little complex at first. The instructions are lengthy but only because they’re detailed not because they’re complex. After doing it I can tell you it was actually easier than I had expected. Thanks for watching!
Lol!! Thank you Captain! I put one in the video to keep it real but cut out the others. It would be hard to beep out the string of language that followed those! Ha! Thanks for watching my friend!
Thank you...Just watched your video to find out if I should do it myself or not, Im Going to do it myself ,thanks to to you......Thank you ...Great video....
Getting ready to install one of three on my 5th wheel. I wanted to try one first to see how difficult it may be before I let the dealer charge me twice as much! Great help! Definitely do how-to videos if you can stay healthy and not fall off the ladder so often!
Just got ours for our Jayco. Plan on installing next week. Very informative. I have watched a few different videos on installing and this one is one of the better explained and showing all the information I needed I think. Thanks
We are looking at getting one for our RV. I have watched a few of these video's on installing it. Yours is the best by far. Thank you for sharing this with us. And please continue to video your steps on doing things to your RV as it is helping us. Will be watching for new ideas from you. Thank you and safe travels.
Thank you so much! I’m happy you found it helpful. I will have to start turning the camera on now when I work on the RV’s. 😂 Thanks for sharing your feedback. Safe travels!
Hi friend! Thanks for the feedback. I’ve gotten a lot of responses saying the same thing. I’m going to start adding in more DIY videos since everyone seems to appreciate them. Thanks for watching!
After my second trip with my new camper and having to climb on and balance my big rear end on a ladder with a floor broom on an extension pole to sweep off my slide-out, I'm getting a topper for it. Your video helped give me good perspective on the installation process. My slide is 13' 6" so I'll definitely get a second set of hands to help. Thanks for a great walk through.
Yes, I am later to the party. I will say you have a new subscriber from this day forward. This is the best video explaining something to DIY with an RV I have every had the pleasure of watching. Even the tip about the Ladder and the bottom step. Glad you where ok when it happened. Thank you and please continue to do videos for us novic. 😃
Thank you so much for your kind words. That means a lot! I’m happy the video was helpful. I will absolutely continue to make videos on any DIY stuff we do from now on. Thanks for sharing with us and welcome to our community!
I have been wanting to add a slide out awning to my TT but really didn't have any idea how easy or hard it was to do myself. Obviously having a dealer do it will cost me $$$$$. So, of I went to RUclips to fine a video on the installation. Behold! Yours is the first one that I found. It is very well done and very informative. You make this look pretty easy. I am very good with handyman tasks and I now know that I can do this installation myself. Thanks for the great video and keep up the good work.
Thank you for your kind words. I’m very happy you found it helpful. If you are good with handyman tasks then you should have no problem with this. I personally thought it would be more complicated than it actually was. I was pleasantly surprised. Best of luck and thanks for your feedback.
Just finished installing a Lippert slide awning. It (the awning) needed to be replaced following a catastrophic failure of another brand during last years camping season. Really appreciate the details you provided in the video. It helped a bunch!!
That’s awesome! I’m happy you found it helpful! It’s funny to think I almost didn’t make this video. 😂 Now, it has become our most viewed one. So glad it is helping people. Congrats on the replacement!
Awesome! So glad it inspire you! You got this. 💪 It looks more intimidating than it really is. Once you understand the order of installation it’s really not that hard.
Excellent job bro. 👏🏾 The most detailed one I've seen yet. Now I have the confidence to tackle mine, which is 21', yes 21 feet long. Thanks again and happy camping 🏕 😀.
Thanks buddy! Glad it helped ya! 21’ is huge. 🤣 Leave your slide open about a foot and it should still work for you to slide the topper all the way down. You got this! 💪🏽
Great video. Use of a drill instead of impact driver is exactly right. I also set the ratcheting setting to a low number to avoid overdriving the screws so no holes get stripped. Also, flaring and de-burring the end of the wall channel and lubing the interior of it will let the fabric slide in easily and avoid any snagging or tearing during installation.
Yes! Those are great callouts. I did check for burrs on the channel. This one was fine but an excellent point you make. Ripping the topper as you slide it in would ruin your day for sure!
Very good video. My new 2024 Alliance Paradigm slide out covers were installed by the dealer. After 6 weeks, the fabric pulled away from the spline. It appears they used a staple, one at each end to fasten the fabric to the spline. I like the way you did it using two screws. Thanks for the video. Keep them coming.
Glad you found it helpful! It’s funny that they used staples. The instructions say to use a screw. In fact, the kit comes with screws specifically for that. This is why I have trust issues and prefer whenever possible to do things myself. 😂
Thank you for the video...I watch a lot of RUclips "Howto" videos and this had great info. I have been considering doing this on my camper and have avoided it for fear it might be too complicated. Your suggestions made it much more likely I will take on this project.
Thank you so much! I’m so happy you found it helpful. At first, the idea of this install seemed a little intimidating but it really was simpler than I expected. Wish I had tried this on our first rig instead of paying the dealership. Could have saved a lot. Lol! Thanks for sharing with us!
I’m happy you found it helpful! When you first read the instructions it can seem a little complicated and overwhelming. Glad I could simplify it for you!
Awesome job! Well made and videos. your instructions on DIY jobs are great. I see future slide toppers if not already installed on new rig and your outdoor Kitchen ... PS keep the DIY's coming!
Thank you so much! As a video creator, your always trying to find that balance of too short or too long. Too short and it’s not helpful. Too long and nobody will watch. Lol! Thanks for sharing with us. Looks like I get to do more projects! Always welcome an excuse to break out the tools! Thanks for watching!
I’m so glad you found it helpful. I’ll admit it was a little intimidating before I started but I only had the instructions to go by. I’m a visual person. Would have loved a video like this to help me. Once I jumped in I found it not to be as complicated as I expected. Glad to hear this video is helping others. Best of luck on your install. You got this! 💪
DIY projects are great. We get to learn from you all. To see if they are easy or hard to do. The awning job seems just to take your time, have a helping hand. Thanks for sharing, hope to see more. Stay safe. 🤓🤓
Hi friend! Thanks so much for sharing your feedback with us. Everyone’s been saying that. Looks like I have to get modding! Lol. Thanks for taking the time to check out our channel. Happy camping!
Thank you friend. We’re so happy it was helpful to you! Thanks for the feedback. Looks like we’ll have to do more of this type of video. Pray for me. Paola’s honey do list is going to grow now! Thanks for watching!
Thanks! I’m happy it helps. I’m better at visual learning than reading instructions. I wished I had a video that showed me the process when I was doing it so I decided to make one for others. 😂
Hi friend! Thanks for sharing. I’ve been getting that answer a lot. Looks like I have to do some more upgrades to the RV. Lol! Thanks so much for taking the time to check out our channel!
Thanks for sharing with us Robert! So glad you found it helpful. I have a few other install video ideas I’m working on that hopefully will help as well. Thanks for watching!
Hi friend! Thank you so much for taking the time to give us your feedback. We’ve been getting similar comments that viewers like this type of video. Better for me. Now I have an excuse to tell Paola when I go shopping for more things for the RV! Lol! Thanks for watching!
Jeremy I'm literally purchasing a 2021 368MBI today and was considering seeing what the dealer would charge me to put these on? Just curious if you tackled the project yourself and how difficult was it after viewing this video?
Really like this kind of video!! Going to do this to my 5th wheel soon! I learned something if Ü don’t have the covers..... always been sweeping the slides off before retracting them!! My Son said why don’t Ü use my leaf blower!! So I tried it and now I have one ordered for the 5th wheel..... the blower made short work of getting stuff off the slide top!! 👍🏼
Hey Matt, thank you for that How to- or DIY-video, I really like that type of content a lot. You asked for input, I gave you input. I would love to see more How to videos or related content, I always find that kind of video interesting and I as a viewer can always learn something new. I never installed Slide Toppers before, so I can't tell you if you did something wrong or how it should be done better or quicker, but after watching this video I would try installing a Slide Topper on myself, but with a pair of two helping hands, just for safety reasons 😉 (and for the fact that I, if necessary, can blame somebody else if something would go wrong 🤪😂😉 Just kidding, I would never do this to my lovely wife 🤪 As promised, this was the last video for today, tomorrow I will continue my "RCRV video watching marathon" 👍🏻 See ya 👋 , Philipp
Hey Philipp. Thank you for sharing your feedback. I have received a lot of positive comments agreeing with you, that I should do more DIY videos. Looks like I have a great excuse to start shopping for the RV. 😂
I’m glad you found it helpful. My personal preference is to order them a little longer than the slides if you have the installation space. I’m speaking of the roof of the slide not the trim edge. Ideally I like it to be about where the trim is giving you a couple inches over hang from the slide roof. This is not always possible given the various measurements of slide outs so you really just have to match it the best you can. Review the description carefully when ordering and make sure what length of cover they are describing. The fabric or the total length with the arms which will be longer. Hope this helps!
Great video. Thank you. I’ve subscribed for more videos. I was going to tackle this with a friend but by the time you buy the awnings and pay the freight the dealers price was very close to my cost. I’d rather have them do it for ease of it being done when I pick up my new Alliance.
Thank you Edward! I’m so happy you enjoyed it. I agree with you. If you can get a good deal to get them preinstalled by the dealer, that’s the smart move. Thanks for being part of our RCRV community and also welcome to the FamAlly! What model Alliance are you getting?
Could you possibly post a video or photo of the other side where you started? The slide with the awning attached. I am purchasing a new camper and one of the slides has an awning. Very curious as to how to install the slide topper with the awning there. I am scared that my awning is even higher on the slide than the one in the start of your video. Trying to figure out how its going to work. Thanks. Great video by the way!
I want to install one of these on our travel trailer the one question I have is where you mount the track on the side of the camper/rv where do the screws go into ? Studs or do you just rely on the material of the side of the camper to screw into? Wasn’t sure if there was a lot of pull on the awning.
Great question. I’m wondered the same when I installed the first one. The track only screws into the siding material. I think this is why there are so many screws. Each screw in the siding holds less force than one in the stud but they make up for the force by having so many screws that it spreads the force out. This is also why I recommend using butyl tape on the back of the track for waterproofing the screw holes instead of caulking. The butyl tape just by itself is VERY sticky and adds even more strength in my opinion. As well as waterproofs the screw holes.
Not sure exactly what clip you’re speaking of but I have gotten other comments about the roller pitch. I think it may be the wise angle lens of the camera making it look that way. In person the pitch is more pronounced.
Hi Jerry. I think the topper goes on the same way. The only issue I ran into was getting the bracket plate to fit. That’s where I had notch out a piece of the awning track.
I tried it both ways and this is what I found. When putting the screws into the metal bracket to lock it into place, the self tapping screws work fine. No need to pre-drill. When putting screws into the fiberglass of your camper, for example the bracket plates or the awning track, I found that pre-drilling was best. The ones I didn’t pre-drill didn’t go in straight and would shift the bracket just a little. Also, without pre-drilling the fiberglass I found I’d have to press really hard and spin the drill very fast to get the screw to start going in. Then it was hard to slow/stop the screw and I’d end up over tightening the screw and stripping the hole and the screw would just spin and spin. If you’re going to pre-drill, most likely your bit will be longer than the screw is. Make sure you don’t push the bit in too far. Just what I learned from trial and error. Hope this helps. -Matt
Yes, it’s holding up great. It’s not on the trim though. It is in the framing. In the middle of the video I show how to measure down to be able to clear your trim and get the screws into the frame. The screws are too long and will go right through the trim and cause damage when you close the slide.
After dragging in tree debris yesterday closing my slide I am revisiting installing a topper. This looks like a home job. I don't have four months for the dealer to do it.
I hear you. The downtime at a dealer can be ridiculous. It’s honestly not as difficult of a job as I had originally thought. Hope this video helped out a bit!
Awesome video! Thank you! This gives us confidence to definitely do this ourselves. QUESTION for you......I notice that the topper is actually angling toward the RV when the slide is out. Should it angle away from the RV when the slide is out? Do the brackets that are attached to the slide need to be lower? Or is that impossible because of the frame....so it is what it is? It seems counterproductive to have it angle toward the RV.
Glad you found it helpful! You are correct. The topper should be angled away from the RV for rain run off. I’ve gotten a few other comments noticing the same thing you did. I think it’s a combination of the wide angle lens on the camera and shooting at weird angles that makes the video look like the toppers are angled incorrectly. 😂 In real life there is an angle away from the RV. To your second question, yes, the arms are adjustable somewhat. You can rotate them up or down to either raise or lower the angle. 👍🏽
Thats awesome, thank you! A lot of people have said that. I’m going to start mixing these type of videos into our channel in between our travel videos. Thanks for sharing with us!
Can you show the proper way to measure for the toppers, I have one that’s 861/2” wide?? And the second one is 1543/8” wide?? First one would be 7’ 1”. Second one 12’10” ??? Thanks for your help. GC
Hi George! That’s a great question. Honestly, I didn’t really understand the measurements at first either. There seem to be 2 different measurements when ordering. The fabric width and the bracket width (which is larger) While I’m not a professional, I can share my understanding of it. Measure the roof of the slide out. I would want the fabric the be that measurement to cover it properly. You could even get the fabric a little larger by an inch or two. If there are no obstructions close to the slide frame/fascia when the slide is in, ex. Another slide out right next to it, an awning arm, etc. You should be good to go. If, however, there are close possible obstructions then you will need the measurements of the outside fascia of the slide and the Total measurements of the topper. The topper roller arm and bracket stick out farther than the fabric. You want to make sure that when the slide out is in that you have enough clearance for the entire topper assembly not to hit anything. This is just my understanding of it. I’m not a professional it’s just what I’ve discovered doing it myself. Hope this helps.
If you’re referring to the slid toppers that I installed in the video, most campers do not come with them. They can be purchased on Amazon. The company that makes them is LCI. You will have to measure the length of you slides to order the correct size. Hope this helps. 👍🏽
I just watched this and I have a question. They look pretty flat when the slideout is extended. Is there any concern for water runoff when it rains? Will it pool on the canvas, or is it slightly at an angle so it runs off?
I think it may be the camera angle. Others have committed that same thing. 😂 Looking at them in real life, there is an angle for runoff. You could, presumably, mount the back track a little higher to get more of an extreme angle. You don’t want to mount them too high though as it may turn into a kite during high winds. Also, easier for debris to get caught between the slide roof and topper.
Yes, you are correct. It should be away from the trailer. Some of the video clips I shot with a wide angle lens and from weird angles to look more cinematic. 😂 It can sometimes change the perspective angles but the awnings are pitched away from the camper. Thanks for the call out though! 👍🏽
The track looks like it could/should be a bit higher up to create more of a slope - seems it would catch water vs shedding off. Wondering if it has been an issue?
You may be right. I always wondered why the directions didn’t recommend putting it higher. I just followed what they said. As far as I know, they haven’t had problems with pooling. It may be the minimum pitch needed to shed water while keeping the smallest gap to prevent wind and debris from getting under it. I may reach out to the manufacturer to get some clarification and make an update video as many others have committed on that very same thing. Has got me curious now. 😂 Thanks for sharing.
Wouldn't adding more slope allow the awning to flap more going down the road? It wouldn't roll up as tight with slide in. I thought about that before I add 2 too my camper.
I believe the instructions say to just measure the slide width and use that number but I prefer to have it 1 or 2 inches wider if possible. Remember, the wider the fabric the wider the roller and hanger arms will be so verify you have enough room. Especially if you have two slides right next to each other.
So glad you found it helpful! The butyl tape I got at Home Depot. I think there’s only one size. Don’t remember exactly but I believe it was around 1.5” wide. You can find it in the roofing section. Don’t be like me and wonder around the adhesive section looking lost. 😂
hello you didnt tell me how much overhang on each side how far past slide should the topper go and what kind of angle should the topper have. i have a gutter about 6 inches up from slide out that my son says i can use but i told him its not for a topper.. what about price... and color... what is the average cost and what is the best color for it.. and do they make topper ends that can attach to topper and side of slide out because our rain sometimes goes sildeways and rain gets in that way
Hi Karen. You have some great questions. As stated in the video, I’m not a professional. I’m just an RVer sharing a DIY project. I would suggest contacting Lippert to get accurate information. That being said, I can share with you my options on your questions. The angle of the topper is measured by how high up from the slide the track is mounted. I believe the instructions say between 3-6 inches up. I believe some gutters, (not all) have an accessory track that may be able to be used but only if your roof has a flat profile. A quick Amazon search will help show you current pricing. They are priced by size. As for labor costs, I’m not really sure as I did it myself. I’ve seen 2 color options. Black and white. There may be others that I’m not aware of. I have not seen topper ends to keep rain out. From my understanding, the toppers are primarily to help keep debris out, not rain. Your slide roof should be built to prevent water intrusion by the slight slant in the roof and also the seals. If rain water is getting into your camper, it may be a sign that there is another problem that should be addressed first. I hope this helps you. Again, it’s just my 2 cents. The most accurate info will come from the manufacturer.
Great video and entertaining. I have the same model I think, 368mbi. Did you have any issues when doing the slide that had the awning attached? Any tips would be appreciated on that slide. Also if we wanted more slope for rain run of do you think going 7 inches up would still work?. Thank you so much! Happy camping to your family
Hi Nathaniel. The only issue I had on that slide was having to notch out the bracket of the awning about an inch. Other than that everything was normal. Personally, I don’t see why you couldn’t raise it up to 7 inches. I was just following the directions but I have seen other camper toppers that look like they have more slope. I would probably give LCI a call and make sure there’s no issues with raising it up a bit. Thanks for watching and happy camping!
I honestly thought the same thing. I was just following the measurements in the Instructions but I don’t see how it would be a problem to raise the track a little more to get more slope. That being said, so far the slope works fine for run off. Thanks for watching!
From my experience, yes, all butyl tape is the same. I’ve purchased at Home Depot, camping world and also a A/V installation warehouse and they’ve all been the same. Only difference seems to be the width of the tape. If you can get the tape the same width of the track or bracket it makes things a lot easier. Just cut to length and keep going. Unrolling a long section and cutting it to the correct width is not fun. This stuff sticks to everything. Doable, but not fun. 😂
Even after I watched your very informative video, and explained to my lovely wife. She still has her doubts about me taking this project on. How did you convince your wife you could do this install? 😂
😂😂😂 Years of practice. 🤣 I’m pretty handy and she has learned over the years to trust me when I take on a project. The scary part I think is drilling into your RV. That’s why I like using the butyl tape. You can place the fixture first and be sure it’s where you need it before drilling.
Hi friend. There was nothing in the instructions about doing that so I’m not for sure. That being said, after doing the installation myself and kind of understanding how it works I can tell you what I would try. I would roll out the cover aprox a foot or so. Then, either replace the tension rod pins back in or bend a metal coat hanger and put that in. Anything to keep it from rolling back. You’d then have to slide the awning back out of the track, wrap it around the roll a couple times and then replace. All this is just guessing though. I would first call LCI and see if there is an easier way to adjust. I hope this helps get you going in the right direction. Wish I had something solid for you but I haven’t had to deal with that.... yet. 😂 Thanks for watching!
Hi friend. Thank you. I just think to myself, if I mess up I’ll have to learn a new skill. Like patching fiberglass. Lol. The toppers were ordered from Amazon. Helpful tip. Measure the slide width and then order by the fabric width. They give 2 measurements. Topper width and fabric width. Renzo ordered his by topper width and wishes they were a little wider. Alfredo ordered his by fabric with and as you see in the video they fit perfect. Thanks for sharing with us and taking the time to check out our channel!
@@RCRVadventures Makes sense. I had to replace the spring kits on both sides of the 25' topper on my motorhome after 80+ MPH winds broke it while in Oklahoma.
It was 2 in the morning when it sounded like a train hit the motorhome and glass shattering. The high wind had broke the front bracket of the 25' slid topper, sending the topper up and slamming down on the roof. The glass was from the glass covers of the LED ceiling lights being knocked out from the impact and breaking on the tile floor. And the topper tube continued to bang on the roof. So, while my wife was vacuuming up the glass, I went on the roof in the wind and sleet to free the topper tube from the motorhome. I cut the fabric as close to the motorhome as possible and with a big heave, through it up in the air. The wind took it about 75 feet south of our rig. The only thing I saved was the 25' tube and the brackets with the hex bars that are bolted to the motorhome. So I replaced both spring assemblies with the arms and the fabric. And it's not easy to find 302" long fabric. People ask me how my trip to Oklahoma was? I reply "Memorable".
Alfredo and Antonella are part of our RCRV crew. They are my brother and sister in-law. They are in most of our travel vlogs. I usually film solo when doing a “how to” type video. This was their camper I was installing on.


Great video! I've been wanting to do the same thing to my camper. I watched a few videos of this process, but yours is by far the best. Please keep up the DIY videos.
Thank you so much! We typically shoot our travel videos but I have gotten a lot of great feedback from this video so we are going to mix in some more DIY content for everyone. Thanks for sharing with us!
The only thing I would change is, I would mount the part that mounts to the trailer higher so it has some pitch so the rain will roll off..
Hi friend. After doing this install I would agree with you. I was following the directions that came with it. Not sure why they say 3-6 inches. I don’t see any reason why you couldn’t give it more pitch. Good observation.
We are brand new at RVing. We have no practical experience at this. We are excited to get into RVing now that we are retired. We have had many people provide advice and information. The funny part is the expense can be overwhelming. Your video is very informative and comforting for us to attempt doing our own install. I know the labor for this job is very high. I bet with my grown children's help we could succeed at this. Thank you.
I’m so happy this video helped you! Congratulations on becoming RVers. It really is such an enjoyment. There will always be something to fix or upgrade on an RV. Whenever possible I try to do it myself and I’m happy to be able to show that a lot of these things may not be as difficult as we think. We wish you guys many happy memories and adventures in your new rig. Happy camping!
I have to admit I admire your courage putting a drill to a new camper. That being said you did a nice job of explaining the job so it didn’t seem to complicated. Without a doubt I am really enjoying the channel so far.
Lol! Yes! The first time is always scary. Well.... every time is scary. I just look at it like this. If I mess up, I’ll have to learn a new skill. Like patching fiberglass. Ha! Thanks so much for watching and sharing with us. We are so thrilled you are enjoying our channel!
-Matt
Record it allllll !!!!!!! You’re good on camera rv upgrades is all I watch
Thanks so much! I’m working on some new ideas for upgrades to work on!
These are so helpful and thanks so much for what you do! 😊. We too like doing it ourselves 1 we are newbies to living in an RV and 2 we have an older RV that does need work and it is s so helpful to have your videos to teach us. You explain everything so clearly. Thank you so much for all you do!
Thank you so much! I’m very happy you found it helpful. Congratulations on RV living. I hope you guys make some awesome memories. Thanks for sharing with us and being part of our little community we’re building!
Thank you Sir. This was very helpful. I have to reinstall my existing awning it was installed wrong. It was fine for 4 years but now it's grinding on the slide out frame😢
I’m happy it was helpful! I have only installed new slide toppers. I haven’t had to reinstall one yet. I have reinstalled an awning before though. It’s not too hard but be careful with your hands. The roller is under a lot of tension. I tried to just hold it with my bare hand and lost my grip. It cut up my hand pretty good. It definitely helps having a second person there for that part. Also, using thick gloves. 😂
I absolutely love "How To" videos. We rely on service departments too much and these are things we should learn to do ourselves. Great video! Hola from Lima!
Wonderful! Thanks for your feedback. I agree with you. The more we can do ourselves, the less down time we have with the RV. Thanks for holding down our viewership in Peru! Paola and Antonella are so excited!
You made that look very easy. You're very well spoken and easy to understand. More DIY videos would be great. Careful on the ladder dismounts 🤕.
Thanks! I’m happy you found it helpful. Honestly, the parts list and written instructions make it look more complicated than it really is. Hope I was able to simplify it. And yes… ladders are still my nemesis. 😂
Looks pretty easy to do I would like to see more DYI projects
Hi friend! Thank you for your feedback. That’s what everyone has been saying. Looks like I’ll have to keep the camera next to my tool bag. Lol!
This project seemed a little complex at first. The instructions are lengthy but only because they’re detailed not because they’re complex. After doing it I can tell you it was actually easier than I had expected. Thanks for watching!
Looks like a great job Matt. Now I know I am not the only one who misses the bottom step on the ladder lol.
Lol!! Thank you Captain! I put one in the video to keep it real but cut out the others. It would be hard to beep out the string of language that followed those! Ha! Thanks for watching my friend!
Thank you...Just watched your video to find out if I should do it myself or not, Im Going to do it myself ,thanks to to you......Thank you ...Great video....
Awesome! Happy I could help.
Getting ready to install one of three on my 5th wheel. I wanted to try one first to see how difficult it may be before I let the dealer charge me twice as much! Great help! Definitely do how-to videos if you can stay healthy and not fall off the ladder so often!
Hahahahaha! Thank you my friend! I can’t make any promises about the ladder though. 😂 Thanks for taking the time to check out our channel!
More DIY. Thanks for the video
Appreciate the feedback. That seems to be what most viewers are saying. Looks like I need to find another project for the RV! 😂 Thanks for watching!
Just got ours for our Jayco. Plan on installing next week. Very informative. I have watched a few different videos on installing and this one is one of the better explained and showing all the information I needed I think. Thanks
I’m really glad you found it helpful! It seems complicated at first but it’s really not bad. After you do the first one you’ll fly through the rest.
We are looking at getting one for our RV. I have watched a few of these video's on installing it. Yours is the best by far. Thank you for sharing this with us. And please continue to video your steps on doing things to your RV as it is helping us. Will be watching for new ideas from you. Thank you and safe travels.
Thank you so much! I’m happy you found it helpful. I will have to start turning the camera on now when I work on the RV’s. 😂 Thanks for sharing your feedback. Safe travels!
Surely love these videos. Dealers will take all your money and not do as good of a job as I, or you, can do. So, if you make more I will surely watch.
Hi friend! Thanks for the feedback. I’ve gotten a lot of responses saying the same thing. I’m going to start adding in more DIY videos since everyone seems to appreciate them. Thanks for watching!
After my second trip with my new camper and having to climb on and balance my big rear end on a ladder with a floor broom on an extension pole to sweep off my slide-out, I'm getting a topper for it. Your video helped give me good perspective on the installation process. My slide is 13' 6" so I'll definitely get a second set of hands to help. Thanks for a great walk through.
So happy you found it helpful! Congratulations on your new rig. Hope you’re able to make some great memories.
Yes, I am later to the party. I will say you have a new subscriber from this day forward. This is the best video explaining something to DIY with an RV I have every had the pleasure of watching. Even the tip about the Ladder and the bottom step. Glad you where ok when it happened. Thank you and please continue to do videos for us novic. 😃
Thank you so much for your kind words. That means a lot! I’m happy the video was helpful. I will absolutely continue to make videos on any DIY stuff we do from now on. Thanks for sharing with us and welcome to our community!
I have been wanting to add a slide out awning to my TT but really didn't have any idea how easy or hard it was to do myself. Obviously having a dealer do it will cost me $$$$$. So, of I went to RUclips to fine a video on the installation. Behold! Yours is the first one that I found. It is very well done and very informative. You make this look pretty easy. I am very good with handyman tasks and I now know that I can do this installation myself. Thanks for the great video and keep up the good work.
Thank you for your kind words. I’m very happy you found it helpful. If you are good with handyman tasks then you should have no problem with this. I personally thought it would be more complicated than it actually was. I was pleasantly surprised. Best of luck and thanks for your feedback.
Going to do this real soon so thanks you made it look easy.
Hope this helped take some of the intimidation away! Once you get one installed, you understand the process and the rest are easy!
Excellent job! Needed this.
Happy it was helpful!
Nice job and yes, please do more recordings.
Thanks for the support!
Thanks so much! Great video - keep this "how to" kind coming!
Thanks for the great feedback! Will do!
Thanks for sharing this video bro definitely was helpful 🙏
So glad it was helpful! Hope I took some of the intimidation away.
Just finished installing a Lippert slide awning. It (the awning) needed to be replaced following a catastrophic failure of another brand during last years camping season. Really appreciate the details you provided in the video. It helped a bunch!!
That’s awesome! I’m happy you found it helpful! It’s funny to think I almost didn’t make this video. 😂 Now, it has become our most viewed one. So glad it is helping people. Congrats on the replacement!
Great how to video! Well made & well explained. Thank you
I’m happy you found it helpful! Thanks!
Way good job your instructions were very nice , thank you!!!
Thank you. I’m so happy you found it helpful! Thanks for watching and commenting!
Thanks very helpful video.
Hi friend. I’m so happy you found it helpful. Thanks for watching!
Thanks for this. It was really helpful. I feel much better about installing mine. Off to order it.
Awesome! So glad it inspire you! You got this. 💪 It looks more intimidating than it really is. Once you understand the order of installation it’s really not that hard.
Excellent job bro. 👏🏾 The most detailed one I've seen yet. Now I have the confidence to tackle mine, which is 21', yes 21 feet long. Thanks again and happy camping 🏕 😀.
Thanks buddy! Glad it helped ya! 21’ is huge. 🤣 Leave your slide open about a foot and it should still work for you to slide the topper all the way down. You got this! 💪🏽
Great video. Use of a drill instead of impact driver is exactly right. I also set the ratcheting setting to a low number to avoid overdriving the screws so no holes get stripped. Also, flaring and de-burring the end of the wall channel and lubing the interior of it will let the fabric slide in easily and avoid any snagging or tearing during installation.
Yes! Those are great callouts. I did check for burrs on the channel. This one was fine but an excellent point you make. Ripping the topper as you slide it in would ruin your day for sure!
Thanks, gave me confidence to install my own.
Glad you found it helpful!
Great video, easy to watch with clear instruction. Thanks Keep these coming.
Hi friend! Thank you for the feedback. I’m glad you liked it. I guess I need to go shopping for more upgrades to the camper! 😂 Thanks for watching!
Very good video. My new 2024 Alliance Paradigm slide out covers were installed by the dealer. After 6 weeks, the fabric pulled away from the spline. It appears they used a staple, one at each end to fasten the fabric to the spline. I like the way you did it
using two screws. Thanks for the video. Keep them coming.
Glad you found it helpful! It’s funny that they used staples. The instructions say to use a screw. In fact, the kit comes with screws specifically for that. This is why I have trust issues and prefer whenever possible to do things myself. 😂
Well done. This video was very informative. Thanks
So happy you found it helpful!
Yes, keep them coming. Great vid.
Thank you! Glad you found it helpful. Have some new ideas I may be trying soon!
Not many topper videos out there. I learned a few things from this one as I'm preparing to do my install. Thank you.
I’m so glad you found it helpful! Best of luck on your install!
Good job, can't wait to put them on my Alliance 310.
Thank you! Always nice to hear from a FamAlly member!
Thank you for the video...I watch a lot of RUclips "Howto" videos and this had great info. I have been considering doing this on my camper and have avoided it for fear it might be too complicated. Your suggestions made it much more likely I will take on this project.
Thank you so much! I’m so happy you found it helpful. At first, the idea of this install seemed a little intimidating but it really was simpler than I expected. Wish I had tried this on our first rig instead of paying the dealership. Could have saved a lot. Lol! Thanks for sharing with us!
Just curious if you tackled the project yourself and how difficult was it after viewing this video?
Thank you for keeping it simple. Well done
I’m happy you found it helpful! When you first read the instructions it can seem a little complicated and overwhelming. Glad I could simplify it for you!
All the help makes it easier
Definitely easier with help but it’s doable by yourself. 👍🏽
Awesome job! Well made and videos. your instructions on DIY jobs are great. I see future slide toppers if not already installed on new rig and your outdoor Kitchen ... PS keep the DIY's coming!
Thank you so much! As a video creator, your always trying to find that balance of too short or too long. Too short and it’s not helpful. Too long and nobody will watch. Lol! Thanks for sharing with us. Looks like I get to do more projects! Always welcome an excuse to break out the tools! Thanks for watching!
You are so good!!!!!! ........Que tal pasiencia!!!!!
Gracias Doña!
Thank You for sharing this. Appreciate it :)
So happy you found it helpful!
I really enjoyed your video. I'm fixing to tackle this today. I have an awning in the way. Thanks for the help.
I’m so glad you found it helpful. I’ll admit it was a little intimidating before I started but I only had the instructions to go by. I’m a visual person. Would have loved a video like this to help me. Once I jumped in I found it not to be as complicated as I expected. Glad to hear this video is helping others. Best of luck on your install. You got this! 💪
DIY projects are great. We get to learn from you all. To see if they are easy or hard to do. The awning job seems just to take your time, have a helping hand. Thanks for sharing, hope to see more. Stay safe. 🤓🤓
Hi friend! Thanks so much for sharing your feedback with us. Everyone’s been saying that. Looks like I have to get modding! Lol. Thanks for taking the time to check out our channel. Happy camping!
Great video. Thought you did a great job of explaining both do’s and don’t. Gotta watch those ladders.
Thanks Dane! 😂 Yes, cameras and ladders should not be used at the same time. 🤣 Glad you found the video helpful!
Dude...that was really clever. Keep it up.
Glad you like it! Hope it was helpful. 👍🏽
That was great thank you so much. I've been thinking about doing that on our rv but I wasn't sure. This video was really helpful.
Thank you friend. We’re so happy it was helpful to you! Thanks for the feedback. Looks like we’ll have to do more of this type of video. Pray for me. Paola’s honey do list is going to grow now! Thanks for watching!
Love diy videos keep them coming
Thanks for sharing Jeremy! I have a couple of unique install ideas I’m planning on. Stay tuned!
Great video. Very informative. Thank you.
Thanks! I’m happy it helps. I’m better at visual learning than reading instructions. I wished I had a video that showed me the process when I was doing it so I decided to make one for others. 😂
I LOVE the DIY stuff !! so informative and great to know !
Hi friend! Thanks for sharing. I’ve been getting that answer a lot. Looks like I have to do some more upgrades to the RV. Lol! Thanks so much for taking the time to check out our channel!
Awesome video! I'd definitely appreciate seeing more DIY videos to learn more that I can do myself
Thanks for sharing with us Robert! So glad you found it helpful. I have a few other install video ideas I’m working on that hopefully will help as well. Thanks for watching!
Really like the how to videos. Also like this video, we also have a 368MBI and will look into adding the toppers as well.
Hi friend! Thank you so much for taking the time to give us your feedback. We’ve been getting similar comments that viewers like this type of video. Better for me. Now I have an excuse to tell Paola when I go shopping for more things for the RV! Lol! Thanks for watching!
Jeremy I'm literally purchasing a 2021 368MBI today and was considering seeing what the dealer would charge me to put these on? Just curious if you tackled the project yourself and how difficult was it after viewing this video?
Sweet keep the videos coming
Thanks! So glad you found it helpful. I’m working on a couple new install and review videos. Hoping to be finished with them soon.
Good video.Saludos desde Miami 👍
Muchísimas gracias! So happy you found it helpful.
Excellent video.
Thanks so much! Hope it helped explain a little and lower the intimidation factor! 🤣
Really like this kind of video!! Going to do this to my 5th wheel soon! I learned something if Ü don’t have the covers..... always been sweeping the slides off before retracting them!! My Son said why don’t Ü use my leaf blower!! So I tried it and now I have one ordered for the 5th wheel..... the blower made short work of getting stuff off the slide top!! 👍🏼
Oh I like that leaf blower idea! Thanks for sharing!
Love the how to videos
Thanks for sharing! Looks like I’ll have to do more of these! 😂
Hey Matt, thank you for that How to- or DIY-video, I really like that type of content a lot. You asked for input, I gave you input.
I would love to see more How to videos or related content, I always find that kind of video interesting and I as a viewer can always learn something new.
I never installed Slide Toppers before, so I can't tell you if you did something wrong or how it should be done better or quicker, but after watching this video I would try installing a Slide Topper on myself, but with a pair of two helping hands, just for safety reasons 😉 (and for the fact that I, if necessary, can blame somebody else if something would go wrong 🤪😂😉 Just kidding, I would never do this to my lovely wife 🤪
As promised, this was the last video for today, tomorrow I will continue my "RCRV video watching marathon" 👍🏻
See ya 👋 ,
Philipp
Hey Philipp. Thank you for sharing your feedback. I have received a lot of positive comments agreeing with you, that I should do more DIY videos. Looks like I have a great excuse to start shopping for the RV. 😂
Outstanding job (even with the sound effects of you coming off the ladder)...
Oh that was no sound effect! 😂 I really missed the last step! 🤣 Thanks for watching!
Just found this video as I wondered if slide toppers could go on slides with the awning
I was able to manage it but I would recommend with a little modification. 😂 Hope you found it helpful.
Great help. Thanks. Getting ready to order my slide covers. Should I order these a bit longer than actual slides?
I’m glad you found it helpful. My personal preference is to order them a little longer than the slides if you have the installation space. I’m speaking of the roof of the slide not the trim edge. Ideally I like it to be about where the trim is giving you a couple inches over hang from the slide roof. This is not always possible given the various measurements of slide outs so you really just have to match it the best you can. Review the description carefully when ordering and make sure what length of cover they are describing. The fabric or the total length with the arms which will be longer. Hope this helps!
Great video. Thank you. I’ve subscribed for more videos. I was going to tackle this with a friend but by the time you buy the awnings and pay the freight the dealers price was very close to my cost. I’d rather have them do it for ease of it being done when I pick up my new Alliance.
Thank you Edward! I’m so happy you enjoyed it. I agree with you. If you can get a good deal to get them preinstalled by the dealer, that’s the smart move. Thanks for being part of our RCRV community and also welcome to the FamAlly! What model Alliance are you getting?
I bought the Avenue 32RLS. Picking it up in a couple of weeks.
Congratulations! How exciting!
Good video
Thanks, hope it was helpful!
Cheaper to diy than going to dealer or hiring someone. I’m a single female senior and like knowing what to do.❤
Glad you found it helpful!
Great video … I also do most repairs myself… looking for video replacing side wiper tubing on slides
Thanks! I haven’t had to replace the tubing yet but if it’s anything like the other repairs I’ve done it’s probably easier than we think. 😂
nice video . thanks!
So happy you found it helpful!
Love it more how to use
Hi friend! Thank you for your feedback. I think that seems to be the general consensus. 😂 Guess I’ve got work to do! Lol. Thanks for watching!
Could you possibly post a video or photo of the other side where you started? The slide with the awning attached. I am purchasing a new camper and one of the slides has an awning. Very curious as to how to install the slide topper with the awning there. I am scared that my awning is even higher on the slide than the one in the start of your video. Trying to figure out how its going to work. Thanks. Great video by the way!
Hi Dale. Direct message me on our RCRV Facebook page and I’ll see if I can send you a picture or video of what ever will help ya.
-Matt
Thank you!!
Hope it was helpful!
I want to install one of these on our travel trailer the one question I have is where you mount the track on the side of the camper/rv where do the screws go into ? Studs or do you just rely on the material of the side of the camper to screw into? Wasn’t sure if there was a lot of pull on the awning.
Great question. I’m wondered the same when I installed the first one. The track only screws into the siding material. I think this is why there are so many screws. Each screw in the siding holds less force than one in the stud but they make up for the force by having so many screws that it spreads the force out. This is also why I recommend using butyl tape on the back of the track for waterproofing the screw holes instead of caulking. The butyl tape just by itself is VERY sticky and adds even more strength in my opinion. As well as waterproofs the screw holes.
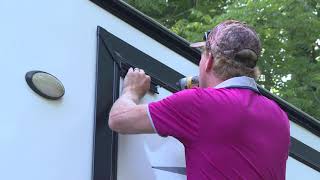
In the picture at 17:00 in appears the outside edge at the roller is to high to let water run off effectively .
Not sure exactly what clip you’re speaking of but I have gotten other comments about the roller pitch. I think it may be the wise angle lens of the camera making it look that way. In person the pitch is more pronounced.
can you show how to put the topper on when there is an awning attached.
thanks
Hi Jerry. I think the topper goes on the same way. The only issue I ran into was getting the bracket plate to fit. That’s where I had notch out a piece of the awning track.
Googd job
Thanks! Hope it was helpful!
the screws that come with the topper are self drilling. do you suggest pre-drilling? the instructions don't talk about that.
I tried it both ways and this is what I found. When putting the screws into the metal bracket to lock it into place, the self tapping screws work fine. No need to pre-drill. When putting screws into the fiberglass of your camper, for example the bracket plates or the awning track, I found that pre-drilling was best. The ones I didn’t pre-drill didn’t go in straight and would shift the bracket just a little. Also, without pre-drilling the fiberglass I found I’d have to press really hard and spin the drill very fast to get the screw to start going in. Then it was hard to slow/stop the screw and I’d end up over tightening the screw and stripping the hole and the screw would just spin and spin.
If you’re going to pre-drill, most likely your bit will be longer than the screw is. Make sure you don’t push the bit in too far.
Just what I learned from trial and error. Hope this helps.
-Matt
I read all over not to install your brackets on the trim flange is it holding up ok?? It would be my only option with the awning also
Yes, it’s holding up great. It’s not on the trim though. It is in the framing. In the middle of the video I show how to measure down to be able to clear your trim and get the screws into the frame. The screws are too long and will go right through the trim and cause damage when you close the slide.
After dragging in tree debris yesterday closing my slide I am revisiting installing a topper. This looks like a home job. I don't have four months for the dealer to do it.
I hear you. The downtime at a dealer can be ridiculous. It’s honestly not as difficult of a job as I had originally thought. Hope this video helped out a bit!
Awesome video! Thank you! This gives us confidence to definitely do this ourselves. QUESTION for you......I notice that the topper is actually angling toward the RV when the slide is out. Should it angle away from the RV when the slide is out? Do the brackets that are attached to the slide need to be lower? Or is that impossible because of the frame....so it is what it is? It seems counterproductive to have it angle toward the RV.
Glad you found it helpful! You are correct. The topper should be angled away from the RV for rain run off. I’ve gotten a few other comments noticing the same thing you did. I think it’s a combination of the wide angle lens on the camera and shooting at weird angles that makes the video look like the toppers are angled incorrectly. 😂 In real life there is an angle away from the RV. To your second question, yes, the arms are adjustable somewhat. You can rotate them up or down to either raise or lower the angle. 👍🏽
@@RCRVadventures Thank you! 🙂
On the part that the fabric slides into, does it matter if the screws are showing or not.
On the version that I installed, the screws are showing. There may be other types that have a plastic cover piece to hide them.
Where do you find butyl tape with double stick qualities? I can only find one side sticky butyl tape
I found it at Home Depot. It’s sold in the roofing supply section. 👍🏽
Put me down as interested in how to videos. Thanks. I’m subscribed too.
Thats awesome, thank you! A lot of people have said that. I’m going to start mixing these type of videos into our channel in between our travel videos. Thanks for sharing with us!
Can you show the proper way to measure for the toppers, I have one that’s 861/2” wide?? And the second one is 1543/8” wide?? First one would be 7’ 1”. Second one 12’10” ??? Thanks for your help. GC
Hi George! That’s a great question. Honestly, I didn’t really understand the measurements at first either. There seem to be 2 different measurements when ordering. The fabric width and the bracket width (which is larger) While I’m not a professional, I can share my understanding of it. Measure the roof of the slide out. I would want the fabric the be that measurement to cover it properly. You could even get the fabric a little larger by an inch or two. If there are no obstructions close to the slide frame/fascia when the slide is in, ex. Another slide out right next to it, an awning arm, etc. You should be good to go. If, however, there are close possible obstructions then you will need the measurements of the outside fascia of the slide and the Total measurements of the topper. The topper roller arm and bracket stick out farther than the fabric. You want to make sure that when the slide out is in that you have enough clearance for the entire topper assembly not to hit anything.
This is just my understanding of it. I’m not a professional it’s just what I’ve discovered doing it myself. Hope this helps.
I bought a camper and the slides don’t have the protection, what can I do? Where do I buy them or what else can I replace them with?
If you’re referring to the slid toppers that I installed in the video, most campers do not come with them. They can be purchased on Amazon. The company that makes them is LCI. You will have to measure the length of you slides to order the correct size. Hope this helps. 👍🏽
I just watched this and I have a question. They look pretty flat when the slideout is extended. Is there any concern for water runoff when it rains? Will it pool on the canvas, or is it slightly at an angle so it runs off?
I think it may be the camera angle. Others have committed that same thing. 😂 Looking at them in real life, there is an angle for runoff. You could, presumably, mount the back track a little higher to get more of an extreme angle. You don’t want to mount them too high though as it may turn into a kite during high winds. Also, easier for debris to get caught between the slide roof and topper.
@@RCRVadventures Thank you for the response! I think that will be a project for next spring.
The pitch on the awning is towards the trailer isn't it supposed to be away from the trailer so the water drains off?
Yes, you are correct. It should be away from the trailer. Some of the video clips I shot with a wide angle lens and from weird angles to look more cinematic. 😂 It can sometimes change the perspective angles but the awnings are pitched away from the camper. Thanks for the call out though! 👍🏽
The track looks like it could/should be a bit higher up to create more of a slope - seems it would catch water vs shedding off. Wondering if it has been an issue?
You may be right. I always wondered why the directions didn’t recommend putting it higher. I just followed what they said. As far as I know, they haven’t had problems with pooling. It may be the minimum pitch needed to shed water while keeping the smallest gap to prevent wind and debris from getting under it. I may reach out to the manufacturer to get some clarification and make an update video as many others have committed on that very same thing. Has got me curious now. 😂 Thanks for sharing.
@@RCRVadventures great video by the way. If you have not had issue then I feel better about the pitch on mine - similar.
Flipping the track likely buys another 3/4 inch without exposing original holes.
Wouldn't adding more slope allow the awning to flap more going down the road? It wouldn't roll up as tight with slide in. I thought about that before I add 2 too my camper.
@@robertmoore8705 No idea - but agree - would not want too much exposed. How much is ideal balance - no idea.
How far should a fabric hangover the size of the slide out
I believe the instructions say to just measure the slide width and use that number but I prefer to have it 1 or 2 inches wider if possible. Remember, the wider the fabric the wider the roller and hanger arms will be so verify you have enough room. Especially if you have two slides right next to each other.
Thanks.
Glad you found it helpful!
Hey Matt what size Butyl tape did you use? Thank you for the video! I have the same camper was wondering how toppers would work with awning on slide😁
So glad you found it helpful! The butyl tape I got at Home Depot. I think there’s only one size. Don’t remember exactly but I believe it was around 1.5” wide. You can find it in the roofing section. Don’t be like me and wonder around the adhesive section looking lost. 😂
hello you didnt tell me how much overhang on each side how far past slide should the topper go and what kind of angle should the topper have. i have a gutter about 6 inches up from slide out that my son says i can use but i told him its not for a topper.. what about price... and color... what is the average cost and what is the best color for it.. and do they make topper ends that can attach to topper and side of slide out because our rain sometimes goes sildeways and rain gets in that way
Hi Karen. You have some great questions. As stated in the video, I’m not a professional. I’m just an RVer sharing a DIY project. I would suggest contacting Lippert to get accurate information. That being said, I can share with you my options on your questions.
The angle of the topper is measured by how high up from the slide the track is mounted. I believe the instructions say between 3-6 inches up.
I believe some gutters, (not all) have an accessory track that may be able to be used but only if your roof has a flat profile.
A quick Amazon search will help show you current pricing. They are priced by size. As for labor costs, I’m not really sure as I did it myself.
I’ve seen 2 color options. Black and white. There may be others that I’m not aware of.
I have not seen topper ends to keep rain out. From my understanding, the toppers are primarily to help keep debris out, not rain. Your slide roof should be built to prevent water intrusion by the slight slant in the roof and also the seals. If rain water is getting into your camper, it may be a sign that there is another problem that should be addressed first.
I hope this helps you. Again, it’s just my 2 cents. The most accurate info will come from the manufacturer.
Great video and entertaining. I have the same model I think, 368mbi. Did you have any issues when doing the slide that had the awning attached? Any tips would be appreciated on that slide. Also if we wanted more slope for rain run of do you think going 7 inches up would still work?. Thank you so much! Happy camping to your family
Hi Nathaniel. The only issue I had on that slide was having to notch out the bracket of the awning about an inch. Other than that everything was normal. Personally, I don’t see why you couldn’t raise it up to 7 inches. I was just following the directions but I have seen other camper toppers that look like they have more slope. I would probably give LCI a call and make sure there’s no issues with raising it up a bit. Thanks for watching and happy camping!
I was just watching your video and wondering, shouldn't the topper have more slope when the slide is out for rain run off?
I honestly thought the same thing. I was just following the measurements in the Instructions but I don’t see how it would be a problem to raise the track a little more to get more slope. That being said, so far the slope works fine for run off. Thanks for watching!
Any certain kid of butyl tape? Is all butyl tape sticky on both sides?
From my experience, yes, all butyl tape is the same. I’ve purchased at Home Depot, camping world and also a A/V installation warehouse and they’ve all been the same. Only difference seems to be the width of the tape. If you can get the tape the same width of the track or bracket it makes things a lot easier. Just cut to length and keep going. Unrolling a long section and cutting it to the correct width is not fun. This stuff sticks to everything. Doable, but not fun. 😂
Even after I watched your very informative video, and explained to my lovely wife. She still has her doubts about me taking this project on. How did you convince your wife you could do this install? 😂
😂😂😂 Years of practice. 🤣 I’m pretty handy and she has learned over the years to trust me when I take on a project. The scary part I think is drilling into your RV. That’s why I like using the butyl tape. You can place the fixture first and be sure it’s where you need it before drilling.
How do you adjust the tension when over time the awning may have some slack to it
Hi friend. There was nothing in the instructions about doing that so I’m not for sure. That being said, after doing the installation myself and kind of understanding how it works I can tell you what I would try. I would roll out the cover aprox a foot or so. Then, either replace the tension rod pins back in or bend a metal coat hanger and put that in. Anything to keep it from rolling back. You’d then have to slide the awning back out of the track, wrap it around the roll a couple times and then replace. All this is just guessing though. I would first call LCI and see if there is an easier way to adjust. I hope this helps get you going in the right direction. Wish I had something solid for you but I haven’t had to deal with that.... yet. 😂 Thanks for watching!
I think you’re pretty brave tackling that alone. I have to install one on my RV too. Where did you purchase them?
Hi friend. Thank you. I just think to myself, if I mess up I’ll have to learn a new skill. Like patching fiberglass. Lol. The toppers were ordered from Amazon. Helpful tip. Measure the slide width and then order by the fabric width. They give 2 measurements. Topper width and fabric width. Renzo ordered his by topper width and wishes they were a little wider. Alfredo ordered his by fabric with and as you see in the video they fit perfect.
Thanks for sharing with us and taking the time to check out our channel!
You never said how many turns to put on the springs to make the topper tight. They don't come tight out of the box.
The ones I installed came pre-tensioned. There is a clip on either side holding the tension. Once installed, you pull the clips out and it gets tight.
@@RCRVadventures Makes sense. I had to replace the spring kits on both sides of the 25' topper on my motorhome after 80+ MPH winds broke it while in Oklahoma.
Oh man, I’m sorry to hear that. Did it just ruin the springs or did it destroy the whole awning?
It was 2 in the morning when it sounded like a train hit the motorhome and glass shattering. The high wind had broke the front bracket of the 25' slid topper, sending the topper up and slamming down on the roof. The glass was from the glass covers of the LED ceiling lights being knocked out from the impact and breaking on the tile floor. And the topper tube continued to bang on the roof. So, while my wife was vacuuming up the glass, I went on the roof in the wind and sleet to free the topper tube from the motorhome. I cut the fabric as close to the motorhome as possible and with a big heave, through it up in the air. The wind took it about 75 feet south of our rig. The only thing I saved was the 25' tube and the brackets with the hex bars that are bolted to the motorhome. So I replaced both spring assemblies with the arms and the fabric. And it's not easy to find 302" long fabric. People ask me how my trip to Oklahoma was? I reply "Memorable".
Holy cow! Now that’s a story. Man you’re awesome. I love your description of your trip. Memorable. 😂
Who is Alfredo altanella???
Alfredo and Antonella are part of our RCRV crew. They are my brother and sister in-law. They are in most of our travel vlogs. I usually film solo when doing a “how to” type video. This was their camper I was installing on.