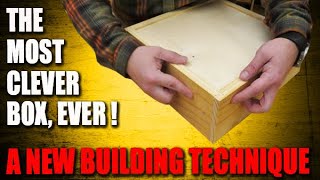
EASY router table finger/box joints without a fancy jig!

HTML-код
- Опубликовано: 26 сен 2024
- ★THIS VIDEO WAS MADE POSSIBLE BY★
Duracell M150 Portable Charging Hub: duracell.sjv.io...
Video about building the router table: • A little router table ...
More great woodworking jigs: stumpynubs.com...


★THIS VIDEO WAS MADE POSSIBLE BY★
Duracell M150 Portable Charging Hub: duracell.sjv.io/StumpyNubs
Video about building the router table: ruclips.net/video/VDEAZLF_seM/видео.html
More great woodworking jigs: stumpynubs.com/product-category/plans/
James, great idea but I do have a suggestion to make it better. You could mark out the measurements right there on the table. A fine point sharpie pen would allow you to mark out a ruler up to say 6". Just a thought, but I do know you appreciate helpful feedback.
i have a problem with to much linseed oil,on an oak floor, its very sticky, tried minersl spirits, been drying for 3 months
The beard adds plus 10 to crediblity and charisma
I just wanted to say the same. Looking good, man!
Truly, it's very Offermanesque!
It definitely buffs the charisma
20 if there are wood chips stuck in it.
"Beards are an affectation" -Dr. Beverly Crusher
Nobody is as precisely concise as you are. You are always on point and your explanations are sooo easy to follow. Thank you
My man, you gotta keep that beard.
A fine beard doesn't have to cost a lot of money.
@@DC9Vhe made it with a few scraps of wood and a straight router bit.
Stubble Nubs.
And he's lost weight!
He's also gained some weight.
Hair weight that is!
This must mean that his hair-to-bodymass ratio must've changed even more than perhaps first anticipated!
Very interesting indeed! 😋
Lovely simple setup, and very handy being able to cut the two boards at the same time
Nice job, James. Your presentations are always simple and easy to follow.
That’s an excellent technique Dude. Cutting mating parts together eliminates (in theory at least) the aftermath of sources of error. My best example is jointing two boards with a track saw, by placing one upon the other, making a single cut, and then just flipping the top board over. Even with error, you have complimentary surfaces to glue up.
BRILLIANT!! Cutting two pieces at ONCE!
Just made a jig to try this. As we British say best thing since sliced bread. It’s brilliant wish I had tried this idea before. Simple to make works perfect every time. 😊
I built a version of your jig. Finished my trial box today. Works perfectly! For ages I’ve wanted to make such boxes for scientific instruments and special tools but previous attempts with a table saw were rough as hessian underpants! Thanks for a much better solution 👌
That’s so freaking clever to cut both pieces together, even with my low level skills & my crappy home made router table I think I could now do finger joints. Thanks for another great video.
I hardly ever actually do anything I watch on a seasoned woodwork video. (I prefer green woodworking). But this one is so well explained, and seems so useful, I might just give it a try. Thanks James.
I’m not a woodworker and I have only ever used my drill to put together IKEA furniture. However, I LOVE your videos. I watch them before I go to bed and as background noise while I’m studying. Your voice is very soothing and your videos are really interesting. Keep up the great work! My grades depend on you lol.
Well done James. Simple. Loved the part where you cut both at once. Just I'm time for a long weekend. Now I just have to find a use for box joints 😂
I have a homebuilt router table in my table saw, this jig will work wonderfully on it. Thanks again for a great tool. I don't miss the floods and snow, but sometimes I do miss Midland and the surrounding area.
Well, bless your heart, James. Your beard looks great! This reminds me of quite a few years ago when you used to show us jigs and fixtures that you made. I really like this one. 😊❤
PERFECT TIMING! I need to build some new beehive boxes which are typically box jointed.
P.S. - Beard looks great on you, now see if you can grow out the moustache for a handlebar! Keep up the awesome work.
Your promotion on the Mpower sharpening station triggered me to order one from Amazon. It just arrived today and I’m pretty excited about it. Mind you in Canadian dollars it’s over $350.00 but comparing it to diamond stones individually it’s a good deal.
Here’s a tip you might want to make a video about. Regarding checking out long boards for straightness. I drilled three very small holes in a black plastic lid. I use it to sight down long boards It allows the eye to see both the close and distant ends clearly. Handy to take to the lumber yard. The lumber yard. I don’t seem to be able to send a photo in the comments.
Wish I had thought about this first, but glad you did and made this helpful video. Keep up the good work!
Once again, I'm unable to spell the sound of my hand slapping my forehead. Another terrific and well thought out tip. Thanks, Mr. H. Excellent beard, too.
Looks great, good info, and free.
This is brilliant!
Yeah, this actually just saved me some cash. Was about to go buy a table similar to this to do exactly this. Thank you. Also, the beard is grand. As a fellow beard wearer, have fun getting your airway PPE fitting properly!
So clever. Thank you for sharing James 🌞
Thanks James, I did one yesterday and used in my router table, worked like a charm.
Thanks, James! It looks so much easier than other methods. 😊😊😊😊😊❤❤❤❤❤
I love your tutorials!!! This is a great technique. THank you
Very useful. Thanks 🙏
Absolutely brilliant! Thank you Stumpy! 😁👍
Great project for my son and I. He can build a small box for Mom & Grandma
Happy Box Making everyone. James thanks for sharing with us such an easy-to-build and inexpensive jig.
The beard definitely working and the video is fabulous thanks 🎉🎉🎉🎉🎉
Rare find on YT indeed. You have to wonder if this guy was born a genius or simply had a lifetime epiphany with this one.
Love this little router table and this application for it and also that Duracell Portable Charger is actually really well thought out, I usually skpi past promos for things like that but this one I actually ended up watching so good job on that too
I was never sure about you honestly, but now with the beard I find you completely credible and commanding.
You're a doggone genius, man! You come up with some pretty cool projects.😃👍🏻
I really appreciate your videos. A true master craftsman that helps us regular people improve our skills.
You never seas' to amaze me . Thanks again Julien . Been working for years and always want to learn more. You are helping big time.
Cease.
This stuff is gold! Thanks Mr. Nubs.
Gave this a shot today. Having to fine tune even after careful set up. Doesn't come easy for me.
Excellent! Thank you so much
Excellent. Inexpensive, and works perfectly. I have a project for it in mind - more than one in fact...
Thank you.
Good vid/tip. Thanks James. Cheers, from Tasmania (Australia)
You are one clever guy! Thanks for these videos!
Great video thanks for sharing definitely going to make me one of these router tables and box finger jigs.
Genius. Both the box joint jig AND the mini-router table. This is exactly the type of content needed from folk who tend to claim 'expertise' in sawdust manufacturing, rather than turning into product shills. Some of the folk I used to watch are simply just ten minutes advertisements for whoever pays the most this week. Sad.
I am here to learn. New skills...YOUR skills...shared ideas and techniques that could possibly bring my skill set to a new level. These last two presentations of yours, James, bring to 'my' table a way to have a router table at work that doesn't weigh a ton or require a truckload of space...on top of now being able to present to a friend new to this game we love a way to mount her lil' Wen palm router to a table she can afford to build.
If we (the viewers) could rate presentations...you'd get a six outta five stars from me. Instead, you get a thumbs-up, and a long-time viewer eager for your next idea! Thanks!!!
You you you, and they're here to make money. Give and take sir.
This is a great setup. One thing that William Ng noted in his saw-cut finger joint jig video is that he developed his pin size based on the depth of a common drawer. The pin layout and cut kerf was cut so each pin was exactly the same size, without that little tab at the end. So, not to take anything from this setup, which, as I said, was great, but a deeper dive (Maybe a follow on video?) would be valuable to reveal the size router bit to use and jig to build to ensure precisely spaced pins for different drawer or box depths. I hope that made sense. Thanks, James, for making videos like this. 👍
You have that option on a table saw with a dado set, which is almost infinitely adjustable. Not so with a router bit, which only comes in a few sizes.
amazing, thank you
Nice. I made a table saw jig a while back but may give your router setup a try too. Wonder if you’ve done a video using finger joints for small boxes. Drawers with lids, it would be interesting to see some variations on that.
Thanks for sharing this.
Could you please do a video on painting cheap raw pine? (Like 2by4's I suppose, I am not sure as I am not American) I am making a simple project and I'd like to paint it white and I don't really know if I need to put a primer on top, what type of paint etc. etc. I'd like the wood to be completely covered, no knots nor wood patterns.
Somewhere I've heard that putting a few layers of shellac is a good primer, maybe you could comment on that as well. I think it would be very useful for those of us who want to use cheaper wood but don't really enjoy the look of stained pine.
Definitely going to try that out 👍
I haven't watched this video yet, sorry. I thought of you with a question, though. We put 2" oak slabs on our kitchen walls as shelves. The wood was evidently still very wet. One of the shorter shelves was cupped when hung. I used 1/4" L brackets as supports. Today, I noticed one of the screws is pulling out. I am assuming that as it dries, the wood shrinks. I'm at a loss. The shelves are finished, and trying to take the cup out would ruin it. We would never be able to match it well enough. Oh, great and powerful wood guru what can we do.
If the beard comes with Duracell ads, I'll take it! Bravo, great technique
Stumpy is married so you need someone else with a beard.
I guess that I'm going to have to buy a router now. Thank for the tip stumpy.
Thanks James
Nice work! Thanks.
Brilliant!
Brilliant!!! (And thank you!)
Smooth seque into that charger commercial...
Great job. Thank you 😊
Excellent, so simple
Very nice! Thank-you!
And the beard looks good!
Really? Just kidding😅
Deffo building one. thanks
Next video you do some angled attachment to make some cute with a dovetail bit
Looks like a pretty cool setup.🙂🙂
This could truly be useful. Thanks.
P.S. Don't have a table saw and probably never will. But I have a router and table.
Love this jig and I’m going to buy your sponsor’s (Duracell) charger.
Great video!
the beard looks great on you! and a bonus, a nice jig to add to one of my router tables. the little veritas table should be a good candidate for it.
So great!!!!
Well done!
Impressive!
Please add, "disconnect the power from your router" to your statement, "rotate the router bit in your fingers". Thanks, and as always, great content!
ps- I, too, like the beard!
But wait, James never told you to plug the router in, or how to walk to the shop.
@@kookiethebear I crapped my pants because he didn't tell me to pull them down when going potty.
Yea and for extra security turnoff the cct breaker too.
Y'all are cute. James makes it a point to stress safety measures in his vids. Just going with his flow.
Great idea
Thanks!...
Please note...for best results use a brand new spiral cutter 😊
What a great jig.
Awesome idea!
This same technique can be applied to using a dado head cutter in a table saw. I started using it about 30 years ago to make dados.
شخص متأدب و أستاذ جيد واصل.🤓
اللحية مناسبة لك😊
Always a great learning experience watching and listening to you, thank you so much!
I think I've watched everything you've got on this little table and jig and read most of the comments... but I have a question, and forgive me if it's been answered.
What is the big slot on the back end of the sled for?
That's where your clamp goes to hold it on the top of the router table.
@@StumpyNubs Doh! Ok, saw it at 6:35 in the first video now. Thanks!
I really like the router joint jig. Well done.
Thank you!!!!!!
Definitely going to build this. What would be the best type of spiral bit to get the cleanest cuts? up cut, down cut, compression?
It really doesn't matter much in this case. Either up-cut or down-cut will shear the fibers at an angle, which is better than a straight cutter. The direction of the spiral is useful for clearing chips (but that's not an issue in this case) and for minimizing surface tear-out when the bit is perpendicular to the fibers (but in this case the bit runs parallel to the grain.) I would consider what else you may use the bit for and choose the direction of cut based upon that.
Good video.
Very nice! 👍
This jig looks pretty nifty and worth trying. I’d like to see the video on building the router table but I always have trouble finding ‘THE LINK BELOW’ as it never seems to show. Any tips would help us old guys.
Expand the comment pinned to the top of the comments section
Great simple build well done!
Nice simple setup. Was waiting for this video since you mentioned about it in the video last week.
One question about the auxiliary base when using this on the full size router table. Why do we need a slot for the bit - will just a hole for the bit work? Or am I missing something. Thanks and always learning a lot from you.
Yes, a hole would be enough.
an oldie but goldie. Saw that on wood magazjne a decade ago.
Very nice. If I might add that a couple strips of teflon drawer slide tape would make your fence slide so much smoother.
Wax
@@StumpyNubs 👍
The beard is getting lots of ‘man love’ James 👍
Use a mdf sacrificial backing board if using on plywood
Would it be advisable to use double sided tape to keep the two pieces together after the initial cut into each one?
I don't think you need it. The indexing key holds them in place. You just have to make sure the bottoms are seated on the table.
Would this work with a 15mm (5/8") bit or is that too big?
Wow, the beard! It really works for you.
I think that’s brilliant. Probably do this on a router than a tablesaw.
Beard looks great!