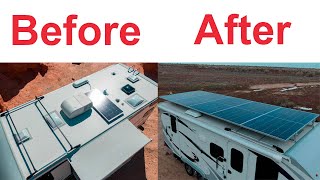
Revisiting the Best Way to Attach Solar Panels to Your RV - Part 1

HTML-код
- Опубликовано: 10 сен 2024
- This is a follow up video (part 1 of 2) where I revisit the "best way to attach solar panels to you RV". I go into more detail about how to install the system and I answer a lot of questions that I received from the original video.
This content is broken into a Part 1 (this video) and a Part 2.
Here is a list of the components that I cover with links to where you can purchase them.
(Disclosure: Some of these are affiliate links. If you click through and purchase an item I will get a small kickback at no extra cost to you. Any little bit I can make helps build the channel and is appreciated.)
All things solar can be found at Continuous Resources (Link - tinyurl.com/y2...) at good prices and with knowledgeable support. I have purchased quite a bit from Matt and he has been super helpful when I have had questions.
Specific Items:
210 Watt Solar Panels: tinyurl.com/y8...
Adjustable Solar Panel Mounts: tinyurl.com/ya...
Strut Channel: tinyurl.com/y8...
Strut Channel Cone Nuts: tinyurl.com/y6...
More info about my full setup can be found in another video titled "My Dream RV Power System" (Link - • My Dream RV Power System! ). Links to all components covered in that video can be found in the video description.
Music: Happy Rock from Bensound.com


I’m doing solar rails length of the Rv with L brackets ! Then add adjustable mounts to raise them ! I won’t have water puddles, I will be able to tilt them up ! And move them around! Im adding to your plan ! Cost is a little more but it’s going to work over some vents but fold up if I must use the vents !! All aluminum are the parts I’m getting ,cost is around 1400 for 14 panels 100 watts each
Good video just a note when your using or choose to use the 3M tape your talking about its super important to seal the entire area around the tape and over it with your dicor because the manufacturer recommends it because water will or could cause the adhesion of their product to detach from the surface encapsulate the tape ensures the bond to hold at it maximum capability.
Hi Brian. Very good information! Thanks for commenting.
Bruce on the part 1 thread wrote about installation on a 26ft Rockwood. Several people have mentioned success (or not)
with a stud finder. Although your RV has wooden roof trusses, many new light weight RV’s are all Azdel, aluminum/foam/aluminum sandwich which is laid down without any trusses. This applies to recent Rockwood models and other brands designed to be pulled with a half ton truck. Obviously if there are no trusses, they can’t be found by a stud finder or hold a screw. Owners should become aware of their construction (as you did) before drilling.
Azdel could be best approached with tape, since it is said not to hold screws well. Gaps as mentioned in the rails and tape would be required for water drainage, I think. Delamination of the flexible roof membrane due to aerodynamic lift might be a problem,, except on fiberglass or metal, but screw holes could be even worse if water gets into wood, or if they pull out of Azdel. Josh the RV Nerd talked about Azdel vs luan and wooden roof underpinnings on a recent video. Also, the center of gravity moves higher and load capacity is reduced by the eight of the added system, so, the lighter materials and panels have an advantage, IMO. .
Lots to consider, including the effects of any new mountings on a roof warranty.
Thanks for your thoughtful discussion and ideas.
Great idea this will be the way i do mine but i'll get the aluminum strut. Every time i have had powder coating done they sandblast it. If they do that your galvanized is gone and all you have is powder coating.
I loved the idea from your year ago video about using strut channels on the RV roof for solar panel installation and used them for my solar project on my 26' Rockwood travel trailer. I installed 8 x 100 watt panels mounted on 4-10' strut channels. I did have a problem trying to find my roof trusses - I couldn't reliably locate them even with a stud finder. I ended up using molly bolts to attach the strut channels to my roof. I placed a two inch wide strip of Eternabond tape directly on the roof before mounting the strut channels to minimize wear and tear of the strut channel directly on the roof membrane. The only concern that I have with my install is that water tends to collect on the center facing edges of the strut channels because of the natural slope of the roof and the fact that the strut channels are blocking the water path to the side gutters. I sealed everything up with self leveling sealant along the whole length of the strut channels (10') and so far it seems to be holding up well with no leaks after 5000 miles of travel.
Using self tapping screws... could have crewed through metal making a new smaller hole and used even fewer screws with better holding power per screw. But hind sight is 20/20. 😁
Fantastic videos. I'm preparing 12 210w panels for install on my rig in the next few weeks. Two thumbs up!
Wow Darin, that's a lot of panels. Good luck on your install!
@@travelnewtrails8232 yep, fortunately I'm putting them on a 36' class A so I've got the room. Up in Ogden just north of you!
Did you get this done? any insights? how is it performing? we are trying to get it done in two weeks.
Great video!!
I am about to do an install following your instructions. I am going to add one small change that i think may also help others. Because the roof of most camper is slopes to the sides to help water drain running long rails across it will possibly stop the good drainage it was designed for. By using deck2wall spacer to provide a 1/2" gap between the roof and the rail you are able to maintain the good drainage the roof was designed for.
my roof is not sloped
Did you attach the strut and the deck 2wall spacer directly to the trusses?
If you don't mind. could you provide the specs on those self tapping screws you used to fasten the strut to the roof rafters of the RV? Trying to decide on #10 or #12 and not sure about ideal length. Tried to look for that kit you got since you mention those screws came with it and you had a bunch of extras but the kits I found online don't show the fasteners.
The tilt mounts appear no longer available via Continuous Resources. Have you another privyder or brand name?
I used the 20ft aluminum slotted deep channel.
My Uhaul box truck has a virgin metal roof so I didn't want to put any holes in it. And my vents are hidden under the truck. Only thing visible is the mini split mounted on a hinge at the top of the back door. So I can have full width and height if needed.
So I had a company waterjet 10 - 1/8" x 6" square stainless steel plates with 1/2" bolt holes in the corner and 3 holes down the center to match the Unistut spacing.
Then I measured so 5 plates were equidistant from each other and 1/8" away from the aluminum roof, corner and rear door pieces. And drilled the holes went back and marine grade epoxied the holes with two coats and placed another plate on the inside to sandwich the FRP (fiberglass reinforced plywood) in between. Added a 14" Unistut post to the plates. Betwen bolts and plates and Unistut I used never seez. And then built my roof rack on to the posts. I have 10 - 440 watt solar panels up there. Total panel weight is 760 pounds. And 4 night vision cameras and 4 led work lights. And a glycol based solar panel heater in the winter so I don't have to climb up 12' and in the summer it cools the panels so they generate more electricity and store the heat for night and then run through a radiator to cool it more and back to the panels.
Thanks for posting a follow-up. I enjoyed Part 1 but can't find Part 2. I assume it is forthcoming soon.
Based on your previous video, I am installing aluminum strut channels with VHB tape on the roof of my Leisure Travel Van to support six solar panels. Because the roof system is an integral composite of fiberglass, plywood, foam and welded aluminum grid, there are no discrete roof trusses to attach to. I use five-foot lengths of 1.625" deep channels with a solid bottom to accept the tape. The roof of my RV is somewhat stiff though I have detected in a few locations some sag of about 1/16" which is problematic for adherence of the tape. I compensate for this with a vertical force on the channel during bonding as well as injection of an expansive agent under the channels. I have found that through composite action, the strut channels actually strengthen the roof.
I have done some load tests of the channels and have found they can resist over 400 pounds of vertical force for a 5-foot length of channel. I stopped the tests well before failure. For my application, this corresponds to a vertical uplift pressure on a solar panel of several hundred pounds per square foot - many times that expected during high winds.
Still to be on the safe side, I ran a small bead of 3M 5200 marine adhesive along the sides of the channels at their base. This provides additional bonding force as well as a sealant to protect the tape from getting wet as Brian points out.
The strut channel concept is very practical for retro reversibility in the future. And, if a future owner is not solar minded, the channels can be used to tie down kayaks and other gear.
Thank you so much for leading me in this direction.
Hi Daniel.
Part 2 is available now (ruclips.net/video/aO3SSkT4CwU/видео.html).
You are correct about the flexibility and modularity of the strut channel beyond just mounting solar. You can use it to mount pretty much anything such as satellite receivers (possibly even StarLink satellite internet receivers in the future), etc.
I am not able to get to the description for the name of the blue anchor nuts that attach to the Unistrut ., Can you please tell me where I can get them or what they are called ? thank you
Have you had any issues with tree branches trying to slide under the sides or strong wind trying to rip your panels/roof off since they elevated several inches above the roof?
If I cannot do a straight line of panels but need to hop scotch around fans and ac units, does the strut system have any advantage? I drive to 29 palms w high winds and need strength. I’m contemplating your strut system or placing 6 brackets per panel (6 panels).
I’m not going to tilt any panels…so that’s not a concern for me.
Excellent Video Thank you
Thanks for this additional info. Stud finder works you say? Didn’t even think that would work.
Is there anything you would have done differently? Do you have any leaks at this point? I saw this video awhile back but im now gonna try exactly what you did with the roof mounts.
Thanks for all the detail about your installation. I am preparing to use this methond on my Cedar Creek 5th wheel.
One thing I can't reconcile is that the adjustable solar panel mount kit available at Continuous Resources has two 22" mounts and two 28" mounts, while I can see clearly in your video that the roof and panel mounts are of equal length (apparently 28"). I contacted Continuous Resources about this and they assured me that your mounts are of different lengths - which is obviously not true.
Can you explain how you obtained mounts that are all of the same size? Did you use 2 kits per panel and only use 1/2 of the parts in each kit? At current prices that would be pretty expensive.
Super helpful!
Excellent video, thank you! I'm considering a box truck RV conversion and I'm wondering if the VHB tape would be best for that. I understand most of the truck boxes are FRP (Fiberglass Reinforced Plywood) or aluminum or some are all fiberglass.
Hi Paul. I've herd that VHB tape can work but I also have heard that you need to be careful about water loosening the bond over time. You would probably want to seal it with Dicor anyway.
It doesn't look like the Continuous Resources solar mounting brackets come with the self tapping screws you showed. It only comes with the bolts and wing nut things. Do you have more details on the self tapping screws?
Hey, I have a question, how do you deal with water run-off around the strut channels? Or is that not a problem if a little bit of water pools around the strut channel?
Was going to say the same thing. Water will pool and not run off into the gutter
I will be mounting solar panels and will use your methods. I can't find and do not know the name of the channel system with the movable bolt down locks that serve as the mount channel (which is bolted and adhered to the roof) for to solar panels. What are they called and where did you buy them? Also what adhesive did you use? I seem to find that 3m 5200 is most highly regarded. Can you tell me names of adhesive as well as mounting hardware and where to purchase with the disclaimer that you mount and use at your own risk
I wouldn't trust those nuts not to come loose. Maybe a backup safety strap? Awesome idea btw!
Thanks! I gut upon the roof before every trip and make sure they are tight. I haven't had to tighten them yet interestingly enough. They have stayed tight.
Question: I have a truck camper with shore power ,after installing my solar panels to my charge controller can I just connect directly from controller to my batteries? Bypassing everything that’s already in place.. ( inverter , shore etc)just red to red , black to black. Should I worry about anything?( lithium batteries)
In your situation I think that is the way it should be done.
Make sure your charge controller is compatible with lithium batteries.
Some arent
@@fredfried8786 thx, I was just worried about back charging the solar controller from the shore power and damaging the unit.
I understand completely. The solar charge controller,when connected directly to the battery,.
Also receives similar feedback directly from the battery,when used without the Shore power. If Your charge controller is low amperage, and you wish to upgrade later, you can add another identical charge controller to your rig and more panels. You can also boost
charging by adding a DC to DC charger, connected to your truck's battery.
This will charge your rig while
You are driving down the road,and let you arrive on site with full batteries.
@@fredfried8786 thx again, yeah I was gonna look into charging via truck. Taking a break after the solar hook up let my fingers heal a bit :)
Thanks for this informative follow-up video! I also have membrane on my roof which is the TPO kind and I was also wondering about whether you had screwed into trusses or not and how you figured out where the trusses are. My trailer is a Lance and I was able to call the manufacturer customer support line directly and they emailed me the blueprints.
Am doing similar on my Lance; will contact them about the blueprints. So I'm assuming finding the trusses went smoothly with measurements?
@@stevegodard4697 I haven't actually done the roof yet. I've been working on the battery/inverter components inside.
@@stevegodard4697 Steve: we’re you able to get plans from Lance? I’m about to try this approach on my Lance 1995 travel trailer. Thanks.
@@stevegodard4697 I just called Lance: she said she’d email them. May I ask what length screws you put in the roof?
👍👍👍
What's to stop the water from going underneath the track and down the screw hole?
The copious amounts of Dicor I put down and screwed through and then added again to the top of the screws. ;-)
@@travelnewtrails8232 I didn't see that part...
Thanks for the reply!
The mounting system may be good but the BEST way to use your solar panels to the full extent of their capabilities is to angle them towards the sun rather than have them lay flat. You can double their output. I'm using linear actuators to raise and lower them to align towards the sun, even better would be solar trackers that move the panel as the sun moves, but that's a bit too complicated for me at this time.
😂... those are tilt mounts. They are just laying flat at the moment. I have the same mounts as the guy in the video
Do you have a parts list, and where to purchase these?
Hi Thomas. Links to all parts can be found in the video description.
How do you find out exactly where your roof trusses are so you can screw the Unistrut channels down? EDIT: never mind, you answered it as I kept watching at 15:35. ruclips.net/video/aO3SSkT4CwU/видео.htmlsi=_n6wp4ODvEvO3mfZ&t=935
The channel and the nuts are no longer available on the lowes site. What are they called so I can find them on my own please?
C channel. Available in different sizes as well.
Thank you! Very informative