Это видео недоступно.
Сожалеем об этом.
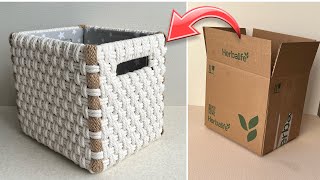
DIY Rainbow Organizer with Waste Cardboard |

HTML-код
- Опубликовано: 1 июл 2024
- Organize in Style: DIY Rainbow Organizer with Waste Cardboard!
Hey everyone, and welcome back to the channel! Today we're tackling a practical and colorful project perfect for anyone who wants to add some storage and brighten up their space with a rainbow organizer made from waste cardboard! This is a great project for upcycling and reducing waste while creating something functional and beautiful for your home.
Cardboard is a versatile material that can be transformed into useful and decorative items. And rainbow colors are always a fun way to add a pop of cheer to any room!
Here's what you'll need:
Cardboard (cardboard boxes in various sizes would work well)
Ruler
Pencil
Craft knife or box cutter (use with caution!)
Scissors (optional)
Hot glue gun with glue sticks
Acrylic paint (various colors - red, orange, yellow, green, blue, indigo, and violet)
Paint brushes
Craft paper (optional, for labeling)
Stencils or stickers (optional)
Let's get crafting!
Cut the cardboard. Disassemble your cardboard boxes and flatten the cardboard. Use your ruler and pencil to measure and draw rectangles or squares on the cardboard. You will need several pieces in different sizes to create the organizer compartments.
Cut out the cardboard pieces. Use your craft knife or box cutter to carefully cut out the cardboard pieces you drew in step 1. Be sure to cut on a cutting mat to protect your work surface.
Assemble the organizer. Use hot glue to secure the cardboard pieces together to create your organizer compartments. You can experiment with different configurations to create the perfect organizer for your needs.
Paint the organizer. Paint the cardboard organizer compartments any colors you like. The classic rainbow order is red, orange, yellow, green, blue, indigo, and violet, but you can get creative with your color scheme! Let the paint dry completely.
Labeling (optional). If you want to label your organizer compartments, you can use craft paper, stencils, or stickers to add labels.
Find a home for your organizer! Once your organizer is complete, find a perfect spot for it in your home. It's perfect for storing office supplies, craft materials, makeup, jewelry, or anything else you need to keep organized.
And voila! You've created a beautiful and functional DIY rainbow organizer with waste cardboard!
Here are some additional tips:
If you want a sturdier organizer, you can use thicker cardboard or reinforce the cardboard pieces with duct tape.
You can customize the size and number of compartments in your organizer to fit your specific needs.
Cardboard organizers are not ideal for storing very heavy items. Use your best judgment to decide what you will store in your organizer.
So grab your cardboard boxes, paint, and get creative! This is a perfect project for upcycling waste materials and creating a functional and colorful organizer for your home.
Don't forget to like and subscribe for more fun and creative DIY craft ideas!
#2024 #diy #best out of waste #cardboard crafts #Alan walker music #Ncs #Recycling #youtube video #Trending #Home decor #Idea #how to make #shorts #Recycle #Alan walker
DIY How to make keychain with clay at home 🏠🐢| Easy Tutorial:-
• DIY How to make keycha...


Everything is usefull with ur ideas 🎉🎉👍👍👍