How to Remove Drain Pump from LG Washer Detailed Instructions Step by Step Pump Repair Part 1 HD 4K

HTML-код
- Опубликовано: 19 окт 2024
- How to Remove Drain Pump from LG Washer Detailed Instructions Step by Step Pump Repair Part 1 - HD 4K
LG Drain pump repair
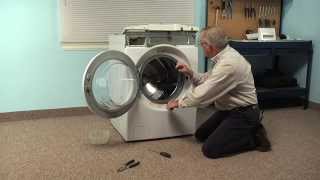
LG Washer Detailed How to Remove Drain Pump from LG Washer Pump Repair Front Load Part 1
Front Load
This how to applies to many models of LG washer
My LG washer model is WM2650HWA
WM2655HWA WM2655H*A
WM2650H*A
Replacement LG Part # Ordered: 4681EA2001T
Symptoms
Washer not draining
Weird sound during rinse and spin
This is a very detailed how to repair your LG Washer Drain Pump
DIY Repair of LG Washer Drain Pump
How to Replace Drain Pump on LG Washer
Lg washer drain pump replacement
Please watch part 2 of the video for detailed installation of the drain pump and trick - tip installing the metal ring! I used a bent camping stakes to install it!
This is a 4K Ultra HD video
Lg washer assembly
LG washer disassembly


![VICTOR Denmark Open 2024 | An Se Young (KOR) [1] vs. Gregoria Mariska Tunjung (INA) [5] | SF](http://i.ytimg.com/vi/Y3QEyCih85s/mqdefault.jpg)


You are amazing!!! I am a 60 year old woman and by the detailed instructions you have provided, I managed to do this by myself! I am impressed with your video and myself for that matter! Thanks :)
Great to hear! Thank you very much for the awesome feedback! I am so happy that it helped you a lot. Congratulations on getting it done... so cool!
Sister, 60 years old doesn't mean dumb and incapable. Congratulations for having the motivation and courage to actually take all that apart in any case.
😊😊😊😊😊😊😊aaaaaaaaaaaaaaaaaa
Wow I'm 63 yr old woman and you gave me enough confidence to do this myself bravo you are amazing thank you , I ordered my part. I had a repair person come prior to watching your video and he want it for 495.00 I thought there's no way undecided to do it myself thanks to you 😊
That's how to make a DIY video. To the point, no screwy music, he didn't yammer on and on. This should be a model for all RUclips video creators.
I give this a A++, 5 out of 5 Stars rating. Thank you for not wasting my time. Excellent video!
Thank you very much for the awesome feedback! I am getting better making how to vids and cutting out the bs and fast forwarding basic stuff. I really hope you looked at my channel and recent vids... oil change - brake jobs... let me know what you think- if you could check it out if so inclined...thanks a million!
cbatilo agree totally , thank you sir
Replaced my LG pump yesterday thanks to this video that made it headache free. Pump was $41. From Amazon and wife couldn’t be happier.
You just saved everyone here a lot of money. Thank you!!
Thanks for posting. Directions worked like a champ I have a WM2501HWA. Same part. Didn't need to remove the whole pump assembly. Just loosen from mount and removed the 3 screws holding the motor from assembly.
Thank you!!! Thank you!! Very easy to follow instructions!!
Thank you for your Video! With your help I was able change out the drain pump and fix my wife’s washing machine with ease. Happy Wife happy life! Awesome job man!
I give you an A- because of your "reverse the order" instruction at the end ;) No really though, just fixed my washer. Leaving for a trip and couldn't possibly leave the family without a washer! Found the pump online, miraculously showed up the next day UPS and fixed it before and after taco dinner! THANK YOU!
Thank you very much for watching and feedback. It is appreciated. Happy to hear you got your washer up!
You're that guy, pal. You help people, you're the guy who helps.
Thanks. Great video. I actually took the 3 screws out of each pump and pulled them apart. They were full of sludge. Fixed my circulating pump noise.
Thank you for making this video! Life saver..
Great video. Thank you...
Thanks for a great instructional video. I paid 275 dollars last year to have the drain pump replaced on my LG washer. I decided this time to do it myself. Your instructions were perfect and saved me some serious cash. Whilst doing the repair, I discovered the previous "technician" forgot to replace all of the parts, tighten screws and used a generic cheap pump. Thanks to your instruction, the replacement went quite well. Thank you.
Thank you very much for watching and feedback! Really appreciate it.
Fantastic. Thanks for posting! Saved me a couple hundred bucks rather than calling those an appliance repair
I did splurge the $20 on a spring spreading tool to get that retainer back on......totally worth it
This video was a life saver for my family. Had my washer on warranty, had a tech out here who diagnosed it. Then I was rescheduled three times for the actual repair job, each one a week apart. The third time they tried to reschedule, I told them to sod off, and did it myself with the help of your video.
So sorry to hear about your service experience... what a bummer. Glad you did it! Happy that it is up and riunning! Awesome! Thank you very much for taking the time to leave feedback, watching and letting us know.
Disassembly instructions are perfect. Pump was definitely bad, and was simple to replace.
I never comment on videos, but this was super helpful when I replaced the drain pump in my LG washer. Different model, but most of the same steps. Thank you so much!
Thank you for watching both videos... thank you very much for leaving feedback, it really helps our channel!
A big THANK YOU. Just enough detail in the video. Perfectly concise. The clip behind door was really tight in my machine. I had to pull it down with pliers while pushing the pin in.
This how-to video is clutch! Thank you so much for making it.
One note: My LG washer had the drain pump mounted differently than the one seen here. Instead of clipping to the floor, mine was mounted to a steel plate that attached to the floor with three long 10mm bolts. These bolts were easily removed using a socket wrench with a short extension.
Straight to the point , no silly music , no yammering on and on , five stars ⭐️
Thank you so, so much Charlie! Your detailed videos, parts 1 and 2, were exceptionally detailed in showing how to make this repair. After doing some of my own troubleshooting on the LG site, which included checking the drain hose and drain filter, the next step on their website was to call a repairman and have the drain pump replaced. Nope. Wasn't going to go there, if I could repair it myself! I'm not afraid to dig in and repair things myself and finding your videos made the repair super, super simple! I had my husband look at your videos and we tag teamed the repair. He's grateful for your detailed videos, as well. I shared pictures of our progress of the repair on an extended family group chat. One interesting thing we found behind the front panel was a small dual tip screwdriver. We've never had the machine serviced, so it's been in there since it was initially manufactured, back in 2006! 😲 In the words of my stepbrother, Brian, "Only thing more satisfying than doing your own repairs is a free screwdriver." 😂 Yep! Thanks, again!
Congratulations n getting it done! Awesome find with the screwdriver… lol. Bonus… thanks for the awesome feedback! Really appreciate it! Knock on wood… my matching dryer gave up 2 years later (after pump repair)… save it Ye dryer video (follow it when the inevitable happens)… thanks again!
@@cbatilo I will definitely look up your dryer repair video if it needed!
Good video. I was able to take your directions and modify it a little and I was able to replace mine without taking off the top and front of the washer. I tilted the washer back against the wall, put something under the front so it couldn't tip back on me and I was able to change it from the bottom. Saved a lot of time that way and I didn't have to take the door seal off.
@james tackett - we need you to make us a video of your mod!
You are really amazing, because of you only I am able to resolve pump issue in my machine. My machine is 10+ years old. I am very happy to using my machine again.
Great help !!!!! Thanks
Thank you very much for watching and for taking the time to leave a positive review! Really appreciate it
Incredibly helpful! Thank you!
wow thank you , this will make it easy for a friend of mine to fix, i need to go look at my model number, and then i see you listed the pumps part number, thank you so much
It worked like magic for me! I have a 11years old LG wm250 model which shows OE error code,and I was wondering between buying a new one or repair. I watched your video and felt it was simple to follow. Ordered the pump and followed through! Felt good about myself but a big thank to you!
Thank you much, your two videos were right on point. My model was slightly different, but that didn't matter much at all, enough ofthe same thing that this was perfect. I had to refer back to your video once to verify, but that was the greatness of this. You all did a grat job with this video, thank you much!
Thank you very much for for watching and feedback! Really appreciate it!
Well done. Every step completely described. I do wish all YT vids were like this!!
Thank you very much for posting this video!!! You saved me a lot of money since I was able to do the repair myself with the aid of your video.
Thank you! This video helped me a lot! Looking forward to your second video about installing the new pump once it arrives.
This is an excellent video for someone that has never done a repair like this on an LG washing machine. My advice to everyone is that the second you start hearing noises like a grinding noise when the drain pump is running order a new drain pump or schedule service right away. What happened with my pump was that the impeller was pushed out and if it had continued to push out it would have snapped off just like you will see in part 2 of this repair. Btw, my LG had two motors on that drain assembly so the mounting bracket is one aluminum base plate that screws to the chassis of the machine so your only option is to unbolt the base plate before you remove the power wires; there was no plastic bracket to unclip from. With the part in hand, I got everything done in under two hours. Excellent video. Thank you!!!!
Hey. Great video but after watching several videos and a little research I have discovered another way to R&R the drain pump. Simply go thru the back. It’s a little contorted but it’s way easier than taking the front of the machine off. Simply because you don’t have to screw with the door seal. Remove the back access panel take the hoses off so you can see and remove the two bolts that you can see from the rear then take the filter cover and plate off the front. This is where it helps to be a little bit of a contortionist. Reach your hand with a 1/4” drive ratchet with a short extension and a 10mm socket up and over the plate (it’s a little tight I have large hands it’s doable) loosen the last bolt and BAM your assembly is loose slide it out the back. Install the new pump and reverse the steps. Again great video and I was just about to go your way. Hope this helps someone
Im going to give it a try! I replaced it once years ago and thought I could do it that way. This time I will try your way! I'll let you know how it goes, it arrives in 2 days.
@@whateverthedaybrings2268 how did it go?
@@TC-lw2rp I opted for the longer way. It was actually pretty quick. I used my dewalt impact and ratchet wrenches. If you don't have the luxury, it may be worth trying the other way.
Thanks a lot. You just saved me a lot of money. Your video was very instructive and easy to follow. 😊
Thanks so much for taking the time to make this video!
Super useful video thanks, followed this without a problem
We wanted to thank you for making the Part 1 & 2 Step by Step Pump Repair videos. My son and I were able to follow your step by step videos to repair the washing machine for $100CDN instead of purchasing a new one or paying $500 for a service call. We will search RUclips in the future to find How to videos but feel none of them would be as good as yours . Thank you again
Thanks so much for the video and your time. Followed your instructions and I was able to change the pump. Washing my second load already. 😊👍
Great video, it was very helpful. Oddly enough, the hardest part of that replacement was getting the white cap off the pump.
Really helpful! Helped me check for stuff blocking that huge currogated black hose. A piece of cloth turned out to be the devil.
For those with a leak in this area I included my issue I just fixed at the end of my comment
Thanks for the great video, it helped me get easy access to diagnose my issue and even if like mentioned by another comment you can access from the bottom this is one of those things that taking a lil bit apart makes worlds of difference in ease of access. That spring wire (or at least getting it back on) is the hardest part of all of this.
For others with a leaking issue like I had at the front left corner it ended up being the spring clamp holding the main rubber tube from the drum to the pump that had rusted apart and was no longer holding tension, a new hose clamp and it was sorted out.
Thank you for the feedback. Awesome share with the other issue (you encountered) and the fix you applied. It will help others...
This video saved me so much money! I got the replacement pump on Amazon for $33 Canadian. Thanks so much for posting this video.
Very detailed and to the point!
I know this is an old video but it helped me on a newer model. There were a few differences but with this video it helped me a lot to figure it out. Thanks.
This video is just gold! Very well done! I have a problem with the pump and will use this video as a guide. Subscribed!!!
EXACTLY what i was looking for. Thank YOU. Cheers.
I did way less dismantling by accessing my pumps from the large hole under the washer. Just laying the washer on its side on a towel. Helpful video thanks.
Jeff Cutten that's exactly what I did great minds think alike
Should have done that, putting this o ring back on the gasket is kicking my ass
Me too
Thanks, this video helped me fix my washer
Outstanding video. Easily, the best "how to video" I have seen or used on youtube. I have worked on many appliances, cars and other equipment for many years but at my advanced age the memory and comprehension ain't what it used to be. But your video made this so easy. Glad I also watched your installation video for this pump as I too had trouble with the retaining wire for the door gasket and your idea for the tools to stretch the spring made me think of my old trampoline spring tools that are basically the same thing...hook with a handle on it. Thank you very much again and great job.
Great video fixed my junk here thanks 👍🏻
Good video. My model had the steel mounting bracket. You have to remove three bolts in order to pull the pump. Also, it's easier to pull the screws holding the face in place then lean it out slightly to pull that electrical plug behind the door latch. The clip released a different way as well.
Yep lol we have model WM4270HVA
10mm socket for bolts
Thank you sir! Great job explaining the LG Washing Machine drainage pump removal. Loved it. Quick and to the point. Thanks for taking the time to share it.
Glad it helped Thank you for watching and feedback. Really appreciate it.
Fantastic video! Superb step-by-step instructions. My drain pump went two days into Coronavirus lock-down and my wife wouldn't let a repairman inside our house. It took a little while to make the fix as my pump was attached to the washer a bit differently (3 socket screws). With your excellent video, I was able to easily take the washer apart, replace the drain pump and put it all back together. No leaks, no problems, clean socks and a happy wife! For future RUclipsrs who find there way here, Amazon sells a Washing Machine Expansion Tool which is about $20 that really helps when you have to put the round gasket spring back on.
Thank you again!
Todd Cooper same here went out today day 7 of lockdown with 5 kids a baby, 2 dogs and 4 cats lol need it fixed. Ordering a pump now. Great video
THANKS FOR THE TUTORIAL ILL JUST FIX MY WASHER BY LOOKING AT YOUR VIDEOS.
Nice!!! I have to replace the pump. Now I know how. Thx u
I couldn’t have done this without your video instructions! They were fantastic! Thank you so much! The washer is working great now.
Just replaced the drain pump on my Kenmore (LG) washer. Good instructions in this video. When you order the replacement pump, be sure to order the pliers to reinstall the drum boot spring and wire. It makes the job MUCH, MUCH easier. Good video, thanks.
Thank you very much for watching and feedback
Great video, man. It helped me out a ton. My washer is model wm8500. A little different than yours, but your directions were perfect, aside from a PITA motor assembly mount that was bolted down rather than have the sweet easy clip. It was obvious on how to get it out, though. Thanks for the awesome, straight forward instructions. Managed to slice myself fighting the front control panel. Looks a little earlier than your cut. Lol. Remember, if you're not bleeding, you're not doing it right... or at least that has been my experience, mostly.
Thank you very much for watching and for the awesome feedback! Lol… i have 90% chance of bleeding… on going joke between me and my wife. I call it donation. I got two cuts as I was doing my latest video- installing ems - hardwired surge protector in my Keystone Cougar RV. Vid has been posted… Anyway, thanks again
Thanks, replaced my pump, works perfect!!
Thank you for creating this video.
Thank you so much. Your video helped me save hundreds of bucks.
Thanks. Took a couple hrs...good as new!!
Appreciate you. Thanks for making these videos. I followed them and changed my pump no problem.
Big Jerm thank you very much for the feedback! I appreciate it very much! It helps our channel grow
All the money I save watching RUclips tutorials🔧🔧
I just changed my own drain pump. Thank you so much!! I love learning how to do things myself.
Thank you very much for taking the time to leave this feedback! It really helps our channel! Thank you - thank you! Awesome to hear you got your running again!
Great step by step video. This worked perfectly. The only hitch was getting the gasket and spring back on without the tool designed for it. Getting the gasket seated and slowly replacing the spring and working it in with a flat head screwdriver did the trick.
Dude, ive been trying for like an hour to get it back on! lol it keeps popping the other side off, right when I'm super close it pops again : [
We have a Kemore washer/dryer we purchased from Sears in November 2010. In June of 2014 the washer pump broke. My wife had it repaired for a total of $295.00. It broke again a few days ago, and since i’m more of a DIY I started looking how to do this myself. I studied your wonderful videos part 1 and 2. I got from Amazon a OEM washer pump for $27.80. Spent about half a day putting it all back together. WOW, wonder what they would charge today???? Thank you so much…… I owe you a Beer….. 👍👍👍
Thank you very much for watching and for the feedback! Lol RE beer… I’ll take a couple virtual pint of stout or pliney (Russian River brewery)! Thanks…
Very good demonstration. Thank you very much!
Saved me significant time and more importantly some guessing.
Thank you.
Thanks for the video it helped a lot. My machine is about 10 yrs old but was pretty much the same except taking the pump out. Instead of a retaining clip mine had three bolts mounted thru a metal plate. Just got putting it all together and running first load. Fingers crossed.
You are the man! Thank you for this quick, detailed and straight-to-the-point video!
Great video!! Easy to follow steps and I was able to get my washer up and running again in no time! Much appreciated for your detailed footage and great instructions!! Very grateful!!
Happy 2023 & thank you cbatilo
Happy New Year to you too and family
Thank you so much, so detailed and helpful the video is. 😊🌷🙏
Great video and easy to understand and see what needs to be done. Well done.
I want to say this is a great video.
First of all I am a pretty handy person( I’m actually a licensed electrician and I was a licensed plumber for years but I couldn’t have done this without your help. A few things to mention
1. You may need to have a new main(black hose) drain hose handy as over time the end can tear and there isn’t a lot to work with.
2. Have some 2”-3” standard hose clamps(screw types) on hand as the cheap ones that LG or whirlpool supply from the factory can be very difficult to open and put back on in confined space under the drum.
3.As for the note from someone saying to try to do the repair from the back, I wouldn’t try it. There is a lot of sharp unfinished metal inside of the machine.
4. Have some help to put the retaining ring and spring back on the door seal. It is not easy. Get the seal completely seated, put the ring on from the top first and have the spring centered on the bottom. Have someone hold the left and right side so the ring does not come out of the seal while you use a flat head screwdriver to pry the spring side of the ring down on to the bottom of the seal.
5. DONE
If you have spring pliers or know someone that does, you won’t need any help unless your dryer was stacked on top of the washer and you need to put it back.
Thank you so much. Every step was included and I was able to fix my washer. Great video!
Thank you very much for the feedback! I appreciate it very much! Great to hear you got it fixed your washer - up and running! Cool!
Great DIY video - thank you
Thank you so much! Great video!!!
Thank you so much, I just replaced new drain pump. This video is really helpful
Thank you very much for watching and feedback? Really appreciate it
Thanks guy you saved me a couple hundred bucks and saw your review on Amazon and how you said the name of your RUclips and saw pictures of those cute little puppies which cracked me up because that’s probably them chewing on a little toy that squeaks during your video ,too cute. Excellent video by the way.
Please add me to the list of “satisfied customers”. This video was easy to follow even though I didn’t have the exact model as yours.
One thing I might add is to invest in the tool for the spring retainer ring for the rubber gasket. Bought a third party tool for $11.
Couple of hours wasted trying to do it by hand. With the tool, 5 seconds!
Hope this helps someone.
Very well done! My same model # washer had a different assembly to mount to. Also, had a VERY slight difference in the screws. But, your instructions were absolutely on-point. Well done and kudos. Hardest part was getting the 'gasket' spring back on. Like you, it took 2 of us. Back in business and saved a bunch of $!!!! Thanks again!
Thank you very much for watching and feedback! I really appreciate it! Glad to hear all worked out!
This helped me so much. Thank you!
Glad it helped! Thank you very much for watching and positive feedback
I just saved $500 not buying a new washer...I was driving nuts trying to disconnect the motor before i saw this video...this video really helped a lot ... Thanks for posting!
Thank you very much for watching and taking the time to leave a feedback! Really appreciate it! Great to hear you got it working!
The squaky noises in the background were the best 👌
Wonderful video_ very helpful. THANK YOU
Very detailed and well done! Made the repair easy!
You saved me a ton of money. Thanks for the detailed instructions.
Thank you very much for watching and giving the feedback. It is appreciated!
Thank you - this helped me through it. Heads up everyone - expect minor variations with your unit. Mine didn't have the 2 screws at 4:30 securing the pump in place - instead it was mounted to a metal plate and I had to remove three bolts (get the metric 1/4 sockets out) -Also if your drain hose has small metal tabs on the spring clip - pick up a set of cheap hose clamp pliers before you start if you want this to go easy. I also recommend taking a picture of the wire connections and the orientation of your pump before you remove it. - Put it back together once ! good luck.
Thank you very much for watching and for the feedback! Great info to add!
Thank you for this extremely helpful how-to video! As others have commented, this is very doable and much easier than working on other appliances.
Two challenges came up that I figured out how to overcome without breaking anything so I wanted to share what I learned in case others might find helpful ...
1. Having different size screw drivers was a must for me because ...
- My machine is in a tight space (needed a short screwdriver to get the ones in the back)
- The five across the top of the door panel needed extra leverage which I got from a right-hand ratcheting screw driver; they have hex heads so a small socket would work too.
- The screw right below the pump assembly and filter was tricky too because you have to come at it at an angle (had to try a few screwdrivers to get it).
2. Getting the power to the door lock power disconnected was tricky. (2:57 - 3:11)*
I found the tab OK, but I had to press it and wiggle the connector back and forth somewhat aggressively to get it loose.Tight space may have been an issue here because I could not open the door past 90 degrees.
*RUclips indicates this is the most replayed portion so it others may have struggled with this too.
Great video, thank you! Second time I had to replace, but installed OEM part this time :)
Thank you so much! My machine is UK and a bit different but I've fixed it with your help. I'm so chuffed!
Callie Catchpole thank you very much for the feedback! It is very much appreciated! Cool to hear this video helped!
Great video! I had the same problem I followed your directions and replaced the pump in less than 25 minutes. Up and running thank you!
c p thank you very much for the feedback! I am happy the videos helped! Have a great Thanksgiving!
thank you! just replaced mine. couldn’t have done it without you!
Thank you very much for the feedback! Really happy to hear the vid helped.
Thanks man just the video I needed !
Great video. Very helpful. Appreciate it.
These very good instructions enabled me to accomplish changing the drain pump on a similar LG Model WM4270H*A. There were a few differences - 6 screws on the top front panel and a mounting bracket on the drain pump. Also, you may want to use a socket wrench as some of the screws tended to strip - they were very tight on my machine. Thanks for posting this video!
Excellent detail. I have LG model WM2277HW which is very similar. Instructions were so clear the repair was easy. My washer has a second pump, called the re-circulation pump, which is attached to the other side (right side) of the pump housing. When you remove the pump housing both pumps are attached. You don't see it in this video so apparently not all models have it. Re-circulation pump looks very similar but is shorter and has a blue and black wire. The drain pump has a brown and black wire. I point this out so you don't remove the wrong pump from the pump housing. It must not fail often because I find very little information on the need to change it. When reinstalling the metal ring around the door seal I simply used a large pair of needle nose pliers (vice grips would work too) in my left hand and pulled against the spring. About 300 degrees of the spring can be replaced. While pulling against the spring use a flat head screwdriver to pry the remaining ring into place. See Steven Leong comment below for similar solution. Thanks for the great video. Saved me about $300.
Thank you for watching and for the input. Good stuff to point out. Thank you again.
Thank you so much. You are the greatest instructor. God bless you and your family.
Thank you very much for the feedback. Really appreciate it
You are amazing for taking the time to help others with this video. Thank you so so so much!!!
Thank you for the video. Although I was born with two "left hands", I was able to remove the drain pump, without much effort. Very appreciative for the detailed images.
Fernaldia Pandurata Woodson thank you very much for the awesome feedback
Fernaldia Pandurata Woodson thank you very much for the awesome feedback