Looks great, your little girl should be very happy. Just a tip for the nail holes, mix Glue and Sawdust together then sand. Great idea with the shapes, much better than stickers,
Thanks George I tried the glue and sawdust and didn’t like the look. Glad I went with covering them completely in the end though, think next time I’ll use resin with sawdust or maybe clear resin.
Very nice project, and I admire your dedication making that out of pallet wood. I have saved some pallet wood but I plan to just make rustic stuff out of it.
Hi, I use pallet wood for all my projects, I also fill the nail holes with dowels but before I do that I drill out the hole with the same size drill as the dowel so their is no danger of splitting the wood and also it makes the repair look much better and sometime you cannot even see where the dowel is.
Thanks Michael it did take a long time! Was worried about the video being so long but wanted to get it all in. I still skipped a few bits of the build.
Great job I am sure it's going to get plenty of use and a bit more hammering. Once you finish the chairs you should make a small drum she seems chuffed bang on the top of it.
Thanks Alasdair I know what you mean about the templates, I’ve taken a couple of chunks out of some of them! I think the key is to take a few shallow passes.
Thanks mike. It’s ok for the money, leaves a decent finish but the fence is a bit flimsy. I tend to use my table saw jig more for jointing and the Titan for flattening and thicknessing. I’d say you get what you pay for really!
Happy Wife Happy Life ok thanks will do you have a email adredd as I have a few questions im a total noob I have same table saw and jointer as you would be very helpful love your channel very good videos you do
Thanks Darren I was a bit annoyed to say the least but managed to use a syringe to pull out a lot of the colours that had run whilst still wet so in the end it’s not very noticeable.
Hi and good evening, we have spoke before, I’m Danny I live that insert plate u made for rag n bone (Keith) I have tried myself so many time to make one lol, I want to do videos myself but real nervous lmao, I will soon, I have s collection off stickers now so may be first project is to make a nice sticker board? I think lol, love ur videos, I’ve watched all of them lol


Top notch, really well done and well described. Look forward to the chairs. Thanks!
Thanks
Looks great, your little girl should be very happy. Just a tip for the nail holes, mix Glue and Sawdust together then sand. Great idea with the shapes, much better than stickers,
Thanks George I tried the glue and sawdust and didn’t like the look. Glad I went with covering them completely in the end though, think next time I’ll use resin with sawdust or maybe clear resin.
Now that's a great idea resin with sawdust that's something I will try
Very nice project, and I admire your dedication making that out of pallet wood. I have saved some pallet wood but I plan to just make rustic stuff out of it.
Thanks I thought I’d set myself the challenge and if it ended up a bit wonky I could blame the palletwood!
Hi, I use pallet wood for all my projects, I also fill the nail holes with dowels but before I do that I drill out the hole with the same size drill as the dowel so their is no danger of splitting the wood and also it makes the repair look much better and sometime you cannot even see where the dowel is.
+John Fithian-Franks thanks for the tip.
Great job, mate. Glad it all worked out as good as it did.
It passed the end user test with flying colours...
Thanks Bill, yes she loves it!
Good job and a lot of work.
Thanks Michael it did take a long time!
Was worried about the video being so long but wanted to get it all in. I still skipped a few bits of the build.
Brilliant job the inlay idea is brilliant and the result is worth the effort I think - how long did this project take to complete
+Andy Marriott thanks it took quite a while; probably about 20 hours. I’m still making the chairs but progress is slow due to family commitments.
Another great idea!
Thanks Steve! Hopefully see you soon.
Great job I am sure it's going to get plenty of use and a bit more hammering. Once you finish the chairs you should make a small drum she seems chuffed bang on the top of it.
Thanks Cliffs the drum’s not a bad idea she seems to like whacking things at the moment!
Fantastic project
Thanks it’s being well used.
Nice one! Rewarding too. I have the same letter templates -
they're okay if you're careful with them... Looking forward to the chairs! All the best.
Thanks Alasdair I know what you mean about the templates, I’ve taken a couple of chunks out of some of them! I think the key is to take a few shallow passes.
bit of a coincidence, was looking at that glue with activator at screwfix. Do you think it would be good for uvpc fascia joints and corners?
Yes should work well. I’ve used it for UPVC trim round a door frame and sticking plastic trim to laminate floor.
Great, thanks! nice job
good build,now that you have had your titan thicknesser for a while how are you getting on with it as in how accurate ect
Thanks mike. It’s ok for the money, leaves a decent finish but the fence is a bit flimsy. I tend to use my table saw jig more for jointing and the Titan for flattening and thicknessing.
I’d say you get what you pay for really!
Yep, the fence is flimsy on those. I tried to make my own out of plywood, but it wasn't much better. will have another go at it sometime.
forgot to say good tenon jig
Amazing table where did you get the letter templates for routing from please im making a toy chest.for my.daughter
Thanks I got them on Amazon I’ll put an affiliate link in the description. If you buy through the link I get a few pence!
Couldn't find them on amazon anymore so put a link to the company's website.
Happy Wife Happy Life ok thanks will do you have a email adredd as I have a few questions im a total noob I have same table saw and jointer as you would be very helpful love your channel very good videos you do
Great video and project. It hurt to see the resin leak and I assume there were a few choice words. The final piece looks fab though. Cheers.
Thanks Darren I was a bit annoyed to say the least but managed to use a syringe to pull out a lot of the colours that had run whilst still wet so in the end it’s not very noticeable.
Great job
Thanks Ian.
Brilliant Mate…
Thanks matey.
Hi and good evening, we have spoke before, I’m Danny I live that insert plate u made for rag n bone (Keith) I have tried myself so many time to make one lol, I want to do videos myself but real nervous lmao, I will soon, I have s collection off stickers now so may be first project is to make a nice sticker board? I think lol, love ur videos, I’ve watched all of them lol
Thanks Dan good luck with the sticker board.
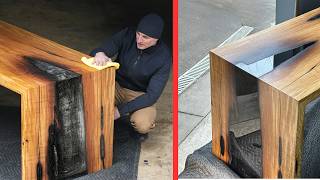
The table came out very nice with the inlays but it seems to be a lot of work with the epoxy sanding.
It was a fair amount of work but when I switched to the angle grinder it removed the excess very quickly!
good job
Thanks Leon.
Likedddd
nice video =)
Thanks Simon.