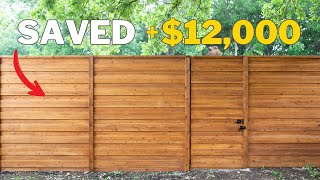
This is hands down my favorite fence diy I’ve seen so far. paid $7k 2 years ago for fences at 2 properties. Will be trying this at our next! Looks SO much better than vertical shadow box.
im a bit of an over thinker so seeing how casual you made this look and how off the cuff you seemed to be with this construction it put my mind at ease with my fence project so thanks
Really appreciate that. The reason I keep them short and sweet is because I watch so many DIY videos that make me want to stomp my phone with all the nonsense and bad editing LOL mine aren't perfect but at least I'm not waisting time
Glad you put primer on the base of the posts. Amazing how much wood deteriorates without some form of protection. At some point you'll get a crazy rain storm and everything will saturate.
Hello I’m sorry I didn’t wAnt to say this but I must say many photos stole your and make fake accounts doing fraud scam why didn’t you do action for them on TikTok on instagram you know it or you didn’t know nothing please do something 🙏
Arizona here as well. I’m on the golf course and I need to separate my side patio so once in a while, I can be in the backyard without golfer, staring at me. Love this design and aesthetic. I think my only change will be HOA friendly color for my house and instead of landscaping fabric between, I’m just gonna offset/stagger/overlap the horizontal slats on either side so you can’t peer through. I’ll space the posts at 5 feet. If I get sagging overtime,I’ll use fasteners with torx heads so it’s easier to replace. 🤙
@@enzprintco.8625 that’s awesome dude. My experience(especially with their 23 gauge nailers) has been overwhelmingly negative, so his comment made me chuckle. I’m glad to know not everyone has my luck.
Hey brother. I followed your video and used everything you used as I loved yours. Same exact everything even Cabot oils! I messaged you on instagram pictures !
Really nice. You are "lucky" that it doesn't rain too much. By us in Czech Republic, though dry climate nowadays too, it would not last long. I would put steel in ground and fence needed to be vertical to protect it from rain.
Pretty sure I'll go with this design, it's awesome and THANK YOU for this how-to!! I like the modern look, it's not boring like so many vertical fences. What size trim piece did you use, and is it pine also? Thanks!!!
in the wet weather climates, instead of the cloth material, you could use 1/4inch "Hardware Cloth" Black Vinyl Coated Chicken Wire Fence. it is Galvanized Welded Mesh Roll for Home Garden and comes in 24" x 50' rolls for about $35. it is obviously a little added cost, but the life-span far exceeds a Ryobi tool any day!
Hey dude just want to wish you guys have a happy Fourth of July!🇺🇸🇺🇸🇺🇸🇺🇸🇺🇸 I absolutely love you videos and think that they always come out sick! Keep up the great work and know that you're loved. God bless you and your family!
Dan, great video. I live in Florida wet climate. What wood do you recommend for rail, reveals and posts? Also, what would you recommend to replace the landscaping material! Love your channel keep it up.
Nothing just will be way easier without having to dig and pour concrete. Watch videos on driving into concrete, go slow with the screws or they’ll hollow out, or if you’re using anchors, make sure you use the right size bit for the anchors
I want to make a free standing privacy fence for my balcony. The fence will be 36” wide. Do you think using a 2x12 lumber laying flat as base is sturdy enough? The 2x12 base will span full width of the panel. Both end post will be screwed to the same base. I will make sure there is no room for the base to move. I will also zip tie or metal strap the end post to the balcony railings.
That would of saved time, money and most likely done the task. I was afraid of you still being able to see into the other side but I think it wouldn’t have been an issue. If I get 2yrs out of the fabric I’ll be happy, we’ll see!!
Rip one board in 1/2 length wise and stager the boards on one side…paint the backsides of all the boards black, so you can’t see through and never have to deal with the landscaping fabric in the future. That way you could widen the gap and use less wood(like only 2 boards less) but it would let more wind pass through if you get lots of wind.
I live in UK and I've been thinking of doing the same but worried about the fabric gets ruined after a year or so. What about plastic sheet, wouldn't it last longer?
I like the look. Good job. However, only putting primer paint on the portion of the post that goes in the ground, does not help much at all. I imagine that maybe those posts will last pretty long in AZ. I have lived in NY, NC and Florida, those post would rot in the ground in three years. A better way to treat the in-ground posts is the old farmers way. There are a couple different processes they use and its reported those post last twenty-plus years. You can youtube search for “farmers wood fence post treatment”. One process is soaking the bottom portion of posts in a container of diesel oil and gas combo for a day of two. Some say just used motor oil. Check it out, if you are doing a fence soon.
Yes, the diesel and motor oil mixture is an old trick that was used on pretty much all farms. Also they stained all the fences with it as well. If want something different than that for the bottom of posts, use a roof coating like Gaco or an off brand. Any roofing supply will have it, silicon based and made to last 20 years on a roof surface so will be more than good for a post.
The landscaping fabric will likely last for quite some time. The staples will give out first, though, as they don't last long at all when exposed to water. So it will sag and droop before it's actually truly unusable. Trying to think what would be more permanent without being expensive, but you might have thought up the best CHEAP short-term solution.
@@danrockwell1883 Well, it looks great, and I bet you get quite some good years out of the fabric, either way. If you put up another one, you can get yourself some stainless staples for it (marine or upholstery ones are available in standard sizes) and then you'll really have an edge. Looks beautiful, and a great stain color, too! 👍
I've heard in AZ you can build 6-foot fencing around the sides and back. Only 3 feet in the front. Is it possible to get around that or is that even true? Or does it depend on the city thank you!!
You should have just used a 2x6 between the posts. Use 2x6 hanger. Then it would be the same look. Less warping. I used copper brown on the part of post that was burried. All u need is a small brick instead of gravel.
use stainless screws/nails. They sell plastic shells to put around the bottom that heat shrinks on, then put into the ground. Seal all the boards/posts before you build the fence, not after. Then recoat annually or more. Horizontal fences posts should not be more than 6' apart. For 6" horizontal, 5'. Smaller boards can go 6'.
@@danrockwell1883 stainless, ring shank, glue dipped, collated nails for a nail gun about $110 for 2500 nails. Not expensive. The stainless doesn't react with the wood chemical treatment, don't rust out, and won't react with the stain, etc. For the price for the benefits, it's def. worth it. I said seal them before, NOT after. This makes sure that every board is completely sealed at least once, and you can do it in a controlled environment. Obviously when recoating, you can't get everything, but once coated the 1rst time, it will def. help resist rot, etc. even though water will get in between the joints.
Instead of using the screening for privacy, an neighbour side A, on the top horizontal panel, cut it the with of your gap narrower than the rest, so that they stagger with neighbour B; the breeze goes thru but you still have privacy.
Just water, wheelbarrow, and some elbow grease haha can’t get simpler than that. Some guys do it in a buck with a paddle mixer but you’ll need more concrete than that


This is hands down my favorite fence diy I’ve seen so far. paid $7k 2 years ago for fences at 2 properties. Will be trying this at our next! Looks SO much better than vertical shadow box.
im a bit of an over thinker so seeing how casual you made this look and how off the cuff you seemed to be with this construction it put my mind at ease with my fence project so thanks
Thank you for mixing the cement without a shirt on
lol
thats necessary to increase the cement strength
😅😂😂😂
😂
Nipple sweat cures the concrete quicker and stronger 💪🏽👊🏼
Sick video. Quick & informative. No fluff. This is how most DIY RUclips videos should be & edited. Nice work.
Really appreciate that. The reason I keep them short and sweet is because I watch so many DIY videos that make me want to stomp my phone with all the nonsense and bad editing LOL mine aren't perfect but at least I'm not waisting time
I had to go back and rewind! lol nice muscles!! the fence looks awesome!
Thank you soooo much for sharing. I followed your instructions and I also added a cap. It turned out so beautiful!!! I wish I could send photos
amazing! Send me photos on instagram @danrockwellfitness would love to see it!
Was just thinking he should've capped it too, lol
Very good job with the video man. Straight forward to the point . And no life stories
Exactly
"Doing things you're afraid of." I'm good for doing that....and I'll try not to overthink things. Beautiful fence work, man.
You got it! Thank you very much
Glad you put primer on the base of the posts. Amazing how much wood deteriorates without some form of protection. At some point you'll get a crazy rain storm and everything will saturate.
I’ve heard reg guard is really good for it and makes a lot of sense!
This video is a great detailed look at how you took a project like this to full completion! Great job Dan.
Thank you sir!
Hello I’m sorry I didn’t wAnt to say this but I must say many photos stole your and make fake accounts doing fraud scam why didn’t you do action for them on TikTok on instagram you know it or you didn’t know nothing please do something 🙏
Why you didn’t any reply
The fabric inside is a creative touch.❤
Great job. I bet people complain about whatever but I have all different colors of cordless tools and all my Ryobi tools still work GREAT 👍 ❤😊
The sconce lighting you failed to discuss was my greatest takeaway. Looks really sharp. I'll figure it out.
Probably solar powered
"Its gonna rot faster than a RYOBI tool breaking!" (Board too close to the ground) 🤣WORD!
Beautiful work!
So excited--We are following your template & building ours now..... 💁♀️if only my husband could follow your MUSCLES 💪 template! 😂
I appreciate the cement scene lol🤍
Looks great, for 2 properties, could have staggered the boards instead of the fabric. I am going to do this for my hot tub.
major thumbs up for showing type of screws used. and hardware in general
Glad you got something out of it
Arizona here as well. I’m on the golf course and I need to separate my side patio so once in a while, I can be in the backyard without golfer, staring at me. Love this design and aesthetic.
I think my only change will be HOA friendly color for my house and instead of landscaping fabric between,
I’m just gonna offset/stagger/overlap the horizontal slats on either side so you can’t peer through.
I’ll space the posts at 5 feet. If I get sagging overtime,I’ll use fasteners with torx heads so it’s easier to replace. 🤙
Did you do it??
“Don’t over think it”. We needed that Dan cos you know we will most definitely overthink it hahah
I always do 😂
Very informative video. And (with all due respect) it doesn't hurt to have a very handsome young guy doing the job lol
Super informative video. Finally a normal “DIY” for an everyday person. Great video man.
Thank you!
Amazing look. Thank you for the detailed explanation!
Thank you!
I learned definitely new tips such as painting your post.
That fence looks sharp! Thanks Dan for sharing.
Thank you!!
The “faster than a Ryobi tool breaking” comment really got me 😂
Haha glad you liked that 😂
😂😂😂😂 best part of the video.
That's when I remembered to like the video. lol
I get it…I do…but miraculously my ryobi drill and driver have been running like new for 15 years. They are well used!
:)
@@enzprintco.8625 that’s awesome dude. My experience(especially with their 23 gauge nailers) has been overwhelmingly negative, so his comment made me chuckle. I’m glad to know not everyone has my luck.
Hey brother. I followed your video and used everything you used as I loved yours. Same exact everything even Cabot oils! I messaged you on instagram pictures !
O wow!! turned out great!! looks great as always.
Thank you!
Absolutely beautiful and the fence is nice too 😁
Thank you!
What fence?
@@barbarafike7633
😆 Exactly 💯
I was not expecting that "Hell Yes" 😂😂😂 this was a great video! TFS!
Hahahaha thank you, glad you liked it
Awesome video man. Its such a beautiful color scheme.
Thanks man!
@ 4:42 Hello to your sweet doggie joining you to make sure the job is going good. 😃
Thanks. Great, straight-forward instructional video.
Glad you liked it!
Great job with the video and killer fence!
Thank you so much!
Thank you for detailing the materials and comparing the different choices. Mr. eye candy for the soul. LOL
Of course!
thank for the production, narration, and effort.... well done on this big video
Definitely liked looking at the video as I learned something. Lol 👀
Thank you!
Really nice. You are "lucky" that it doesn't rain too much. By us in Czech Republic, though dry climate nowadays too, it would not last long. I would put steel in ground and fence needed to be vertical to protect it from rain.
I thought of putting black metal roofing behind the fence but we’ll see how long it lasts 👍🏼
ITS ALSO OVER 100 DEGREES EVERY DAY FOR 7 MONTHS
Best advice: “don’t overthink it”
It looks really nice..did you do anything on the top of the post to prevent water sipping in
Came out rad!
Thanks so much
Pretty sure I'll go with this design, it's awesome and THANK YOU for this how-to!!
I like the modern look, it's not boring like so many vertical fences. What size trim piece did you use, and is it pine also? Thanks!!!
Yes pine and 1x2 :) thank you!
Very informative and quick and simple video, next time, keep your shirt on .
thank you..didn't think about using cheaper boards for the horizontal..
Awesome job man. Got me motivated
Thank you!
This guy on the juice no doubt
wow you looked great
Thank you!
He sure does. 😊❤❤❤
in the wet weather climates, instead of the cloth material, you could use 1/4inch "Hardware Cloth" Black Vinyl Coated Chicken Wire Fence. it is Galvanized Welded Mesh Roll for Home Garden and comes in 24" x 50' rolls for about $35. it is obviously a little added cost, but the life-span far exceeds a Ryobi tool any day!
@@neilgarity4617 such a great idea! Definitely will have to remember that next time. Ryobi 🤣
Hey dude just want to wish you guys have a happy Fourth of July!🇺🇸🇺🇸🇺🇸🇺🇸🇺🇸
I absolutely love you videos and think that they always come out sick! Keep up the great work and know that you're loved. God bless you and your family!
Really appreciate that Zach, thanks for the kind words. God Bless!
Yes to and your beautiful family may you guys be happy n love one another
@@djkiki2038 amen
Didn't have to stunt on us with the shirtless clip I think my girlfriends leaving me now
😂😂😂 like fam really wanted to show off that ab work
Wow I’m an instant fan, good stuff 🔥
Thank you!
Hi im big fan from
Its relly Nice keep it🥰🥰🥰🥰 God blessing
Dan, great video. I live in Florida wet climate. What wood do you recommend for rail, reveals and posts? Also, what would you recommend to replace the landscaping material! Love your channel keep it up.
What ladder is that at 3:40?
Great work i need one of those over pool🙏🙏🎆happy 4 th of july🎇🎇
Happy 4th! 🇺🇸
@@danrockwell1883 🙏😘
How would this design work with bolting a baseplate into asphalt and fixing the post in as opposed to digging 2 ft deep?
Nothing just will be way easier without having to dig and pour concrete. Watch videos on driving into concrete, go slow with the screws or they’ll hollow out, or if you’re using anchors, make sure you use the right size bit for the anchors
hey man. was doing good ole reseaech for a fence like this and love what you did. how many 1x6s did ypu buy?
@@patrickstallings9613 thank you! 48 per side
I want to make a free standing privacy fence for my balcony. The fence will be 36” wide. Do you think using a 2x12 lumber laying flat as base is sturdy enough? The 2x12 base will span full width of the panel. Both end post will be screwed to the same base. I will make sure there is no room for the base to move. I will also zip tie or metal strap the end post to the balcony railings.
Cabot is my favorite. Haven't seen much of it here since I moved from WA to CA😢😢
Are the supporting 2x4s in the ground or just sit on the ground and held up by the horizontal boards?
Not in ground
Well on is one the concrete because it’s easy to secure like that but on top of ground no
D.R.......good job very generous thanks for sharing
Glad you liked it!
Yeah I think I’m gonna make my own house instead of buying 🤔you inspire me 😁💙
Would you install rails on the other side if you didn’t attach it to a block wall?
Id just do a regular 4x4 3ft deep
What size was the trim pieces did you say 2x4 the ones that go over the 4x4 and want brand has iron ore or do I just tell them that color
Sherwin williams and the black trim is like a 1x2
Thanks for that I was getting ready to order 2x4 the fence is amazing I hope mine turns out as nice
Nice job . Elegant for privacy
Thank you!
Yeah looks good
Epic commentary
Thank you
How is the landscaping fabric holding up. Great job looks really good
So far so good, been almost a year
😊 I'm one of ur biggest fans ❤
Awesome video - thanks!
Glad you liked it!
A good suggestion Woolf have been to off set 2 side so that they cover each others gap. This would be called a shadow box fence
That would of saved time, money and most likely done the task. I was afraid of you still being able to see into the other side but I think it wouldn’t have been an issue. If I get 2yrs out of the fabric I’ll be happy, we’ll see!!
Ya ya
❤. Thanx for simple great ideas. ❤❤❤
Glad you liked it!
Rip one board in 1/2 length wise and stager the boards on one side…paint the backsides of all the boards black, so you can’t see through and never have to deal with the landscaping fabric in the future. That way you could widen the gap and use less wood(like only 2 boards less) but it would let more wind pass through if you get lots of wind.
Great idea! So far the fabric has held up great but when it fails it’ll be a pain
@@danrockwell1883 I just did mine…all it got me is doing my neighbors fence like mine😉
Around how much was the cost?
Wow you’re amazing ❤
Thank you
"Easy, fun, and cheap...like how I like my women"
I feels that ...
🤣
I have Ryobi tools that I have used regularly for 20 years. I’m still waiting for them to break.
Just a joke, they’re actually made my duwalt I think
It did make some people laugh.
I have some Rigid tool attachments that fit Ryobi.
I live in UK and I've been thinking of doing the same but worried about the fabric gets ruined after a year or so. What about plastic sheet, wouldn't it last longer?
Are you able to share what the cost for this was roughly?
Subscribing to see more of you 💩 on Ryobi. Definitely got a good laugh watching this.
😂 In their defense I have an amazing ryobi miter saw
For wetlands like Florida and Houston we should be able to use a black Plastic Liner if you so wish to have privacy. Amazing video man 👍🏼
Nice! And thank you!
@@danrockwell1883hi how are you.
Thanks Stud!!!
Yes sir!
Your fence should be 3feet towards your property so you have the legal right to work on your fence on his side SOTHING A FEW HAVE THE gots TO DO.
I like the look. Good job. However, only putting primer paint on the portion of the post that goes in the ground, does not help much at all. I imagine that maybe those posts will last pretty long in AZ. I have lived in NY, NC and Florida, those post would rot in the ground in three years. A better way to treat the in-ground posts is the old farmers way. There are a couple different processes they use and its reported those post last twenty-plus years. You can youtube search for “farmers wood fence post treatment”. One process is soaking the bottom portion of posts in a container of diesel oil and gas combo for a day of two. Some say just used motor oil. Check it out, if you are doing a fence soon.
You’re probably right, thanks for the info!
Yes, the diesel and motor oil mixture is an old trick that was used on pretty much all farms. Also they stained all the fences with it as well. If want something different than that for the bottom of posts, use a roof coating like Gaco or an off brand. Any roofing supply will have it, silicon based and made to last 20 years on a roof surface so will be more than good for a post.
Yep, and using roof tar would seem better if next to a veggie garden where minimal petro leaches in soil.
That's some funny shit you go Nathan
How tall are the fences above ground? Thanks!
6ft
The landscaping fabric will likely last for quite some time. The staples will give out first, though, as they don't last long at all when exposed to water. So it will sag and droop before it's actually truly unusable. Trying to think what would be more permanent without being expensive, but you might have thought up the best CHEAP short-term solution.
Yeah it was kind of a last minute thing on a budget, so far so good, been well over a year. Luckily for me we get very little rain here.
@@danrockwell1883 Well, it looks great, and I bet you get quite some good years out of the fabric, either way. If you put up another one, you can get yourself some stainless staples for it (marine or upholstery ones are available in standard sizes) and then you'll really have an edge. Looks beautiful, and a great stain color, too! 👍
If you fasten it where it wont be seen behind one of the board, button caps would work fine. Just plastic and gal nail
Very nice 🤠 thanks
Thank you
I've heard in AZ you can build 6-foot fencing around the sides and back. Only 3 feet in the front. Is it possible to get around that or is that even true? Or does it depend on the city thank you!!
Every city has its own ordinance. Here in Tucson there are 6 feet fence/walls around the back and front of houses.
I love the look, but for some reason it looks like 4 x 4 and then a 6 x 4 could you explain please thanks
sorry I'm not getting your questions
Great SHOT at ryobi!!! Too bad you were at that store though. They SUCK!!! Great video, man.
The depth is based on your frost line. Here in iowa we need to go down to 4ft.
Here in Phoenix we don’t have that problem. I grew up in NY though, so I know how that goes haha
You should have just used a 2x6 between the posts. Use 2x6 hanger. Then it would be the same look. Less warping. I used copper brown on the part of post that was burried. All u need is a small brick instead of gravel.
many ways to skin a cat!
Yep the best part of the video was the cement mixing! lol
What do you connect the 2x4 brace too? Or does it just float off the ground onto the panels ?
use stainless screws/nails. They sell plastic shells to put around the bottom that heat shrinks on, then put into the ground. Seal all the boards/posts before you build the fence, not after. Then recoat annually or more. Horizontal fences posts should not be more than 6' apart. For 6" horizontal, 5'. Smaller boards can go 6'.
why stain after? how much are stainless screws? Sounds pricey. I remember getting all stainless for my gate hardware and it was so much
@@danrockwell1883 stainless, ring shank, glue dipped, collated nails for a nail gun about $110 for 2500 nails. Not expensive. The stainless doesn't react with the wood chemical treatment, don't rust out, and won't react with the stain, etc. For the price for the benefits, it's def. worth it. I said seal them before, NOT after. This makes sure that every board is completely sealed at least once, and you can do it in a controlled environment. Obviously when recoating, you can't get everything, but once coated the 1rst time, it will def. help resist rot, etc. even though water will get in between the joints.
@@RobHTech great info!!
Instead of using the screening for privacy, an neighbour side A, on the top horizontal panel, cut it the with of your gap narrower than the rest, so that they stagger with neighbour B; the breeze goes thru but you still have privacy.
That would have been a great option
Beautiful fence! But I would rather have the space in between open so I can see who's coming!👀
Looks amazing
Thank you
I think 🤔 don’t understand how you mix the concrete, would you show again 😂
Just water, wheelbarrow, and some elbow grease haha can’t get simpler than that. Some guys do it in a buck with a paddle mixer but you’ll need more concrete than that
I love your video your tips and I love you ❤❤❤❤
Curious where do u get those fence lights and how did u hook them up?
Is the landscaping fabric covered on both sides