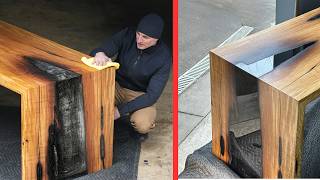
How to distress new wood and layer stain

HTML-код
- Опубликовано: 8 фев 2025
- Showing techniques I use to distress new wood and layer stain for a unique aged, rustic look.
Please Like and Subscribe:
/ amodernmaker
Tools and stains I used:
Jacobean Stain: amzn.to/2tlWPvb
Early American Stain: amzn.to/2FTbPmV
Red Mahogany Stain: amzn.to/2NtiR65
Honey Stain: amzn.to/2RyIGUH
Dark Walnut Stain: amzn.to/3163lmu
Classic Gray Stain: amzn.to/3aPyjnf
Dewalt Miter Saw: amzn.to/2FNhATc
Sander: amzn.to/36Ttmr2
Sandpaper: amzn.to/2QS523c
Bandsaw: amzn.to/30kJWxw
Bandsaw Blade: amzn.to/2RhDqUn
Poly Top Coat: amzn.to/30nWKTZ
Instagram:
/ amodernmaker
Facebook:
/ amodernmaker
Twitter:
@aModernMaker


Great technique for making the wood look aged!
Quick tip from my part if you don't have access to a bandsaw. A steel brush also works pretty good if the wood is not too hard. It will take a bit longer but if that's all you have, it's a good alternative in my opinion.
Thanks Peter, and great idea!
I know this video is 8 years old, you can also use a board with a few nails in it and make holes like worm holes. Nice work by the way. I used to do a lot of this type of destress wood back in the day in a furniture company
Great video! Wish I had a bandsaw . I actually learned this technique myself by chance . My hubby and I were doing real reclaimed barnwood walls in a customer’s house and we ran out of it . I just started playing around, layering stain on a piece of already rough wood . I made about 10 different pieces with different colors . The homeowner loved them so much that she cried . One of my best days in carpentry. Now I’m trying to distress boat oars for an accent wall . I have over 40 to do and want each one to look like it has a different story . Don’t want them all to be the same and look contrived . Any ideas on products one could wipe on and have it get only in the recessed parts , then wipe off . I’m considering staining, then sealing them . Then wipe on a dark stain n wipe it off . The homeowner is set on 4 different colors . So it’s making it harder for me because I like using lots of different stain colors . Especially grey and black . It’s been fun so far . But I’m running outa ideas 😂
I selected this video to watch the layering, but the distressing of the wood was excellent. Very useful info. Thanks!
Thank you!
Craftsman at work. always a pleasure to watch
Thank you!
Best distress video I’ve seen. I’ve used the rusty chain, but the bandsaw is a game changer. Keep up the great posts! Thank you!
I almost didn’t bother watching this video, thinking “I know how to do that”, but I’m glad I watched it! Those look much better than any ‘aged’ boards that I’ve ever made!!! I can’t wait to use your techniques. Thank you for making this video.
Glad you got some use out of it. Good luck!
Holy cats! That bandsaw trick is going to be used on my next project! Super helpful and eye opening video! Thanks!!
This makes me feel better about the amount of time and effort I have been expending finding and breaking down used pallets. Once I get the boards, the painting only takes a few minutes. The boards ARE all different widths, though, and that makes for a little extra hassle with my project.
Yeah it just depends on the project I’m doing. Sometimes I’ll use real pallet wood. Can’t beat that true “beat up rustic” look of pallets.
Thanks for the quick and straight to the point video.
Thank you!
I love how organized you are! Thanks for sharing!
Thank you!
Using a bandsaw for the 'rough sawn' look is brilliant. Thank you.
Thanks Arf!
That is such a cool look, thank you for sharing!
Thanks for watching!
Great video! I love the way you got straight to the point! Nice results on the wood planks, too.
Thanks, I appreciate it!
now that looks really cool
Thanks!
Wow, you put a lot of work into that. I've been curious about layering stain but was kind of afraid to try it. Thanks for posting the results.
Give it a shot and experiment!
Great job! I like how this turned out.
Thank you!
Very nice! I learned something! Thanks!
Glad you did, thanks!
These turned out so good!!
Thank you!
great bandsaw technique! very creative
+brian rezarch Thank you!
nice work ,love the stressing with the band saw, thanks for sharing
+SIMON PIDGEON Thank you!
Genius artist. Fabulous vision.
Thank you!
Great Video..
I loved the way you Filmed this..
Short and Sweet... Totally explainable
Especially the loud noise of the SAW...
Thank you for sharing this great video
Thanks!
Ок
Thankyou for the video I really learned something 👍 it's crazy how back then I had to ask people questions how do you this and that even trying fix a car issue when I was 19 I'm 33 now and now everything is on youtube these kids now and days should know how to do everything on there own pretty fast with all these DIY videos
Thanks! Yeah you can learn anything on RUclips but surprisingly what I’ve found is the younger kids still ask questions rather than find the answers on the web or RUclips.
Nice trick with the bandsaw.
+Ron Marshall Thank you!
Very creative love to try this
Thank you, hope you can give it a shot!
SO BEAUTIFUL!!
Thank you maria casiano!
Your technique and stain choices helped me match some repurposed boards I found some time ago. Thanks for sharing! Great work.
Glad I could help you out!
Great work on this. Never really see a technique on Weathering wooden materials before...
+1500lego Thank you!
Wow!!! So many hateful and judgmental people, you must be doing something good. Keep up the good work and don’t let hateful people get you down.
+gr8wunz Thank you! Doesn’t phase me one bit. I’m not building or creating videos for them anyway.
Just amazing
Thank you!
Looks great!
Thank you!
Really well done. Thanks.
+180 Second Ideas Thanks for watching!
Very good video
Thank you!
Que hermoso trabajo!!!...fantástica la técnica y el resultado....aplausos!!!
Excellent! Thanks!
Thank you Mike!
On a smooth pine wood surface get some mineral Turps, apply randomly, with a brush of different sizes to create streaks then before it dries hit it with stain, you get this effect without roughing up the wood or any sanding.
I'll have to try it out sometime, but I personally like the roughed up wood look and texture.
Awesome!
Very interesting techniques, really applaud the stain colour mix which really gives you a truly unique pieces Wuat do you sell these for?
Love the bandsaw technique, I used a handsaw for a small shelf project and it was kind of a pain. Will be doing this on my next one for sure
Thank you +Bryan Chittenden Good luck!
That is awesome!!!!
Love love love this technique! Thanks for sharing!
Thank you!
cool stuff man
This is so amazing 👏 😍 ❤ 💖 🙌
Brother! You are a master!
Thanks!
that was awesome nice work can't wait to see what u make out of it
Thank you +Kaylee Aloma
Beautiful!!
Thank you!
That part with the chain fulfilled my S&M fetish for the day!
You’re welcome!
nice designs
Thank you.
Wow awesome
Thank you +JustinTrojan!
I like the planks where you run them flat on the bed of the saw. That really gives them the rough lumber look. The ones that have the angled scrapes just look a little to contrived to me but maybe that's just because I saw what you did. Along the lines of the bandsaw trick, I've been trying to figure out a way to get a rounded scrape like you'd see from a sawmill that uses one of those giant circular saws to rough cut the logs. I've tried a few things but it takes forever to do one board so it's not working out so well. Have you ever done anything like that?
Way back when (40+ years ago), my mother, my brother, and I refinished some furniture in the distressed fashion. For some of the distressing, we used a chain but rather than beat it as you did, we laid it out in a random pattern and then hit it in various spots with a hammer. Same idea, different approach.
Thanks for the comment Roger. The angled scrapes weren’t necessarily for a rough dawn look. I figured it could have been a plank of wood that was drug around like on a pallet. I’d like to get the old sawmill look with the rounded blade saw marks but haven’t played around with it.
Great idea with the chain, I’ll have to try it out sometime.
Awesome just love your creations". Simply outstanding
Thank you very much!
😂😂😂Never saw anything like this! Absolutely great! I would love to have the floor of my house like this.
I bet I know many people which would get a heart attack by watching this.😊 🤣
And to all the people who commented why not using pallet wood or something similar, I think it’s a proper solution if you can’t get pallet wood. It’s so popular making furniture of it that it’s not that easy to find or to get. At least you have to pay a lot sometimes.
I will definitely try this.
Thanks for sharing!
Thank you Sandy! It’s true, pallet wood can be tough to find and a pain to break up and prep for use.
Great video. I use the same technique except the fact that I gave up on oil stains. Too much odor for a very long time. What I do is fir lumber with vinegar + steel wool and when all is sanded out, I finish with oil of linseed. I have to say that I also use the sawzall
Thanks Pikubird Ok! I’ve done that as well. Just depends on the finished look you’re going for.
I love the "early American" finish and who said you can't teach an old dog new tricks. Thanks mate. 👊👊
Thanks, it's one of my favorites as well!
Excellent video!!
Thank you!
This is really cool! Well done. I am going to try this, thanks so much for taking the time to make this video!
Thank you very much!
Congrats! You just did a whole lotta work to make your wood look like those cheap ass pallet wood, especially the stain. Shoulda just tied em to the back of your truck and drove around the block. But if you like it then its great!
whow the final look was great!
Thank you!
I honestly haven't seen anything this awesome in a long time. I am going to do this and build a sliding barn door with this idea. Absolutely amazing. You should be proud of yourself. There is nothing cooler than character rich old stuff like that . How did you get the blue color? Was it from using the classic gray. Truly masterful art bro!
Thanks Chris, that’ll look great! Yeah the blue was a mix of the gray.
I had to LOL while watching this video. I found it pretty funny the way you moved in the fast forward portions. And the sounds that went with it. LOL
I like the way you demonstrate the wood with different stsins, and sizes too. Stains look different to me on different size wood. I guess because its more of that stain color than no color. If that makes any sense. Thanks for the video
+Cynthia Cler Haha. Thank you!
I just stumbled upon this video. Wow! Amazing job! I love the looks.
Thank you!
just a joke but mostly true i can make anything look rustic and beat up if you ask me to becareful when i handle it ok really your video is amazing and i wish you luck with everything you do in life thank you for sharing
+Jean Myers Haha. Very true! Thank you, same to to!
Que efeito bonito que ficou na madeira!!
For example 1 coat was dark walnut which color goes on it as 2 coat????
I like the technique, the bandsaw mark darkening is a little intense, I would maybe sand it down after passing it through backwards.
Yes, I typically sand it down but was trying to get more contrast on these. You can see what they look like with a top coat on in the desk build. The colors change quite a bit.
Really? That is awesome. I love the look of rustic pieces but I struggle with building with it because I like things to be more square. This is the best of both worlds. Thanks for sharing.
+Angie Overton I know what you mean. Thanks for watching!
Angie Overton i
LOVED IT!!! THANK YOU
Thank you very much!
Interesting
Awesome! Do you have a photo of them all that has the stain used labeled on each of them? Be helpful to choose a stain looking at them all and knowing the kind needed :) thanks
Thank you! But no, unfortunately I don’t...
This looks fantastic. Did you go over each board a 2nd time thru bandsaw and 2nd stain. Just looks like a few in video. Thanks looks great
Thank you! Yes I did.
I am a little confused, which color goes on which color ????
Sorry I can’t write as well...
How would you finnish this wood? Polyurethane ? Or is the stain enough as it is?
I finished it with polyurethane. You can see what it looks like finished in my desk build.
what do you use for applying stain?
Great job btw
Thanks! I just use a cheap brush or rags.
That`s one nice trick mate! Cheers for that. Keep up the good work
+Chúcaro Cimarrón Thank you!
Fantastic
Thank you
cool
What did you make out of it
I made a desk. It’s in another video
bandsaw technique! woo good never thought of that :)
+1TicTacPat Thank you!
yea, 15 seconds into the video & you've made me smile, all the work people do to 'finish' a piece of wood, all that sanding. LOL Excellent!
Thank you arthur dent!
Great video. I admire what you've done here, and am trying to make some videos like yours. I would recommend however, to add some music in the background to make things a bit more interesting.
+Dad&Son DIY Thanks for the recommendations!
Si es que la madera estaba sin cepillar. El efecto no sería el mismo?
No exactamente, Pero depende de la madera. Si empieza co madera “rough sawn”, seria similar.
Amazing work! Highly inspirational. I may try this with pallet wood as I do not have a band saw to distress the wood with saw marks. Was the wood you used "fresh" from the lumber yard or did you let it sit for a few months? Kiln-dried wood can still hold unwanted moisture. Any warping or movement in the boards over time? I've heard when you nail/screw and glue, the table top can warp as the wood expands and contracts with the seasons. Maybe not in this case because none of the pieces are very long.
Thank you! The wood was fairly fresh from the lumber yard. Is the warping question in reference to the desk build?
Is stain like paint? And is wood finisher just a stain?
How much would natural rustic wood go for by the ft?
I’m talking about ones from old homes that have 2x4, 2x6, etc
$5-10 a board foot is typical
Cool! Love it! Looks great! Bout to do a gray distress finish to my solid pine body Broadcaster Fender style guitar!
Awesome +Anton Simper! Send me some pics when you're done!
Goodnight. Is the fool oil-based? After applying, does it have any other treatment such as varnish or lacquer? Thank you.
Oil based stain, the clear coat on top which you can see in the next video where I use this wood to build a desk, is water based.
Did you sand before applying the first coat of stain?
It’s been a while but I think I sanded a little with something like 80 grit. But it’s not necessary.
Wow!!!! Really great work. Greetings from Ghana. Please could you list the items used?
Very interesting finishes!! These stains are mineral spirits based? In Brazil we can't find oil based stain to apply and wipe like you do. Regards, Patrícia
Thank you +Patricia de Mendonça Nascimento! I believe they are.
You should make a panel to devide a room . It would be awesome !!!! I m very curious, what did you make ? How many days we must wait to see. Not long I guess ?
It's up now! Great idea though!
dude! this was my dream to do stuff like this! very creative! great job man :D
Thank you!
Fab 👍👍👍🎸
+Jono Rezzillo Thank you!
Isn't old wood usually grey, cracked, chipped and sunburnt?
Depends on the wood and if there’s a finish applied.
Some old wood is more beat up, but distressed wood does not necessarily have to look like old wood.
What kind of wood was that?
Just cheap pine or whitewood.
what type of wood and what size please
+dennis calderone 1" x 5" or so
Thanks what type of wood though
+dennis calderone I believe it's the kiln dried square edge whitewood common board from Home Depot. The cheap stuff you get in the 1x area of Home Depot. Not select pine or anything.
I use an angle grinder for my saw marks, circular is better in my opinion.
I do too sometimes. Just depends on the look I want.
do you like the the triton router what is the h/p
Never used a triton. I’ve got a Dewalt and porter cable.
What kind of bandsaw is that it has a higher or deeper throat
It's the Laguna 14 Twelve
were the stains all oil based?
I plan on using this technique for a wood accent wall in my basement, a roughly 20' W x 9' H wall. I want to use 1x 4, 6, 8, 10 in. boards, is that an OK thickness (3/4") for that space going on a wall? I see a lot of people use super thin "shiplap" style boards but I just don't like that look as much. Would you suggest using construction adhesive/glue of some type and brad nails as well?
That would work fine. If you nail in the studs, you shouldn’t need any construction adhesive, though it wouldn’t hurt. Send a pic when you’re done if you can!