Herringbone Cutting Board - Tips & Techniques

HTML-код
- Опубликовано: 14 дек 2020
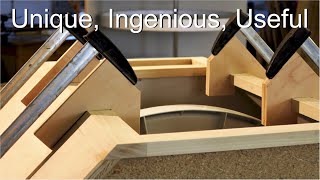
- If you’ve seen our speeded-up time-lapse video on making herringbone cutting boards and you’d like to make your own, we made this (regular speed) vid for you. Nick explains his technique in detail, including the simple math you need to design your own cutting boards. He shows five different herringbone patterns as examples, and then walks you through each step as he builds one of them. This tutorial takes some time, but there are plenty of tips and useful jigs to see along the way. And if you’d like a project plan for these boards, including the patterns and formulas that Nick uses, visit the Workshop Companion General Store atworkshopcompanionstore.com/pr... . It includes drawings for the (extremely) useful assembly table shown in our videos.
To see all of our videos and SUBSCRIBE for more, see: / @workshopcompanion
Also visit the WORKSHOP COMPANION GENERAL STORE where we offer a wide selection of Nick's BOOKS and PROJECT PLANS in digital format: workshopcompanionstore.com/
Pick up one of Nick’s books FREE just for visiting!
To follow us on social media, try:
FACEBOOK - / workshopcompanion
INSTAGRAM - / workshop_companion
For our non-English-speaking viewers: Closed captions can be set to any language. Click on “CC” (Closed Captions) at the bottom of the screen to turn them on. Click on the gear (Settings) and a menu appears. Click on “Subtitles/CC” and another menu will appear. Click on “Auto Translate” and a menu of languages will appear. Click on the language you want for the closed captions and you will be returned to the video -- closed captions will appear in the language you have chosen. If these captions cover up some of the action, place the cursor over the captions, press and hold the left mouse button, then drag the captions to where you want them on your screen. Release the mouse buttons and they’ll stay there.
Para nuestros espectadores que no hablan inglés: los subtítulos se pueden configurar en cualquier idioma. Haga clic en "CC" (Subtítulos) en la parte inferior de la pantalla para activarlos. Haga clic en el engranaje (Configuración) y aparecerá un menú. Haga clic en "Subtítulos/CC" y aparecerá otro menú. Haga clic en "Traducir automáticamente" y aparecerá un menú de idiomas. Haga clic en el idioma que desea para los subtítulos y volverá al video; los subtítulos aparecerán en el idioma que haya elegido. Si estos subtítulos cubren parte de la acción, coloque el cursor sobre los subtítulos, presione y mantenga presionado el botón izquierdo del mouse, luego arrastre los subtítulos a donde quiera que estén en su pantalla. Suelte los botones del mouse y permanecerán allí.
Our Music is Licensed through Epidemic Sounds - www.epidemicsound.com/referra...
And thank you so much for your time and interest!


Mr. Engler I had to glue up a cutting board recently and I found that if I lay all the pieces out and use a roller to apply the glue at the same time then flip up the pieces together helped tremendously. Thank you for all your woodworking wisdom your awesome! Love the all thread trick.
Yeah, it was rough watching him do them individually while talking about how he doesn't have much work time with the glue
This is GREAT. Love the explanation, and the math helps me understand what is going on. Thank you for putting this in a way that us engineers can understand
Most welcome.
Thank you Mr Engler for such an informative & wonderful video. Truly delightful to learn these professional woodworking techniques & finishes.
Thanks for saying.
I stumbled across this video sometime ago and silently liked how good of a teacher you were. Woodshop was always my favorite class. I'd like to say if you were my teacher, I would've found out alot sooner just how much I'd push to make this become a job or at the very least a full time hobby. Thanks for making honest videos, that are enjoyable to watch and soak in all the knowledge you have!
You're very welcome; those were some very kind words.
I to stumbled upon this video today and the title " workshop companion " rang very familiar. Then out popped the name "Nick Engler". I had been reading your books some 25 years ago and have a fair number in my woodworking reference material bookcase. Your books are excellent, well written and a foundational reference for any woodworker. It was no surprise that your videos were of equal or better quality. I now have several of your videos to watch to further enhance my woodworking skills. Well done, Mr. Engler. A true professional.
Thanks for saying. And always good to hear from a reader.
Thank you very much for ALL the information you have given us. This really has been the very best video on cutting boards that anyone can ask for.
Thanks for your kind words, Navarro.
I love math. For someone that, according to you, slept through geometry, you did a fantastic job explaining those formulas. I wasn't expecting you to even explain what Theta represents in mathematics. Well done.
Kind of your to say.
I love watching you work and I love your attitude. Beautiful boards.
Thank you for your kind words. Can you email this to my wife?
Incredible. Super. Thank you for an in-depth well done/edited video. Most excellent idea.
Thanks, John.
Omg. That is a work of ART!
Very enjoyable video Nick, Thanks. Oh and your plans are great!
Thanks much. We're trying.
This is very cool I just found your channel today and have watched 3 of your videos I love your content! I love the little tips and tricks you share in your process it gets me excited as a maker to push myself to try projects I once thought were out of my abilities. So thank you:)
Most welcome.
Fantastic tutorial, I am currently making small boxes and cupboards I will give this a try and see how they turn out. Thank you
Most welcome.
Great job and very well done video. Thanks!
You're welcome, and a Happy New Year to all the good folks at LMR.
I like the way you teach,this was very informative.
Thanks.
Thanks for awesome video Nick. I have always been amazed by your hammer 🔨 twirl. Hope that you have a Merry Christmas!
If you like the hammer twirl, watch me twirl a bench plane at the end of the "Harbor Freight Bench Plane" video. Took us about 20 takes (and as many blisters) to get it right, but the HF plane was such an extreme disappointment that I figured I had to do something to reward my viewers for enduring all that pain and agony with me.
Thanks for the informative math on that. I’ve been trying to figure it out for a bit after my boards end up much smaller than I planned. I knew there was an equation to use but couldn’t figure it out.
Yeah, I had that exact same problem. So I dug out an old Trigonometry text that I keep around for emergencies and stared at it for a while until I realized that I needed to call someone who actually understands this stuff...
Yeah , I'm going to have to cram for this test,
I haven't studied math now for about 42 years.
You explained it in depth, very well and the
cutting boards you made show your love for wood.
Happy Holidays.... Stay Safe
Got you beat; the last time I was in a math class was 51 years ago. Fortunately, I have friends who actually remember this stuff. Thanks for your kind words.
Neat project, Nick. I have a similar fence as what you show at 34:35 but as usual, yours puts mine to shame. Great vid as always, Scott
Thanks, Scott.
Very nice.
1. Instead of gluing the strips so you have a big 90 degree plank, offset them so they are at about 45 degrees, less waste.
2. Would a band saw with a wide blade give a good enough gluing surface? The kerf is smaller and you would have less cutting board sawdust.
A staggered glue-up is a worthy idea, but it's difficult to clamp the ends so you get a good glue interface all along the plank. I simply use the waste to make smaller cutting boards and coasters. As far as a band saw is concerned, the washboard saw marks don't make for good gluing surfaces. You'd have to sand or trim them. I use a thin-kerf blade (.095") to reduce waste. Thanks so much for your ideas!
Love the pattern
Nice work.
Thanks.
I bought that one, Thanks Nick!
Most welcome.
Just keep the naptha and vapors away from the flame. Super nice video.
Thanks.
To cut strips of different width without having to set the fence all the time, you could make additional spacers of different width to insert in the spacer you have clamped to the fence.
Yes, you could. Good suggestion if you're making a lot of these.
@@WorkshopCompanion thank you!
I just love to waste time to save time.
You could even glue a staggered block to clamp to your fence and then pull back the miter gauge depending on what width of strip you want to cut.. Narrow strip? Pull back very far. Wide strip? Just clear the blade
I hope that sketch of a description makes sense ...
Very nice thanks 😊
Most welcome.
If you offset the edges of your boards during the initial glue up to approximate a 45 degree angle, you’ll have a lot less waste when you make your 45 degree cuts
Good suggestion, but they will be a lot more difficult to clamp. See my reply to Franken Berry.
Very impressive. I was wondering how you made those zig zag pattern.
You are very methodical in your procedures.
A good way to utilise off cuts.
Thanks.
thank you
Now where did I put my cosine? It must be somewhere in one of these drawers...
Nice project and some neat tips. 👍
Thanks!
Wow, beautiful work! I have a question about gluing end grain to end grain, does it create a very strong joint?
I think he glues along the grain.
I really enjoy your videos and I find all the tips to be very useful and unique. I made one of these with oak and beech leftovers in our workshop and the result was quite satisfying and it was lots of fun to make, so thank you for the inspiration. I just wanted to ask which sanding grit did you use to apply the tongue oil? and also do you think it would be possible to use normal kitchen walnut or olive oil for the finish? and again Thank you Sir for these awesome educational and informative videos!
I use 220# or 320# to sand in a finish. Any smaller than that, and you risk burnishing the wood. This may limit how deeply the finish is absorbed.
An excellent presentation! But I have a suggestion for cutting the strips to width. Instead of constantly shifting the fence, why not fix it in one place and then make a set of spacer fences that are placed against the main fence? The spacer fences could hook on the edge of the saw's table to keep them from sliding with the stock, and possibly have magnet as well.
Hey Nick, which do you prefer, end-grain or conventional style cutting boards, and why? Thanks!
I would like to say that I prefer flat grain for three reasons. (1) It doesn't absorb/release moisture as quickly as end grain. (2) The alignment of annual rings isn't as critical as it can be in some species where there is a large disparity between radial and tangential expansion/contraction. (3) The board is much stronger when the grain runs through the length rather than the thickness. The down side, of course, is the knife marks don't "heal" as they do with end grain. However, all these considerations are moot in my kitchen. I'm not allowed to use any of the "good" cutting boards I've made lest I mar them. I am confined to an ugly piece of resin-impregnated bamboo with burn marks owing to a close encounter with a hot stove. All the arguments I have just presented pale in comparison to this: (1) Not using the "good" cutting boards -- no matter what their grain orientation -- keeps my marriage intact. So, in the end, I prefer badly burned bamboo.
I love your videos.
What is the blue surface on your assembly table that you use for making a herringbone cutting board?
It's a grey-blue plastic laminate. It's would have been easier to use melamine -- see our video on how to make that assembly table.
@@WorkshopCompanion Thanks
I'm curious as to why you didn't angle your initial glue-up.
Show 💯💯💯💢💢
is that minwax paste wax a good idea for cutting boards?? i don think its natural. but this vid is full of details for this type of cutting board. good stuff. the math made me a lil dizzy but i survived it. ill be trying it without all that math. again, just not too sure about that paste wax. it doesnt smell natural but maybe it 's for ppl that dont use it with food,. other than that i thot it was full of good info. thx!
Our wax is made from paraffin, microcrystaline wax, beeswax, and carnauba, all non-toxic. As for commercial paste waxes, I got into their chemistry pretty deep when I wrote my book on finishing. The MSDS (Materials Data Safety Sheets) will scare you to death, but these don't tell the whole story. Most if not all the toxicity is in the carrier (solvent). This evaporates immediately upon application. If you properly buff the remaining wax, you'll be left with a layer just a few molecules thick -- and all of those molecules will be non-toxic wax of some sort . As woodworkers, we touch waxed/buffed tool surfaces all day long, much more so than the general public. We then bring our fingers to our lips and eyes -- yet I've not found a single professional craftsman that has missed a day of work because of wax poisoning. But just to be safe -- and to set a good example -- we make our own non-toxic wax for food-contact projects. If you would like more information, watch our video on mixing waxes: ruclips.net/video/6DdNMrRn_jk/видео.html . You can also get a free recipe for non-toxic waxes from our store at workshopcompanion.selz.com/item/nicks-paste-wax-recipes .
I thought of waxing but was concerned that, especially with end grain, the wax might get in deep enough to the gain to ruin the oil finish. Have you had that issue?
No. But then I wipe down all my projects with water before finishing to raise the compressed grain and make any loose fibers stand up. (Then I sand once more with the last grit used.) The water will expose any spots where stray glue, wax, oil, silicone, stearate, or grease might interfere with the finish. If there are any spots, I either sand them or clean them with naptha or acetone.
Hay Nick the math is great but it works on a chevron pattern not a "herringbone" pattern. Your first "standard pattern" sheet at 10:50 has chevron printed on it, so is it Herringbone or Chevron?
It depends on whose definition of "herringbone" you subscribe to. When I started publishing the designs for these cutting boards in my books over 30 years ago, I wrote this: "A 'herringbone' design is an arrangement rectangles or parallelograms in a zig-zag pattern, resembling the bones of a fish. The designs I’m about to show you are technically all “chevrons,” so-called because the parallelograms are arranged so that each zig and zag comes to a point, forming a saw-tooth pattern. (Chevron is descended from an old Latin word that referred to the joining of two rafters to form a peak.) Whatever you want to call it, the design is tremendously versatile, as you are about to discover..."
.
111111111111
I didn't fine the plans for the leg at your store. I would like to buy the plans to make the leg.
I don't think the herringbone cutting board has a leg. Were you watching another video?
My problem with cutting boards such as the ones you have is I can not put a knife to them. My first board I made was of pure pine because I felt I would be an idiot to use quality wood. I still have the original board and have never cut a thing on it. I quit making boards because I could not use then to cut upon. I have made boards for others, not a fancy and I was never there to see a knife cut into them. The one I use in the kitchen is ugly and I don't care as I didn't take the time to make it nice. The biggest one I ever made was 24 x 24 and 4 inches thick, all maple with maple legs that made it stand 30 inches tall. It is in a meat processing plant some where in Nebraska so I never saw it again
Are wood cabinets expensive?
Please could you hold the sheet up so we can see it?
Can i purchase these cutting boards?
Eventually. We're thinking about offering some on Etsy.
@@WorkshopCompanion I’ll be your first customer!
Talenan
How come when I tried a carriage bull I just made a mess everywhere and the carriage built Didn't do what yours did
Sounds like you used too much glue to begin with. However, you should know that when you're applying glue to strips for the first time, almost everyone makes a mess no matter what method they use to spread it. You get better with practice.
@@WorkshopCompanion are you turning the bolt?
@@TheDuttonExperience Nope. Also, it helps to use a glue with a low-to-medium viscosity. If the glue is too viscous, it won't flow between the threads.
"FOOD GRADE"
Food Contact Safe -- USFDA.