Probably the best video in RUclips in terms of visual explanation, i really appreciate the visuals of the pin-capillary action of weldon. now i know what is perfect gluing with a pin method there is almost no other vides in YT that shows closeup shots of the capillary action using a pin method in HD. Great video.
Thanks Suresh! With the pin method, what I've found is to use more solvent (Weldon 4) than you think, and really flood the joints well, from both sides. As it evaporates, to gets sucked into the joint, and sometimes I even go back and do a second light application after about 5-10 minutes for good measure.
I’ve seen this video around 10 times and love the explanation! I did build some many thing in my system and the next step is a sump because i need a bigger to my 220 g ! Thanks for the video man 🙏 im a big fan of your channel
LOL - thanks CC - and yes, definitely ate some shavings. Those things went everywhere - and I'm still finding them stuck to things even after a good shop clean! Need to work on my shop dust collection for sure...
One small detail. When mounted on a router table, you really want a down cut bit, so that it pulls the acrylic onto the table, and not push it up. On a cnc, where the spindle is top mounted, the upcut is the preferred method. I always used a large straight flute for edge prep and they work great.
@@DsilvaShelly Oh - you mean cleaning up the edges of the panels before glue up? Yes, that is a spiral down cut bit (but since it is upside down, it throws the chips up and away). I'm using the fence of the table saw as a straight edge on one side, and to keep the edges parallel as a take off just a tad. In my setup, the router is built into the right side of the table saw table, so I can use the table saw fence for routing as well. I don't remember exactly what bit I got, but I think it is basically this one: www.amazon.com/SpeTool-Downdcut-Cutting-Diameter-Carbide/dp/B07QXK88L8/ref=sr_1_8?crid=CA0R0ZYLILUR&keywords=1%2F2%22+spiral+downcut+bit+plastic&qid=1660788812&sprefix=1%2F2+spiral+downcut+bit+plastic%2Caps%2C242&sr=8-8 Hope that helps!
Hey there, in California, I buy from either Professional Plastics, or Interstate Plastics. Eplastics or Usplastics are online vendors, but I would buy and pick up from a local supplier to you if possible, as shipping acrylic sheet can be very pricey. Thanks for the watch!
Thinking of building my own sump soon as I don’t really like the one that’s with it, had it for a year now and it’s time to change it, going to be around 800mmx380mmx380mm with wa water level of around 10” how this acrylic would you go?
Hey Billy - for that size, 6mm thickness should be fine. Just make sure to add the top frame, which adds quite a bit of long term strength. Thanks, Peter
wow wow wow i can't stop watching.keep making these video they are amazing you are amazing. how much $$$$$$$$$ would i need to have one in my house?????
Thanks! Glad to have you along! Budgets for tanks range greatly, depending on how much a gear head you are, and how much you care about having "high end" corals. A good rule of thumb is $50-$75 per gallon. And you can certainly do it for less than that, if you DIY a lot of gear and enjoy hunting for bargain prices on corals...
@@ReefEco thank you Peter, i also am a bit of a gear junky and a bit of a handyman and also have a reef system. Nowhere near as big or sophisticated as you or yours, so i know what throwing money in the bucket is!!! LOL Btw i check every day for a new video the suspense is killing me, can't wait!!!!!!!!!!
@@ReefEco thats amazing now you got me excited.It's to bad I live in the out skirts of Montreal because i think i'd trade my best friend for you, i would always be over at your place. I would bring beer and munchies!!!!thanks again and keep keeping
I think I used the same bit that I used in the table router - and upcut spiral bit. But, if you are not plunging into the material and drill a pilot hole first like I do in the video, you can likely use a straight bit as well. Spiral bit just give a little bit of a smoother edge. Thanks for the watch!
Hey Kevin - you would need something to do the edge prep - and while you can do that by hand, the likelyhood of getting it right the first time is VERY remote. You would have to scrape it by hand, and keep the edges perfectly flat and square. As handy as I am, even I would never try this, LOL. If you don't already have the tools - table saw and router for square cuts and edge prep, you might not glean that much in cost savings. You might try something small first, to see how it goes - like a small dosing container or similar - to practice a bit first...
@@kevinferreira3301 Tough call - trouble is that acrylic is not cheap, and if the edges aren't prepped correctly when you try to glue it up, you'll see the seems aren't good, and you can waste a lot of material. Then there goes the money you are trying to save. If you have a table saw, maybe try to make a small box or dosing container and see how it goes. There are probably some videos on RUclips on hand prepping acrylic edges for solvent glueing too. First sump I made from acrylic 20 years ago popped a seam and leaked everywhere - and it was because the edges weren't prepped at all and the bod wasn't great...
@@ReefEco damn that’s scary to hear!! I was thinking of even taking the additional time to add the square rods to the corner just to make sure, I’ll see if I can think of something for those corners then. I’m trying to make a 29x21 sump for a Red Sea max s 500 I got for 100 bucks but I have no sump for it, I want to use up all the space I have on the right hand side of the cabinet.
@@kevinferreira3301 Yes, now you know why I add those rods to all the corners now, LOL! My edges and seams are much better now, but it is something I still do. That first sump I glued it together right off the table saw, so all the edges were total crapola. If you are looking to save money, you might not save all that much on that size of a sump - so make it because you want to and to have the satisfaction. Check out what a sheet of 1/4" cast acrylic runs in your area...
What specific blade did you use on your table saw? Red seems to indicate Diablo or Freud but Freud's plastic-specific blade is not painted. And while we are at it...where did you source your acupuncture pins and what thickness are they? My inclination would be to use the smallest one possible but I think that's like .12mm which may be a bit too small...maybe .25 would be better? Totally possible I am overthinking that as well :)
Hey Jeremy - yes, it is a Diablo TCG blade 10" - good eye! I think it is marketed for Non-ferrous metals and plastic. I honestly don't recall where I ordered the acupuncture needles from - I just googled it and there are lots of options. I think I'm using the .30mm width x 40mm length, but I think you are right - it probably doesn't matter all that much. I would probably err on the side of larger, rather than the .12mm as you said, since a little larger will allow more solvent to flow into the seam, which is likely better than starving the joint of glue. Any leftover solvent evaporates from the seam quickly and does no harm, whereas under-glueing the seam is harder to fix...
Hi Reef Eco, I am trying to build my first aquarium a biggie 60 X 24 X 20, and based on various research online I had just settled in on 18mm thick acrylic, can you tell me how i go about edge prepping the largest of my sheets which will be the 60 X 20 ( back and side panels), I do not have a router and based on some posts in R2R it seems like hand prepping is waste of time as it is not going to give a good result. Should i ask the sheet seller to edge prep it for me ? or should i take it to a say carpenter and do it because I neither have the tools or skills to do a router based edge prep. Thanks, Suresh Kumar
Hey Suresh - I would agree that hand prepping is risky unless you are REALLY good at it, which I'm not. It would be too easy to get a dip or round off the edge I think. I've seen it done (I think there was a video by Joey/King of DIY), but I personally wouldn't try it, especially with thicker more expensive material. You could try either a woodworker shop (who might not want to work on acrylic, not sure), or try a sign shop to cut your panels on their CNC. That might eat into your budget, as I imagine having them cut the panels would add significantly to cost. BTW, I'm only using 3/8" acrylic (10mm) on my sumps, one of which is about the same dimensions as yours (even longer), so using 18mm seem like overkill unless you are not adding a top rim or any baffles or bracing to help the long span not bow. I'm all for over-building though, so thicker acrylic is better in general : ) if not cost-prohibitive. Sorry I can't be more help on the edge prep, which is even more difficult the thicker the panels - as it gets more difficult to keep the edges perfectly flat and perpendicular to the sides the thicker the panels. If you do end up having to hand prep, you might buy some material and practice before trying it on the real sheets for the aquarium...
@@ReefEco Hi firstly thanks for taking the time out to reply, Here and in R2R didn’t mean to spam but I commented here and thought why not put something there as well in the forum. I would like to ask, if laser cut from the manufacturer is any better ? That is instead of saw cuts but based on some search online it seems like laser cut acrylic when welded on with solvents instantly cracks near the seams ? If the above laser thing is true even if I scale my build down I should make sure my Acrylic for aquariums are never Laser cut right ? Thanks again.
@@sureshkumarsivasubramaniam1895 No worries! Not spamming at all. Yes, laser cutting melts the material and it can craze when solvent welded after laser cutting. I think that is why tank/sump manufacturers use router bits and CNC cutters for their parts and panels.


Clearly, a King of DIY saltwater side, excellent work 👍
Thanks Luna! I'll do my best to live up to that comparison : )
Probably the best video in RUclips in terms of visual explanation, i really appreciate the visuals of the pin-capillary action of weldon. now i know what is perfect gluing with a pin method there is almost no other vides in YT that shows closeup shots of the capillary action using a pin method in HD. Great video.
Thanks Suresh! With the pin method, what I've found is to use more solvent (Weldon 4) than you think, and really flood the joints well, from both sides. As it evaporates, to gets sucked into the joint, and sometimes I even go back and do a second light application after about 5-10 minutes for good measure.
@@ReefEco I just want to say what you got there going for the entire fish room is mind boggling for me, I wish you the best of luck.
Incredible detail! Loving your video's so far, cannot wait to see this build come together!
Thanks so much Jason - appreciate it!
I’ve seen this video around 10 times and love the explanation!
I did build some many thing in my system and the next step is a sump because i need a bigger to my 220 g ! Thanks for the video man 🙏 im a big fan of your channel
Thanks so much! Good luck with the sump - its all about keeping things square and edge prep : )
@@ReefEco you are the best !
Awesome video. Aside from an amazing sump, seems like you got a free meal out of it too with those shavings. What a deal
LOL - thanks CC - and yes, definitely ate some shavings. Those things went everywhere - and I'm still finding them stuck to things even after a good shop clean! Need to work on my shop dust collection for sure...
love this video series; i have built one and not well, but now i want to try again.
Thanks! You should have seen the first sump I made like 15 years ago - not pretty, LOL : )
Awesome seeing craftsmanship at work!
Thanks man - appreciate the kind words!
One small detail. When mounted on a router table, you really want a down cut bit, so that it pulls the acrylic onto the table, and not push it up. On a cnc, where the spindle is top mounted, the upcut is the preferred method. I always used a large straight flute for edge prep and they work great.
That may be another way to do it for sure - I've found the chip clearance is the more important mechanism of the bit orientation...
Nice
Thanks Chuck - appreciate the watch!
Very nice and detailed build video. Can I know which router bit have you used for routing the edges?
Thanks Shelly - I think I used a 1/8" round over bit for easing all the edges.
@@ReefEco Can you provide me a link to buy the router bit?
I don't see the bearing in the bit. How are you making sure to trim only the edges? Are you running the panel on a sledge?
@@DsilvaShelly Oh - you mean cleaning up the edges of the panels before glue up? Yes, that is a spiral down cut bit (but since it is upside down, it throws the chips up and away). I'm using the fence of the table saw as a straight edge on one side, and to keep the edges parallel as a take off just a tad. In my setup, the router is built into the right side of the table saw table, so I can use the table saw fence for routing as well. I don't remember exactly what bit I got, but I think it is basically this one: www.amazon.com/SpeTool-Downdcut-Cutting-Diameter-Carbide/dp/B07QXK88L8/ref=sr_1_8?crid=CA0R0ZYLILUR&keywords=1%2F2%22+spiral+downcut+bit+plastic&qid=1660788812&sprefix=1%2F2+spiral+downcut+bit+plastic%2Caps%2C242&sr=8-8 Hope that helps!
@@ReefEco Thanks for the response. That makes it clear.
Where do you buy your acrylic? And if not online is there an online source you can recommend?
Hey there, in California, I buy from either Professional Plastics, or Interstate Plastics. Eplastics or Usplastics are online vendors, but I would buy and pick up from a local supplier to you if possible, as shipping acrylic sheet can be very pricey. Thanks for the watch!
Hi what 2 router bit did you use to smooth the edges out ? round over bit and what was the other thanks
Hey there - it is a spiral up cut bit to just shave off the tiniest sliver...
Thinking of building my own sump soon as I don’t really like the one that’s with it, had it for a year now and it’s time to change it, going to be around 800mmx380mmx380mm with wa water level of around 10” how this acrylic would you go?
Hey Billy - for that size, 6mm thickness should be fine. Just make sure to add the top frame, which adds quite a bit of long term strength. Thanks, Peter
wow wow wow i can't stop watching.keep making these video they are amazing you are amazing. how much $$$$$$$$$ would i need to have one in my house?????
Thanks! Glad to have you along! Budgets for tanks range greatly, depending on how much a gear head you are, and how much you care about having "high end" corals. A good rule of thumb is $50-$75 per gallon. And you can certainly do it for less than that, if you DIY a lot of gear and enjoy hunting for bargain prices on corals...
@@ReefEco thank you Peter, i also am a bit of a gear junky and a bit of a handyman and also have a reef system. Nowhere near as big or sophisticated as you or yours, so i know what throwing money in the bucket is!!! LOL Btw i check every day for a new video the suspense is killing me, can't wait!!!!!!!!!!
it's like a soap opera, you can't wait to see who killed JR
@@claudiamelfi3882 I bumped up the dosing video, out tomorrow - just for you! ; )
@@ReefEco thats amazing now you got me excited.It's to bad I live in the out skirts of Montreal because i think i'd trade my best friend for you, i would always be over at your place. I would bring beer and munchies!!!!thanks again and keep keeping
What router bit is used to do the cut outs?
I think I used the same bit that I used in the table router - and upcut spiral bit. But, if you are not plunging into the material and drill a pilot hole first like I do in the video, you can likely use a straight bit as well. Spiral bit just give a little bit of a smoother edge. Thanks for the watch!
I want to make my own sump for the cost savings as well but I don’t have a router, is it absolutely necessary or can I do it by hand?
Hey Kevin - you would need something to do the edge prep - and while you can do that by hand, the likelyhood of getting it right the first time is VERY remote. You would have to scrape it by hand, and keep the edges perfectly flat and square. As handy as I am, even I would never try this, LOL. If you don't already have the tools - table saw and router for square cuts and edge prep, you might not glean that much in cost savings. You might try something small first, to see how it goes - like a small dosing container or similar - to practice a bit first...
@@ReefEco thanks for the response, so I have a table saw for straight edges I just don’t have a router, would it still not be worth it?
@@kevinferreira3301 Tough call - trouble is that acrylic is not cheap, and if the edges aren't prepped correctly when you try to glue it up, you'll see the seems aren't good, and you can waste a lot of material. Then there goes the money you are trying to save. If you have a table saw, maybe try to make a small box or dosing container and see how it goes. There are probably some videos on RUclips on hand prepping acrylic edges for solvent glueing too. First sump I made from acrylic 20 years ago popped a seam and leaked everywhere - and it was because the edges weren't prepped at all and the bod wasn't great...
@@ReefEco damn that’s scary to hear!! I was thinking of even taking the additional time to add the square rods to the corner just to make sure, I’ll see if I can think of something for those corners then. I’m trying to make a 29x21 sump for a Red Sea max s 500 I got for 100 bucks but I have no sump for it, I want to use up all the space I have on the right hand side of the cabinet.
@@kevinferreira3301 Yes, now you know why I add those rods to all the corners now, LOL! My edges and seams are much better now, but it is something I still do. That first sump I glued it together right off the table saw, so all the edges were total crapola. If you are looking to save money, you might not save all that much on that size of a sump - so make it because you want to and to have the satisfaction. Check out what a sheet of 1/4" cast acrylic runs in your area...
What specific blade did you use on your table saw?
Red seems to indicate Diablo or Freud but Freud's plastic-specific blade is not painted. And while we are at it...where did you source your acupuncture pins and what thickness are they? My inclination would be to use the smallest one possible but I think that's like .12mm which may be a bit too small...maybe .25 would be better? Totally possible I am overthinking that as well :)
Hey Jeremy - yes, it is a Diablo TCG blade 10" - good eye! I think it is marketed for Non-ferrous metals and plastic. I honestly don't recall where I ordered the acupuncture needles from - I just googled it and there are lots of options. I think I'm using the .30mm width x 40mm length, but I think you are right - it probably doesn't matter all that much. I would probably err on the side of larger, rather than the .12mm as you said, since a little larger will allow more solvent to flow into the seam, which is likely better than starving the joint of glue. Any leftover solvent evaporates from the seam quickly and does no harm, whereas under-glueing the seam is harder to fix...
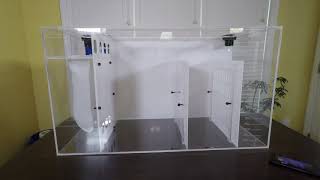
What thickness is that acrylic?
Hey there - it is 3/8" cast for all the sumps, white acrylic on top is 1/4"
Hi Reef Eco, I am trying to build my first aquarium a biggie 60 X 24 X 20, and based on various research online I had just settled in on 18mm thick acrylic, can you tell me how i go about edge prepping the largest of my sheets which will be the 60 X 20 ( back and side panels), I do not have a router and based on some posts in R2R it seems like hand prepping is waste of time as it is not going to give a good result.
Should i ask the sheet seller to edge prep it for me ? or should i take it to a say carpenter and do it because I neither have the tools or skills to do a router based edge prep.
Thanks,
Suresh Kumar
Hey Suresh - I would agree that hand prepping is risky unless you are REALLY good at it, which I'm not. It would be too easy to get a dip or round off the edge I think. I've seen it done (I think there was a video by Joey/King of DIY), but I personally wouldn't try it, especially with thicker more expensive material. You could try either a woodworker shop (who might not want to work on acrylic, not sure), or try a sign shop to cut your panels on their CNC. That might eat into your budget, as I imagine having them cut the panels would add significantly to cost. BTW, I'm only using 3/8" acrylic (10mm) on my sumps, one of which is about the same dimensions as yours (even longer), so using 18mm seem like overkill unless you are not adding a top rim or any baffles or bracing to help the long span not bow. I'm all for over-building though, so thicker acrylic is better in general : ) if not cost-prohibitive. Sorry I can't be more help on the edge prep, which is even more difficult the thicker the panels - as it gets more difficult to keep the edges perfectly flat and perpendicular to the sides the thicker the panels. If you do end up having to hand prep, you might buy some material and practice before trying it on the real sheets for the aquarium...
@@ReefEco Hi firstly thanks for taking the time out to reply, Here and in R2R didn’t mean to spam but I commented here and thought why not put something there as well in the forum.
I would like to ask, if laser cut from the manufacturer is any better ? That is instead of saw cuts but based on some search online it seems like laser cut acrylic when welded on with solvents instantly cracks near the seams ? If the above laser thing is true even if I scale my build down I should make sure my Acrylic for aquariums are never Laser cut right ? Thanks again.
@@sureshkumarsivasubramaniam1895 No worries! Not spamming at all. Yes, laser cutting melts the material and it can craze when solvent welded after laser cutting. I think that is why tank/sump manufacturers use router bits and CNC cutters for their parts and panels.